Showing posts with label Brunch. Show all posts

Sunday, June 16, 2024

Ina Garten's Zucchini Flower and Leek Frittata {A Thing of Beauty}

I am my Lost Kitchen Era, where I am obsessed with Erin French's The Lost Kitchen show, restaurant, food, plating, and all the edible flowers she uses to garnish her dishes! I love how Erin goes to the local farms and is inspired by what is in season to make beautiful dishes. 

I wanted to create a Lost Kitchen dish in my own kitchen, so I went to the Lexington, Kentucky Farmers Market and I found zucchini flowers! I was so excited because I had never cooked with zucchini flowers before.

So I turned to the one and only queen, Ina Garten and I found her recipe for Zucchini and Leek Fritatta. This was a major win as it allows me to really channel the whole edible flowers vibe of The Lost Kitchen.

I searched the market for the rest of the ingredients needed: pancetta, leeks, baby zucchini, fresh thyme, eggs, half and half, Gruyere, and fresh basil. This added up to be a pricier dish than most recipes I cook, but that's ok, because as I shared above, I'm in my Lost Kitchen Era and I have a major need to cook with edible flowers.

This was more laborious than most dishes, with a lot of prep, as I had to clean the zucchini flowers, removing the stamen, and dry them. I had to cut and wash the leeks, which was a rather sandy and dirty task.I had to cut and wash the basil, the thyme, the zucchini. Cut and cook the bacon. Shred the cheese. Crack and beat 8 eggs. Cook the frittata filling. It was more involved than your regular everyday frittata, but no worries, this was THE FRITTATA to end all fritattas! It was going to be adorned with the most beautiful zucchini flowers. Doesn't it look gorgeous going into the oven?

Doesn't it look gorgeous coming out of the oven? I mean wow...It's stunning! Ina says to allow the frittata to cool for five minutes and then cut into it. I am dying to see how it all tastes.

The frittata slices perfectly and each person gets their own zucchini flower with their portion, how brilliant! The frittata is brimming with zucchini, zucchini flowers, bacon, leeks, and my favorite...Gruyere cheese. I love all these ingredients so much!

I go to take a long awaited bite and the zucchini flower is soft and baked into the frittata. It is an odd texture, soft and hard to cut into, the whole flower wants to stay together. Something about the flavor and texture is not appealing. I push the flower off and take a bite of the egg and filling, the flavors are too strong and overpowering. I take another bite and something here is just not working. I keep taking bites because I love all the ingredients, it appears to have baked up perfectly, and Ina Garten has never let me down, but the dish just didn't work for me. I am, however, very happy to have made the dish and finally get a chance to work with zucchini flowers. I like to try new things even if they don't work out. I do have another zucchini flower recipes up my sleeve, so stay tuned for that. The verdict is still out!

 Seasonal and Local Produce @ IHCC


Sunday, March 19, 2023

St. Patty's Day Showdown: Corned Beef Hash {Reichl vs. Bittman}


St. Patrick's Day calls for a special Stirring the Pot treat! Of the Corned Beef Hash variety.

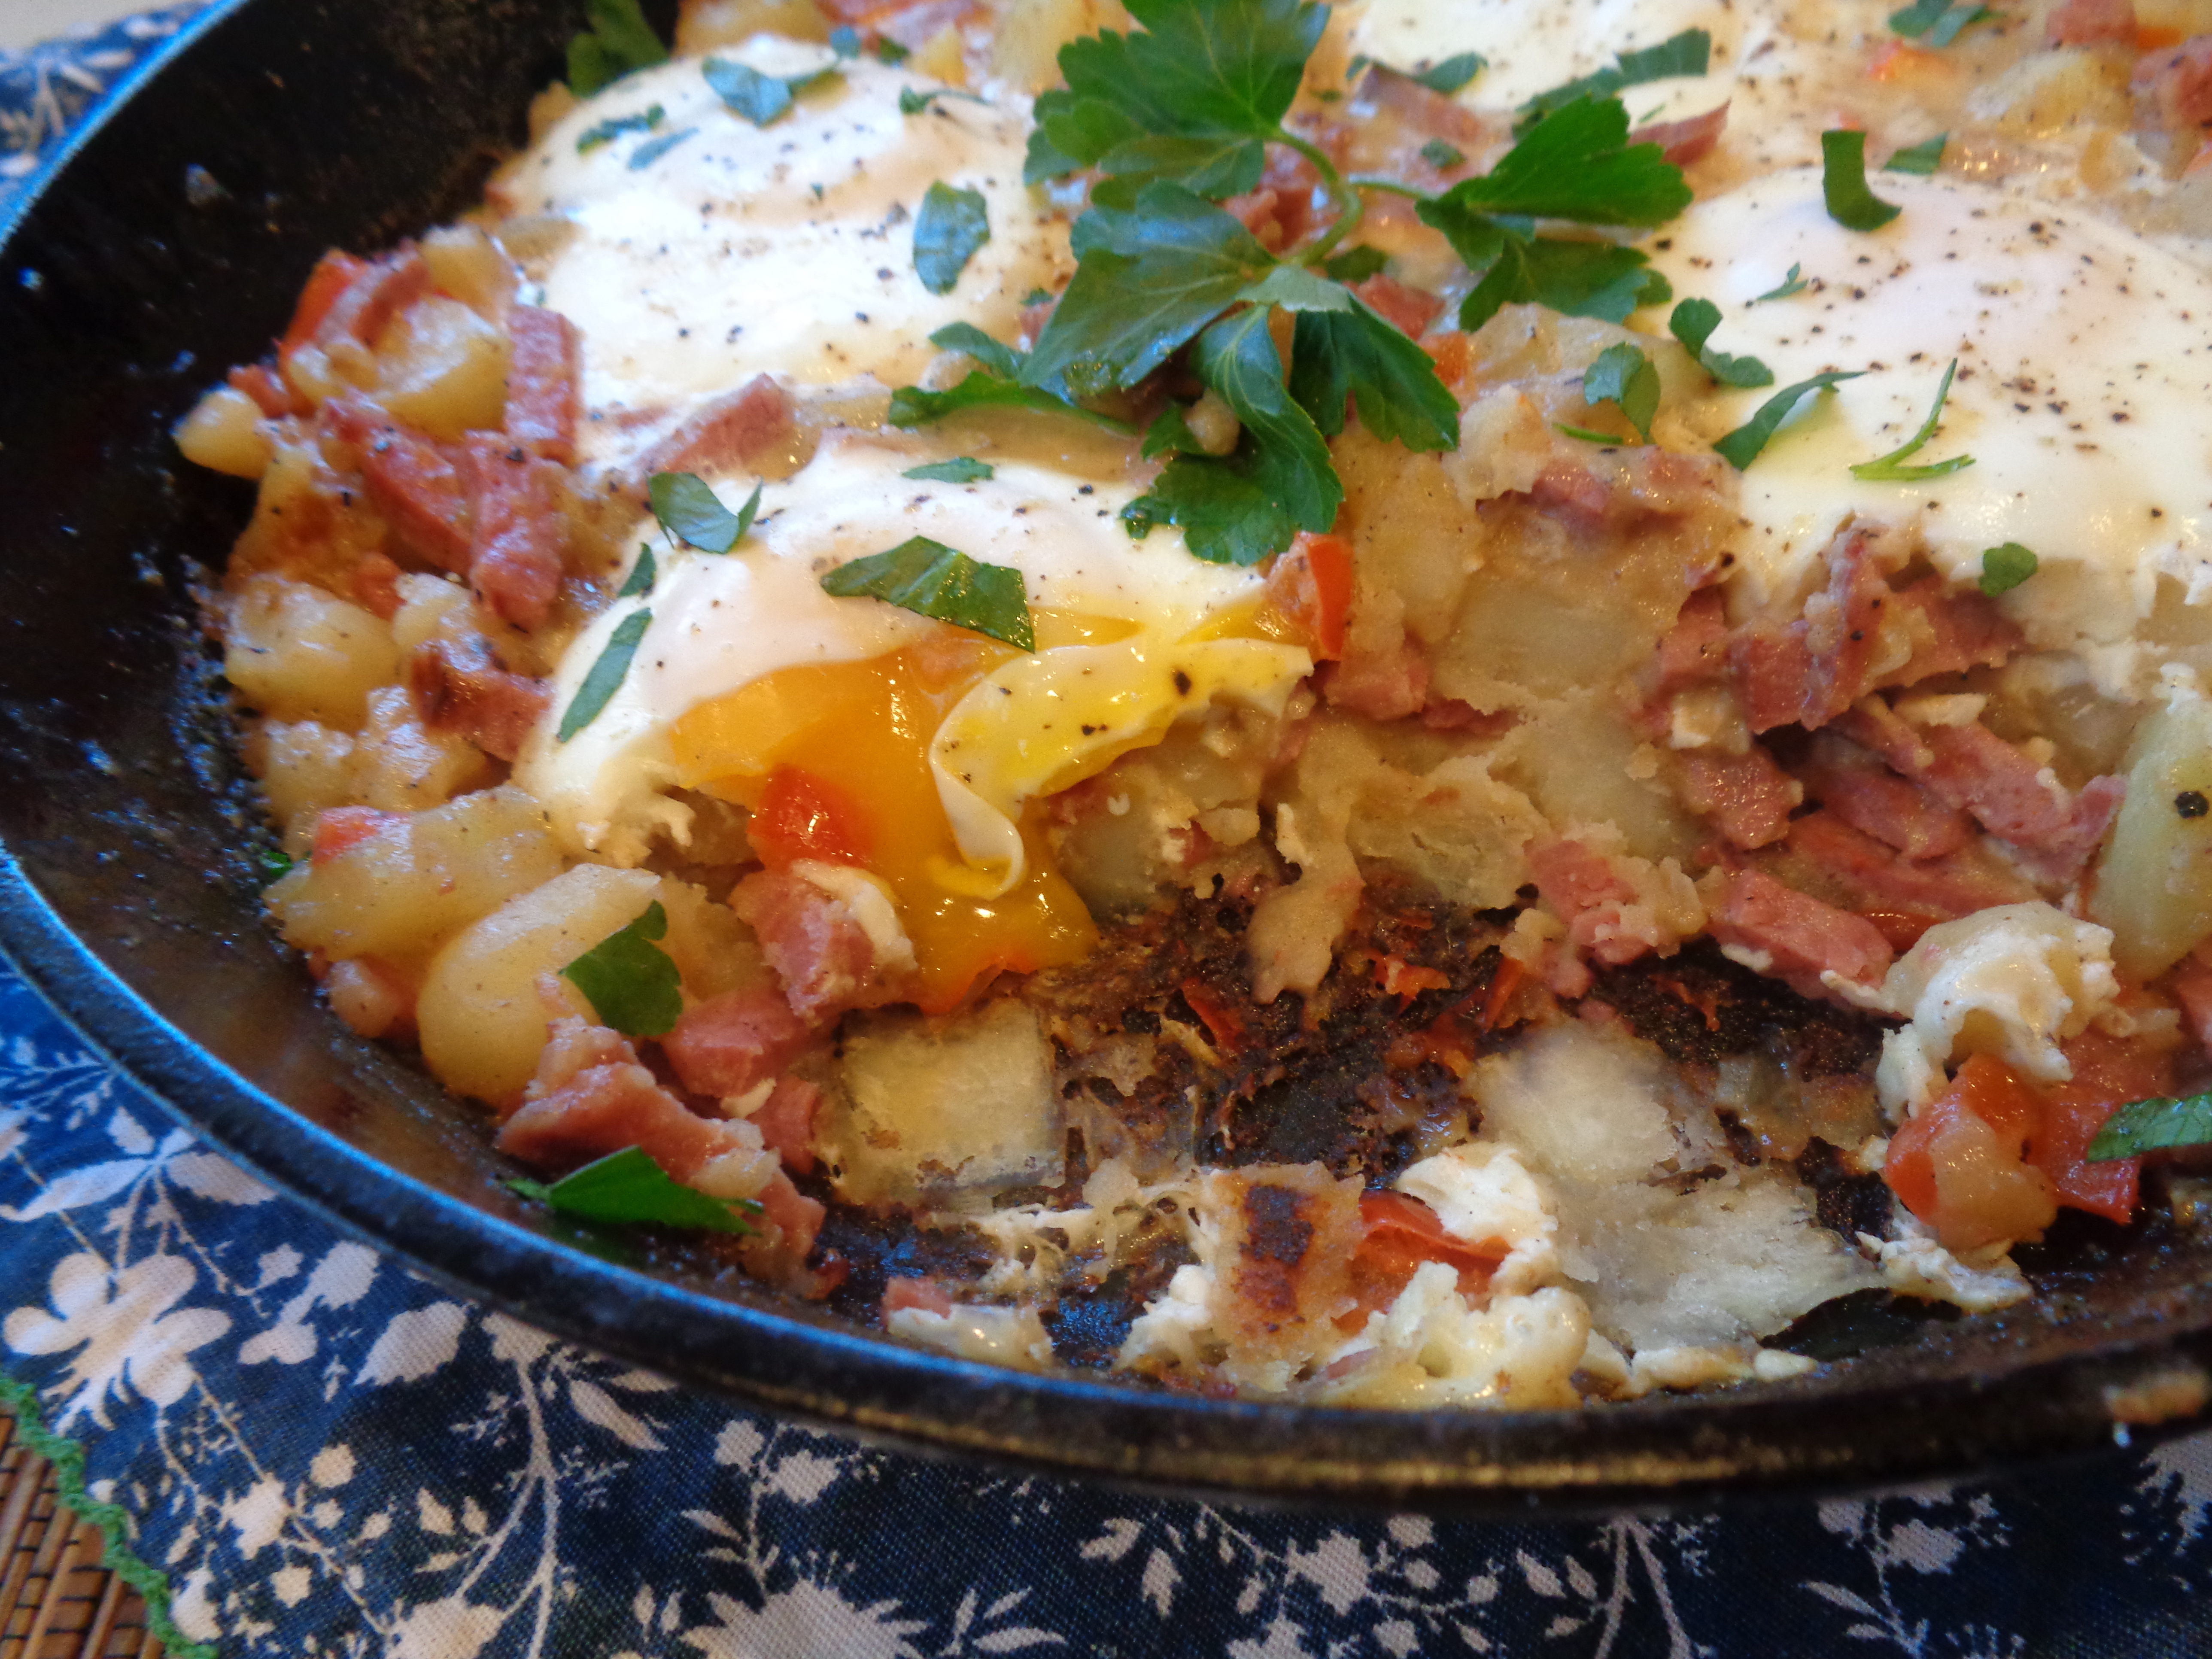
In 2019, I made Mark Bittman's Corned Beef Hash (pictured below). Bittman's recipe is very similar to Reichl's. They both call for boiled potato, chopped corned beef, onion, eggs, and some type of liquid. Bittman's version (shown below) calls for slightly more liquid and liquid of various variety: stock, tomato sauce, gravy, corned beef liquid, milk, or cream). Bittman also calls for slightly longer cooking time with no stirring so a crust forms on the bottom of the hash and since there is slightly more liquid in his version the potatoes become more mashed - the whole thing is kinda like one big hash cake, if you will. 

Reichl's Corned Beef Hash (pictured below) differs from Bittman's in that it calls for diced red bell pepper.  Reichl also calls for less liquid and less cooking time so the potatoes remain whole and separate from the corned beef. There is pretty much no time for a crust to develop on the bottom of the pan. Reichl specifically calls for cream and doesn't mention using any other liquid, but let's face it, Bittman is known for being very versatile and flexible in his cooking.

SHOWDOWN RESULTS: Both recipes are great and largely very similar. I think Corned Beef Hash lovers would love both recipes, but I have to say that my husband and I both preferred Bittman's more. Something about the mashed-potato-corned-beef-hash-cake type version has nostalgia associated with it and is closer to what we had growing up. However, if I was making this dish for company and I was going solely on looks, I'd say Reichl's version is definitely the prettier of the two!

Corned Beef Hash

Adapted from The Gourmet Cookbook

by Ruth Reichl

Serves 4

1 pound russet potatoes

1 pound piece cooked corned beef, cut into chunks

2 tablespoons butter

1 cup chopped onion

1 large red bell pepper, cored, seeded, and cut into 1/4" pieces

salt and black pepper

1/4 cup heavy cream

4 large eggs

 Peel potatoes and cut into 1/4 inch dice. Cook in a saucepan of boiling well-salted water to cover until just tender, about 3 minutes; drain.

Pulse corned beef in a food processor until coarsely chopped. 

Heat butter in a 12 inch nonstick skillet over moderately high eat until foam subsides. Add onion and bell pepper and cook, stirring, until lightly browned, about 5 minutes. Add potatoes and cook, stirring occasionally, until browned, about 5 minutes. Stir in corned beef, season with salt and pepper, and cook, stirring occasionally until golden brown. Add cream and cook, stirring, for 1 minute.

Make 4 depressions in hash and break 1 egg into each. Reduce heat to moderately low and cook, covered, until eggs are cooked to desired doneness, 4 to 6 minutes. Season eggs with salt and pepper and sprinkle parsley over hash.


Sunday, March 6, 2022

Half Baked Harvest's Farmhouse Cheddar and Angel Hair Frittata


This frittata has a lot in common with the week I had, it's got a lot going on, and none of it is good.

I wanted to make this Instagram-worthy frittata ever since I first set eyes on it in the Half Baked Harvest Cookbook a few years ago. The colors, the flavors, the way the frittata just jumps off the page with all the lovely garnishes on top. I love eggs, so surely I would love this beautiful frittata, right? 

Well, wrong. 

It did seem like it was meant to be. After all, I had leftover pesto from my egg sammies last week, along with leftover yogurt from Ina's lemon cake I made two weeks ago. In fact, I had a lot of the ingredients just waiting to be used up.

I started to question the ingredients as I was putting the frittata together. One and one half cups yogurt mixed into the eggs? Dill in the same recipe as sun-dried tomatoes and basil pesto? Italian flavors like pesto with sliced avocado? Sharp cheddar cheese instead of Italian cheese? I began to realize this was just a hodge podge of flavors that didn't really seem to go together, but I am in a mood this week, so I went ahead with it all.

I made some substitutions. I subbed the last bits of fettuccine instead of angel hair. I didn't have sun-dried tomatoes packed in oil, but I did have sun-dried tomato pesto. I didn't have prosciutto, but I did have shaved ham. I had leftover pancetta so I sauteed that up along with the broccoli and roasted red pepper. I felt fine with all those substitutions.

The frittata cooked beautifully and I set about decorating. I drew the line at the avocado (and we still can't get them here). I used cherry tomatoes, shaved ham, sautéed broccoli, basil pesto and a sprinkle of Parmesan. 

I slice the frittata and notice the pasta is a little dark from the cast iron pan. Not a fan of that. I taste the frittata and it's not inedible, but it's not great. I knew anything tomato-based didn't belong in a cast iron pan (but Tieghan uses one in her cookbook I lament to myself). I taste overwhelming flavors of cheese that don't mingle well with pesto and dill that just doesn't belong. I taste an overwhelming amount of tangy yogurt and wish that I had used milk, half and half, or even cream. I am unimpressed and it occurs to me that some of these gorgeous dishes are made solely to be Instagram-worthy only, even down to the cast iron pan which should never be used with tomato.

Did I know better? Yes, I did. I kinda felt like testing the limits and seeing how things unfolded. Do I believe a frittata can be made Instagram-worthy and still be delicious? Of course! I think it best to find a classic frittata recipe with mild flavors and then decorate the top with ingredients that meld well together. This one missed the mark.

I'm a fan of a total failure. If we're not failing, then we're not learning.


Farmhouse Cheddar and Angel Hair Frittata

Adapted from Half Baked Harvest Cookbook

by Tieghan Gerard

Serves 8

salt and pepper

1/3 pound angel hair pasta

8 large eggs

1-1/2 cups plain Greek yogurt

2 tablespoons chopped fresh dill

1 teaspoon crushed red pepper flakes

1 cup shredded sharp cheddar cheese

1/4 cup olive oil

1 bunch broccoli or broccolini, chopped

1 roasted red bell pepper sliced

1/2 cup oil-packed sun-dried tomatoes, drained and chopped

1/4 cup basil pesto, store-bought or homemade

1 cup cherry tomatoes, halved

6 ounces torn prosciuto

1 avocado, pitted, peeled, and sliced

Preheat the oven to 450F. Bring a large pot of salted water to a boil over high heat. Add the pasta and cook until al dente according to the package directions. Drain and set aside.

In a medium bowl, whisk together the eggs, yogurt, dill, and red pepper flakes. Stir in half the cheese.

In a large ovenproof skillet (I used cast iron), heat the olive oil over medium. When it shimmers, add the broccoli or broccolini and cook for about 5 minutes, until tender. Season with salt and black pepper. Add the pasta, roasted red pepper, sun-dried tomatoes, and pesto and toss to combine. Slowly pour the egg mixture into the skillet, using a spatula to evenly coat the veggies and the pasta. Cook for 1 to 2 minutes, until the eggs begin to set around the edges, then remove the skillet from the heat.

Sprinkle the remaining cheese over the top and transfer the skillet to the oven. Bake for 15 to 20 minutes, or until the eggs are just set.

Top the frittata with the cherry tomatoes, proscuitto (or shaved ham), avocado, broccoli or broccolini, pesto, etc. Have fun with the decorating. Serve immediately! 


Sunday, December 26, 2021

Five Brunchmas Dishes!


I had high hopes to make a really special new Brunchmas dish this week, but time got the best of me. I was too busy doing last minute shopping, wrapping, decorating, baking, and cooking up non-blog dishes.

So, here is a recap of some of the dishes I think would be Brunchmas-worthy!

Click on the recipe title to be directed to the original post with the recipes!

Ottolenghi's Shakshuka It certainly fits the bill as far as representing all the Christmas colors, right? The red and green and front and center and the dish is healthy, light, fresh, and delicious. Plus, it's gorgeous and can be served family style or individual.

Giada's Breakfast Tart and Fruit Salad with Honey-Lime Syrup I made this breakfast tart years ago, but I still remember it fondly. Pancetta, mascarpone, Gruyere, and green onions really make a flavorful taste sensation! Plus, the recipe is kinda perfection! Giada's Fruit Salad with Honey-Lime Syrup was a wonderful accompaniment and let's face it....fresh fruit isn't what it's meant to be during the winter months so the honey-lime syrup really brings it all to life!
 

 Ina's Tri-Berry Oven Pancakes No one really wants to stand by the stove flipping pancakes on Christmas day, so Oven Pancakes or Dutch babies are perfect for Brunchmas! Ina Garten's recipe is the perfect choice for Christmas Day! Serve family-style or individual and have a nice selection of fruits.


Herbed-Baked Eggs These Herbed-Baked Eggs are hands down the easiest way to do any brunch, while also making something that feels special. All you need is a baking dish and some butter and cream. Crack your eggs into the dish and then top with various herbs, cheese, and garlic. These could be personalized to suit all tastes and flavor profiles! Love them!
 
 
Winter Citrus Tart w/ Rosemary Whipped Cream  Look no further if you need a special wintery brunch dessert because Curtis Stone's Winter Citrus Tart with Rosemary Whipped Cream is perfect for the holidays! I mean oranges are all the rage at Christmastime, right? They are juicy and delicious and in season! Plus, we decorate with them, we make simmer pots with them and we make desserts and cocktails with them! This is THE PERFECT and easy dessert for your Brunchmas.
 
Plus, it's worth mentioning that this glorious dessert takes only a mere handful of ingredients: puff pastry, orange marmalade, oranges, cream, and rosemary! It is the epitome of easy, beautiful, and delicious! Everyone will be so impressed!


I hope everyone celebrating had a wonderful and Merry Christmas!


Sunday, August 29, 2021

Herby Bread Frittata {Inspired by the Farmer's Market}


The farmer's market is a wealth of inspiration. One week it's the fresh ripe peaches, another week it's fresh corn on the cob, and yet another week it's a batch of spicy dill pickles. I think that's the fun of it. You just never know what's going to call to you.

This weekend I went to my local farmer's market and nothing was speaking to me. Our local market is very nice, but only about 10 small stalls, and I was feeling the whole been there, done that vibe. So, I got in the car and drove to Lexington. Their market is MUCH bigger and I hadn't been there in a few years. 

In a market of at least 40 stalls, with everything imaginable, I focused in on one booth full of the most amazing looking organic produce and THE MOST BEAUTIFUL HERBS I had ever seen! I starting grabbing up bundles of herbs: chives, sage, dill, basil, and thyme. I bought one of each! Inspiration had struck.

On the way home I was thinking of my favorite "base" ingredients that are my "go-to's" for all the things I bought at the market. What lends itself well to herbs, and onions, and peppers? 

Some things are just standby's for me, like: eggs, chicken, potatoes, any type of bread or stuffing, and homemade butters or even pesto. I started creating a menu to use up my bounty.

To start with I turned to Mark Bittman. I really wanted to make a quiche, but a frittata is much healthier. I found that he had a variety of fritatta options in his book: pasta, grains, potato, and bread. I had some wonderful sourdough bread that needing using up, so I went with the bread frittata.

The next task was to chose the herbs. I went with dill, chives, and basil. Lots of them, anywhere from 1/4 - 1/2 cup. I wanted the frittata to sing with herbaceous flavor!

Let me go ahead and say...this frittata was one of my all-time favorites! I AM SO GLAD I WENT WITH THE BREAD FRITATTA! The sourdough cubes held up to the egg but also absorbed the egg much better than potatoes and the texture was heavenly! I will be ALL ABOUT a bread frittata from now on, it is just superior in texture to a potato frittata. Plus, I always really want my potatoes fried crispy and served on the side, and this allows for that. 

The herbs were a perfect combination and I really, really loved the tang of the fresh dill with the eggs. Dill and eggs are just a perfect pairing, every bit as good together as peanut butter and jelly! I can't tell you how much I enjoyed this breakfast. I will be trying more bread frittatas in the future with various herbs and veggies and cheeses. I think this is a fabulous base recipe to play around with and highly suggest it!


Herby Bread Frittata

Adapted from How To Cook Everything Vegetarian

by Mark Bittman

Serves 4-6

1-1/2 cups cubed bread

 salt and pepper

4 tablespoons butter

5 eggs

1/2 cup Parmesan cheese

1/4 cup feta cheese*

1/4-1/2 cup fresh herbs*

Notes: You can use any herbs here. I used a combination of chives, dill, and basil. You can also use any type of cheese, but be mindful that it goes with the variety of herbs you're using. I used Parmesan and a sprinkle of feta on top, which pairs lovely with the dill.

Preheat the oven to 400F. Get out a 10" skillet that is ovenproof (I use my cast iron skillet for all frittatas). Put the butter in the skillet over low heat.

Beat the eggs with some salt and pepper in a large bowl, then stir in the bread cubes, the Parmesan, and the herbs. Mix to incorporate evenly. Pour the egg mixture into the skillet, using a spoon or spatula to distribute the ingredients evenly, and cook over low for about 10 minutes. I think the secret is cooking this real low and slow for around 10 minutes. You want the egg mixture to be firm around the sides before placing the frittata in the oven. This is also the point where I sprinkled on little bits of feta cheese! Once it looks like it is cooked around the edges, you can place the frittata into the oven. Note: You are really only placing this frittata in the oven long enough to firm up and cook the middle of the frittata. This should take only a few minutes. Keep checking the frittata so that it does not overcook, and keep in mind that this will continue to cook once removed from the oven. Best to pull it out when it still looks slightly liquidy in the center. Remove and serve hot.


Sunday, March 1, 2020

Ottolenghi's Braised Eggs with Leek, Kale, Feta and Za'atar


When I received my copy of Simple by Yotam Ottolenghi, this recipe was at the top of the list. Then as I paged through the book, my list kept growing and growing until it covered an entire sheet of paper.

Nevertheless, this recipe stuck in my mind. That happens to you too, right? Out of an entire page of recipes, and recipes from other books, there's always those few that stay right in the front of your mind. The ones you can't stop thinking about until you just bite the bullet and make them?

So, when I received my Misfits Market box and it had two very large leeks, and a nice bunch of kale, I knew they were destined for this recipe. Now, Ottolenghi calls for spinach in his recipe but I say, use what you've got. I enjoy spinach, but I prefer kale so this substitution was to my advantage.

I also didn't have the preserved lemons, and while it's not a perfect substitute, I did go ahead and make my own veggie stock (something that I do at least once a month to alleviate food waste) and so I added a little lemon peel this time around for a lemony flavor. How's that for a run-on sentence?

In the scheme of Ottolenghi recipes, this is an easy one, and it is both healthy and delicious. I personally loved the za'atar oil drizzled over the top and felt like this added loads of flavor to an otherwise simple dish. I made this on a Sunday morning for brunch and it was best served straight out of the skillet, immediately. That said, it also held up in the refrigerator well. I enjoyed it several mornings prior to work during the weekday.

Healthy, delicious, and simple. A total winner in my book!


Braised Eggs with Leek, Kale, Feta, and Za'atar
Adapted from Ottolenghi Simple
by Yotam Ottolenghi
Serves 6

2 tablespoons butter
2 tablespoons olive oil
2 extra-large leeks (or 4 smaller), trimmed and cut into 1/4"  slices (6 cups)
salt and pepper, to taste
1 teaspoon cumin seeds, toasted and lightly crushed
1/2 small preserved lemon, seeds discarded, skin and flesh finely chopped (2-1/2 tablespoons)*
1-1/4 cups vegetable stock*
7 ounces baby spinach or kale (use whatever greens you have on hand)
6 large eggs
3-1/2 ounces feta, broken into 3/4"inch pieces
1 tablespoon za'atar

Notes: I used kale because it's what I had on hand. Use whatever green you happen to have on hand. I also make my own veggie stock, so since I didn't have preserved lemon I added some lemon peel to my veggie stock to help carry over some lemon flavor.

Put the butter and 1 tablespoon of the oil into a large saute pan with a lid and place over medium-high heat. Once the butter starts to foam, add the leeks, salt to taste, and plenty of pepper. Fry for 3 minutes, stirring frequently, until the leeks are soft. Add the cumin, lemon (if using), (this is also where I added the kale sine is heartier and needs a longer cooking time) and vegetable stock and boil rapidly for 4-5 minutes, until most of the stock has evaporated. If you're using spinach, this is the time to add the spinach and cook for 1 minute, until wilted, then decrease the heat to medium. 
Use a large spoon to make 6 indentations in the mixture and break 1 egg into each space.  Sprinkle the eggs with a pinch of salt, dot the feta around the eggs, then cover the pan. Simmer for 4-5 minutes, until the egg whites are cooked but the yolks are still runny.

Mix the za'atar with the remaining 1 tablespoon of oil and brush over the eggs. Serve at once, straight from the pan.


Sunday, September 8, 2019

Yotam Ottolenghi's Most Exquisite Caramelized Garlic Tart {A Must Make}


I'm an expert at procrastinating and I have a LONG list of recipes that I have been putting off for one reason or another. Maybe the ingredient list is too long, or the recipe takes too long, maybe the ingredients are hard to source and/or they're too expensive, and then there's also the fact that maybe my family might not like the recipe and I'll be the only one to eat it.

Yotam Ottolenghi's Caramelized Garlic Tart has been on my list for years now and I've put it off because I didn't think I could source the Goat Gouda cheese it requires. I also put it off because it's fussier than most recipes I make, requiring the advance forethought to thaw puff pastry and use pie weights, etc. Plus, I wasn't sure if my family would like this one, and I was sure that I would, which means that I'd very likely be eating the whole thing myself.

So thanks to this week's theme, Procrastinator's Special, I had the push I needed to make the recipe. I didn't think I'd find the Goat Gouda cheese, but it turns out my market had it. Score! What I wasn't prepared for is my store to be completely out of garlic! WHAT?? Thankfully I got the last package of already peeled garlic and went ahead and used that, which turned out to be somewhat of a blessing since this recipe required 3 heads of peeled garlic!

Now I was dealing with the high cost of the recipe. Puff pastry, goat cheese, goat gouda, creme fraiche, fresh herbs, heavy cream, etc. You get the drift. This is a $30 tart. I don't usually cook recipes that costly, but every once in awhile it's nice to splurge.

Now we've come to the part that holds me back from a lot of recipes: the family isn't going to like it. Well, let me tell you something, EVERYONE LOVED THIS TART! It is seriously up there with some of the best recipes I've made on my blog!

You've probably seen this tart all over the place. It is, after all, one of Yotam Ottolenghi's signature recipes. Mostly, you've seen recipes of the tart with all it's caramelized garlic glory, but what you haven't seen is the inside of the tart, with all the creamy goat cheese. Holy cow, this tart is glorious, it's perfectly seasoned, and it needs nothing else. It is complete and total perfection! It's tangy, creamy, sweet, with the most lovely mild garlic flavor, herbaceous, crispy, buttery, and flaky. You won't believe how delicious it is. You'll find yourself going back for another slice and dreaming about a time when you can make it again.


This is hands down a MUST MAKE recipe. It's worth the trouble to source the ingredients, worth the time, worth the cost, and just plain worth the fuss. It is absolutely exquisite!

"I think this is the most delicious recipe in the world" - Yotam Ottolenghi's friend, Claudine, after testing it for his book Plenty


Caramelized Garlic Tart
Adapted from Plenty
by Yotam Ottolenghi
Serves 4

13 ounces puff pastry
3 medium heads of garlic, cloves separated and peeled
1 tablespoon olive oil
1 teaspoon balsamic vinegar
1 cup water
3/4 tablespoon sugar
1 teaspoon chopped rosemary
1 teaspoon chopped thyme, plus a few whole sprigs to finish
salt 
4 -1/2 ounces soft, creamy goat cheese (such as chevre)
4-12 ounces hard, mature goat cheese (such as goat gouda)
2 eggs
6-1/2 tablespoons heavy cream
6-1/2 tablespoons creme fraiche
black pepper
Parchment paper, pie weights (or beans) for baking tart

Have ready a shallow, loose-bottomed 11-inch fluted tart pan (I have a 9" tart pan and it worked just fine). Roll out the puff pastry into a circle that will line the bottom and sides of the pan, plus be sure to have a little extra puff pastry hanging over the sides as it will shrink while baking. Line the pan with the pastry. Place a large circle of waxed paper on the bottom and fillup with pie weights or dried beans. Leave to rest in the fridge for about 20 minutes.

Preheat the oven to 350F. Place the tart shell in the oven and blind bake for 20 minutes. Remove the weights and paper, then bake for 5 to 10 minutes more, or until the pastry is golden. Set aside. Leave the oven on.  

While the tart shell is baking, make the caramelized garlic. Put the cloves in a small saucepan and cover with plenty of water. Bring to a simmer and blanch for 3 minutes, then drain well. Dry the saucepan, return the cloves to it and add the olive oil. Fry the garlic cloves on high heat for 2 minutes. Add the balsamic vinegar and water and bring to the boil, then simmer gently for 10 minutes. Add the sugar, rosemary, chopped thyme, and 1/4 teaspoon salt. Continue simmering on a medium flame for 10 minutes, or until most of the liquid has evaporated and the garlic cloves are coated in dark caramel syrup. Set aside.

To assemble the tart, break both types of goat cheese into pieces and scatter in the tart shell.  Spoon the garlic cloves and syrup evenly over the cheese. In a jug whisk together the eggs, cream, creme fraiche, 1/2 teaspoon salt, and some black pepper. Pour this custard over the tart filling to fill the gaps, making sure that you can still see the garlic and cheese over the surface (I went ahead and added the garlic and the liquid to the top, after adding the egg mixture, in order to be sure the lovely caramelized bits of garlic were on top).

Reduce the oven temperature to 325F and place the tart inside. Bake for 35-45 minutes (mine cooked in less than 30 minutes), or until the tart filling has set and the top is golden brown. Remove from the oven and leave to cool a little. Then take out of the pan, trim the pastry edge if needed, lay a few sprigs of thyme on top and serve warm (it reheats well!) with a crisp salad, or without.


Wednesday, June 5, 2019

Chrissy Tiegan's Croissant Bread Pudding Ham Cups


Chrissy Tiegan published her first cookbook and I ignored it. I chalked it up to another celebrity cookbook that I didn't need. Then she published a second cookbook and I rolled my eyes and continued to ignore it. Both cookbooks were bestsellers and people raved about them and yet I continued to ignore them. I couldn't believe that people were giving these books the time of day. After all, how can a model know good food and write good cookbooks?

Then I kept seeing her recipes pop up on Instagram and each one looked more delicious than the next. I started to change my mind. On one of my trips to Target I picked up her cookbooks and quickly saw why so many people loved them! They were full of beautifully photographed food and the most delicious and completely different recipes. I bought both of them and quickly found myself bookmarking so many recipes.

I gotta tell you...these Cravings cookbooks from Chrissy Tiegan are hands down my favorite cookbooks right now! So far I've made her Croissant Bread Pudding Ham Cups, Crispy Bacon and Sweet Pickle Patty Melts, Parmesan Skillet Eggs, and her Skillet Peanut Butter Chocolate Chip Blondies and each of the recipes I've tried have been insanely delicious! So, this summer I'll be sharing lots of Chrissy Tiegan recipes and I cannot wait.

To start, I have these Croissant Bread Pudding Ham Cups and they could not be easier! If you're looking for a quick brunch dish or a special breakfast, look no further. All you need is a handful of ingredients. This recipe comes together in no time.

A few day-old croissants, some eggs, half and half, sugar, and a pinch of salt go into thin slices of ham that are made into cups. A quick soak of the bread pudding mixture and you can pop this right into the oven.  A delicious breakfast or brunch in a cute little ham package!

I really like the sweet bread pudding version, but I'm also imagining a savory version using a few tablespoons of Dijon mustard instead of sugar and vanilla.  I think both versions would be equally delicious!

Stay tuned for next week because I'm sharing my new favorite recipe, Chrissy's Parmesan Skillet Eggs. They are mind-blowingly delicious!  
 

Croissant Bread Pudding Ham Cups
Adapted from Cravings Hungry For More
by Chrissy Tiegan
Serves 3-6

6 thin slices deli ham, patted dry
3 large eggs
3/4 cup half and half
1/4 cup granulated sugar
1-1/2 teaspoons vanilla extract
1-2 croissants (3 cups chopped croissants)
Demerara or Turbinado sugar for decorating tops

Preheat the oven to 400F.  Coat 6 cups of a standard muffin tin with cooking spray.

Tuck one thin slice of ham into each cup, trying to make as much of a cup shape as possible with the edges sticking out on top. You're going to feel ridiculous doing this. It's ok. Life is ridiculous.

In a bowl, whisk together the eggs and half and half, then add the granulated sugar, vanilla, and a dash of salt. 

Tear the croissant(s) into 2-inch pieces (about 3 cups, so use more croissants to get to that amount if you need to). Throw the pieces into the egg mixture, toss to coat, and let sit 15 minutes.

Fill the ham cups with the croissant mixture and sprinkle each one with Demerara sugar.  Bake until the tops are golden and crusty, about 15 minutes (mine needed about 18 minutes).  Let them cool slightly, then unmold them by slipping a knife under the cups and gently transferring them to a plate. Serve with fruit, if desired.


Chrissy Tiegan's Cravings Hungry For More


Sunday, April 21, 2019

Mark Bittman's Corned Beef Hash


I like recipes with minimal ingredients. Evidently I also like recipes with potatoes. As proof, my last FIVE posts have all been about recipes centered around potatoes! Ruth's Sauteed Cabbage with Bacon and Cream and Potato Pierogi; Tessa's Omeleta Horiatiki with Potato, Feta, and Oregano; A roundup of Ruth Reichl favorites with two of them being Cheddar and Garlic Twice-Baked Potatoes and Shirred Eggs Over Potato Puree; Tessa's Patates Tiganites (Greek French Fries), Nigel's Classic Shepherd's Pie, and now Mark Bittman's Corned Beef Hash! I think it's reasonable to say that I need to move on from potatoes and share something fresh and light next.

I'm laughing because there are two reasons I have so many potato dishes. First and foremost, we just love potatoes. Who doesn't? Secondly, potatoes are ALWAYS in my pantry and I can ALWAYS make a potato dish without having to venture out and run to the store.


I tell ya. Put some potatoes in your pantry and with a few other basic ingredients you can always put a meal together!

I bought this corned beef hash on sale for a mere $1.99/lb, which is a fabulous price. Listen to me: DO NOT BOIL YOUR CORNED BEEF! Roast it! Roast it at about 300F to 350F, covered, for about an hour per pound. If your corned beef is good quality then you should end up with a very tender corned beef that almost falls apart, or shreds, like a roast. NOTE: Save any liquid that accumulates in the pan for your hash! Note that it will be quite salty so if you like salt then this will be okay, but if you do not, then you will want to use another liquid such as stock.

Corned beef hash is a delightful and hearty dish that is exceptionally delicious when made from scratch! Bittman's version is different in that he calls for more liquid, so it does not fry up to be as crisp as other versions. When mine came together it had great flavor, but was quite soft, and while some people would like that, I opted to place my has under the broiler (as he suggested) to create a crisp crust on the top. The broiler worked nicely and was much easier than standing over a pan, flipping and flopping the hash, which can be quite finicky. I topped the hash with two over-easy eggs and watched as the yolks oozed over the hash. We are big fans of a skillet breakfast and corned beef hash is easily one of our all-time favorites, perfect for an Easter Brunch!


Corned Beef Hash
Adapted from How To Cook Everything
by Mark Bittman
Serves 2-4

2 cups cut-up leftover corned beef (I like it cut pretty small)
2 cups cut-up cold boiled potatoes
1 cup chopped onion
1/2 cup liquid (stock, tomato sauce, milk, cream, or gravy)*
3 tablespoons oil or butter
salt and pepper, to taste*
eggs, optional*

Toss together 2 cups of left-over corned beef (I don't like to boil my corned beef. I like to roast it at 350 for about an hour per pound). Add 2 cups cut-up cold boiled potatoes.  Add 1 cup chopped onion and 1/2 cup liquid (*I used the leftover stock from roasting the corned beef, but be warned if you do this - it will be quite salty-also watch the amount of salt you add to this dish*). You can also use stock, tomato sauce, milk, cream, or gravy as a liquid. The goal is to moisten the mixture but not so much as to make it soupy. 

Heat 3 tablespoons oil or butter in a heavy skillet, preferably non-stick, over medium-low heat. When the butter has melted or the oil begins to shimmer, put the hash in the pan and cook it, undisturbed, for about 10 minutes, or until a nice crust has formed. Turn the has and brown the other side, or flip half of it over onto the other, or brown the top under a broiler (mine was too moist to brown on the stovetop so I put it under the broiler).  Serve with over easy eggs* on top and a sprinkling of parsley or something green.

Theme: April Showers @ I Heart Cooking Clubs!


Sunday, July 30, 2017

Pan-Roasted Asparagus with a Crispy Fried Egg {Perfection On A Plate}


This recipe is all about texture and flavor.

Crunchy, cheesy, herbaceous breadcrumbs with the kick of red pepper flakes and a hint of lemon zest sit atop a crispy-bottomed fried egg that oozes with yolk down over the tops of pan-fried asparagus spears. I'm telling ya....this is the perfect breakfast or brunch dish. This is really the perfect anytime dish. 

I was wowed by how good this was! In fact, this was so good, I instantly felt mad at myself for not making it sooner. Do you ever do that? I do. After that first bite I found myself thinking "why oh why did I allow this to sit on my "to make list" for so long? Nonsense I tell ya.

There's just something about the crunch of the breadcrumbs and the oozing egg yolk that is the perfect topper for the asparagus. It just really wakes up those taste buds and keep you wanting more.

It's one of those dishes that is kinda naughty but kinda angelic. Widely satisfying, but still light. You know, one of those rare dishes that strike the perfect balance. The kind you make again and again and highly recommend. Perfection on a plate.


Pan-Fried Asparagus with a Crispy Fried Egg
Adapted from Food Network
by Giada De Laurentiis
Serves 4

Breadcrumb Gremolata
2 tablespoons olive oil
1/2 cup panko breadcrumbs
1 teaspoon lemon zest (1 lemon)
1/4 teaspoon red pepper flakes
1/2 teaspoon salt
1/2 cup Italian parsley leaves, chopped
2 tablespoons grated Parmesan

Asparagus
4 tablespoons olive oil, plus more for drizzling
1 pound thin asparagus, trimmed
salt and pepper, to taste
4 large eggs

For the Gremolata: Heat a large skillet over medium heat. Add the breadcrumbs and olive oil and toast, stirring often with a wooden spoon until golden brown. Place in a small bowl and while still hot, add the lemon zest, red pepper flakes and salt. Mix together and cool the mixture to room temperature. Stir in the parsley and cheese.

For the Asaparagus: Wipe the pan with a clean dish towel. Place over medium-high heat and add 2 tablespoons of the olive oil. Add the asparagus and salt to taste.  Cook, stirring and flipping often with tongs until the asparagus is bright green, cooked through and slightly browned, 4 to 5 minutes.

Divide the asparagus among four serving plates. To the same pan, add the remaining 2 tablespoons of olive oil and place over medium-high heat. Crack 2 of the egg into the pan, being careful as it may splatter, sprinkle with salt and reduce the heat slightly and cook until the edges are light brown and crispy and the whites are just set, 2 to 3 minutes. The yolk should still be runny. Repeat for the remaining 2 eggs. Using a slotted spatula, slide an egg on each plate. Sprinkle each dish with the breadcrumb gremolata and a drizzle of olive oil if desired.


Sunday, April 30, 2017

Baked Gruyere and Sausage Omelet


Today I'm bringing you a hearty and satisfying baked omelet with some of my very favorite ingredients: Gruyere, eggs, and sausage! I first discovered real cave-aged Gruyere cheese while I was cooking the recipes of Jacques Pepin and let me just tell you....it was love at first bite! The nutty robust flavor combined with the ooey-gooey melt factor... there is no other cheese quite like it!

Nowadays, I am never without a wedge of Gruyere. It comes in handy for making one incredible French Onion Soup, is delicious grated over pasta, and is a star ingredient in many egg dishes, such as this recipe. 

I happened to have all the ingredients on hand to make this flavor-filled baked omelet, although I will say that you could just as easily cater this dish to whatever you have on hand, just keeping the ratios in tact.  Of course I highly recommend using a good Gruyere no matter what, but this is a perfect recipe to make your own and is well-suited for entertaining. We enjoyed this straight out of the oven for breakfast and it was also just as good leftover the next day. A staple recipe for any cook to keep in their arsenal!


Baked Gruyere and Sausage Omelet
Adapted from Food Network
Recipe by Giada De Laurentiis
Serves 4-6

Butter, for greasing baking dish
2 tablespoons olive oil
1 small onion, diced
1/2 pound mild sausage, casings removed
8 large eggs
1/3 cup milk (whole preferably)
salt and pepper, to taste
1 red bell pepper, diced
1-1/2 cups grated Gruyere cheese
1/4 cup plus a few tablespoons freshly chopped parsley for garnish


Preheat the oven to 425 degrees F. Lightly butter an 8 by 8-inch baking dish.Heat the oil in a medium skillet over medium-high heat. Add the onion and cook until translucent, about 3 minutes. Add the sausage and cook until brown, about 5 minutes. Set the pan aside to cool.

In a large bowl, whisk together the eggs, milk, salt and pepper, to taste, until smooth, about 20 seconds. Add the red bell pepper, 1 cup of Gruyere cheese and 1/4 cup of parsley. Stir in the onion mixture. Pour the batter into the prepared pan. Sprinkle with the remaining cheese. Bake for 20 to 25 minutes or until golden brown.

Cut the baked omelet into wedges and sprinkle with remaining parsley before serving.

Cook's Note: To make individual servings, divide the batter between 4 buttered 8-ounce ramekins. Bake for 15 to 18 minutes.