Showing posts with label veggies. Show all posts

Sunday, June 9, 2024

Roasted Asparagus with Parmesan Breadcrumbs

My new favorite thing is making fresh Parmesan Breadcrumbs. You cook fresh breadcrumbs on the stove top with butter and olive oil until golden brown and toasty, then you add in lots of Parmesan cheese and the Parmesan clusters together with the breadcrumbs to create cheesy clusters of hot crunchy bread and cheese. It's good on pasta dishes and great on green veggies! Give it a try on asparagus like I've done here, or on broccoli! It's delicious!

 Roasted Asparagus with Parmesan Breadcrumbs

Adapted from Food Network

by Giada De Laurentiis

Serves 4

1 pound asparagus, trimmed

1 tablespoon olive oil

salt and freshly cracked black pepper

1/2 cup fresh breadcrumbs

1/4 cup Parmesan cheese

1 tablespoon butter

1 tablespoon olive oil

For the Asparagus: Preheat the oven to 400F. Snap or cut the dry steam ends off each asparagus and place on a heavy baking sheet. Drizzle with olive oil, sprinkle with salt and pepper, and toss. Roast until the asparagus is tender, about 15 minutes. 

For the Parmesan Breadcrumbs: Add 1 tablespoon butter and 1 tablespoon olive oil to a medium skillet and allow butter to melt. Add breadcrumbs and cook, stirring, until golden brown, about 5-7 minutes. Add in Parmesan cheese, stirring, allowing the Parmesan to marry with the breadcrumbs and create clusters. 

Plate the asparagus and arrange the Parmesan Breadcrumbs over the asparagus. Enjoy!

Spring Brunch @ IHCC


Sunday, July 23, 2023

Summer of Salads #9: Mark Bittman's Sichuan-Style Cucumber Salad {The Most Delcious Cucumber Salad Ever}


You're gonna think I'm crazy. But that's ok. I'm gonna say it anyway. This Sichuan-Style Cucumber Salad is one of the best things I've ate all year! I'm not kidding.

I had another salad planned this week but my friend gave me two beautiful cucumbers from her garden and since we're making Cool Treats this week at I Heart Cooking Clubs I decided I'd made a cucumber recipe. Because nothing is as cool as a cucumber, right?

This is NOT your typical cucumber salad served all summer long. This cucumber salad will BLOW YOUR MIND! I'm still not sure why on earth this is so dang delicious, but I ate the ENTIRE recipe all by myself. I couldn't stop! Something wonderful happens when you cut those cucumbers and let them sit for 30 minutes with salt and sugar sprinkled over top and then combine them with a soy sauce/sesame oil dressing with garlic and fresh hot chile and cilantro and lime juice and peppercorns! I mean WOW, I absolutely inhaled this. 

I even tried to put half away in the fridge but I kept licking my lips and getting that taste and I found myself going back to the fridge and eating the rest straight outta the bowl!

There is so many wonderful flavors going on here and the cucumber is just so bright and fresh and crunchy and flavorful and delicious. It's just simply addictive! Please get some garden fresh cucumbers and make this! I can't recommend it enough!

Sichuan-Style Cucumber Salad
Adapted from Mark Bittman
Serves 2-4

1 pound cucumbers
about 2 teaspoons slat
1 teaspoon sugar
1 teaspoon Sichuan peppercorns*
1 small clove garlic
1 teaspoon minced fresh jalapeno or other hot chile
2 tablespoons soy sauce
1 tablespoon lime juice or rice vinegar
2 teaspoons sesame oil
chopped cilantro, to your taste
 
NOTE: I couldn't find Sichuan peppercorns so I just used fresh cracked black pepper!
 
If the cucumbers are seedy (you'll know as soon as you cut into one), cut them in half lengthwise and scrape out the seeds with a spoon. (If they're not seedy, don't!). Chop the cucumbers, I like 1/2" or slightly bigger pieces. Put them in a colander or strainer and sprinkle with the sat and sugar; toss a bit and let sit for 20 to 30 minutes.

Grind the peppercorns in a spice grinder. (If you have a spice grinder than can handle it, add the garlic and chile, too - I used a mortar and pestle for this). Otherwise, mince the garlic and chile and combine with the peppercorns.

When the cucumbers look darker and slightly shriveled, toss the colander a few times to remove as much liquid as possible that's clinging to them. (You don't have to rinse; if anything, you'll wind up adding salt.) Put the cucumbers in a bowl and add all the other ingredients except cilantro. Taste and adjust the seasoning, then garnish with cilantro and serve. Bittman says room temperature is best, but I liked this as cold as can be best!


Sunday, June 27, 2021

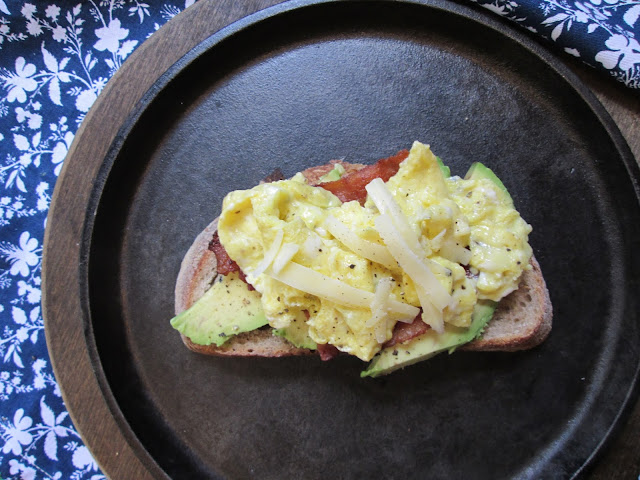
Breakfast Sandwich {Summer Slim Down Series #5}

These days everyone is all about some sourdough bread. I see it all over YouTube, and in the markets. Then yesterday I saw something that told me EVERYONE really is all about sourdough because I went to our little Georgetown, KY farmers market and there was a whole booth set up just for sourdough! There are only about 10-12 booths and one of them is totally and completely dedicated to sourdough. I couldn't resist buying some! Bonus, because she had it wrapped up real pretty. I am such a sucker for packaging.

Why is sourdough good for you? Well, answers vary, depending on where you look, but they say sourdough is easier to digest, has a lower glycemic index, is better for gluten sensitivity, has more good acid, has healthy bacteria, less yeast, fewer preservatives, and provides good fuel.

Better yet, sourdough has always been my favorite, so this new fad pleases me greatly. I decided to use my sourdough to make Ina's Bacon, Egg, & Cheddar Sandwich from her latest cookbook, Modern Comfort Food. To make the recipe healthier and reduce my gluten intake, I made a breakfast toast or an open-faced sandwich. I do this nearly all the time now because my tummy cannot handle much gluten anymore.

Now some may say, "Kim...this is no slim down healthy sandwich." I'll agree that the calorie content is probably on the high side, but I also don't think calories are the only thing we should pay attention to. We have to find healthy ways of incorporating favorites like the breakfast sandwich into a healthier lifestyle and I think this sandwich is perfectly balanced and achieves that goal. I'm also of the firm belief that every once in awhile we need a healthy dose of fats, whether it's healthy fat from avocado or fat from bacon.

Plus, we are representing all the basic food groups here, and using portion control: a slice of sourdough, some sliced avocado, one slice of bacon, two eggs, and two tablespoons of cheese. You are getting a lot of bang for your buck because, this is no sissy sandwich. It is so substantial that you are likely to be full for hours. I tend to look for more substantial healthier meals that keep me from getting hungry and having cravings at inconvenient times because that's when my not-so-healthy impulses tend to get the best of me (chocolate and sugar, I'm talking to you).

Something interesting about Ina's approach to this sandwich recipe is the way she cooks the eggs. Would you believe she cooks them in the microwave? I had to read it and then reread it several times because I could not believe THE Ina Garten cooks her eggs in the microwave AND put it in a cookbook! And you know what? They are oh so creamy and delicious! You'd never guess. She puts the eggs in an oiled bowl and microwaves them at 30-second intervals, stirring between each one, and it works like magic. The eggs are so good! I love this approach and will continue to try it out. I thought this was an incredibly delicious and filling sandwich. I was trying to think about how to describe it and words like  "unctuous and top-quality and so satisfying" came to mind. It's only a few simple ingredients, but you can taste them all so well and they all play together so nicely.

Breakfast Sandwich

Adapted from Modern Comfort Food

by Ina Garten

Serves 2

2 slices thick-cut bacon

olive oil

4 eggs

2 tablespoons milk

salt and black pepper

4 tablespoons grated sharp white Cheddar, divided

Bread of some kind: English Muffins, bagels, sourdough bread, etc.

1/2 ripe avocado, thinly sliced

Notes: Ina wrote this recipe as an English muffin sandwich and you can certainly serve it that way or on any other type of bread you fancy. There are so few ingredients here and it does pay to use the best you can buy. I love the Tillamook sharp white Cheddar and can really taste the difference.


To cook the bacon heat a large saute pan over medium heat. Add the bacon and cook for 5-7 minutes, turning occasionally, until nicely browned. Transfer to a plate lined with paper towels and set aside. (I never cook my bacon on the stove top. I always preheat the oven to 375F and lay out all the bacon on a baking sheet and bake around 10-15 minutes, until done to desired level of crispiness).

NEW METHOD FOR COOKING EGGS: Meanwhile, generously brush two small microwavable bowls (about 4 inches in diameter) with olive oil and set aside. In a separate bowl, beat together the eggs, milk, 1/2 teaspoon salt, and 1/4 teaspoon pepper. Pour half of the egg mixture into each of the two oiled bowls and microwave on high for 30 seconds. Stir the eggs gently with a fork to combine the cooked parts with the uncooked parts. Continue to microwave and stir at 30-second intervals, until the eggs are puffed and almost cooked through. Sprinkle 1 tablespoon of the Cheddar in each bowl and microwave for 30 seconds to melt the cheese and finish cooking the eggs.

Meanwhile, toast the English muffins, or bread of your choice, until nicely browned. Place the bottom half of each toasted English muffin, or bread of your choice, on a plate. Layer half of the avocado slices on each one and sprinkle with salt and pepper. Break the bacon strips in half and place two halves on each sandwich. Slide the eggs, cheese side up, on top of the bacon, and sprinkle a tablespoon of the remaining Cheddar on each sandwich. Sprinkle with salt and pepper and cover with the tops of the toasted English muffins. Serve hot.


Souper Sundays @Kahakai Kitchen

Summer Sammies @ IHCC


Sunday, March 14, 2021

Mark Bittman's Roasted Asparagus with Bacon and Parmesan


 When I think of spring I think of three veggies: peas, carrots, and asparagus. Asparagus was my mom's favorite and it always reminds me of her. She used to say that it just made her feel so good to eat it. When I came across a beautiful bunch of fresh asparagus, I couldn't refuse it. 

While searching online for recipes, I found Mark Bittman's article titled, Asparagus, 12 ways. While they all sounded delicious, particularly Grilled Asparagus with Red Pepper Glaze, I opted for Roasted Asparagus with Bacon and Parmesan because, let's face it, bacon and parmesan. I'm trying to be good, but springing forward isn't my favorite, ya know? Why does the time change affect us all week?

This dish was so unbelievably good! The asparagus was still fresh with a bit of a snap to it and the roasting really brings out the flavor. The little bit of bacon and parmesan really go a long way in building flavor and I found that this veggie dish was somewhat addictive. I wanted to go back for more!

This is perfectly delicious by itself, but I'm thinking I would really enjoy it for breakfast with a crispy fried egg on top! Yum! I will be making this easy and delicious veggie many more times in the future! 

Recipe per Mark Bittman's, article linked above. Recipe is for one pound of aspargus, serves 4.

Heat the oven to 450F. Toss the asparagus with 1 tablespoon olive oil and 4 slices bacon, chopped (I wanted my bacon to be crispy and I knew the thin asparagus would only take 5-6 minutes so I cooked some chopped bacon until it was almost done in a skillet then added it to the asparagus) in a roasting pan. Roast, turning the asparagus once or twice, until done. Garnish with grated Parmesan. Serve immediately.

My asparagus was thin so it only took between 5-6 minutes, but thick asparagus would take longer. Best to check on it while it's roasting.


Spring Forward @ IHCC

Sunday, February 28, 2021

Ina Garten's Baked Sweet Potato Fries

It's been one heck of a week. We went back to in person classes after not having school for two weeks due to Snowmageddon. Going back to work after you've been off for any length of time is so difficult, you forget the routine, you forget what you were doing, you just can't get into the swing of things. 

Then on Friday we had the day off so that all staff could get their 2nd dose of the Moderna Covid-19 vaccine. I was starting to feel achy and tired a few short hours later, so I was going to have a light meal and go to bed, but then I broke my molar eating grapes. Yes, I know. I have no idea how that happened. I didn't get to go to bed early though.

Instead I was up half the night feeling achy with a low grade fever and chills and although I was unbelievably tired I couldn't sleep because I was stressed out about my broken tooth. I thought I'd feel better the next day, but no. In fact, I ended up feeling the worst the next night, shivering and laying under tons of blankets all night. Don't get me wrong, I am grateful to have had the vaccine, but I will warn you, almost everyone I work with was feeling pretty bad all weekend. If you get the vaccine, plan to have a couple down days.

I am feeling a little better today, but I'm going to go right back to resting after I share this recipe for Ina's Baked Sweet Potato Fries. I had this recipe set aside to make this week because I had two huge sweet potatoes that I've had for sometime and this recipe is less than 5 ingredients, which is my favorite kind of recipe to make. Even though I'm not feeling well, I can definitely put together this recipe which is about as easy as they come. Plus, as a bonus, you can totally chew these sweet potato fries with one side of your mouth, which is required when one is in need of a dentist.

I'm not reinventing the wheel here, but if you have some sweet potatoes lying about then these make a fun and delicious side. I've seen a lot of savory sweet potato fries, but Ina goes the sweet route, using light brown sugar. The fries get a coating of olive oil, brown sugar, salt and pepper and I have to say I do love how the brown sugar caramelizes on the sweet potato fries creating this rather sweet and sticky goodness. If you like sweet potato recipes that are on the sweet side, then this are worth a shot!


Baked Sweet Potato Fries

Adapted from Food Network

by Ina Garten

Serves 4-6

 2 medium sweet potatoes, peeled

2 tablespoons good olive oil

1 tablespoon light brown sugar

1/2 teaspoon kosher salt, plus extra for sprinkling

1/2 teaspoon freshly ground black pepper

Preheat the oven to 450F. Halve the sweet potatoes lengthwise and cut into 3 long spears. Place them on a sheet pan and toss with the olive oil. Spread the potatoes in one layer. Combine the brown sugar, salt, and pepper and sprinkle on the potatoes. Bake for 15 minutes and then turn with a spatula. Bake for another 5 to 0 minutes, until lightly browned. Sprinkle lightly with salt and serve hot. 


Sunday, January 31, 2021

Ina Garten's Creamed Spinach & Eggs

I am a big fan of spinach and eggs combined in about any fashion. They just go so well together! One of my favorite breakfasts is taking leftover spinach and artichoke dip, slathering it on some crusty bread, then topping it with a fried egg. Trust me, If I can put an egg on anything, I will!

 So, with that in mind, I figured Ina's Creamed Spinach and Eggs would be an awesome breakfast that I would love. The bonus, there is over ONE POUND of spinach in this recipe and eating leafy greens is SO HEALTHY, right? I think it cancels out all the cheese and cream in this recipe. 

This comes together so easily, tastes great, looks gorgeous, and would be perfect to serve at a brunch if and when we can ever entertain again. However, this is also something different to make for your family and/or just for yourself, because it does reheat well, if necessary. We really enjoyed this one, but next time I will definitely be adding some artichokes because I think that would make it even better!

Creamed Spinach & Eggs

Adapted from Modern Comfort Food

By Ina Garten

Serves 4

2 tablespoons butter

2 tablespoons olive oil

1/2 cup minced shallots (2 shallots)

1-1/4 pounds fresh baby spinach, washed and spun dry

1 (5.2 ounce) package Boursin Garlic and Fines Herbs Cheese

 1/3 cup heavy cream

pinch of ground nutmeg

salt and black pepper

4 extra-large eggs

1/3 cup grated Gruyere cheese

1 tablespoon freshly grated Italian Parmesan cheese

Preheat the oven to 400 degrees. Heat the butter and olive oil in a large (12-inch) saute pan over medium heat. Add the shallots and cook for 3 to 5 minutes, until tender. Add the spinach in large handfuls, tossing with metal tongs to wilt each batch before adding another. After all of the spinach has been added and completely wilted, crumble the Boursin into the spinach and add the cream, nutmeg, 1 teaspoon salt, and 1/2 teaspoon pepper. Cook for 3 minutes, stirring often, until the cheese and cream form a sauce.

Transfer the spinach mixture to a 9x9" square or 8x10" oval baking dish. With the back of a wooden spoon, make four indentations in the spinach. Place an egg in each indentation. Sprinkle the eggs with salt and pepper. Sprinkle the spinach and eggs with the Gruyere and Parmesan. Bake for 12 to 13 minutes for runny yolks or 13 to 14 minutes for yolks that are just cooked. Serve hot from the baking dish.


Sunday, March 1, 2020

Ottolenghi's Braised Eggs with Leek, Kale, Feta and Za'atar


When I received my copy of Simple by Yotam Ottolenghi, this recipe was at the top of the list. Then as I paged through the book, my list kept growing and growing until it covered an entire sheet of paper.

Nevertheless, this recipe stuck in my mind. That happens to you too, right? Out of an entire page of recipes, and recipes from other books, there's always those few that stay right in the front of your mind. The ones you can't stop thinking about until you just bite the bullet and make them?

So, when I received my Misfits Market box and it had two very large leeks, and a nice bunch of kale, I knew they were destined for this recipe. Now, Ottolenghi calls for spinach in his recipe but I say, use what you've got. I enjoy spinach, but I prefer kale so this substitution was to my advantage.

I also didn't have the preserved lemons, and while it's not a perfect substitute, I did go ahead and make my own veggie stock (something that I do at least once a month to alleviate food waste) and so I added a little lemon peel this time around for a lemony flavor. How's that for a run-on sentence?

In the scheme of Ottolenghi recipes, this is an easy one, and it is both healthy and delicious. I personally loved the za'atar oil drizzled over the top and felt like this added loads of flavor to an otherwise simple dish. I made this on a Sunday morning for brunch and it was best served straight out of the skillet, immediately. That said, it also held up in the refrigerator well. I enjoyed it several mornings prior to work during the weekday.

Healthy, delicious, and simple. A total winner in my book!


Braised Eggs with Leek, Kale, Feta, and Za'atar
Adapted from Ottolenghi Simple
by Yotam Ottolenghi
Serves 6

2 tablespoons butter
2 tablespoons olive oil
2 extra-large leeks (or 4 smaller), trimmed and cut into 1/4"  slices (6 cups)
salt and pepper, to taste
1 teaspoon cumin seeds, toasted and lightly crushed
1/2 small preserved lemon, seeds discarded, skin and flesh finely chopped (2-1/2 tablespoons)*
1-1/4 cups vegetable stock*
7 ounces baby spinach or kale (use whatever greens you have on hand)
6 large eggs
3-1/2 ounces feta, broken into 3/4"inch pieces
1 tablespoon za'atar

Notes: I used kale because it's what I had on hand. Use whatever green you happen to have on hand. I also make my own veggie stock, so since I didn't have preserved lemon I added some lemon peel to my veggie stock to help carry over some lemon flavor.

Put the butter and 1 tablespoon of the oil into a large saute pan with a lid and place over medium-high heat. Once the butter starts to foam, add the leeks, salt to taste, and plenty of pepper. Fry for 3 minutes, stirring frequently, until the leeks are soft. Add the cumin, lemon (if using), (this is also where I added the kale sine is heartier and needs a longer cooking time) and vegetable stock and boil rapidly for 4-5 minutes, until most of the stock has evaporated. If you're using spinach, this is the time to add the spinach and cook for 1 minute, until wilted, then decrease the heat to medium. 
Use a large spoon to make 6 indentations in the mixture and break 1 egg into each space.  Sprinkle the eggs with a pinch of salt, dot the feta around the eggs, then cover the pan. Simmer for 4-5 minutes, until the egg whites are cooked but the yolks are still runny.

Mix the za'atar with the remaining 1 tablespoon of oil and brush over the eggs. Serve at once, straight from the pan.


Sunday, January 7, 2018

Tuscan Mashed Chickpeas {#Foodgoals}

I love the first few weeks of January when everyone is sharing their new year's resolutions. There is a certain kind of hope in the air. The kind that says I can do anything I set my mind to. You can almost feel the slate being cleared. A fresh start for everyone!

I always make several different types of resolutions. My biggest resolution this year has to do with my family. I've learned that if we want quality family time then we've really got to carve it out for ourselves, otherwise, life gets way too busy. This year our biggest goal is to spend more quality time together as a family (without phones or electronics).

For Stirring the Pot I set three #Foodgoals. The first is to share my mom's recipes in order to preserve them for the future. The second is to teach my daughter how to cook a few dishes and also to share her experiences. The last resolution should be simple, but it's something I just forget to do, and that is to share ALL of my dishes (even the dishes I don't put on my blog) on my Instagram page. This is just a fun resolution so that I can look back over the year and see everything I made all in one place. I'm looking forward to sharing all these kitchen adventures with you and know that I am much more likely to stick with these resolutions if I share them with you!

This week I'm lightening things up with this healthy Tuscan Mashed Chickpea dip. If you've followed me here for anything length of time, then you know that hummus is a real favorite of mine. Now, I'm not suggesting that hummus isn't healthy, because it definitely can be. What I am going to say is that it can be full of oil and/or tahini which makes it a bit heftier in the calorie department.

These Tuscan Mashed Chickpeas are mashed with chicken broth instead of oil and are therefore noticeably lighter than your traditional hummus. Now, Ina does tell you to drizzle oil here and there and you can do that and feel good about it. I chose to drizzle just a tiny bit to keep things light. 

Think of this as a fresh alternative to hummus, chunky in texture and bright in flavor. I personally loved the touch of tomato and Parmesan cheese and found it to be a welcome change. You can certainly serve this on grilled country bread, but I enjoyed this best with some Triscuit crackers and also with carrots and celery. I think this would be great served in lettuce cups or wraps and I also think this would make a great spread for a sandwich! I'd definitely make it again.


Tuscan Mashed Chickpeas
by Ina Garten
Serves 6-8

2  (15.5 ounce) cans chickpeas
1/2cup chicken stock
3 tablespoons olive oil, plus extra for serving
2 ripe medium-size tomatoes, seeded and small-diced
1/4 cup freshly grated Parmesan cheese
3 tablespoons minced fresh flat-leaf parsley
2 tablespoons freshly squeezed lemon juice
salt and pepper, to taste
To serve: grilled country bread, crackers, and/or veggies

Pour the chickpeas into a colander and rinse them under cold running water. Drain well. Place the chickpeas in the bowl of a food processor fitted with the steel blade. Add the chicken stock and pulse until the chickpeas are coarsely chopped but not pureed.

In a medium saute pan, heat the 3 tablespoons of olive oil over medium heat. Add the tomatoes and saute for 3 to 4 minutes until the tomatoes are softened. Add the garlic and cook for 1 minute more. Add the chickpeas, stirring to combine with the tomatoes and garlic. Cook for about 5 minutes, stirring occasionally until heated through. Off the heat, stir in the Parmesan, parsley, lemon juice, salt and pepper and taste for seasonings. Pile in a serving bowl, drizzle with olive oil and serve warm or at room temperature.

IHCC: Lighten It Up!

Sunday, June 12, 2016

Donna Hay's Smashed Avocado Toast w/ Hard Boiled Egg


I work in a special needs room at a local elementary school and I absolutely love it. My favorite part is that we get to teach practical life skills: cooking, crafting, hygiene, shopping, and social skills, all with the hope that the kids can be as independent as possible. I love to watch the kids' faces when they learn these new skills, but it is even more rewarding to watch them master these skills and see their confidence grow over time.

All of these skills are fun to practice, but of course I favor the days we cook. Not every student is capable of doing some of the skills we practice, but I feel like cooking is something everyone can experience in one way or another. Cooking is such a sensory experience and even if you can't see, then you can still feel the food, touch the food, hear it cooking, smell it and definitely taste it, and so on. So while we have several students who are impaired in different ways, there is usually something they can experience while cooking.

During the last few weeks of school our Spanish translator came into the room and made a Mexican feast. The kids made guacamole in her molcajete. They also made homemade corn tortillas from maseca and learned how to cook them on a comal. We cut veggies for salsa and also made a steak filling for tacos. It was a very special day. The kids were beaming, the food was delicious, and everyone learned something, including me.

The guacamole was something that everyone could participate in, more so than any other dish we created up to that point. The avocados were soft, and easy for the kids to chop and mash, and of course their pretty green color was a hit. The guacamole, because of it's soft nature, was also something everyone could eat, and for that we were thankful.  We had such a special time making and eating the guacamole that we even decided to buy the teacher in our room a mortar and pestle, as well as the ingredients to make her own guacamole, as a special end of the year gift. Now guacamole is present at every get together we have. It's our signature dish that holds special meaning.

Since that day I've been buying avocados and eating them with everything: on sandwiches, on toast, in guacamole, chopped up in a salad, and so on. Not only are they good for you, but they just make me smile!

This Smashed Avocado Toast with Hard Boiled Egg is an easy and quick recipe that is perfect for the hot summer mornings we've been having. Satisfying enough, but also light enough, so as not to weigh you down. I love the sprinkling of seeds and the refreshing pop from the mint and squeeze of lime. Perfect for enjoying before heading to the pool!


Smashed Avocado Toast with Hard Boiled Egg
Recipe Adapted from Donna Hay Website
Serves 2-4

4 eggs
 4 slices of wholemeal bread, toasted
1 avocado, mashed
1 teaspoon white chia seeds
1 teaspoon sesame seeds
1 teaspoon cumin seeds
salt and black pepper, to taste
mint springs, to serve
lime wedges, to serve

Place the eggs in a saucepan of boiling water and cook for 7 minutes. Drain and refresh under cold water. Peel, slice in half and set aside.

Place the toast on plates and top each slice with the avocado and egg. Place the chia seeds, sesame seeds, cumin seeds, salt and pepper in a small bowl and mix to combine.

Sprinkle the seed mixture and mint over the avocado and serve with lime wedges. 


Theme: Monthly Featured Chef: Donna Hay!

Sunday, May 19, 2013

Crispy Couscous with Tomato and Shallots

When my friend, Michelle of Ms. enPlace, shared her version of Couscous with Tomato and Onion I knew right away I had to make it for myself! The concept of a couscous cake with a crispy, buttery, golden brown crust and a fluffy interior was so very appealing.   

I rushed to the store for the ingredients, brought them home, and then began procrastinating. For days.  For some reason the idea of inverting the couscous onto a plate with the hopes of transferring a perfectly golden thing of beauty was causing me stress.  So I put it off.  All week.  Until today.  As you can see, the couscous cake did fall apart when I inverted it.  I'd like to tell you that I handled this in a classy way, but that would be a lie.  After having a little bit of a hissy fit, I realized the couscous actually looked good a little broken up because it reveals the texture difference between the crusty exterior and the fluffy interior.  Or at least that's what I told myself.  

Either way, this dish is absolutely delicious.  It's crispy, buttery, and fluffy with a very mild flavor making this a great side dish to serve with nearly anything you'd like.  The next time I make this I'd probably add just a touch of minced garlic, but only because we love garlic.  I will definitely be making this again!


Crispy Couscous with Tomato and Shallots
Adapted from Jerusalem
by Yotam Ottolenghi and Sami Tamimi
Serves 4

3 tablespoons olive oil
1/2 cup chopped shallots (or one medium onion, chopped)
1 tablespoon tomato paste
1/2 teaspoon sugar
1-3/4 cups very ripe diced tomatoes
1 cup couscous
1 cup boiling chicken or vegetable stock
2-1/2 tablespoons butter
 salt and pepper, to taste 

Notes: I decided to sub shallots in place of onions because I prefer the subtle flavor of shallots over onions.  I wanted this to be a mild and kid-friendly dish that everyone would eat. 

 Pour 2 tablespoons of the olive oil into a nonstick pan about 8-1/2 inches in diameter and place over medium heat.  Add the shallots (or onion) and cook for about 3-5 minutes, until softened but no colored.  Stir in the tomato paste and sugar and cook for 1 minute.  Add the tomatoes and salt and pepper to taste.  Cook down until you have a chunky looking tomato sauce, about 3 minutes or so.

Meanwhile, put the couscous in a shallow bowl, pour over the boiling stock, and cover with plastic wrap.  Set aside for 10 minutes, then remove the cover and fluff the couscous with a fork.  Add the tomato sauce and stir well.

Wipe the pan clean and heat the butter and the remaining 1 tablespoon olive oil over medium heat.  When the butter has melted, spoon the couscous into the pan and use the back of the spoon to pat it down gently so it is all packed in snugly.  (At this point, Ottolenghi's instructions say to cover the pan, reduce the heat to its lowest setting, and allow the couscous to steam for 10 - 12 minutes, until you can see a light brown color around the edges).  I didn't really like the idea of covering the pan and trapping all that moisture so I decided to leave my couscous uncovered.  I cooked it for about 10-12 minutes until it was golden brown on the edges.  Use an offset spatula or a knife to help you peer between the edge of the couscous and the side of the pan; you want a really crisp edge all over the base and sides.

Invert a large plate on top of the pan and quickly invert the pan and plate together, releasing the couscous onto the plate. Serve warm or room temperature.  Garnish with tomato, herbs, etc.
Theme: Use Your Noodle!