Tuesday, November 30, 2010

French Fridays with Dorie Monthly Roundup


One of my friends, Mimi of Mimi's Kitchen, had a great idea to do a monthly roundup of the French Fridays with Dorie recipes. I liked the idea so well, that I adopted it and decided to do it myself. Without further adieu, here is my first monthly roundup of this month's French Fridays with Dorie recipes.

Without a doubt, Dorie's Roast Chicken for Les Paresseu (roast chicken for lazy people), is my favorite pick of the month. Hmmm...maybe there's a hidden message in there somewhere. Seriously though, it may very well be my favorite roast chicken recipe ever. I know, I say that all the time. What can I say? I find it hard to quell my excitement. I will say that I liked this version even better than Ina's, which is saying a lot.

I think maybe the secret might lie in using a roasting dish that hugs the chicken. Either way, the chicken browned wonderfully, it was moist and tender, and the flavor was amazing. I was more than impressed with Dorie's recipe.

Of course, it's hard to knock a recipe for cheesy and cream-laden potatoes. Dorie's Potato Gratin (Pommes Dauphinois) was in fact a real delight.

How could it not be?

Marie-Helene's Apple Cake was a pick from October that I just got around to making this month. A very moist cake, filled with chunks of apples, and distinct rum flavor, we enjoyed it with a side of apple pie ice cream.

Not only was this cake perfect for the fall season, it would also be perfect for someone watching their waistline. Most desserts don't fit into a diet plan at all, but this one fit in nicely, without all the feelings of guilt. The ice cream, of course, is another story altogether.

And, finally Dorie's Pumpkin-Gorgonzola Flans. I eagerly awaited the day when I could make these without all the critiques of what was going into them. No one in my family appreciates pumpkin or any type of blue cheese. Crazy folk I live with, I know...

The flans had a very smooth and silky consistency, with a strong pumpkin flavor. The gorgonzola paired beautifully with the pumpkin and was a nice contrast in flavor. I do feel like it was the toasted walnuts that made the dish and added a nice contrast in texture. If you enjoy these flavors together, then this would be a fun recipe for you. It certainly is beautiful to look at as well.

**In lieu of my family's finickiness, I skipped the Caramel-Topped Semolina Cake because I didn't think they would enjoy it and I hardly need to eat an entire dessert myself.

Which one do you think would be your favorite? Or, if you were lucky enough to try them all...which one was your favorite?

Monday, November 29, 2010

Michael Symon's Italian Braised Beef with Root Vegetables for Food 'n Flix


This recipe is a huge labor of love. However, fifteen hours later you will have the most deliciously tender, succulent, melt-in-your mouth beef roast with a complex and flavorful sauce served over rigatoni. It will make your family swoon. It will make you want to kiss Michael Symon (assuming you never thought of kissing him before).

When my family sees Symon's cookbook laying on the kitchen counter they know they're in for something good. They also know when they see his book it means that I'll be in the kitchen for awhile and his Yia Yia's Sunday Sauce is no exception. Yia Yia was Symon's maternal grandmother and this is her sauce. A rich homemade tomato sauce that simmers for 8 hours, Symon uses this sauce as a base in many recipes throughout his book, including his Italian Braised Beef with Root Vegetables.
Yia Yia's Sunday Sauce
Adapted from Michael Symon's Live To Cook
Makes 2 quarts, freezes well
1/4 cup olive oil
1 large Spanish onion, finely diced
6 garlic cloves, sliced
1 tablespoon kosher salt, or more to taste
2 28-ounce cans San Marzano tomatoes, with their juice
1 cup dry white wine
2 pounds meaty beef bones (or 2 cups beef broth)
1 bay leaf
1 tablespoon fresh oregano leaves
1/4 teaspoon freshly ground black pepper
1 tablespoon crushed red pepper flakes (optional)

Heat the oil in a 4-quart saucepan or large Dutch oven over medium heat. Add the onion and cook until transparent, 2 minutes. Add the garlic and salt and cook until everything is soft but not browned, about 3 minutes.

Squeeze the tomatoes one by one into the pan, pulverizing them by hand, and pour in their juice, too. Add the wine, beef bones (or broth), bay leaf, oregano, black pepper, and red pepper flakes, if using. Bring the sauce to a simmer, then reduce the heat to its lowest possible setting, and continue to cook for 8 hours. The sauce should reduce by about one third.

Taste for seasoning and add more salt if necessary. Remove the bones (if using) and bay leaf. If not using right away, let the sauce cool, then cover, and refrigerate for up to 1 week or freeze for up to 2 months.


Let's talk about a couple key points in making a roast. The first, and most important step, is picking a great roast. If you don't buy a great roast then it won't matter how long you cook it or what you do with it. Symon says to use a rump roast, but after years of experimenting I like to use a shoulder roast, preferably black angus. The shoulder cut is a flat cut, which fits well into most pans or slow cookers, and has good marbling throughout. Marbling is very important! I always check to make sure the roast is fresh, meaning that the roast itself is bright red and the marbling is very white.

The second step in a great pot roast is to SEAR the roast, on all sides. Searing is one of the keys to great flavor.

Another great tip that I learned from Symon is to make sure that when braising, a third of the meat is above the liquid. The meat should not be submerged, so pot size is important. I found that a 9 x 13 dish was the perfect size for this roast.

In the movie The Ramen Girl, the broth for the ramen noodle soup was the heart of the recipe. In Symon's Italian Braised Beef, the sauce is the heart of the recipe. Full of complex and robust flavors, which have cooked and simmered for hours upon hours, it is what makes this recipe so good.

Italian Braised Beef with Root Vegetables
Adapted from Michael Symon's Live To Cook
Serves 6
3 pounds rump roast (NOTE: I used a 4.5lb shoulder roast)
Kosher salt and freshly ground black pepper
3 tablespoons olive oil
1 carrot, peeled and cut into 1-inch chunks
1 onion, coarsely chopped
1 small celery root, peeled and cut into 1-inch chunks
4 garlic cloves, minced
1 cup red wine
2 cups Yia Yia's Sunday Sauce*make day before
2 bay leaves

Preheat the oven to 300F.

Season the meat liberally with salt and pepper, as much as a day in advance. (Cover and refrigerate it if doing so and take the meat out of the fridge 30 minutes before cooking.) Heat the oil in a large Dutch oven over high heat. When the oil is on the verge of smoking, sear the meat, about 2 minutes on each side. Move the meat to the side (or remove it from the pot altogether if necessary), and add the carrot, onion, and celery root. Brown the vegetables, about 3 minutes, then add the garlic and cook for a minute or two longer.

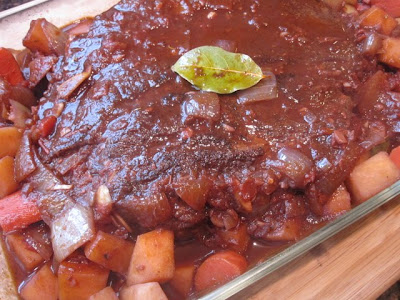
Add the wine to deglaze the pot, scraping up the browned bits on the bottom. Add the tomato sauce, 1 cup water, and the bay leaves (and the pot roast if you removed it). Bring the liquid to a simmer and taste for seasoning. Add more salt if necessary. Cover the pot and place it in the oven for 3 hours, basting the meat occasionally during this time.

Discard the bay leaves before serving. The meat can be removed to a cutting board and sliced if you're serving individual plates, or the meat can be pulled apart with a couple of forks right in the pot at the table and served with plenty of the sauce and vegetables.

*Michael's family served their roast over rigatoni, so I did the same.

Notes/Results: A fabulous and soul-satisfying dish, one to be proud of for sure. The sauce on this pot roast is so sensational, a winning component of the recipe. This roast would be great served on it's own, with polenta, or with mashed potatoes. I served this 4 pound roast over a pound of rigatoni and it was gone in record time. Many hands fought over the leftovers the next day. This recipe will be made again in the coming months.

This recipe is being submitted to Ashlee over at Veggie By Season for the bi-monthly Symon Sundays event.

It is also being submitted to Food 'n Flix, where this month's movie is The Ramen Girl.


And also to the Hearth 'n Soul Blog hop, co-hosted by my friend Heather of girlichef.

Sunday, November 28, 2010

Turkey and Cranberry Ravioli


I hope those of you celebrating Thanksgiving had a wonderful weekend. We had a quiet and peaceful Thanksgiving here, with a few food highlights that I'll share later in the week.

It's been a busy weekend, full of shopping, putting up the tree, and stringing the lights. I can't wait for tomorrow morning when everything is back to normal and I can have some time to catch up on what all of you have been making.

I chose Giada's Turkey and Cranberry Raviol for the potluck at I Heart Cooking Clubs this week and the results were out of this world! These ravioli are absolutely fantastic! The recipe is a little messy and somewhat time consuming, but the results are worthwhile and the end result is really impressive. I'm beginning to think that I might make a double batch of this recipe next year and serve it all on it's own for Thanksgiving dinner. It really is that good!


Turkey and Cranberry Ravioli

Adapted from Giada De Laurentiis as found on Food Network
Ravioli:
* 1/4 pound ground turkey, preferably dark meat
* 2 tablespoons cranberry sauce
* 2 tablespoons grated Romano
* 1 tablespoon bread crumbs
* 1 tablespoon chopped fresh parsley leaves
* 1 egg
* 1/4 teaspoon kosher salt
* 1/4 teaspoon freshly ground black pepper
* 20 store-bought wonton wrappers
Gravy:
* 3 tablespoons butter
* 1 shallot, chopped
* 1 tablespoon all-purpose flour
* 1/2 cup chicken broth
* 2 tablespoons heavy cream
* 1 tablespoon chopped parsley leaves
* 1/4 teaspoon kosher salt
* 1/4 teaspoon freshly ground black pepper

Directions
To make the ravioli: in a medium bowl, stir together the turkey, cranberry sauce, cheese, bread crumbs, parsley, egg, salt, and pepper. Place 10 wonton wrappers on a work surface. Brush lightly with water using a pastry brush. Place 1 tablespoon of the turkey mixture on each of the wonton wrappers. Top with another wonton wrapper. Push out any air bubbles and press the edges tightly to seal.

To make the gravy:
in a medium, heavy skillet, heat the butter over medium heat. Add the shallots and cook until tender, about 5 minutes. Add the flour and stir until cooked, about 1 minute. Slowly add the chicken broth, stirring quickly to avoid lumps. Add the cream, parley, salt, and pepper and cook, without boiling, for 2 minutes, stirring often.

Meanwhile, bring a large pot of salted water to a boil over high heat. Add the ravioli and cook until tender but still firm to the bite and the turkey is cooked, stirring occasionally, about 3 minutes. Drain the ravioli into the gravy and stir to coat. Serve immediately in individual dishes, drizzled with the remaining gravy.


Notes/Results: Absolutely delicious! I have to say that I was a little intimidated by this recipe, mostly worried that my ravioli would burst while cooking. I'm happy to say that I had no problems or issues with this recipe. Sure, it was a little messy and a little time-consuming, but so are a lot of other great recipes. The ravioli themselves are really meaty, with a just a hint of cranberry (my husband didn't even notice it), and the gravy sauce is some really good and creamy stuff. I will tell you that if you simply love cranberry, go ahead and add some more to the filling. Either way, you should try this recipe at some point. I really am thinking of making a double batch next year and serving it as the main course for Thanksgiving dinner. It's definitely one of my favorite Giada recipes so far.

Now celebrating the recipes of Giada De Laurentiis.

Monday, November 22, 2010

Thanksgiving Crockpot Recipe: Trisha Yearwood's Macaroni & Cheese


This year we're having a rather quiet and peaceful Thanksgiving celebration. We're not traveling anywhere and the only one joining the four of us for dinner will be my Mom. We're planning a simple meal, revolving around a roast chicken, the only meat my son isn't allergic to. It's going to be an easy going Thanksgiving around here and I'm loving that.

Whether you are hosting Thanksgiving or simply bringing a dish, don't forget about your crockpot! It is a great way to free up space on your stove and in your oven. It's also a great way to keep food warm if you're transporting a dish to a family member or friend's house.

We almost always have macaroni and cheese, especially for the kids, on Thanksgiving. This year I tested out a crockpot recipe from Trisha Yearwood's newest book and we found it to be quite good.

Crockpot Macaroni and Cheese

Adapted from Home Cooking with Trisha Yearwood
Serves 12
8 ounces elbow macaroni, cooked
1- 12 ounce can evaporated milk
1 1/2 cups whole milk
2 large eggs, beaten
1/4 cup (1/2 stick) butter, melted
1 teaspoon salt
Dash of pepper
2 10-ounce bricks sharp Cheddar cheese, grated (about 5 cups)
Dash of paprika

In a large 4-quart crockpot sprayed with cooking spray, mix the macaroni, milks, eggs, butter, salt, pepper, and all but 1/2 cup of the grated cheese. Sprinkle the reserved cheese over the top of the mixture and then sprinkle with paprika. Cook on low heat for 3 hours and 15 minutes. Turn off the crockpot, stir the mixture, and serve hot.

Another Crockpot Note:
I'm also using my crockpot tomorrow to cook fresh corn on the cob for my son's preschool celebration. Fresh corn on the cob is husked, wrapped in foil and placed on high in the crockpot for 2 hours. The corn steams in it's own juices and is actually quite delicious.

I'm submitting this crockpot recipe to Reeni's Thanksgiving Side Dish Showdown over at Cinnamon Spice & Everything Nice.

I wanted to take this time to say that I am thankful for each and every one of you. I hope you have a wonderful Thanksgiving full of family, friends, fun, laughter and memories!

Sunday, November 21, 2010

Bacon-Wrapped Pan-Roasted Fish and Red Potatoes with Spinach


I wish my pictures had turned out better because this bacon-wrapped fish was so succulent, tender, and moist. I loved every bite of the fish, especially alongside the sliced red potatoes, which were doused in a sauce consisting of three magic words: creamy mustard sauce. Amen!
Bacon-Wrapped Pan-Roasted Fish
Adapted from Live to Cook by Michael Symon
NOTE: Symon uses 8 3-ounce skinless walleye fillets in his recipe
I couldn't find walleye here so I used tilapia
Serves 4
8 3-ounce skinless walleye fillets (I used tilapia)
Kosher salt
1 teaspoon fresh thyme leaves
2 tablespoons unsalted butter, softened
16 strips bacon
1 tablespoon canola oil

Season the fillets with salt and sprinkle with the thyme. Rub on side of each of the fillets with the butter. Rest one fillet on another, buttered side to buttered side, to make four portions. Lay down 4 strips of bacon overlapping the strips. Arrange one portion of fish on top and wrap the bacon slices up and around the fish. Repeat with the remaining bacon and fish portions. Transfer to a large plate, cover with plastic wrap, and refrigerate for 1 hour.

Preheat the oven to 425F.

Heat the oil in an ovenproof saute pan over medium heat. Add the fish fillets to the pan seam side down and saute the fillets to render the bacon, 3-4 minutes per side. Place the pan in the oven to crisp the bacon and finish the cooking the fish, 2-4 minutes. Remove to a tray lined with paper towels to drain before serving.


Red Potatoes with Arugula

Adapted from Michael Symon's Live To Cook
Serves 4-6
Note: I subbed spinach for arugula because I happened to have a mass of it in the fridge.
2 pounds 2-inch red potatoes
Kosher salt
1/2 cup heavy cream
1/2 cup chicken stock
2 tablespoons whole-grain Dijon mustard
2 tablespoons unsalted butter
Freshly ground black pepper
1/4 to 1/2 pound arugula
Put the potatoes in a large pot and add enough water to cover by 2 inches. Season the water well with salt and bring to a boil. Cook until the potatoes are tender when pierced with a knife, 30 to 40 minutes. Drain them and let the moisture steam off. When they're cool enough to handle, peel them if you wish. (Huh? ....who does that?) Cut into 1/2-inch-thick slices.

In a medium saute pan, whisk together the cream, stock, and mustard. Reduce by one-third over high heat, about 5 minutes. Add the potatoes and toss to coat. Stir in the butter and season with salt and pepper to taste. When the cream comes to a simmer, add the arugula (spinach). Continue to cook until the arugula (spinach) is completely wilted, about 45 seconds.

Notes/Results: This bacon-wrapped fish would be a great way to introduce fish to anyone, especially children. The bacon is a decadent touch and adds great moisture and flavor to the fish. This recipe, along with the potatoes, makes for a quick and great weeknight meal.

This recipe is being submitted to Ashlee at Veggie By Season for the Symon Sundays roundup.

Friday, November 19, 2010

Orecchiette with Sausage, Beans and Mascarpone.....a new favorite!


This pasta recipe has three of my top ten favorite foods in it: pasta, beans, and cheese. If I were to serve this with some sauteed greens, a hunk of good bread, and follow it with a piece or two of chocolate then I would be in pig heaven, literally.

I made Giada's Orecchiette with Sausage, Beans, and Mascarpone when I was low on time and craving comfort food. I expected to love it, but even I was shocked by just how much I loved it. Evidently my husband loved it too because he ate up all the leftovers when I wasn't looking and let me just tell you....I was not happy. A couple days later I went to the store and bought the ingredients again. I made it again last night and treasured every bite. There is just something about the way that orecchiette cradles the sausage and beans. It makes my mouth water just looking at it.

I made a few changes to Giada's recipe. I can never find turkey sausage, so I use 1/2 pound regular Italian sausage. I also add red pepper flakes (to taste), about a teaspoon of Italian seasoning, and a couple cloves of minced garlic. After cooking the sausage and onions, I deglaze the pan with about 1/2 cup of Marsala wine (not to be fancy, but mostly because I have a bottle I'm trying to use up). The wine isn't a necessary step, but it helps to get all the good stuff off the bottom of the pan and also helps to add color and a little bit more flavor to the meat. I've listed my changes below.
Orecchiette with Sausage, Beans, and Mascarpone
Adapted from Giada De Laurentiis/TV Food Network
* 1 pound orecchiette pasta
* 2 tablespoons olive oil
* 1/2 pound turkey sausage, casing removed
* 1 small onion, chopped
* 1 (15-ounce) can cannellini beans, drained and rinsed
* 2 tablespoons chopped fresh oregano leaves
* 1/2 cup mascarpone cheese
* 1 teaspoon salt
* 1/2 teaspoon freshly ground black pepper
My Additions:
2 cloves garlic, minced
1-2 teaspoons red pepper flakes
1 teaspoon Italian seasoning
1/2 Marsala wine to deglaze pan after cooking sausage

Bring a large pot of salted water to a boil over high heat. Add the pasta and cook until tender but still firm to the bite, stirring occasionally, about 8 to 10 minutes. Drain pasta reserving 1 cup of the cooking liquid.

In a large, heavy skillet warm the olive oil over medium-high heat. Add the sausage and onions. Using a wooden spoon break up the sausage into bite-sized pieces as it browns.

Continue cooking until the sausage is golden and the onions are tender. (I deglaze the pan with about 1/2 cup Marsala wine and add the garlic at this point.) Add the beans and oregano cook for 2 more minutes. Add the cup of pasta cooking liquid and stir, scrapping up any brown bits from the bottom of the pan. Add the mascarpone cheese and stir until it dissolved into a light sauce. Add the salt, pepper, and hot pasta. Stir until coated and serve.

Notes/Results: This pasta recipe is a winner for me! One of my new favorites to be sure. If you love pasta, beans and cheese as I do then this is your recipe. Also, if you like quick, easy, and economical, then this is the recipe for you. If you like creamy, comforting, satisfying and hearty pasta dishes than this is the recipe for you. If you like to be creative and change up recipes, then this is the recipe for you. Add some greens, spice it up, add more meat....whatever you like. You really can't go wrong!
Special Note: I think the shape of the orecchiette makes this recipe and have become enamored with the DeCecco brand, but it can sometimes be hard to find. If you can't find orecchiette in your market then shells would be a good back up.

This week at I Heart Cooking Clubs we are cooking up fall favorites. Since I've made this recipe twice and will no doubt be making it again, I think this qualifies as one of my fall favorites!

Slow-Cooker Bacon Jam


Each month, either on the 15th or 16th, my new issue of Martha Stewart's Everyday Food magazine gets delivered to my mailbox. Don't worry, I'm not stalking the mailman. Er....well, maybe I am. He does arrive at my mailbox about 10:15 every morning. Is it bad that I know that?

I cozied up on the couch with my December issue this past Tuesday and quickly noticed this recipe for Slow-Cooker Bacon Jam. I mean....HELLO, Bacon Jam? Where has that been all my life? Then I thought of my friend Beth over at The Seventh Level of Boredom and I knew this recipe would be perfect for her new food adventure, The Bacon Games.


Slow-Cooker Bacon Jam

Adapted from the December 2010 Issue of Everyday Food Magazine
Makes 3 cups
Active Time: 30 minutes
Total Time: 4 HR

1-1/2 pounds sliced bacon, cut crosswise into 1-inch pieces
2 medium yellow onions, diced small
3 garlic cloves, smashed and peeled
1/2 cup cider vinegar
1/2 cup packed dark-brown sugar
1/4 cup pure maple syrup
3/4 cup brewed coffee

In a large skillet, cook bacon over medium-high, stirring occasionally, until fat is rendered and bacon is lightly browned, about 20 minutes. With a slotted spoon, transfer bacon to paper towels to drain. Pour off all but 1 tablespoon fat from skillet (reserve for another use); add onions and garlic and cook until onions are translucent, about 6 minutes. Add vinegar, brown sugar, maple syrup, and coffee and bring to a boil, stirring and scraping up browned bits from skillet with a wooden spoon, about 2 minutes. Add bacon and stir to combine.

Transfer mixture to a 6-quart slow cooker and cook on high, uncovered, until liquid is syrupy; 3-1/2 to 4 hours. Transfer to a food processor; pulse until coarsely chopped. Let cool, then refrigerate in airtight containers, up to 4 weeks

Per 2 tablespoons: 191 calories, 12.6 fat (4.9 g sat fat), 10.8 protein, 8.1g carb, 0.2g fiber

Notes/Results:
I think everyone should have a little bacon jam in their life. You can literally put this stuff on anything: bread, burgers, pizza, steaks, sandwiches, eggs, potatoes, chicken, fish....you name it! The combination of the bacon, sugar, maple syrup, onions, and coffee makes a smoky, sweet, tangy combination that is really unique and quite delicious. The jam keeps in the refrigerator for up to 4 weeks, but with so many uses it will never last that long. It is best served warm.
Timing Note: I will confess that it took me almost double the time for the prep, more like 50 minutes instead of 30 minutes, but I'm never usually in a hurry when I cook.
Additional Note: My bacon jam wasn't as photo friendly as in the magazine. I added a touch of chopped parsley and a little sprinkling of freshly cooked bacon to spruce up the photo. If you do choose to make this, make sure to use a food processor and follow the directions to coarsely chop the jam.

For now I plan on making some breakfast sandwiches and also some cheeseburgers with my bacon jam. Anyone have any fun ideas? I'd be happy to hear all about them!

Wednesday, November 17, 2010

Recipe# 57 & 58 -Stirring the Pot: Crab Cakes and Zucchini Crab Fritters


Working my way through Tyler's Stirring the Pot has presented different challenges along the way. Now that I'm more than halfway through the book, one of the biggest challenges has been sourcing some of the more "specialty" items. I suspect this was the reason why I never made them in the first place. It wasn't that Lobster Cakes with Lemon Aioli and Bacon Frisee Salad didn't sound good or that I feared no one would like Zucchini Crab Fritters with Grapefruit Aioli. It was simply because I never found fresh lobster and never ran across fresh crab that looked good enough to use.

When Crab Tater Tots came due for Symon Sundays I knew it was time to get serious and get my hands on some crab. I hightailed it to the city, going to 3 specialty stores, and only found two cans of pasteurized crab in all my searches. One can contained one pound of lump crab meat, $26.99 and the other can contained one pound of claw meat, $8.99. The lump crab meat is ideal, but since I was going to be frying most of my recipes, I opted for the can of claw meat. Eager to make the most of my crab, I spread it out and made three crab recipes. The first recipe was Symon's Crab Tater Tots, the second was Tyler's Zucchini Crab Fritters, and the third was Tyler's Lobster Cakes, which I had to turn into crab cakes simply because I don't think I'll ever find fresh lobster anywhere around here.

Let's talk about these tasty little morsels known as Zucchini Crab Fritters with Grapefruit Aioli. Well worth getting out the deep fryer, these are a real treat! First, zucchini is sliced thinly with a powerfully sharp mandoline. The thinly sliced zucchini is salted and set aside so that they moisture is drawn out and the slices become pliable. Crab is mixed with egg white and seasoned simply with salt and pepper. A spoonful of crab is placed on one end of each zucchini slice and rolled up, starting with the end that has the crab meat. Each zucchini fritter is rolled in flour, dipped in egg, and finished in panko. Tyler always advises to let your coated items set aside in the refrigerator for at least 10-15 minutes. He says that this added step helps the coating to set up. I use this tip constantly, applying it to all coatings, and have had lots of success with it.

After resting, the fritters are ready to be fried for 3-4 minutes and dipped in a delicious grapefruit aioli. Everyone loved these fritters, including my husband who isn't the biggest fan of crab. We ate them up in record time!

Saving the best for last are these fabulous Lobster turned Crab Cakes with Lemon Aioli and Bacon Frisee Salad. (NOTE: In all my travels I didn't find frisee either, so I used a mix of field greens) The crab cakes were very simple and delicately flavored with sliced white bread, egg white and mayo. Panfried until crisp, they were served with the most delicious and bacony salad and an equally delicious and complimentary lemon aioli. I found this recipe to be my favorite of all three crab recipes.

Although I would've enjoyed having fresh crab, the pasteurized canned claw meat worked well in all three applications. I would buy it again if I couldn't find fresh.

Both recipes can be found on Tyler's blog, or by clicking on the links below:
Zucchini Crab Fritters with Grapefruit Aioli
Lobster/Crab Cakes with Lemon Aioli and Bacon Frisee Salad

I'm submitting my Crab Cakes with Lemon Aioli and Bacon Frisee Salad to Beth at The Seventh Level of Boredom for The Bacon Games, a very tasty and promising new foodie adventure.

Monday, November 15, 2010

Thanksgiving Dinner Burger


Ever since I announced the Thanksgiving Dinner Burger Challenge I've been dreaming up all kinds of burger combinations. Ideas were running through my head constantly and then I saw them.....Baked Creamed Pearl Onions, and I knew I had to incorporate them.

My obsession with the creamed pearl onions wouldn't go away so I decided to model my burger after a recipe for sausage stuffing. Using the creamed pearl onions as a topping, I wanted to incorporate all the other elements of the stuffing into the burger. To the ground turkey I added sausage, grated apple, celery and fresh sage. Now for the fun part... the bread. I opted for King Arthur's Stuffing Buns, a sage-scented yeast bun reminiscent of stuffing. To add color and freshness to the burger I decided to top them with a little fresh spinach.

My Thanksgiving Dinner (Sausage Stuffing Inspired) Burgers
Makes 12 mini burgers or 4 regular burgers
1 recipe King Arthur Stuffing Buns, recipe found HERE (Note: Stuffing bun recipe makes 16 mini buns or 8 regular sized hamburger buns)
1 recipe Baked Creamed Pearl Onions, recipe found directly below
About 2 handfuls of spinach

For the burgers:
1 pound ground turkey
1/4 pound sausage
1/2 stalk celery, grated
1/2 red gala apple, grated
4 sage leaves, chopped
1 egg
About 1/2 - 3/4 cup panko or breadcrumbs (enough to bind the mixture)

Prepare stuffing buns, set aside. Prepare baked creamed pearl onions, set aside.

Mix burger ingredients together. Form mixture into 12 mini patties or 4 normal sized burgers. For mini burgers, cook about 3-4 minutes each side.

Place burgers on stuffing bun. Top with spinach and a spoonful (or two) of baked creamed pearl onions.

Baked Creamed Pearl Onions
Original Recipe
Ingredients
1 cup pearl onions, peeled (mine were from the produce dept/could use frozen)
sprinkle with dash of salt and pepper
1 tablespoons butter, melted
1/4 cup crushed buttery round crackers
1/2 cup heavy cream, or enough to cover just the tops of the crackers
Preheat oven to 350 degrees F. Place onions in small ramekin or small casserole dish. Season with salt and pepper. Pour melted butter over onions and sprinkle crushed crackers on top. Pour cream over crackers. Bake in preheated oven for 30-40 minutes, or until bubbly and crackers are golden.

Notes/Results: The turkey burgers themselves were amazing. They were extremely juicy and flavorful from the addition of sausage, grated apple, and grated celery. A very good blend of flavors. The baked creamed pearl onions oozed with cream and looked beautiful pouring down over the burgers. The only issue with these burgers were the stuffing buns. No one liked them. I was a little surprised to find that they were dry (maybe my fault), but also that they lacked flavor and weren't really reminiscent of stuffing in anyway. We ended up eating them on different buns altogether. All in all, the burgers and toppings were a hit, just not the bun.

I had so much fun putting the different elements of this Thanksgiving Dinner Burger together. I'm still toying around with ideas for another Thanksgiving Dinner Burger coming up.

If you'd like to participate in the Thanksgiving Dinner Burger Challenge, please see my original post HERE.

A big thanks to Natashya of Living in the Kitchen with Puppies and also to Teresa of A Blog About Food for their contributions, please see each of their links below for further inspiration:
Natashya's Thanksgiving Dinner Burger

Teresa's Favorite Turkey Burger

Wednesday, November 10, 2010

Fettucine Alfredo for the Kid at Heart


Ah, the good old days. Remember how it felt to be a kid? Full of energy, laughter, and innocence. The days when it was more fun to share a chair with a friend, even though there were plenty of other chairs around. Everything, and I do mean everything, was funny and you giggled and laughed your way through the day.

Silly, playful, and full of imagination you made up games. For example, maybe you and your friend would do something as simple as recite the alphabet. Just for fun you'd start with the letter "A", pointing to the top of your head, working your way down your body so that the letters "H" and "I" arrived at your chest, and the letter "P" arrived.....well, you get the idea right? Something that silly would send you into hysterics, uncontrollable full-on belly shaking laughter. You laughed so hard it hurt. Your temples ached and your side was burning.

The laughter spread to every room in the house and made the adults smile. Loving the sound of laughter, your Dad gets up and snaps a picture(my friend Julie is on the left, I'm on the right). He says something like "This one will be worth holding onto." As usual, he was right. Years later this is one of your favorite pictures. It reminds you that you're still a kid at heart and that even after all these years your favorite thing to do is laugh.

My favorite thing to do is laugh, but my favorite thing to eat, both back in the day and now, is pasta! The kid in me decided that we wouldn't count calories or fat grams this week. Instead I played innocent and naive and made Fettucine Alfredo, a favorite of my daughter's and also an old favorite of mine. I got out the pasta, cream, butter, and cheese and closed my eyes. My husband asked me if I really needed that all that butter and I put my fingers in my ears, "la....la.....la...I can't hear you, I said."

Fettucine Alfredo
Adapted from Giada De Laurentiis, recipe found online at Food Network
* 18 ounces fresh fettuccine (I used one pound dried pasta)
* 2 1/2 cups heavy cream
* 1/2 cup fresh lemon juice (I used about 1/4 cup)
* 12 tablespoons unsalted butter (I used 8 tbsp. or one stick)
* 2 cups grated Parmesan
* 2 teaspoons grated lemon zest
* Pinch freshly grated nutmeg
* Salt and freshly ground white pepper

Directions

Cook the pasta in a large pot of boiling salted water until tender but still firm to the bite, stirring occasionally, about 4 minutes. Drain.

Stir 2 cups of the cream and the lemon juice in a heavy large skillet to blend. Add the butter and cook over medium heat just until the butter melts, stirring occasionally, about 3 minutes. Remove from the heat.

Add the pasta and toss. Add the remaining 1/2 cup of cream, and Parmesan to the cream sauce in the skillet. Add the lemon zest, nutmeg, salt, and white pepper. Toss the pasta mixture over low heat until the sauce thickens slightly, about 1 minute.

Notes/Results: The alfredo was very indulgent and rich and we did enjoy it. My husband and I enjoyed a small portion with chicken and andouille sausage. My daughter and her friends enjoyed theirs plain. I had read the reviews on this one and heard that the 1/2 cup of lemon juice was too much so I cut it back to about 1/4 cup. I think a little bit of lemon juice is a good thing, but 1/4 cup lemon juice might still be too much. I guess it's all personal preference. Also, this recipe makes a ton of pasta and is best eaten on the day that it's served. If I wasn't serving this to a crowd then I would halve the recipe for sure.

I might feel like a kid at heart, but I don't have the metabolism of one.

Best to save most of it for the kids. They gobbled it up and then wiped out a dozen chocolate chip cookies. Ah, to be a kid again!

Cooking the recipes of Giada De Laurentiis. Feel free to join in the fun....but only if you're prepared to be a kid at heart, which is this week's theme.