Sunday, July 31, 2022

Grown-Up Tomato-Parmesan Pasta {AKA Homemade Spaghettios}


When I was little my parents were strictly healthy and I wasn't eating any "junk food." Until I met the next door neighbor. My friend next door was eating ALL the junk food!

My mom couldn't keep me away from my next door neighbor, Julie. Julie was a year older than me and when I would go to her house she would climb the cabinets, get on the countertops, and get out the Nesquick for chocolate milk, or the Hostess treats, like the Ho-Ho's and Twinkies. Most importantly, her parents made THE BEST BUTTERED NOODLES and served them in the old school Tupperware bowls.

Our families became fast friends and before too long our moms started part-time jobs. The moms decided to get opposite shifts and take turns watching us. During this time, my exposure to endless buttered noodles and treats was on high. Julie's house had all the good stuff.

Julie's mom, Sally, would watch me in the morning while my mom was at work. Soon after, Julie started Kindergarten and oh my...how I missed my friend terribly when she was away at school. I can remember sitting at her big picture window waiting to see her walking home from school. I always knew Julie was about to come home when Sally opened the can of Spaghettios for lunch. She would put two bowls of Spaghettios on the table right by the picture window and in no time at all Julie would come walking down the street.

That was about 42 years ago now, but I remember it like it was yesterday. Steaming bowls of Spaghettios and my friend walking down the street with a big smile on her face, running to the door to give me a hug and tell me all about Kindergarten. We loved each other fiercely.

Julie and me, Christmas 1979

The years passed and we both moved away, but kept in touch. At Julie's bridal shower her mom gifted her the old beat up buttered noodle pan that had been lovingly used over the years to cook us all our buttered noodles and Spaghettios. There wasn't a dry eye in the place.

Not too many years later, Mrs. Sally had a severe stroke, became wheelchair bound, and was unable to speak. Everyone was so upset and I remember my mom crying because Mrs. Sally was so active and hated sitting still. My mom couldn't bear the thought of it. Mrs. Sally lived several years this way and was able to meet her grandchildren before passing, but she deserved so much more. 

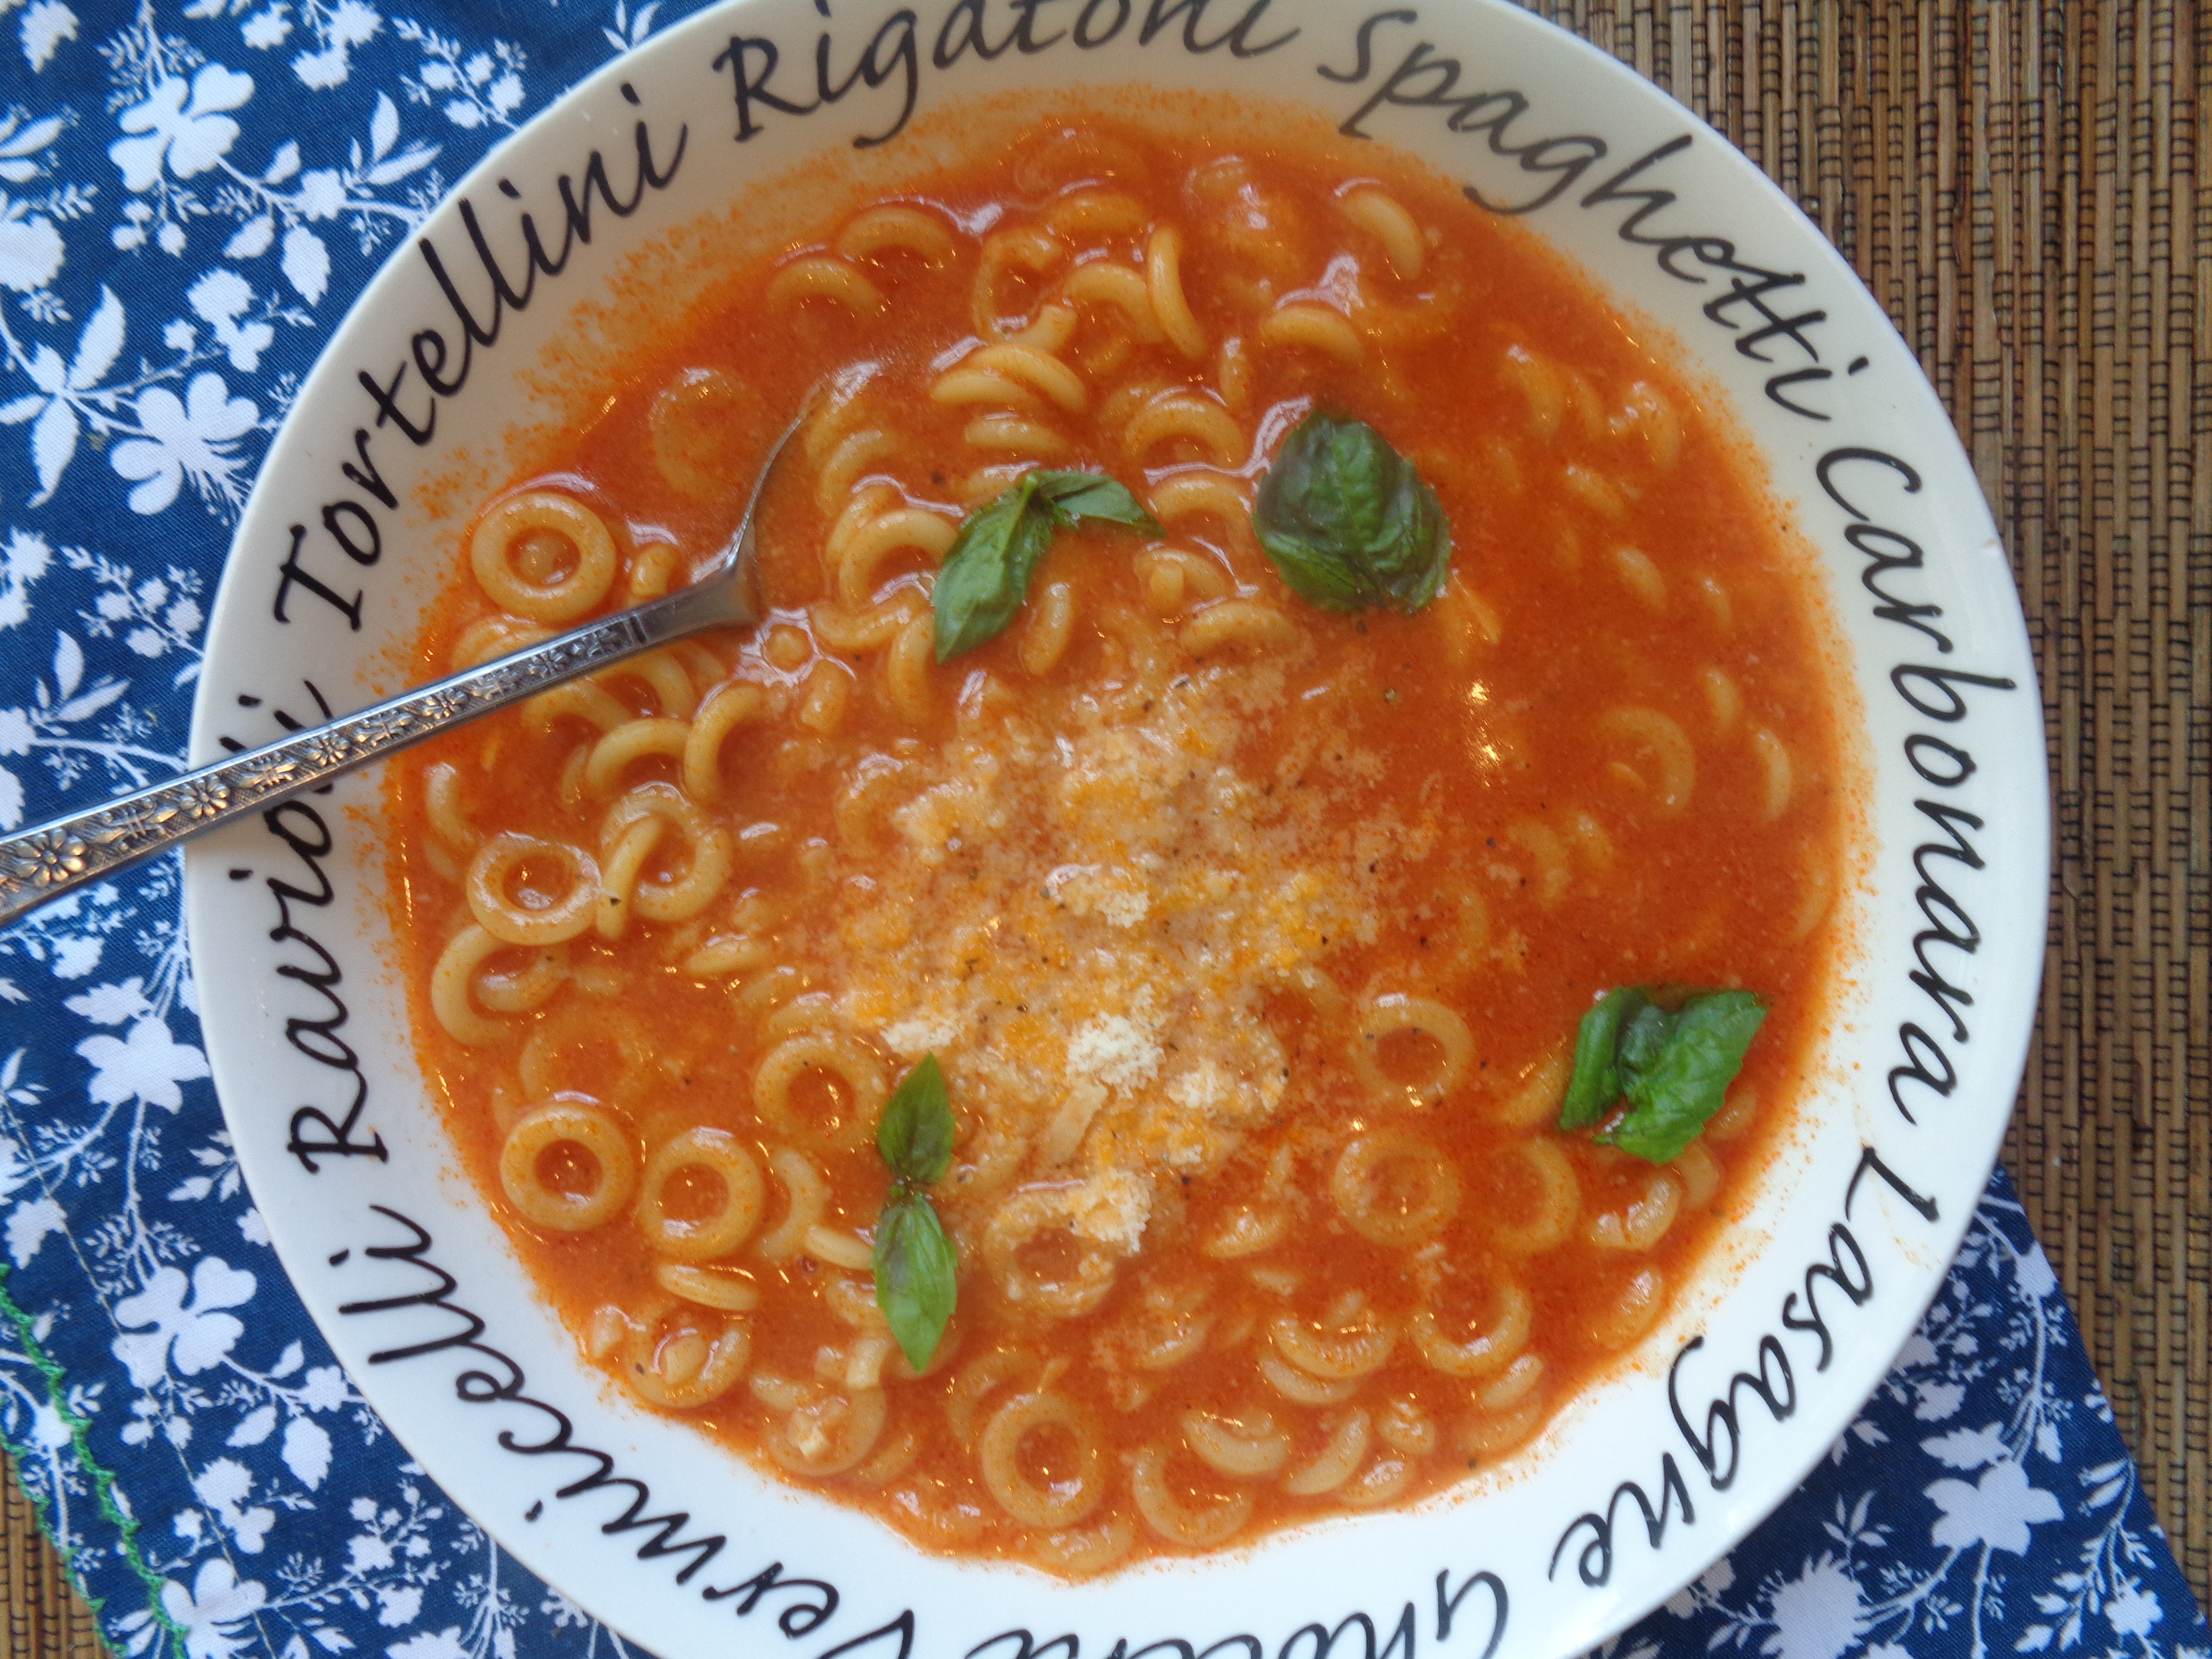
When I saw this recipe for Grown-Up Tomato-Parmesan Pasta I immediately thought of my old friend Julie and her mom, Mrs. Sally. 

I also thought of my daughter, who also loves pasta, but has never had Spaghettios (my mom and I succeeded on that one). Well, I made her this homemade version and it was so easy. A little bit of olive oil and minced garlic and seasonings, then tomato paste and water to a boil, toss the pasta in, cook until al dente, throw in some Parmesan and you have Homemade Spaghettios. 

My daughter loved it, just like I expected. I thought the tomato flavor was a bit sharp, but I only like tomatoes (I don't love them), so this makes sense. Tieghan calls for 3 tablespoons of tomato paste and that might be a bit too much for me. I might try less tomato paste next time. Overall, it is a fast and family-friendly dish to make and I think kids would really love it.

This week my daughter moved into her very own place. I have been 'in my feels lately' and really missing my mom. She's been gone for almost 5 years now. As I was packing things up I got mom's old pasta pan and colander, grabbed a box of pasta from the pantry, and a stick of butter from the fridge and put it all in a box. It was time for me to part with mom's pasta pan and pass it on to my daughter. I loaded it in the car and it was the first box to cross the threshold into Olivia's new place. 

I set the pan, colander, pasta and butter on Olivia's new stove and stepped back feeling so much reverence. In that moment they were all there with me: mom, Mrs. Sally, and my friend Julie. I snapped a picture and sent the text to my old friend Julie with the caption "first things in Olivia's new place." A handful of words with a lifetime of meaning.

Later that night Olivia send me a text and it read, "Made the pasta and I'm having the time of my life."

A little while later Julie answered my text, "Our moms would love this."

In these moments life sure is beautiful.

 Grown-Up Tomato-Parmesan Pasta

Adapted from Super Simple

by Tieghan Gerard @ Half Baked Harvest

Serves 2

3 tablespoons extra virgin olive oil

1 garlic clove, smashed

2 teaspoons chopped fresh rosemary

crushed red pepper flakes

3 tablespoons tomato paste

3/4 cup anelli, or other short, tubular pasta*

salt and freshly ground black pepper

1/3 cup shaved Parmesan cheese

Fresh basil leaves, for garnish

In a medium saucepan, combine the olive oil and garlic over medium-low heat (*see note below). Cook, stirring occasionally, until the garlic is fragrant, about 2 minutes. Add the rosemary and a pinch of red pepper flakes and cook until toasted and fragrant, about 1 minute more.

Remove the saucepan from the heat. Stir in the tomato paste, then add 2-1/2 cups of water. Return the pan to high heat and bring to a boil. Add the pasta and season generously with salt. Cook, stirring often, until the pasta is al dente, about 12 minutes.

Remove the pan from the heat again and stir in the Parmesan. Taste and add more salt and pepper as needed.

Divide the pasta between two bowls and top with fresh basil. Serve immediately. Store any leftovers refrigerated in an airtight container for up to 3 days.

*Note: It's important to keep the olive oil at a low temperature throughout step 1. If the oil is too hot when you add the rosemary and tomato paste, the rosemary will burn and the tomato paste will splatter.


 Potluck @ IHCC

Sunday, July 24, 2022

Ina's Milk Chocolate Oreo Ice Cream


The first time I thumbed through Ina Garten's copy of Modern Comfort Food, this recipe for Milk Chocolate Oreo Ice Cream screamed at me! It was just begging to be made. 

I couldn't quit put my hand on why this ice cream stuck out like it did. Then I showed it to my daughter and right away she said, "You never see chocolate ice cream with Oreos. It's always the classic Cookies 'N Cream with the vanilla base." She hit the nail on the head.

Not to mention, I don't want small little Oreo crumbles in my ice cream. I'm looking for the big chunks of Oreo, so much better if I make it myself!

Let me tell you...this ice cream is insanely delicious! It does not disappoint. The milk chocolate base has a few teaspoons of Brandy so that it stays soft and creamy and I just love the big chunks of Oreos running throughout. I can see this being one of our all-time favorite ice cream recipes!

Milk Chocolate Oreo Ice Cream

Adapted from Modern Comfort Food

by Ina Garten

Makes 1 quart

1-1/2 cups heavy cream

8 ounces milk chocolate, finely chopped

2 tablespoons cocoa powder

1 teaspoon pure vanilla extract

2 teaspoons Cognac or Brandy

1-1/2 cups whole milk

3/4 cups sugar

1/2 teaspoon kosher salt

4 extra-large egg yolks

1/2 teaspoon cornstarch

2 cups Oreo cookies, rough chopped (15 cookies)

Place the cream and chocolate in a large heatproof bowl set over a pan of simmering water, making sure the water doesn't touch the bottom of the bowl. Heat just until the chocolate melts, stirring occasionally. Off the heat, whisk in the cocoa powder, vanilla, and Cognac or Brandy, and set aside.

In a medium saucepan over medium heat, heat the milk, sugar, and salt until hot but not simmering. In a separate large bowl, whisk together the egg yolks and cornstarch. Slowly whisk the hot milk mixture into the egg mixture, then pour it back into the saucepan. Cook over medium-low heat for a few minutes, stirring almost constantly with a wooden spoon, until the mixture thickens like heavy cream (DON'T ALLOW IT TO BOIL!). Cook for 30 seconds, scraping the bottom of the pan with the spoon. The mixture should coat the spoon and if you run your finger down the back of the spoon, it will leave a clear trail.

Immediately, pour the mixture through a fine-mesh sieve into the chocolate mixture and stir to combine. Cover and chill completely in the fridge or over a bowl of ice water. Transfer to an ice cream maker and freeze according to the manufacturer's instructions. Mix in the Oreos in the last few minutes. Transfer to a container or loaf pan, cover, and freeze. Soften slightly, scoop, and serve frozen. 


Ice Cream Social @ IHCC

Sunday, July 17, 2022

Tessa's Cottage Pie

 Not everyone makes a heavy meat and potatoes dish like this in the middle of July...but I do!

Sometimes I just crave simple comfort food like this, even when it's 90 degrees outside.

Other times I'm just in the mood for a little time in the kitchen. A little kitchen therapy we'll call it.

  Plus, I also have summers off and that's when I have the most time to make those dishes I've been wanting to make throughout the year.

So, Happy July...we're having Cottage Pie for supper!


I'm sure everyone has heard of the British classic named Shepherd's Pie, a dish of ground meat (namely lamb) under a layer of mashed potato. Well, Cottage Pie is like Shepherd's Pie cousin, or maybe even it's sibling, because it is the same exact thing except Cottage Pie is typically made with beef. So to recap, Shepherd's Pie=Lamb and Cottage Pie=Beef!

Both dishes are absolutely comforting and delicious and one can hardly go wrong with either!

I have made my fair share of Shepherd's Pie and I can tell you that this Cottage Pie tastes almost the same is actually much easier to source as I typically always have ground beef.

Tessa's Cottage Pie filling is a mixture of ground beef, onion, carrot, garlic, peas, tomato sauce, bay leaf, allspice berries, basil, and parsley that cooks down on the stove for about an hour. The time is well spent because the flavors have time to concentrate. The entire mixture gets covered with fluffy butter mashed potatoes and then baked until the potatoes puff up, turn golden brown, and start to go crispy.

We loved this dish and will definitely make it again!


Cottage Pie

Adapted from Apples For Jam

by Tessa Kiros

Serves 6 to 8

6 tablespoons olive oil

1-3/4 pounds ground beef

4 tablespoons dry white wine

1 large onion, chopped

2 cloves garlic, finely chopped

1 large carrot, chopped

1 (14-ounce) can tomato sauce

salt

1 bay leaf

2 allspice berries

4 basil leaves, torn

3 tablespoons chopped fresh parsley

3 cups hot water

2/3 cup shelled peas

7 to 8 medium potatoes, scrubbed but not peeled

3 tablespoons butter

2/3 cup milk

a little freshly grated nutmeg

Heat half the oil in a nonstick frying pan and fry the ground beef over fairly high heat for about 10 minutes until it is golden brown, stirring often and breaking up any clusters with a wooden spoon. Pour in the wine and scrape up any bits that are stuck to the bottom of the pan. When the wine has evaporated, remove the pan from the heat.

Meanwhile, heat the remaining oil in a large saucepan. Saute the onion for 5 minutes or so over low-medium heat until it is lightly golden and a bit sticky. Add the garlic and carrot, and saute for a few minutes more so that the carrot looks a bit caramelized. Add the tomato sauce and cook for a couple of minutes, then add the browned beef. Season well with salt and add the bay leaf, allspice berries, basil, and parsley. Stir in 2 cups of hot water. Bring to a boil and then turn the heat to low, cover the pan ,and cook for 30 minutes. Add a little water if the meat sauce seems very dry; it should neither be runny nor too stiff. Check the seasoning and try to find all the allspice berries.

Preheat the oven to 350F. Meanwhile, boil the potatoes in salted water for about 30 minutes (depending on their size) until they are soft enough to mash. Drain, and when they're cool enough to handle, peel and mash, or pass through a food mill. In a small saucepan, heat the butter and milk and, when the butter has melted, add to the potatoes. Add the nutmeg, taste for salt, and mix to a soft and fluffy mash (add a little more butter or milk if it seems too stiff).

Butter a 10-cup ovenproof dish or 6 to 8 individual dishes. Spoon in the meat sauce, smoothing the surface, and then spoon mashed potato over top, spreading it very gently to completely cover the sauce. Roughen the mash with a fork here and there so you get some crispy bits. Bake for 30 minutes, until the top is softly crusted and golden in places. 


Kitchen Travels @ IHCC


Sunday, July 10, 2022

Tessa's Zucchini Bread

When I was little the neighbors behind us were the nicest older couple named Mr. and Mrs. Mosso. They had a paved driveway, which was rare back then, and they were nice enough to let us kids ride our big wheels up and down their driveway all the time. As if that wasn't nice enough, Mrs. Mosso even bought us candy. I can remember all us kids lining up at her door waiting to reach in the candy dish and pull out one of those chewy square caramels that were so popular back in the day.

I remember my parents standing in the backyard talking to Mr. and Mrs. Mosso all the time and it was a real good day, when late in the summer, Mrs. Mosso came over with her famous Zucchini Bread. Mrs. Mosso made THE BEST ZUCCHINI BREAD and everyone loved it! I remember it would be gone almost as soon as she gave it to us.

Eventually we moved away and shortly thereafter both Mr. and Mrs. Mosso passed away. But every summer without fail, someone would give mom tons of zucchini and she would get out her old battered, well-loved, red and white checkered Better Homes and Gardens Cookbook held together with rubber bands. She would search through her recipe cards until she found the one that Mrs. Mosso had written out for her. The old recipe card of yesteryear with the beautiful cursive script that only the greatest generation used. The one I still have. 

Then mom would bake two loaves. One for us to eat. One to share, just like Mrs. Mosso.

Those sure were the good old days. I don't know if my mom knew how close I watched her in the kitchen when she got out her ol' Better Homes and Gardens Cookbook, but that was the beginning of my love for cooking. That cookbook was magical to me, watching her gather ingredients and make something delicious. Like a diary of my family, with all the recipes and recipe cards from loved ones over the years. It is an undying connection to who I am, my most prized possession. The one thing I would save in a fire. The one thing that will never lose it's magic.


You didn't know you signed up to read a book, did you?

These days I'm making Tessa Kiros' Zucchini Bread which is way different than Mrs. Mosso's. Tessa's recipe is different in that it calls for olive oil instead of vegetable/canola oil, and then she adds in lemon zest, and black pepper.

I didn't notice much of a difference using olive oil in place of the other oils. I did notice a touch of lemon flavor from the added lemon zest, which I thought was a nice addition. The major difference in Tessa's recipe is the pinch of black pepper. Even though it is just a pinch, you can definitely taste the pepper. It lends an interesting taste and really kind of stands out.

Tessa's recipe is a tasty and enjoyable version of a summertime favorite, but the black pepper does lend a distinct spicy taste. If you're in the mood for something different, then this might be the recipe for you. If not, I'm sure you could make this recipe without the black pepper and that would be more like your traditional zucchini bread recipe.

I'm looking forward to eating more of this zucchini bread and I don't mind the black pepper. I will say that even though I enjoy it and am happy I tried it; I'm not likely to make this version again because I prefer Mrs. Mosso's recipe.


Zucchini Bread

Adapted from Apples For Jam

by Tessa Kiros

Makes 10-12 slices

2/3 cup pecans

1 cup sugar

3/4 cup light olive oil

1 teaspoon vanilla extract

3 eggs

2-1/4 cups all purpose flour

1-1/2 teaspoons baking powder

1/2 teaspoon baking soda

1/2 teaspoon ground cinnamon

pinch of ground nutmeg

salt

about 3 zucchini, coarsely grated

freshly ground black pepper

Zest of one lemon, or 2 teaspoons lemon zest

Notes: I omitted the pecans because I don't care for the interference of nuts in my quick breads.

Preheat the oven to 350F. Butter and flour a 12 x 4" loaf pan. Spread the pecans in a baking pan and toast them in the oven until they are just crisp and lightly roasted (keep a close eye on them so that they don't burn), then remove the pan from the oven and leave them to cool.

Beat the sugar with the oil and vanilla until smooth and then add the eggs one by one, beating well after each addition. Keep on beating until you have a thick , yet light and fluffy batter. Sift in the flour, baking powder, baking soda, cinnamon, and nutmeg. Add a pinch of salt, the zucchini, several good grinds of black pepper, and the lemon zest, and fold together well. Coarsely chop the pecans and gently stir through the batter.

Scrape the batter into the pan and bake for 55 to 60 minutes, or until a skewer poked into the middle of the loaf comes out clean. Leave the pan on a rack to cool for 10 minutes before turning the loaf out onto the rack to cool. Serve warm or at room temperature, buttered if you like. Well wrapped up, this stays moist and soft for days, and it toasts well even after it's lost its moistness.

Cuts into 10 to 12 slices.


Block Party @ IHCC

Sunday, July 3, 2022

Julia's Supremes de Volaille aux Champignons {Chicken Breasts with Mushrooms and Cream}

 Here I am with yet another Julia Child recipe. In fact, it is the very same chicken recipe, just a different twist. Julia has several variations of Chicken Breasts with Cream sauces and I literally want to try them all.

Now, hear me when I say, I enjoyed last week's chicken dish so much that I decided I would try Julia's Supremes de Volaille aux Champignons, which is the French way of saying Chicken Breasts with Mushrooms and Cream.

I DO NOT LIKE MUSHROOMS. I haven't liked them for 46 years, but I keep trying because I want to like them. 

My favorite cook on Youtube, Anti-Chef, made Julia's chicken with mushroom cream and I thought if anyone can make me like mushrooms it's Julia.

Guess what? The dish turned out perfectly, but I still don't like mushrooms. I tried. Oh, how I've tried. My husband has tried. We did manage to eat a few mushrooms slices, but it's just a texture thing. We love the flavor. We just don't love mushrooms.

Regardless, don't let me sway you at all. If you're a mushroom lover then you should definitely try this version of Julia's Chicken Breasts with Cream. The sauce is crazy good. Like fine dining good.

Julia's recipes can be somewhat fussy and take time to put together, but these chicken breasts recipes with cream are super easy and fast, on the table in less than 30 minutes.

I highly recommend both of the recipes~!


Supremes de Volaille aux Champignons

Adapted from Mastering The Art of French Cooking

by Julia Child

Serves 4

For The Chicken

4 supremes (boned breasts from two fryers)*

1/2 teaspoon lemon juice

salt and pepper, to taste

heavy, covered, fireproof casserole about 10" in diameter

1 round of waxed paper 10 " in diameter and buttered on one side 

For The Sauce

1/4 cup white or brown stock or canned beef bouillon

1/4 cup port, Maderia, or dry white vermouth

1 cup whipping cream

salt and pepper

lemon juice, as needed

2 tablespoons fresh minced parsley

5 tablespoons butter

1 tablespoon minced shallot or green onion

1/4 pound diced or sliced fresh mushrooms

salt, to taste

Notes: Julia's supremes must be very small if they only take 6 minutes to cook completely in the oven. I have found that I need to cut my chicken breasts in half lengthwise and cook them on one side for 6 minutes and then maybe 4-5 minutes on the other side. Each piece of chicken will cook differently. Best to check often.

Preheat the oven to 400F

Start with the Mushrooms: Heat the butter in the casserole over moderate heat until foaming. Stir in the minced shallots or green onion and saute a moment without browning. Then stir in the mushrooms and saute lightly for a minute or two without browning. Sprinkle with salt.

Time For the Chicken: Rub the supremes with drops of lemon juice and sprinkle lightly with salt and pepper. Quickly roll the supremes in the mushrooms and butter, lay the buttered paper over them, cover casserole and place in hot oven. After 6 minutes*, press top of supremes with your finger. If still soft, return to oven for a moment or two. When the meat is springy to the touch it is done. Remove the supremes to a warm platter and cover while making the sauce (2 to 3 minutes).

For the Mushroom Sauce: Pour the stock, bouillon, or wine into the pan with the mushrooms and the cooking butter and boil down quickly over high heat until liquid is syrupy. Stir in the cream and boil down again over high heat until cream has thickened slightly. Off heat, taste carefully for seasoning, and add drops of lemon juice to taste. Pour the sauce over the supremes, sprinkle with parsley, and serve at once.