Sunday, January 28, 2018

Mark Bittman's Beef and Potato Samosas


Whenever I feel a little restless, I head straight for the kitchen for some good ol' kitchen therapy. Sometimes this means roasting a whole chicken with all the fixings, other times it means making one of my mom's recipes, but today I wanted to make something different. Something I never made before. Something to completely get lost in. 

I grabbed Mark Bittman's How To Cook Everything and when I found Beef and Potato Samosas I knew I had found the right thing. Doesn't everyone love a little handheld pie?

I chose to make a beef and potato version because I was craving comfort food and wanted a heartier option, but you could totally make these vegetarian by making a potato samosa or even a lentil samosa. It's all good!

The dough for the samosas came together easy and I was surprised how easy the dough was to roll out and shape. I didn't have any breaking or tearing, which is what usually happens to me. One tip I will give you is to taste your mixture before filling the samosas. You'll want to make sure your mixture is perfectly seasoned because you can't really season them afterward.

You can choose to fry your samosas, which I'm sure is delicious, or you can choose to bake them. I chose to bake mine and was so glad that I did. I didn't feel like I was missing out at all and I didn't have a big oil mess to clean up. Major score!

These samosas have been on my to-do list for years and years and I'm so thankful I finally got around to making them. I can't wait to pack them for my lunch this week. Yum!


Beef and Potato Filled Samosas
Adapted from How To Cook Everything
by Mark Bittman
Makes 10-12 large 
or 20 small

About 1-1/4 pounds baking potatoes, russet
2 cups all-purpose flour, plus a little more as needed
1 teaspoon salt, plus more for seasoning mixture
8 tablespoons butter, divided
2 tablespoons plain yogurt, sour cream, or buttermilk
1 tablespoon ice water, plus more as necessary*
3/4 pound ground beef
1 cup chopped onion
1 fresh chile, minced or cayenne to taste
1 tablespoon minced garlic
2 teaspoons minced ginger
1 tablespoon curry powder*
1 teaspoon coriander or fresh cilantro, to taste
salt and black pepper to taste 

Note:* Recipe calls for around 1 tablespoon of water to get the dough to form a ball. I had to use about 5 tablespoons of water. Regardless, the dough still turned out wonderfully. I finally got to use my Curry Powder from Penzey's and even though it turned a neon green kind of color when it hit the heat it was still delicious!

For The Dough: Place the flour and 1 teaspoon of salt in a medium mixing bowl, and stir to blend. Cut half the butter (4 tablespoons) into small bits, add it to the flour, and use your fingers until the flour mixture resembles small peas and the butter is mixed in. Add the 2 tablespoons of yogurt, sour cream, or buttermilk and stir to mix. Then, add 1 tablespoon ice cold water at a time until the mixture starts to form a ball. Knead the dough for 1 minute by hand, then cover with plastic wrap and rest in the fridge while you make the filling.
 
For The Potatoes: Peel the potato (should be about 1 large) and dice them into 1/2" cubes; set them in a pot of water to cover, turn the heat to high. Boil them until soft, 5 minutes should work fine.  Drain and set aside.

For The Beef:  Heat 2 tablespoons butter or olive oil in a large skillet over medium heat. Add onion, chile, ginger, garlic, curry powder, and coriander. Allow the vegetables to cook down for a few minutes. Add in the ground beef and stir, until the meat loses its color, about 5 minutes. Stir in the potatoes and stir to combine the mixture. Remove the mixture with a slotted spoon, being careful to leave the grease behind (you do not want a wet greasy mixture). Place the meat and potato mixture into a bowl and allow it to cool before making the samosas.

To Make The Samosas: First and foremost, I found it is best to watch a Youtube video in order to learn some helpful tips about folding the samosas. In Bittman's book, he tells you to break off a piece of the dough, roll it into a circle (adding more flour if necessary), place 1 tablespoon of filling in the center, then fold over and seal with a few drops of water. He says to repeat these steps until you are done making all the samosas. I watched a video that had me roll the dough into a circle, cut the circle in half, place the dough in the middle, and roll up into a triangle shape. I made some samosas smaller like this and then I made some larger half moon shapes. The size and shape you chose to make are up to you.  

To Cook: You can fry the samosas. If you do you will need a frying pan with about 2 inches of oil at a temperature of about 375F. Fry only a few at a time, until they are golden brown.  Drain on paper towels and keep in a warm oven until you have finished frying all of them 

I chose to bake mine for a healthier option. If you chose to bake yours as well, then bake them on a buttered baking sheet for about 20-25 minutes at 350F. Do not feel as if you're compromising by baking your samosas, they are wonderful and taste just like little handheld pies! 


Sunday, January 21, 2018

Ina Garten's Buttermilk Mashed Potatoes


This week we got around four to five inches of snow. That may not sound like much accumulation to some of you, but here in Kentucky that is enough snow to shut down school for a full five days! We love it when this happens because we have the perfect excuse to relax and be cozy, without interruption, for days. This gives us plenty of time to cozy up with our blankets and catch up on movies/shows, play board games, cook up tasty goodies, and go sledding. I love winter. I love how nature forces you to stay in and slow down.

Of course, reality has come knocking on the door because school is back in session tomorrow. This means our cozy time is over and it's time to get back to the grind. Today will be a flurry of activity. There will be plenty of hussling around as clothes need to be washed and laid out, backpacks and binders prepared, last minute assignments completed, and lunches prepped.

With all the hussle and bustle I wanted to make something quick, using ingredients I already had on hand. A quick look through Ina Garten's recipes revealed this recipe for her Buttermilk Mashed Potatoes. This is the perfect recipe since I have some leftover buttermilk from the muffins last week. Plus, I don't have to run to the store for anything...major score!

 
Ina's Buttermilk Mashed Potatoes are heavenly. The potato ricer (pictured above and below) is the best tool I have found to achieve the desired fluffy and light texture. Mashed potatoes have a way of warming your soul. The perfect comforting indulgence. This is much needed for my kiddos as they have not had a full week of school since the middle of December! This week is going to be hard on them as they get back in the swing of things. So, to cater to them, we had a very kid-friendly meal of chicken tenders, Ina's Buttermilk Mashed Potatoes, and green beans. It was a thumbs-up from everyone. I can definitely see myself making these mashed potatoes again!  

These Buttermilk Mashed Potatoes are also for my dear friend Deb, of Kahakai Kitchen, who is feeling under the weather. She loves mashed potatoes. Thinking of you, Deb, and hoping you feel better soon!


Buttermilk Mashed Potatoes
Adapted from Food Network
by Ina Garten
Serves 5 to 6

salt
1-1/2 pounds boiling potatoes
1/4 cup milk
4 tablespoons butter
1/2 cup buttermilk
salt and pepper, to taste

In a large pot, bring 2 quarts of water and 1 tablespoon of salt to a boil. Meanwhile, peel the potatoes and cut them into 1-1/2" cubes. Add them to the boiling water and bring the water back to a boil. Lower the heat and simmer uncovered for 10 to 15 minutes, until the potatoes fall apart easily when pierced with a fork.

Meanwhile, heat the milk and butter in a small saucepan, making sure it doesn't boil. Set aside until the potatoes are done. 

As soon as the potatoes are tender, drain them in a colander. Place a food mill fitted with a small dish/blade over a heatproof bowl. Pass the potatoes through the food mill, turning the handle back and forth. (Alternatively, you can use pass the potatoes through a potato ricer- which is the method I prefer and used for this recipe). As soon as the potatoes are mashed, stir in the hot milk mixture with a whisk or rubber spatula. Add enough buttermilk to make the potatoes creamy. Add salt and pepper, to taste. If needed, you can place the potatoes over a pan of simmering water for up to 30 minutes to keep them warm, adding a little extra hot milk to keep them creamy.


Sunday, January 14, 2018

Nigella Lawson's Very Versatile {and Delicious} Granola Muffins


This week I wanted to make Jamie Oliver's Granola Dust so I could use it in these muffins, but the week totally got away from me. Job searches, snow, ice, and having the kids home from school dominated most of my week. This makes me sad because it's Granola week at I Heart Cooking Clubs and granola is one of my favorite things.

Since I didn't make it to the store, I made my own granola dust by crushing up some Oats 'n Honey granola that I had in my pantry. This granola dust comes in handy to help make a batch of Nigella Lawson's very delicious, and very versatile, Granola Muffins. I made them and shared them back in 2010 (pictured below) and have thought about them fondly ever since.


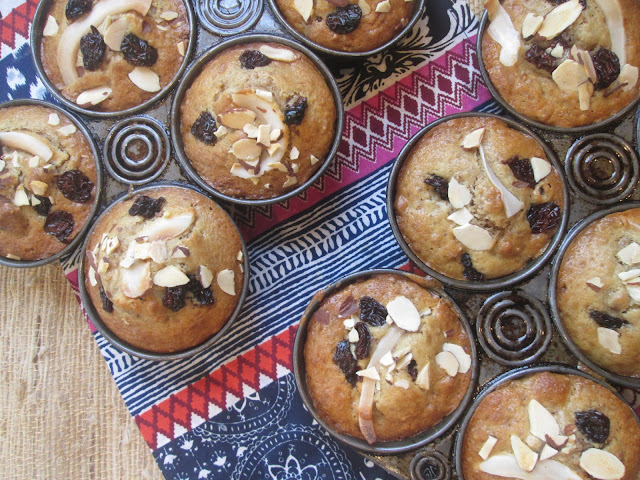
Back in 2010, I made a simple version of this muffin with oats 'n honey granola and a drizzle of honey on top. This time around, I'm using a much heartier oats 'n honey granola and decided to jazz things up a bit by adding in some dried cherries, sliced almonds, and coconut chips for flavor, texture, and color. I fell in love with these muffins 8 years ago and I am even more in love with them today. 

These muffins are so versatile and delicious. There are a full two cups of granola, along with a hefty dose of brown sugar, so you really get the flavor of both. I think these muffins would be great with a maple granola, cinnamon granola, and especially peanut butter granola (maybe a few chocolate chips too)! I've made the oats n' honey version twice and I must admit that I like this jazzed up version with the add in's even better. My favorite addition was the dried cherries, simply because of their chewy texture and pop of color.

These are the perfect treat to wake up to! I like to serve them with a drizzle of honey, but honey butter would be great as well. These muffins are great served with some fruit and/or yogurt and are a great grab-and-go breakfast. Try them and I bet you'll love them too!

Note: These muffins may vary in color depending on the granola you use. The version I made and shared here today was much darker than my original version. This is ok! Also, Nigella suggests baking these for 25 minutes. My first batch in 2010 took 28 minutes. This batch took 15 minutes (I think my new oven runs hot). Of course, muffin size plays a role in baking time, also. Check your muffins periodically to ensure they are baked to your liking.


Granola Muffins
Adapted from Nigella Lawson
Recipe found online New York Times Cooking
Makes 12 muffins

1-1/2 cups all-purpose flour
1 teaspoon baking soda
1/4 teaspoon salt
1 cup buttermilk
1 egg
3/4 cup light brown sugar
1/3 cup vegetable oil
2 cups granola
Optional: dried fruit, nuts, honey, etc.

Preheat the oven to 400F. Line a 12-cup muffin tin with paper muffin cups or grease the tins and don't use paper muffin cups (either one works). Combine the flour, baking soda and salt in a large bowl. In a wide-necked bowl, whisk together the buttermilk, egg, sugar, and oil. Pour this into the dry ingredients and mix lightly to combine.  Fold in the granola and mix lightly to combine. Fold in the granola and then divide the muffin mixture between 12 paper cups (or greased tins). Bake for 25 minutes, by which time they should have risen and become golden brown (mine baked about 15  minutes). Remove from oven, let cool, on a wire rack. 


Sunday, January 7, 2018

Tuscan Mashed Chickpeas {#Foodgoals}

I love the first few weeks of January when everyone is sharing their new year's resolutions. There is a certain kind of hope in the air. The kind that says I can do anything I set my mind to. You can almost feel the slate being cleared. A fresh start for everyone!

I always make several different types of resolutions. My biggest resolution this year has to do with my family. I've learned that if we want quality family time then we've really got to carve it out for ourselves, otherwise, life gets way too busy. This year our biggest goal is to spend more quality time together as a family (without phones or electronics).

For Stirring the Pot I set three #Foodgoals. The first is to share my mom's recipes in order to preserve them for the future. The second is to teach my daughter how to cook a few dishes and also to share her experiences. The last resolution should be simple, but it's something I just forget to do, and that is to share ALL of my dishes (even the dishes I don't put on my blog) on my Instagram page. This is just a fun resolution so that I can look back over the year and see everything I made all in one place. I'm looking forward to sharing all these kitchen adventures with you and know that I am much more likely to stick with these resolutions if I share them with you!

This week I'm lightening things up with this healthy Tuscan Mashed Chickpea dip. If you've followed me here for anything length of time, then you know that hummus is a real favorite of mine. Now, I'm not suggesting that hummus isn't healthy, because it definitely can be. What I am going to say is that it can be full of oil and/or tahini which makes it a bit heftier in the calorie department.

These Tuscan Mashed Chickpeas are mashed with chicken broth instead of oil and are therefore noticeably lighter than your traditional hummus. Now, Ina does tell you to drizzle oil here and there and you can do that and feel good about it. I chose to drizzle just a tiny bit to keep things light. 

Think of this as a fresh alternative to hummus, chunky in texture and bright in flavor. I personally loved the touch of tomato and Parmesan cheese and found it to be a welcome change. You can certainly serve this on grilled country bread, but I enjoyed this best with some Triscuit crackers and also with carrots and celery. I think this would be great served in lettuce cups or wraps and I also think this would make a great spread for a sandwich! I'd definitely make it again.


Tuscan Mashed Chickpeas
by Ina Garten
Serves 6-8

2  (15.5 ounce) cans chickpeas
1/2cup chicken stock
3 tablespoons olive oil, plus extra for serving
2 ripe medium-size tomatoes, seeded and small-diced
1/4 cup freshly grated Parmesan cheese
3 tablespoons minced fresh flat-leaf parsley
2 tablespoons freshly squeezed lemon juice
salt and pepper, to taste
To serve: grilled country bread, crackers, and/or veggies

Pour the chickpeas into a colander and rinse them under cold running water. Drain well. Place the chickpeas in the bowl of a food processor fitted with the steel blade. Add the chicken stock and pulse until the chickpeas are coarsely chopped but not pureed.

In a medium saute pan, heat the 3 tablespoons of olive oil over medium heat. Add the tomatoes and saute for 3 to 4 minutes until the tomatoes are softened. Add the garlic and cook for 1 minute more. Add the chickpeas, stirring to combine with the tomatoes and garlic. Cook for about 5 minutes, stirring occasionally until heated through. Off the heat, stir in the Parmesan, parsley, lemon juice, salt and pepper and taste for seasonings. Pile in a serving bowl, drizzle with olive oil and serve warm or at room temperature.

IHCC: Lighten It Up!

Thursday, January 4, 2018

Top Ten Favorites of 2017

Two thousand seventeen was delicious, but these are the recipes that were held in the highest regard, requested repeatedly, and created more than once. They are in no particular order, but there was one surprise favorite that reigned out above all the rest.

Click on the recipe titles to be directed back to the original post and feel free to leave a comment with your favorite recipes from 2017!

Let's get started!
 
  Winter Citrus Tart with Rosemary Whipped Cream
 Sometimes the recipes you're not quite sure about are the ones that make the biggest impression. I wasn't sure about pairing oranges with puff pastry, but I was won over by the beauty of the dish, so I decided to make it. It was love at first bite! A juicy and fresh citrus tart with bright flavors layered on a light and flaky buttery crust...so dang good! Best of all, this is SO easy and can be thrown together in a matter of minutes, with ingredients that are very easy to keep on hand. Do yourself a favor and make it this winter. I guarantee you will love it!

Ravioli with Balsamic Brown Butter
I still remember the day I took these leftovers to work. I put my container in the microwave and within seconds the nutty aroma of the balsamic brown butter filled the air. EVERYONE was lured in by the scent and several people were standing over my shoulder. Soft, fluffy, cheese-filled ravioli with a nutty brown butter sauce and crunchy toasted walnuts...it's heavenly. It's so heavenly I wrote it a love letter.
This brunch dish is a flavor and texture explosion. Oozing yolk meets crunchy herbeaceous breadcrumb topping and that's just the beginning. This is a dish that belongs on everyone's brunch menu.

Engagement Roast Chicken {aka The Very Best Roast Chicken}
This is THE BEST ROAST CHICKEN recipe is the history of ever! No other words necessary.

Anytime I make a cheese sauce containing flour it is usually slightly grainy - not this one! Try this recipe, and buy a really good English Cheddar, and prepare for your mind to be blown. This is one luscious and velveety cheese sauce. You will be slathering it over everything.

I doubted this recipe a couple times along the way, but my oh my...this is hands down the very best tomato sauce I've ever had. Maybe I had some really great homegrown tomatoes or maybe it was roasting the tomatoes that made it so good. Either way, this was hands down the best and will be my one and only in the future.
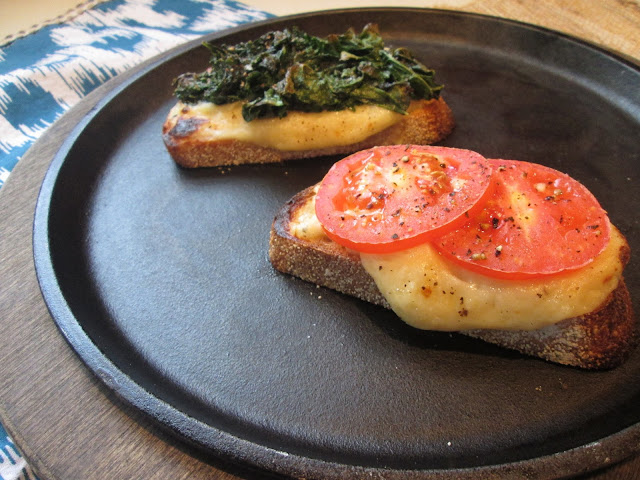
If I had to chose my top favorite recipe of 2017, this Butternut Squash & Ricotta Bruschetta would be the ultimate winner! Crusty and creamy, spicy and sweet, it strikes the perfect balance for me. Suprise yourself in the best way possible and make this dish asap. Your tastebuds will thank you!
 Cavatappi with Kale Ragu
 Put down the Pasta Bolognese. This Cavatappi with Kale Ragu will blow that bolognese right out of the park. If you're under the impression that kale ragu cannot compete with a hearty meat sauce then you're definitely wrong! This kale ragu is cooked down with some Parmesan cheese, onion, garlic, and red pepper flakes and it has a glorious way of turning pasta into a majorly satisfying and comforting meal. I like this dish so much I've tried several versions, all just as delicious as the last.
 
Who doesn't love twice-baked potatoes? Who doesn't love mini food? These Mini Twice-Baked Potatoes may be a labor of love, but they are a welcome sight at the dinner table and are sure to bring smiles to all. Ignore the chores and make these instead. All hearts deserve some good old-fashioned comfort food like mom and grandma used to make.
Last, but not least, if you love all things spicy, then this Green Chie Whipped Cream Cheese is good on just about anything! I used a spicy serrano for this recipe and the heat level was perfect for us. Heat isn't the only flavor here, there is a fair amount of garlic, which makes this one flavorful spread. We enjoyed this spread on some of our favorite bagels from Panera and everyone swooned with delight. This spread disappeared in record time and has been requested repeatedly.
I can't wait to see all the tasty dishes in store for 2018! Happy New Year to all!
www.dreamstime.com