Thursday, October 27, 2011

Midnight Milky Way Bar Sauce

Happy Halloween weekend everyone!  We absolutely love this time of year in my house.  We have a full schedule this weekend, including carving pumpkins, going to the yearly Thriller event downtown, and lots of trick-or-treating.  Our small town has trick-or-treating for the kids downtown Friday afternoon, then we're going to Boo at the Zoo, followed by trick-or-treating in the neighborhood.  Wish me lots of luck keeping up with the kids! 

As a special treat before our big Halloween weekend, I made a chocolate sauce using Midnight Milky Way Bars. The rich dark chocolate of the Midnight Milky Way is fantastic when melted down into the cream and goes fantastic with vanilla ice cream.  However, the genius of this recipe (especially this time of year) is that you could use just about any candy bar with equally fantastic results.  I see a lot of candy bar sundaes in our future!

Midnight Milky Way Bar Sauce
Adapted from Apples for Jam by Tessa Kiros
Makes 2 cups

Tessa says, "This is a wonderfully rich and good-and really quick to make in an emergency.  We like it dribbled down the side of a milkshake or slightly warm over ice cream, so that the cold makes the caramel set just slightly.  When the pan is left covered on the stove or in the fridge, everyone goes with a teaspoon and takes out a healthy scoop, and the marks of the diggers clearly remain."

1 cup heavy whipping cream
5 (2-ounce) Milky Way Midnight Bars

Pour half the cream into a heavy-bottomed pan and heat gently.  Coarsely chop the Midnight Milky Way bars and add to the pan, stirring all the time with a wooden spoon, until they are completely melted.  Make sure that the cream is not too hot and that nothing gets stuck on the bottom of the pan, which would ruin your chocolate.  When everything is nearly all melted together, add the rest of the cream, and whisk to break up the soft lumps.  Remove fro the heat and carry on whisking until the sauce is completely smooth.  cover when it has cooled a bit.  Serve warm or even at room temperature, but store in the fridge if you don't finish it all.  Even a teaspoon of it cold or at room temperature is great for lifting the spirits.
Theme: Harvest Moon


HAPPY HALLOWEEN!

Thursday, October 20, 2011

Risotto with Fried Egg

When I think of peasant food I always think of the most delicious and comforting dishes.  Recipes born out of necessity that stand the test of time, passing from one generation to the next.  I think mostly, for me, the very definition of peasant food is making something with what you have on hand.  Now that might not sound appealing to some; but, to people like us (who love food) we know that making something delicious with what we have on hand is the sign of a good cook.  It's the true test.  And, quite often, it's these recipes that are the most well-loved of all.


Take Tessa's recipe for Risotto with Fried Egg for example.  It's a very basic dish using ingredients that everyone is sure to have on hand, but it is the method with which it is put together that is exciting, fresh, and something I'm quite sure everyone would be pleased to eat.  Creamy cheesy rice, with crispy fried sage leaves, and a nice egg with a runny yolk so that it can drip down into the rice.  Total comfort food!  Better yet, it would be great served for breakfast, lunch, or dinner. 
 Risotto with Fried Egg
Adapted from Apples for Jam by Tessa Kiros
Serves 4

 Tessa says: "These are all the things my family loves - white risotto, egg, Parmesan - on one plate.  The egg yolk must be soft when you serve it so that it can drip into the rice, and we like the white to be golden and frayed around the edge."

3 tablespoons butter
 4 tablespoons olive oil
2 shallots, chopped
1-2/3 cup risotto rice
1/2 cup white wine
4 cups hot vegetable broth
freshly grated nutmeg
salt 
1/2 cup grated Parmesan cheese
about 8 fresh sage leaves
4 eggs
grated Parmesan and black pepper, to serve

Heat half the butter and 2 tablespoons of oil in a heavy-bottomed pan suitable for making risotto.  Saute the shallots over low heat until light gold and then stir in the rice with a wooden spoon.  Stir for a few minutes to completely coat the rice and let it cook just a bit.  Add the wine, and when that has evaporated, add all of the broth.  Add a few good grinds of nutmeg and taste for salt.  Simmer uncovered over high heat for about 15 minutes, or until the rice has absorbed much of the liquid.  If it seems as if it needs a bit more liquid, add some hot water.  Remove from the hat and stir in the remaining butter and the Parmesan.  Taste for salt, adjusting if necessary.  Leave with the lid on so that the steam continues to cook the rice.

Heat the remaining oil in a large nonstick frying pan and briefly fry the sage leaves until crisp.  Remove with tongs.  Gently break the eggs into the pan and sprinkle a little salt on the yolks.  Cook until the edges of the white are a bit golden.  Cover the pan with a lid and fry until the yolks are just slightly opaque on the surface but still soft inside (they are best when the undersides are golden and a bit crisp).  

Scoop rice onto serving plates and top each serving with an egg and a couple of sage leaves, being careful not to break the yolk just yet.  Serve with a sprinkling of Parmesan and a few grinds of black pepper for those who want it.

Theme: Peasant Food

Friday, October 14, 2011

Pear Berry Crisp and Vacation!

As you're reading this, my family and I are in the air heading south to Orlando, FL.  We're on our way to go see Mickey and the gang and celebrate the Halloween season in style for the next week and half.  There's going to be lots of amusement parks, lots of walking, lots of good food, and I'm sure we'll empty a few wallets along the way (my husband has a running joke that Disney is more expensive than going to Paris).  We have a very tight schedule, with lots to see and do, and I probably won't be around for the next few days.  I do promise that I'll have lots of pictures to share.

Before I left I made a Pear and Blueberry Crisp for our From the Orchard theme at I Heart Cooking Clubs.  Pears are one of my favorite fruits and I realized that I just don't devote very much time to them in the kitchen.  After eating this crisp, I will do my best to remedy that situation. 
 

Pear and Blueberry Crisp
Adapted from Apples for Jam by Tessa Kiros
Serves 8

3 large pears
1 cup blueberries
1/3 cup sugar
1-2/3 cups all purpose flour
1/4 cup firmly packed light brown sugar
1/4 pound plus 3 tablespoons butter, softened
1 teaspoon vanilla extract
Preheat your oven to 375F.  Generously butter a 14 by 8-1/2 by 2-1/2 inch ovenproof dish.  Peel, core, and slice the pears, and put them in the dish.  Mix in the berries and scatter half the superfine sugar over the fruit.

Mix together the flour, brown sugar, and the other half of the superfine sugar in a bowl.  Add the butter and vanilla and rub them in with your fingertips, working until the mixture isn't smooth but looks like  damp clustery sand.  Your fingers might be tired. 

Scatter the topping over the fruit to cover it completely in a good thick layer.  Bake for about 45 minutes, or until the top is nicely golden and some berry juice has oozed up a bit over the crust and darkened it here and there.

Let it cool down a touch and then serve warm with whipped cream, a bowl of custard, or vanilla ice cream.
Theme: From the Orchard


See ya real soon!

Wednesday, October 12, 2011

The Slow Cook Book Recipe #1: Mustard Chicken Casserole

I received this cookbook, The Slow Cook Book, a little over a month ago and I was really taken with it.  It's certainly not your average slow cooker book with all the traditional recipes.  It's more of a slow cooking gone gourmet kind of book.  There are your average types of chapters such as soups, stews, casseroles; but, the recipes are anything but average.

After looking through the book, and marking way too many recipes, I decided it was time to break out my slow cooker and start cooking with it more.  For the next few weeks, I'll be featuring some slow cooking recipes from The Slow Cook Book.   

Now, after saying all that, the first recipe I chose was one of the more traditional recipes in the book; but, I simply couldn't pass it up....Mustard Chicken Casserole
The recipe calls for chicken thighs, but I'm sure you could use whatever you have on hand.  The chicken marinates in a mixture of whole-grain mustard, English mustard, and honey for at least 30 minutes, longer if possible.  After marinating, the chicken is cooked in a skillet until golden.  Using the same pan the chicken was cooked in, you saute onions and parsnips until golden.  After that, everything is placed in the slow cooker and that's it.  Easy peasy.
 Mustard Chicken Casserole
Adapted from The Slow Cook Book
Serves 4-6

2 Tbsp. whole-grain mustard
1 Tbsp. English mustard
2 Tbsp. honey
8 bone-in chicken thighs, skin on
salt and black pepper
2 Tbsp. olive Oil
2 onions, roughly chopped
10 oz. parsnips, peeled and roughly chopped
few sprigs of thyme
2 cups hot vegetable or chicken stock
bunch of flat-leaf parsley

Note: I omitted the parsnips because I couldn't find them in the store. I served the chicken over boiled and buttered baby potatoes instead.

Mix the mustards together in a bowl and stir in the honey.  Season the chicken thighs well with salt and pepper, then smother them with the mustard mixture.  Cover and leave to marinate for 30 minutes, if time permits.

Preheat the slow cooker.  Heat half the oil in a large Dutch oven over medium-high heat and add the chicken pieces, a few at a time.  Cook for 6-10 minutes until golden-be careful, because the honey may cause them to blacken quickly.  Remove and set aside.

Heat the remaining oil in the pot over medium heat, add the onions, and toss them around in the pot to coat in any juices.  Stir to scrape up the sticky bits from the bottom, then add the parsnips and thyme.  Transfer everything to the slow cooker, pour in the stock, and add the chicken pieces.  Season, cover with the lid, and cook on auto-low for 6-8 hours or on high for 3-4 hours.  Add the parsley, taste, and season, if necessary.  

Notes/Results:  This chicken dish was so good that I simply couldn't get pictures of it fast enough.  The chicken was nice and tender and had a wonderful mild flavor without any overwhelming mustard flavors.  Everyone in the house declared it a winner, including the kids, and it was gobbled up in one serving.

I am submitting this to my friend Michelle of Ms. enPlace for her See Ya in the Gumbo event.

Monday, October 10, 2011

Cookbook Review: Ellie Krieger's Comfort Food Fix

It's that time of year again when we are all craving our favorite comfort foods and Ellie Krieger's  Comfort Food Fix couldn't have come at a better time.  Full of healthy comfort food recipes, Ellie's book is a treasure trove for anyone wanting to have their cake and eat it too. 

In Ellie's newest book, you will find 150 recipes to suit your every craving.  From Honey-Crisp Oven-Fried Chicken, to Country Fried Steak with Gravy, to something both decadent and chocolatey for dessert. You will really feel like you are truly indulging in your favorites, but without all the guilt.

The book is hardbound and has 304 pages with lots of beautiful photographs.  The chapters, along with some of the recipes I'd like to try are:

Chapter 1: Breakfast, Brunch and Bakery: Crispy French Toast Fingers with Blueberry Maple Sauce and Ellie's Honey Whole-Wheat Cinnamon Raisin Bread

Chapter 2: Snack and Starters: Five-Layer Mexican Dip with Chili Tortilla Chips and also Sesame Whole-Wheat Soft Pretzels, plus the "Everything" Parmesan Crisps

Chapter 3: Soups and Sandwiches: Broccoli-Cheddar Soup

Chapter 4: Meat Main Dishes: Horseradish, Cheddar and Caramelized Onion-Stuffed Burgers

Chapter 5: Poultry Main Dishes: Chicken Alfredo with Zucchini Ribbons, Spicy Chicken Fried Rice with Peanuts, Cincinnati Turkey Chili, and Chicken and Biscuit Potpie

Chapter 6: Seafood Main Dishes: Crispy Crab Cakes with Creamy Chili-Garlic Dipping Sauce

Chapter 7: Vegetarian Main Dishes: Autumn Vegetable Curry

Chapter 8: Sides and Salads: Herbed Squash Casserole, Rustic Mashed Potatoes with Blue Cheese, and Corn and Cheddar Spoonbread

Chapter 9: Desserts: I really want to try all the desserts, but I've narrowed it down to her Pumpkin Pie with the Better Basic Pie Crust for now.

First up, I made the Crispy Beef and Bean Tacos.  Ellie uses a lean ground beef and adds black beans to the taco filling.  As a bean lover, this is something that I've done before BUT the one thing I haven't done before is to make my own taco shells.  Instead of frying the taco shells, she brushes them with a little oil and bakes them in the oven like this:

As the tortillas bake, the sides drape down further creating a flat-bottomed taco shape.  My 10 year old daughter thought this was the coolest thing ever and I have to admit that I did too.
These Crispy Beef and Bean Tacos really hit the spot and everyone loved the oven-baked shells.  With flavorful toppings like tomato, red onion, romaine lettuce, cilantro and a little bit of cheese, these tacos rang in at 340 calories for two.  I would, and will, definitely make these again.
 Next up, and completely heavenly, were these Honey-Crisp Oven-Fried Chicken Thighs.  Meaty, tender, succulent chicken thighs are soaked in buttermilk for up to 4 hours and then brushed with honey and coated with crushed cornflakes, seasoning, and baked to perfection.  
I was incredibly impressed with this recipe.  Since the chicken thighs soaked in the buttermilk for 4 hours it was incredibly moist and tender.  The honey provided a touch of sweetness and the cornflake crust was very crunchy.  You could even hear the crunch when you took a bite!  My Mom and I were bowled over with this recipe. This is a recipe that will go into regular rotation here at my house. With very little fat, lots of protein, and only 330 calories per thigh, this is a good thing!
Did you know that you could have Country Fried Steak with Gravy with Smooth and Creamy Mashed Potatoes and not feel guilty?  Yep, it was news to me too!  I had no idea that cubed steak was already a lean cut of meat.  With a mixture of whole wheat and all purpose flour, these cube steaks are double-dipped to create a thick coating around the steak.  The gravy was nice and creamy and went perfectly with the Smooth and Creamy Mashed Potatoes (which by the way were made with only 1 tablespoon of butter in the whole batch).  A down-home comfort food dinner that is delicious and healthy, with about 610 calories total.


Paper Bag Popcorn was a fantastic, easy, and no-fuss snack that we enjoyed and will continue to enjoy for years.  In fact, I wish I'd known that you could make popcorn in the microwave using a paper bag earlier. I would have definitely saved lots of money on microwave popcorn.  Additionally, this paper bag popcorn can be seasoned with whatever seasoning blend you chose, from savory to sweet, and is only 100 calories per serving compared to 170 calories per serving out of the microwave bag.

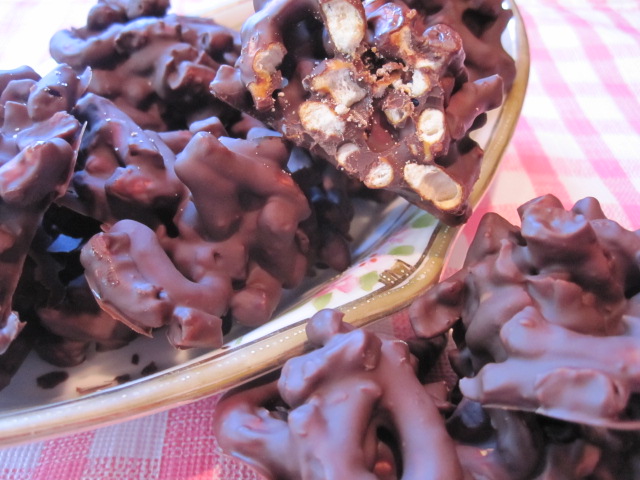
However, being the chocoholic I am, it was these Dark Chocolate Pretzel Clusters that totally grabbed my attention when first paging through the book and it was these Dark Chocolate Pretzel Clusters that were my very favorite recipe I tried.  Goodness gracious these things are good!!  Chocolatey, crunchy, and salty, they are so ultra satisfying.  The best part is that they really couldn't be any simpler to make.  Just two easy ingredients.

Dark Chocolate Pretzel Clusters
Adapted from Comfort Food Fix by Ellie Krieger
Makes about 12 (I got 15)

Ellie says: "Chocolate with a salty crunch is all the rage now - even the mass market candy makers have caught on.  but some of us are long-time devotees.  Dark chocolate-covered pretzels have been a favorite of mine since childhood, so when I found myself with a bag of broken pretzels what else could I do but smother them in the best quality chocolate and turn them into a mouthwatering candy cluster."

4 ounces any shape thick-style salted pretzels (I used normal-sized twists)
6 ounces dark chocolate (60-70% cocoa solids), chopped

Note: I used Lindt brand chocolate 
Note:  I sprinkled a tiny dash of salt into the mixture as it melted
Line a baking sheet with wax paper.  Put the pretzels into a sealable plastic bag and crush them with a rolling pin or mallet into about 1/4-inch pretzel pieces.
Place the chocolate in the top of a double boiler set over barely simmering water.  Make sure the bottom of the pan does not touch the water.  Melt the chocolate, stirring frequently, about 1 minute.  Remove the pan from the heat.  Add the pretzel pieces to the chocolate and stir until well coated.  

Scoop heaping tablespoon-size stacks of the chocolate-covered pretzel pieces onto the prepared baking sheet.  Place the baking sheet in the refrigerator and allow to cool and set, about 20 minutes.  Store and serve at room temperature.

Serving size: 1 piece
Per serving: Calories 110; Total Fat 5g (Sat Fat 3g; Mono Fat 0.1g, Poly Fat .1g); Protein 2g; Carb 16g, Fiber 2g, Cholesterol 0mg; Sodium 130mg


I've always been a huge fan of Ellie Krieger's recipes.  I find that her recipes are always well-tested and extremely well-written.  In fact, in all the Ellie recipes I've tried I've never come across a bad recipe.  I've come to count on Ellie's recipes and believe that they are very tried and true.  I was super excited to see that Ellie had a third book coming out and even more excited when I learned that it had to do with comfort food.  I raced to the store and bought the book on the day it came out.   

If you like comfort food and are concerned about eating healthfully, then this book is for you.  I think you'll be very pleased with your purchase.

Disclosure: I bought and paid for the book on my own. All opinions are my own.

Sunday, October 9, 2011

Greek Yogurt with Sweetened Condensed Milk and Oranges


We really enjoy yogurt parfaits and when I saw this recipe for Greek yogurt with condensed milk I knew it would be a winner.  I knew the sweet, thick, syrupy condensed milk would make for a delicious add-in to greek yogurt and I was really excited to give it a try.

This sunny breakfast parfait is really reminiscent of an orange creamsicle and is so silky, luxurious, and creamy that it can easily double as dessert.   You  will really feel like you're indulging in something sinful and delicious and you will be so sorry when you reach the end of the glass.

Orange juice and orange zest are mixed with sweetened condensed milk and then stirred into Greek yogurt to make a very thin mixture.  Once that mixture sets up for a few hours in the fridge it gains thickness and takes on the texture of a light pudding. With some pretty orange wheels for garnish and a little sprinkling of orange zest on top it is pure heaven.  We absolutely loved this and I can't wait to make it again.


Greek Yogurt with Condensed Milk and Oranges
Adapted from Apples to Jam by Tessa Kiros
Serves 4

Tessa says: "The basis of this recipe was given to me - thank you, Ioanna.  I added the oranges, but you might like to add another fruit.  I sometimes use blood oranges, sometimes ordinary.  Whatever sort you use, make sure they are sweet as sweet.  You could actually serve this with any other fruit you like, keeping the orange juice and rind for mixing into the yogurt, and then spooning this over any other cut fruit - bananas, mangoes, plums would be beautiful..."

2 whole oranges or blood oranges
sugar (optional)
1/2 cup sweetened condensed milk
finely grated rind and juice of 1 small orange
1-1/4 cups Greek yogurt


Use a small sharp knife to cut away the skin of the oranges, leaving no pith.  Slice the oranges into substantial wheels, maybe 1/4 inch thick, and then halve those.  Put the cut slices in a bowl to collect their juice.  If you don't think they're very sweet, sprinkle a tablespoon or so of sugar over them.

Put the condensed milk, half of the orange rind, and 5 tablespoons of the orange juice in a pouring cup (you can drink the rest of the orange juice).  Slowly mix this into the yogurt, bit by bit.  Cover and put in the fridge for a couple of hours until it has set to a very soft and creamy pudding.  Serve a few orange slices with a dollop of the yogurt, some juice dribbled over the top, and a tiny hill of leftover rid, just for extra color. 


Theme: Potluck


Tuesday, October 4, 2011

Ham and Cheese Sliders, Bacon and Cheddar Deviled Eggs, and a Quick Idea for Fruit Salad

I'm not quite adept yet when it comes to entertaining.  Serving my family dinner is one thing.  Serving a large number of people is quite intimidating.  For one, I'm incredibly shy which doesn't help matters.  Secondly, I worry way too much.  What if my guests don't like what I'm serving?  What if there's not enough?  What if it's cold by the time it gets to the table?  Believe me, if there is something to fret over I'll do it.  So, when planning my Eggland's Best Pink Party & Brunch, I concentrated on making things easy.

First and foremost, I wanted all the food to be able to be served room temperature.  I didn't want to worry about keeping food hot.  Once I determined that I wanted everything to be served at room temperature I started planning the other details.  I wanted the food to be as pink as possible.  I also wanted to keep things as light and easy as possible.  I'm always a fan of finger foods so I decided to try and chose recipes that can, for the most part, be eaten out of hand. 

These delicious ham and cheese sliders met all my criteria and I after seeing them all over pinterest, I was so happy to get the chance to make them.  The recipe couldn't be any simpler.  Either make or buy some fluffy white rolls, layer them with honey ham, swiss cheese, and a quick smear of mayo and place into a baking dish.  Whip up a batch of poppyseed sauce (consisting of butter, mustard, Worcestershire sauce, and a bit of onion) and pour over the rolls.  Bake the sandwiches until the cheese starts to melt and the sauce oozes down the sides of the rolls. The recipe (and a truly mouth watering photo can be found HERE).
Deviled eggs are always such a hit at any party and I knew I wanted to serve them.  My struggle was trying to add a bit of pink to them.  Using smoked salmon crossed my mind, but I didn't know how my guests felt about fish so I kept looking up different recipes.  I finally stumbled across this recipe for Bacon and Cheddar Deviled Eggs on Allrecipes.com.  These are your standard deviled eggs with just a tad of chopped bacon and shredded cheddar cheese added in.  These eggs were a hit, but my family and I agreed that we still like the good old standard deviled egg a little better.


Lastly, I knew I wanted to have something really colorful, fresh, and vibrant to put on the table so I went with a fruit salad.  I struck it rich in the produce department and was able to find beautiful ripe kiwi, starfruit, and passion fruit (all of them pretty rare finds in my neck of the woods).  I decided to do an exotic twist on traditional fruit salad using the passion fruit pulp as a dressing of sorts.  I added strawberries, pineapple, cantaloupe, grapes, blueberries, plums, kiwi, and starfruit to my platter and garnished it with halved passion fruit to use as a topping. If you want to eat the rainbow, this is for you.

I had so much fun hosting the party and was honored to help raise awareness for the fight against breast cancer.  A huge thanks to Eggland's Best for making it all possible! 

Be on the lookout for more Eggland's Best Pink Parties coming this month.

Sunday, October 2, 2011

The Homesick Texan's Strawberry Sheetcake & The Eggland's Best Giveaway Winner!!

This Strawberry Sheetcake is so rich, thick, dense, and satisfying that one little piece is all you need to satisfy your sweet tooth.  The strawberry flavor is perfectly balanced.  It's neither too sweet or too subtle, but just right.  The cake itself has a wonderful thick texture with a lot of body to it.  And, let's not forget the frosting on the cake....a creamy pink strawberry cream cheese frosting.  As far as I'm concerned it really doesn't get any better than cream cheese frosting, especially if that cream cream frosting is pink with little chunks of strawberries running through it and just a hint of lime to wake things up a bit.

I made this cake for my Eggland's Best Pink Party in honor of Susan G. Komen for the cure.  While this cake would be great for any pink party, it would also be great for a little girl's party, or any other party where you need to serve a large number of guests.   I imagine it would be even better at the height of strawberry season.
 
Strawberry Sheetcake
Borrowed from Lisa Fain/Homesick Texan
Serves 16 (at least)

12 oz fresh strawberries, stems removed and chopped (about 3 cups)
2 cups of sugar plus 2 teaspoons
2 cups of flour
2 sticks of butter (1 cup)
2 eggs lightly beaten
1/2 cup of buttermilk
1 teaspoon of baking soda
1 teaspoon of vanilla

Method:
Over the chopped strawberries, sprinkle 2 teaspoons of sugar and 1/4 cup of water. Let them sit for an hour at room temperature so they can release some of their juices. The berries should reduce to about 1 1/2 cups. In a blender of food processor, crush the berries on a low speed for a few seconds—you want them juicy but still with some texture. Take 1/2 cup of the strawberry mixture for the frosting and leave the remaining crushed strawberries for the cake.

Preheat oven to 400 degrees.

Sift the sugar and flour together in a bowl.

Melt the butter on low in a saucepan and then whisk it with the eggs, buttermilk, vanilla and baking soda. Add the liquid to the flour and then stir in one cup of the crushed strawberries.

Pour batter into greased 9x13 inch pan and bake for 20-25 minutes. Cake is done when a knife comes out clean from the center. Let it cool and then frost with the strawberry cream cheese frosting (recipe below).

Note: The cake will be a little brown. This, I hear, is because of the alkaline reaction of the ingredients. Do not be alarmed!

Strawberry Cream Cheese Frosting
1/4 pound of butter (1 stick) at room temperature
8 ounces of cream cheese at room temperature
3 cups of powdered sugar
1/2 cup crushed strawberries
2 teaspoons of lime juice (about half a lime)
1/4 teaspoon lime zest
1 teaspoon vanilla extract

Method:
Whip together the cream cheese and butter until smooth. Slowly add the powdered sugar until blended. Add the strawberries, lime juice, lime zest and vanilla. Spread over cooled cake.

Note: Depending on how juicy your berries are, your icing may be runnier than usual. If this is the case, I'd add more cream cheese to thicken it up.

Note: The strawberry cream cheese frosting makes quite a bit and could easily be cut in half depending on how thick you like your frosting.  While I did love the frosting I found that I only needed to use about half  to frost the cake. 
 

The winner of the Eggland's Best Giveaway is Mimi of Mimi's Kitchen!  Congratulations Mimi!
I will contact Eggland's Best and have them send out your prize package.