Showing posts with label soup. Show all posts

Sunday, September 14, 2025

Half Baked Harvest's Creamy Gnocchi Soup with Rosemary Bacon!


Ironically, when i was chopping the vegetables and stirring the soup I was thinking, "This would be a really good soup to have on hand if you were sick." Little did I know that not even two days later I'd get diagnosed with Flu A, followed by pneumonia.

I suppose I timed the making of this soup just right because it was a really good soup to have on hand now that I was sick as a dog.

Full of chopped veggies: onions; kale, carrots, celery, and garlic and swimming in a creamy broth with soft pillowy gnocchi it was healing and comforting and just what the doctor ordered. I loved the crunch of the rosemary bacon on top and I even added in some leftover rotissierre chicken to make it more substantial. 

I would definitely make this again, but I would use chicken broth in lieu of vegetable broth only because I prefer it. But, that is the beauty of cooking. You make it your own. 

Stay healthy and wash your hands! Apparently flu season has come early! 

Creamy Gnocchi Soup with Rosemary Bacon

Adapted from Half Baked Harvest

by Tieghan Gerard

Serves 6-8

4 slices thick but bacon, chopped

1 tablespoon fresh chopped rosemary

2 tablespoons extra virgin olive oil

1 yellow onion, chopped

6 carrots, chopped

4 celery stalks, chopped

2-4 cloves garlic, minced or grated

2 tablespoons fresh thyme leaves or 2 teaspoons dried

1 tablespoon dried basil

1-2 teaspoons fennel seeds, to your taste

1 pinch crushed red pepper flakes

salt and balck pepper

2 tablespoons butter

 2 tablespoons all-purpose flour

4-6 cups vegetable broth

4-6 cups roughly chopped kale

1-1/2 cups canned coconut milk, heavy cream, or whole milk

1/2 cup grated Parmesan or Asiago cheese, plus more for serving 

Cook the bacon in a large dutch oven over medium heat until crisp, about 5 minutes. During the last minute of cooking, add the rosemary. Remove the bacon. If there's excess bacon grease, drain off all but 1 tablespoon. Add the olive oil and onion and cook 5 minutes, until golden. Add the carrots, celery, garlic, thyme, basil, fennel, crushed red pepper, and a pinch each of salt and pepper. Cook another 5 minutes, until very fragrant.

Stir in the butter and flour, cook 1 minute. Add 4 cups of broth. Simmer over medium heat for 20 minutes, until the carrots are tender. About 10 minutes before serving, stir in the kale, cream/milk, Parmesan, and gnocchi. If the soup is too thick, add additional broth.

Serve the soup topped with the rosemary bacon and Parmesan. Enjoy warm, preferably with a crusty piece of bread. 

It's Officially Soup Season @ IHCC!
 

Friday, July 4, 2025

Southern Summer Series: Just A Few Miles South #6: Whitesburg Soup Beans and Buttermilk Cornbread!

Every summer I like to chose a cookbook or a special focus and do a summer cooking series. Some of the summer series that I've done in the past are: popsicles; ice creams; cookies; salads; and healthy recipes. One series I've always wanted to do is a series of southern summer recipes. So, this summer I chose a local cookbook from James Beard Nominee, Ouita Michel. Each week I will be cooking recipes from Ouita's Just A Few Miles South Cookbook

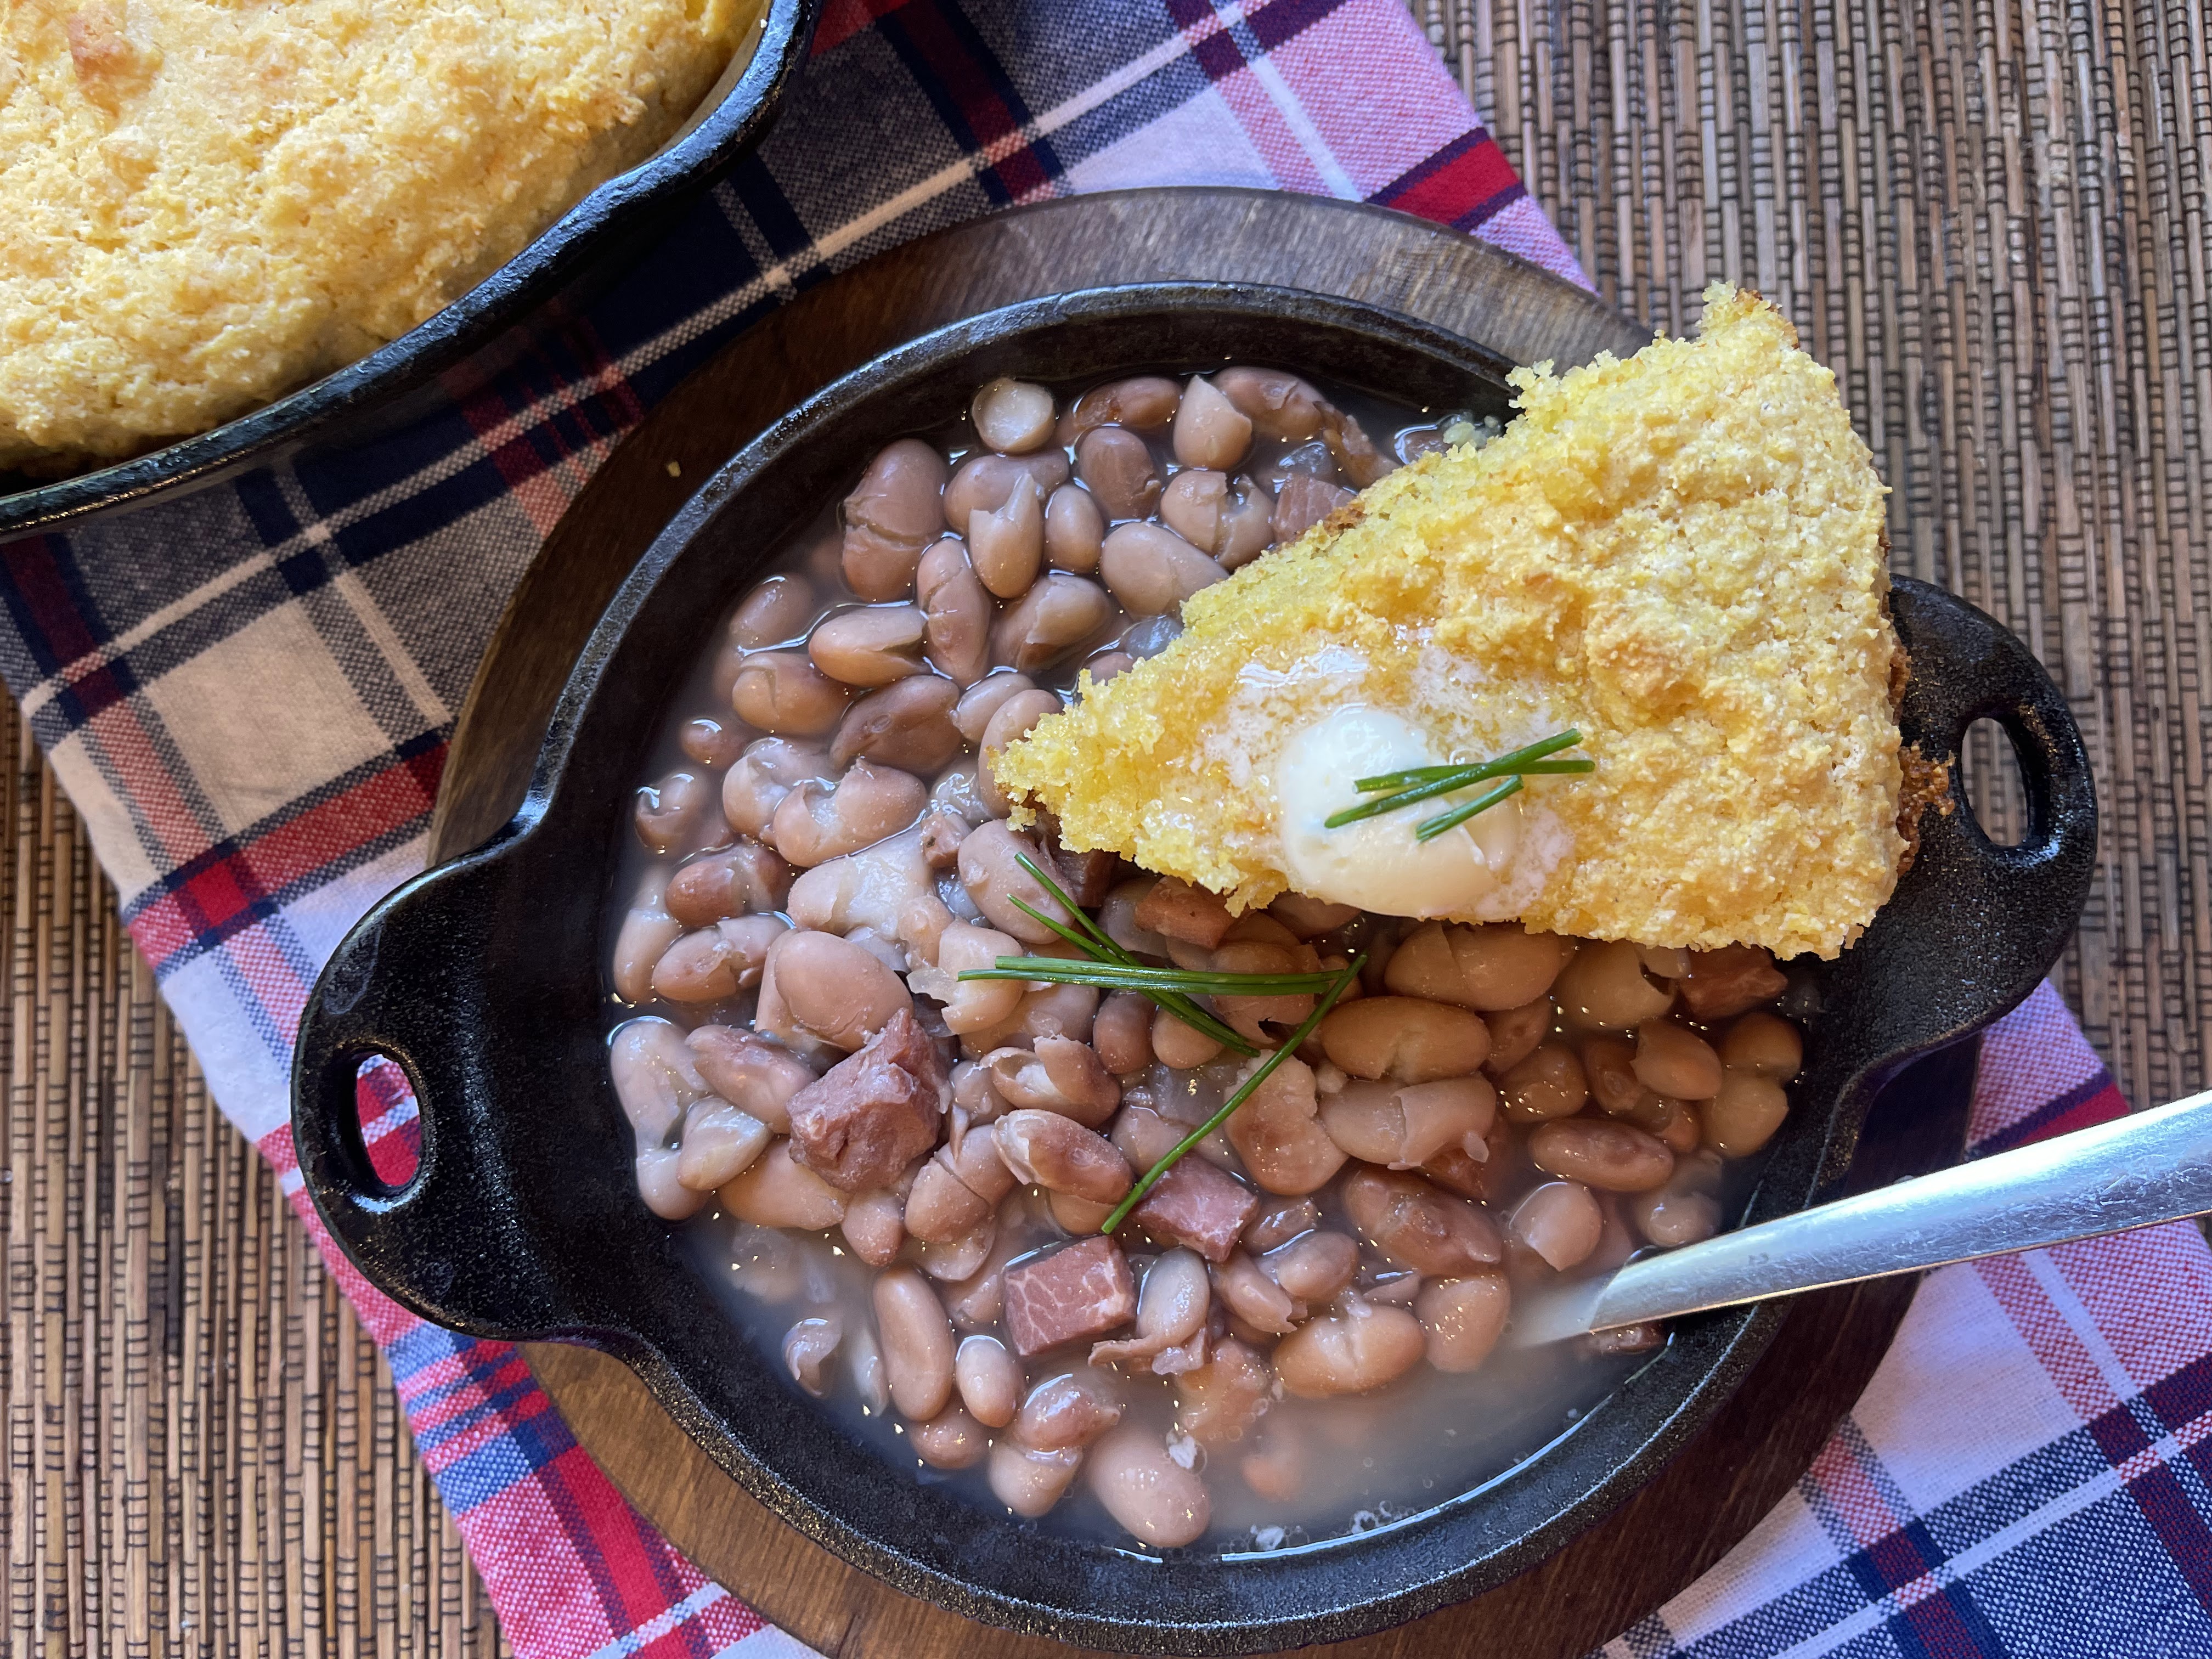
We're over halfway through with our Southern Summer Series, which is kinda sad because that means that summer is a little over halfway over. But, things are still delicious so that's good. This week we have a Kentucky staple from the hills of Appalachia, Whitesburg Soup Beans and Buttermilk Cornbread.

This is complete and total comfort food and it's really not all that unhealthy either. 

The beans take about 7 hours, four to five hours to soak and then another two hours to cook, so plan accordingly. The cornbread only takes about 20-30 minutes, and you should serve it as hot as can be straight from the skillet so have the beans hot and ready to go!

The soup beans are mild but flavorful and comforting and they pair so dang well with the Buttermilk Cornbread. 

When it comes to the cornbread, try to save yourself some bacon fat to season the bottom of the cast iron pan before adding the cornbread batter in. The cast iron pan and the bacon fat heat up in the pan and the pan should be really hot when you pour the cornbread batter in. You should hear a sizzle. This ensures a really nice crust on the bottom. The skillet cornbread bakes up fast, 15 minutes or so and you wanna serve it straight away with a nice ice cream size scoop of butter on top.

Now you're ready for total comfort food. Ladle some soup beans in a bowl and cut yourself a wedge or two of cornbread and get to dippin'!  


Whitesburg Soup Beans

Adapted from Just A Few Miles South

by Ouita Michel

Makes 2 quarts

1 pound dried pinto beans

1 cup chopped white onion

5-6 ounces boneless country ham, diced

1-1/2 tablespoons minced garlic

2 teaspoons Worcestershire sauce

2 teaspoons hot sauce

2 teaspoons kosher salt

 1 teaspoon freshly ground black pepper

Pick pinto beans for pebbles, rinse until clean, and place in a 4-quart Dutch oven. Cover with cold water and soak 5-6 hours. Drain. Return to the pot, cover beans with about 3 quarts of water, and bring to a boil over medium-high heat. Add remaining ingredients. Cover and bring to a boil, stirring occasionally. Turn down to a slow simmer and continue to cook until the beans change color and are slightly softened but not mushy, about 2 hours. Taste for seasoning. Serve with Buttermilk Cornbread or Hoecakes.


Buttermilk Cornbread

Adapted from Just A Few Miles South

by Ouita Michel

Makes 1 large skillet bread or 12 wedges

1-1/3 cups white or yellow cornmeal

1/2 cup all-purpose flour

1/2 teaspoon baking soda

1 teaspoon baking powder

1/2 teaspoon salt

1 large egg, beaten

1-1/3 cups buttermilk

2 tablespoons butter, melted

1 tablespoon butter or bacon drippings

Place a 9-inch cast-iron skillet in the oven and preheat to 400F. In a medium bowl, mix together cornmeal, flour, baking soda, baking powder, and salt. Add egg, buttermilk, and melted butter and mix well with a whisk. Carefully remove the hot cast-iron skillet from the oven and drop in 1 tablespoon butter or bacon drippings, swirl quickly to coat the pan, and return to the oven for another 2-3 minutes, until the butter bubbles and turns dark golden brown. Remove the skillet from the oven again and pour in the batter. Return immediately to the oven and bake 18-23 minutes, until the edges are brown and the center is firm to the touch. Cut into 12 wedges. Serve immediately with butter and/or Whitesburg Soup Beans. 


 Southern Summer Series: Just A Few Miles South


Sunday, December 1, 2024

Ina Garten's Roasted Vegetable Soup with Brioche Croutons


Dear Ina,

You published this recipe, and aired it on your cooking show, back in 2002. I have been wanting to make this soup recipe ever since then. Twenty-two years, Ina. It's not like I haven't been busy cooking away in my kitchen because I truly have. 

The problem is, there is just isn't enough time for all the recipes.

Something I wonder about all the time. How do cookbook authors and celebrities, such as yourself, have the time to try so many recipes? Do you cook and try new recipes all day every day? Morning to night? Do you ever sleep?

I'd really love to know the secret because I'm turning 50 next year and I need to figure out how to jam pack thousands of recipes in to the second half of my life. 

I happened to have all the ingredients for this soup on hand: carrots, parsnips, sweet potatoes, and butternut squash. I set about roasting all the veggies, then followed your directions to blend them in a blender with some chicken stock. I returned the mixture to a dutch oven, adding chicken broth and bringing to a slow boil.

I plated some in a bowl with some leftover roasted veggies, the brioche croutons, and some parsley. I decided to top with a little Parmesan cheese. It looks very festive and seasonal and was really warming and comforting. We enjoyed it with some added spice, sprinkling and stirring in some cayenne pepper to really warm the soul. Happy to finally try it!

Hoping for answers to my above questions,

Kim 

Roasted Vegetable Soup with Brioche Croutons

Adapted from Food Network

by Ina Garten

Serves 4-6

3 to 4 cups chicken stock

1 quart Roasted Winter Vegetables

salt and black pepper

Brioche Croutons

olive oil

Roasted Winter Vegetables

1 pound carrots, peeled

1 pound parsnips, peeled

1 large sweet potato, peeled

1 small butternut squash (about 2 pounds), peeled and seeded

3 tablespoons olive oil

1-1/2 teaspoons salt

1/2 teaspoon black pepper

2 tablespoons chopped fresh flat-leaf parsley

Brioche Croutons

6 ounces brioche or Challah

1 tablespoon olive oil

1/4 teaspoon salt

1/8 teaspoon black pepper

For the Roasted Veggies:  Preheat the oven to 425F. Cut the carrots, parsnips, sweet potato, and butternut squash in 1 to 1-1/4" cubes. All the vegetables will shrink while roasting, so don't cut them too small. Place all the cut vegetables in a single layer on 2 baking sheets. Drizzle them with olive oil, salt and pepper. Toss well. Bake for 25 to 30 minutes, until all the vegetables are tender, turning once with a metal spatula. Sprinkle with parsley, season to taste, and serve hot. 

For the Brioche Croutons: Slice the bread about 3/4" thick. Cut off the crusts and then cut the slices in 3/4" dice. You should have 3 to 4 cups of croutons. Place the croutons on a sheet pan and toss them with the olive oil, salt, and pepper. Bake for 5-6 minutes, checking periodically, until they're nicely browned on all sides. Cool to room temperature before using and store in a sealed plastic bag.

For the Soup: In a large saucepan, heat 3 cups of chicken stock. Coarsely puree the Roasted Winter Vegetables and the chicken stock in the bowl of a food processor or blender. Pour the soup back into the pot and season, to taste. Thin with more chicken stock and reheat. The soup should be thick but not like a vegetable puree, so add more chicken stock and/or water until it's the consistency you like. Serve with Brioche Croutons, a sprinkle of parsley, and a good drizzle of olive oil. 


November Potluck @ IHCC


Sunday, November 3, 2024

How Sweet Eat's Cheeseburger Soup

 It is officially soup season when the nights get cold and dark and we turn the clocks back!

I made Cheeseburger Soup for the first time years ago and I remember it being a big hit! When I saw How Sweet Eat's share her family's favorite version, I knew I had to give it a try.

You start with browned ground beef, then add all the classic soup veggies like onion, carrot, celery, and garlic. You cook the cubed potatoes in broth with the veggies and meat, until tender and then you add in the roux, milk, and cheese.

In the soup world, I feel like there are two kinds of people: those who like thick soups and those who like brothy soups. This version is differently on the brothy side. We are not brothy soup lovers, but we did enjoy this with some pretzel garlic bread. It was cheesy and comforting and we loved dipping the bread in the soup.


Cheeseburger Soup

Adapted from How Sweet Eats

by Jessica Merchant

Serves 4-6

1 pound ground beef

salt and pepper, to taste

1 tablespoon olive oil

1 sweet onion, diced

1 cup freshly grated carrots

1 cup diced celery

4 garlic cloves, minced

1/2 teaspoon dried oregano

1 pound petite gold potatoes, quartered

4 to 5 cups chicken stock*

2 tablespoons butter

3 tablespoons flour

1 cup milk

16 ounces freshly grated sharp cheddar cheese

1/2 cup sour cream

freshly chopped parsley or chives, for serving

*Note: If you are a brothy soup person, go ahead and use the 4 cups of chicken broth in this recipe. If you're into thicker soups, maybe start with 3 cups of broth and add more if you feel like it needs it.

Season the ground beef all over with salt and pepper. Heat a large stock pot over medium heat and add beef. Brown the beef, using a meat chopped or wooden spoon to break it into small crumbles.

Once browned, remove the beef with a slotted spoon and transfer it to a plate.

Add the olive oil to the same skillet. Add in the onions, carrots, celery and garlic with a big pinch of salt and pepper. Add the oregano. Stir. Cook, stirring often, until the veggies soften, about 5 to 6 minutes.

Add in the potatoes and 4 cups of chicken stock. Return the beef to the pot. Bring the mixture to a boil, then reduce to a simmer and cover. Cook until the potatoes are tender, about 10 to 15 minutes.

Heat the butter in a separate skillet. Once melted, whisk in the flour to create a roux. Whisk and cook for 2 to 3 minutes, until the color is golden and the mixture is fragrant.

Use a spatula to scrape the roux right into the soup pot. Bring the mixture back to a boil. Boil for 1 to 2 minutes. Add in the milk and cook for another 1 to 2 minutes.

Reduce the heat to low and stir in the cheese. Stir until it is all melted. At this point, you can add in the additional cup of chicken stock or not. Sometimes I like to add it before I pack the soup up for the fridge since it thickens more as it sits. Taste and season the soup with more salt and pepper if necessary. Stir in the sour cream. Once melted, serve! Top with fresh chives or parsley to serve. 


 October Potluck @ I Heart Cooking Clubs!


Sunday, February 25, 2024

Smoked Sausage and Potato Soup

 My family really enjoys smoked sausage, so when I saw this recipe for Smoked Sausage and Potato Soup on the How Sweet Eats blog this week, I knew I had to make it!

The recipe calls for Yukon Gold potatoes, but you could use regular old russet potatoes if you like. The Yukon Gold potatoes hold up better and retain their shape, making more of chunkier potato soup with a thinner broth. The russet potatoes will break down into the soup, creating a thicker soup, with not as many chunks of potato. Use what you like best or use what you have on hand!

I used the Yukon Gold potatoes that the recipe called for and my family loved the flavor and texture of the soup. They thought the sausage to potato ratio was right on point and especially liked dunking their crusty bread into the flavorful broth. They said the soup was hearty and satisfying and gave it bonus points for being a little different than your everyday soup.


Summer Sausage and Potato Soup

Adapted from How Sweet Eats

by Jessica Merchant

Serves 4

2 tablespoons olive oil

1 onion, diced

4 garlic cloves, minced

salt and pepper, to taste

1/2 teaspoon paprika

1/2 teaspoon dried oregano

1 package smoked sausage, sliced into rounds

2 pounds yukon gold potatoes, cut into chunks

5 cups chicken stock

3/4 cup heavy cream

1 tablespoon all-purpose flour

4 cups shredded kale or spinach

Note: Feel free to use russet potatoes if that's what you have on hand. The russet potatoes will break up and help to give you a thicker and creamier soup. The yukon gold potatoes will hold their shape and your end result will be a more brothier soup.

Heat the olive oil in a large stock pot over medium-low heat. Add the onions and the garlic with a big pinch of salt and pepper. Cook, stirring often, until the onions soften, about 5 minutes. Stir in the paprika and oregano.

Add in the sausage. Cook, stirring often until the sausage browns a bit on both sides, another 5 to 6 minutes.

Add in the potatoes and the stock. Bring the mixture to a boil, then reduce it to a simmer. Cover and cook until the potatoes are tender, about 12 to 15 minutes.

Whisk or shake together the cream and flour until combined. Pour the mixture into the soup and bring it to a boil. Reduce to a simmer and cook for another 5 minutes, stirring often, until thickened.

Taste the soup and season with more salt and pepper if desired. Stir in the kale. Cook for 5 more minutes until the kale wilts a bit and serve! 


Sunday, October 1, 2023

Ruth Reichl's Stuffed Pumpkin


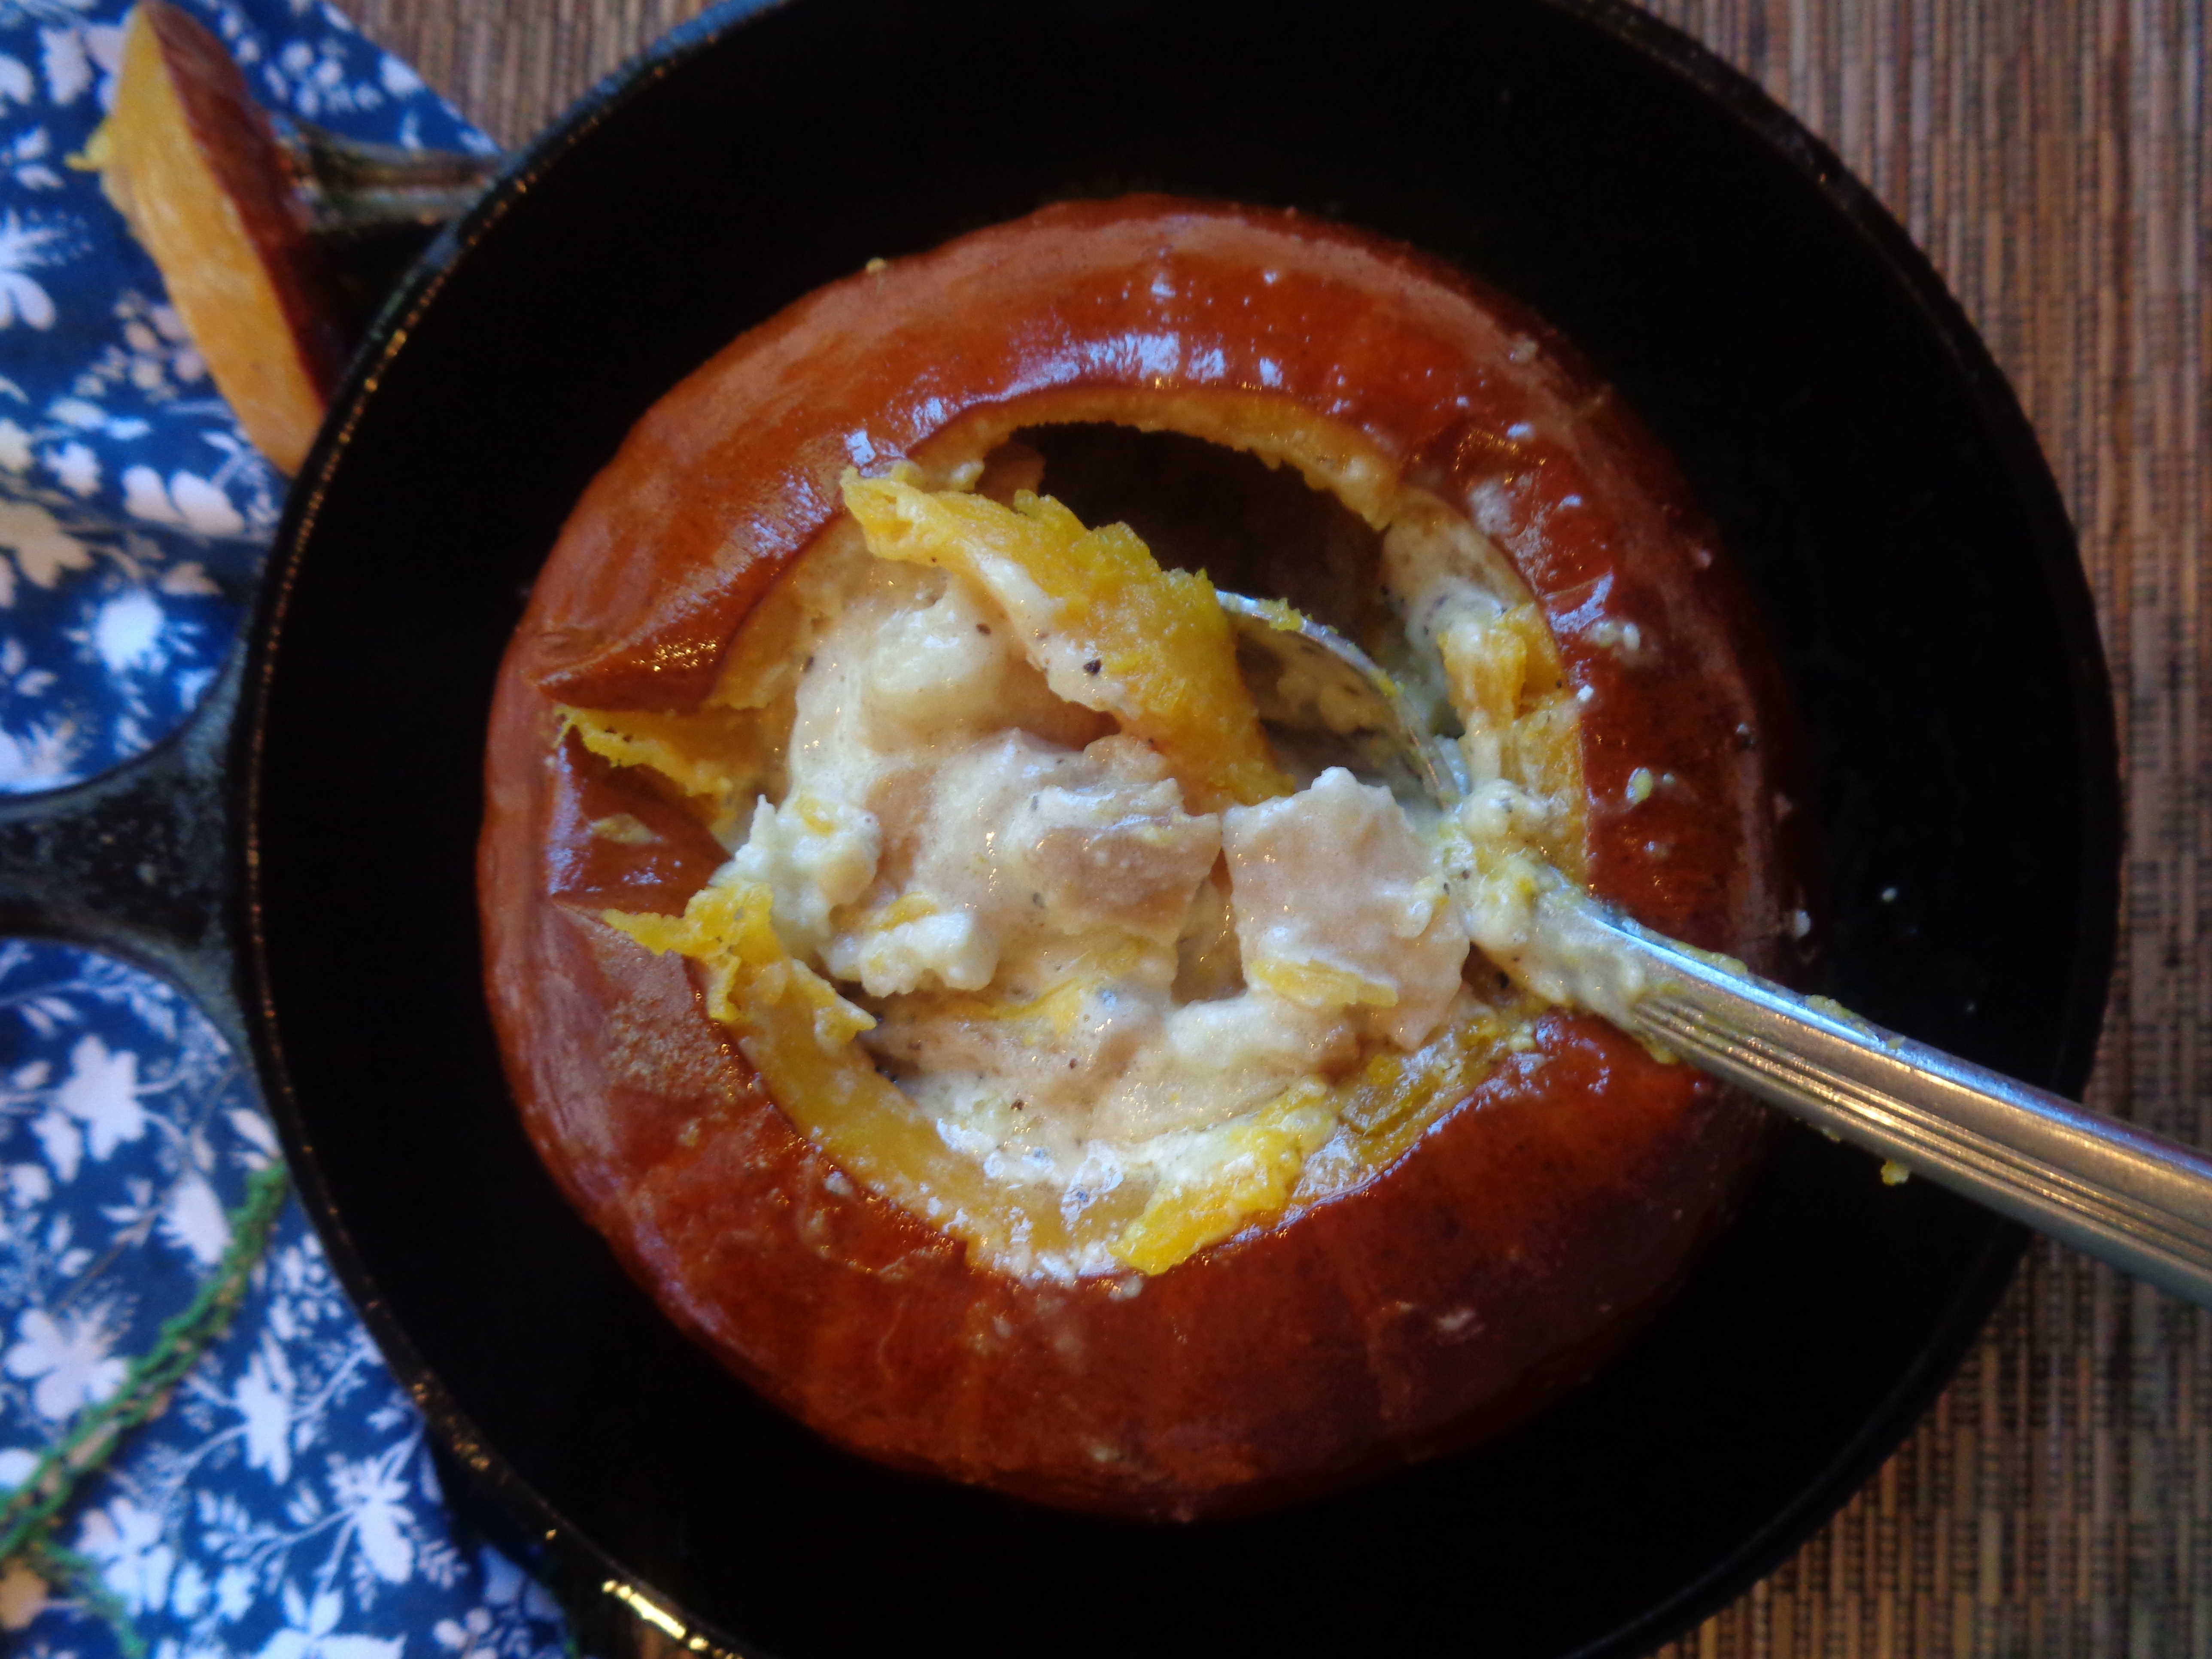
 Tis the season for stuffing pumpkins! In the past few weeks I've seen pumpkins stuffed in all sorts of ways, this one is stuffed with bread, cheese, cream, chicken broth, salt, pepper, nutmeg, and baked in the oven for an hour! Some would liken it to a pumpkin soup, while others would think it was more like a gratin of sorts.


The is really more of a method than a true recipe. The amount of filling is truly based on the size of your pumpkin or the number of pumpkins you stuff. Honestly, the main idea is to clean out the pumpkin, stuff it with toasted bread, Gruyere cheese, more bread, more cheese (in layers), and then pour a mixture of chicken broth and cream over the bread and cheese. You need about half an inch of room left at the top for things to expand and you're ready to go in the oven.


This is a very fun and festive autumn project to enjoy on the weekend. Most of the time is is spent with the pumpkin baking away in the oven. 

The pumpkin, bread, and cheese compliment one another perfectly. This is very tasty and comforting, but extremely rich so one small pumpkin would serve 4-6 easily. I can see topping this with some toasted walnuts or maybe some cooked and crumbled sausage. A very pretty fall dish that is fun for the whole family!


Stuffed Pumpkin

RuthReichl.Com 

by Ruth Reichl

Serves 2-4, depending

1 pie pumpkin (about 4 pounds)

good loaf French bread

Gruyere or Swiss cheese

1 cup chicken broth

1 cup cream

salt and black pepper

*nutmeg, if desired

neutral oil, for coating pumpkin

Buy a fairly small pumpkin (a pie pumpkin is perfect - about 4 pounds) with a flat bottom. Cut off the top, as if you were going to carve a jack-o-lantern, and hollow it out. Spread the seeds out and dry them to eat later.

Now get a good loaf of French bread, cube it, put the cubes on a baking sheet and toast them lightly in a 350 degree oven for about 9 minutes. Leave the oven on.

 Grate a good amount of the one of the Swiss cheese - Emmenthaler, Gruyere or Apppenzeller (the amount you need depends upon the size of your pumpkin. Layer the bread and cheese inside the pumpkin until it's almost full (leave a half inch on the top because the filling will expand a bit).

Mix 1 cup of chicken stock into a cup of cream. Add a teaspoon of salt. Grind in some black pepper and grate in some nutmeg. Then fill the pumpkin almost to the top with as much of this mixture as you need, replace the top of the pumpkin, brush the outside with neutral oil, set it on a baking sheet, and bake for about 2 hours.

Bring the whole pumpkin to the table. When you serve it be sure to scoop out the pumpkin flesh with the cheese and the cream.

September Potluck @ I Heart Cooking Clubs


Sunday, November 20, 2022

Ina Garten's Ravioli En Brodo

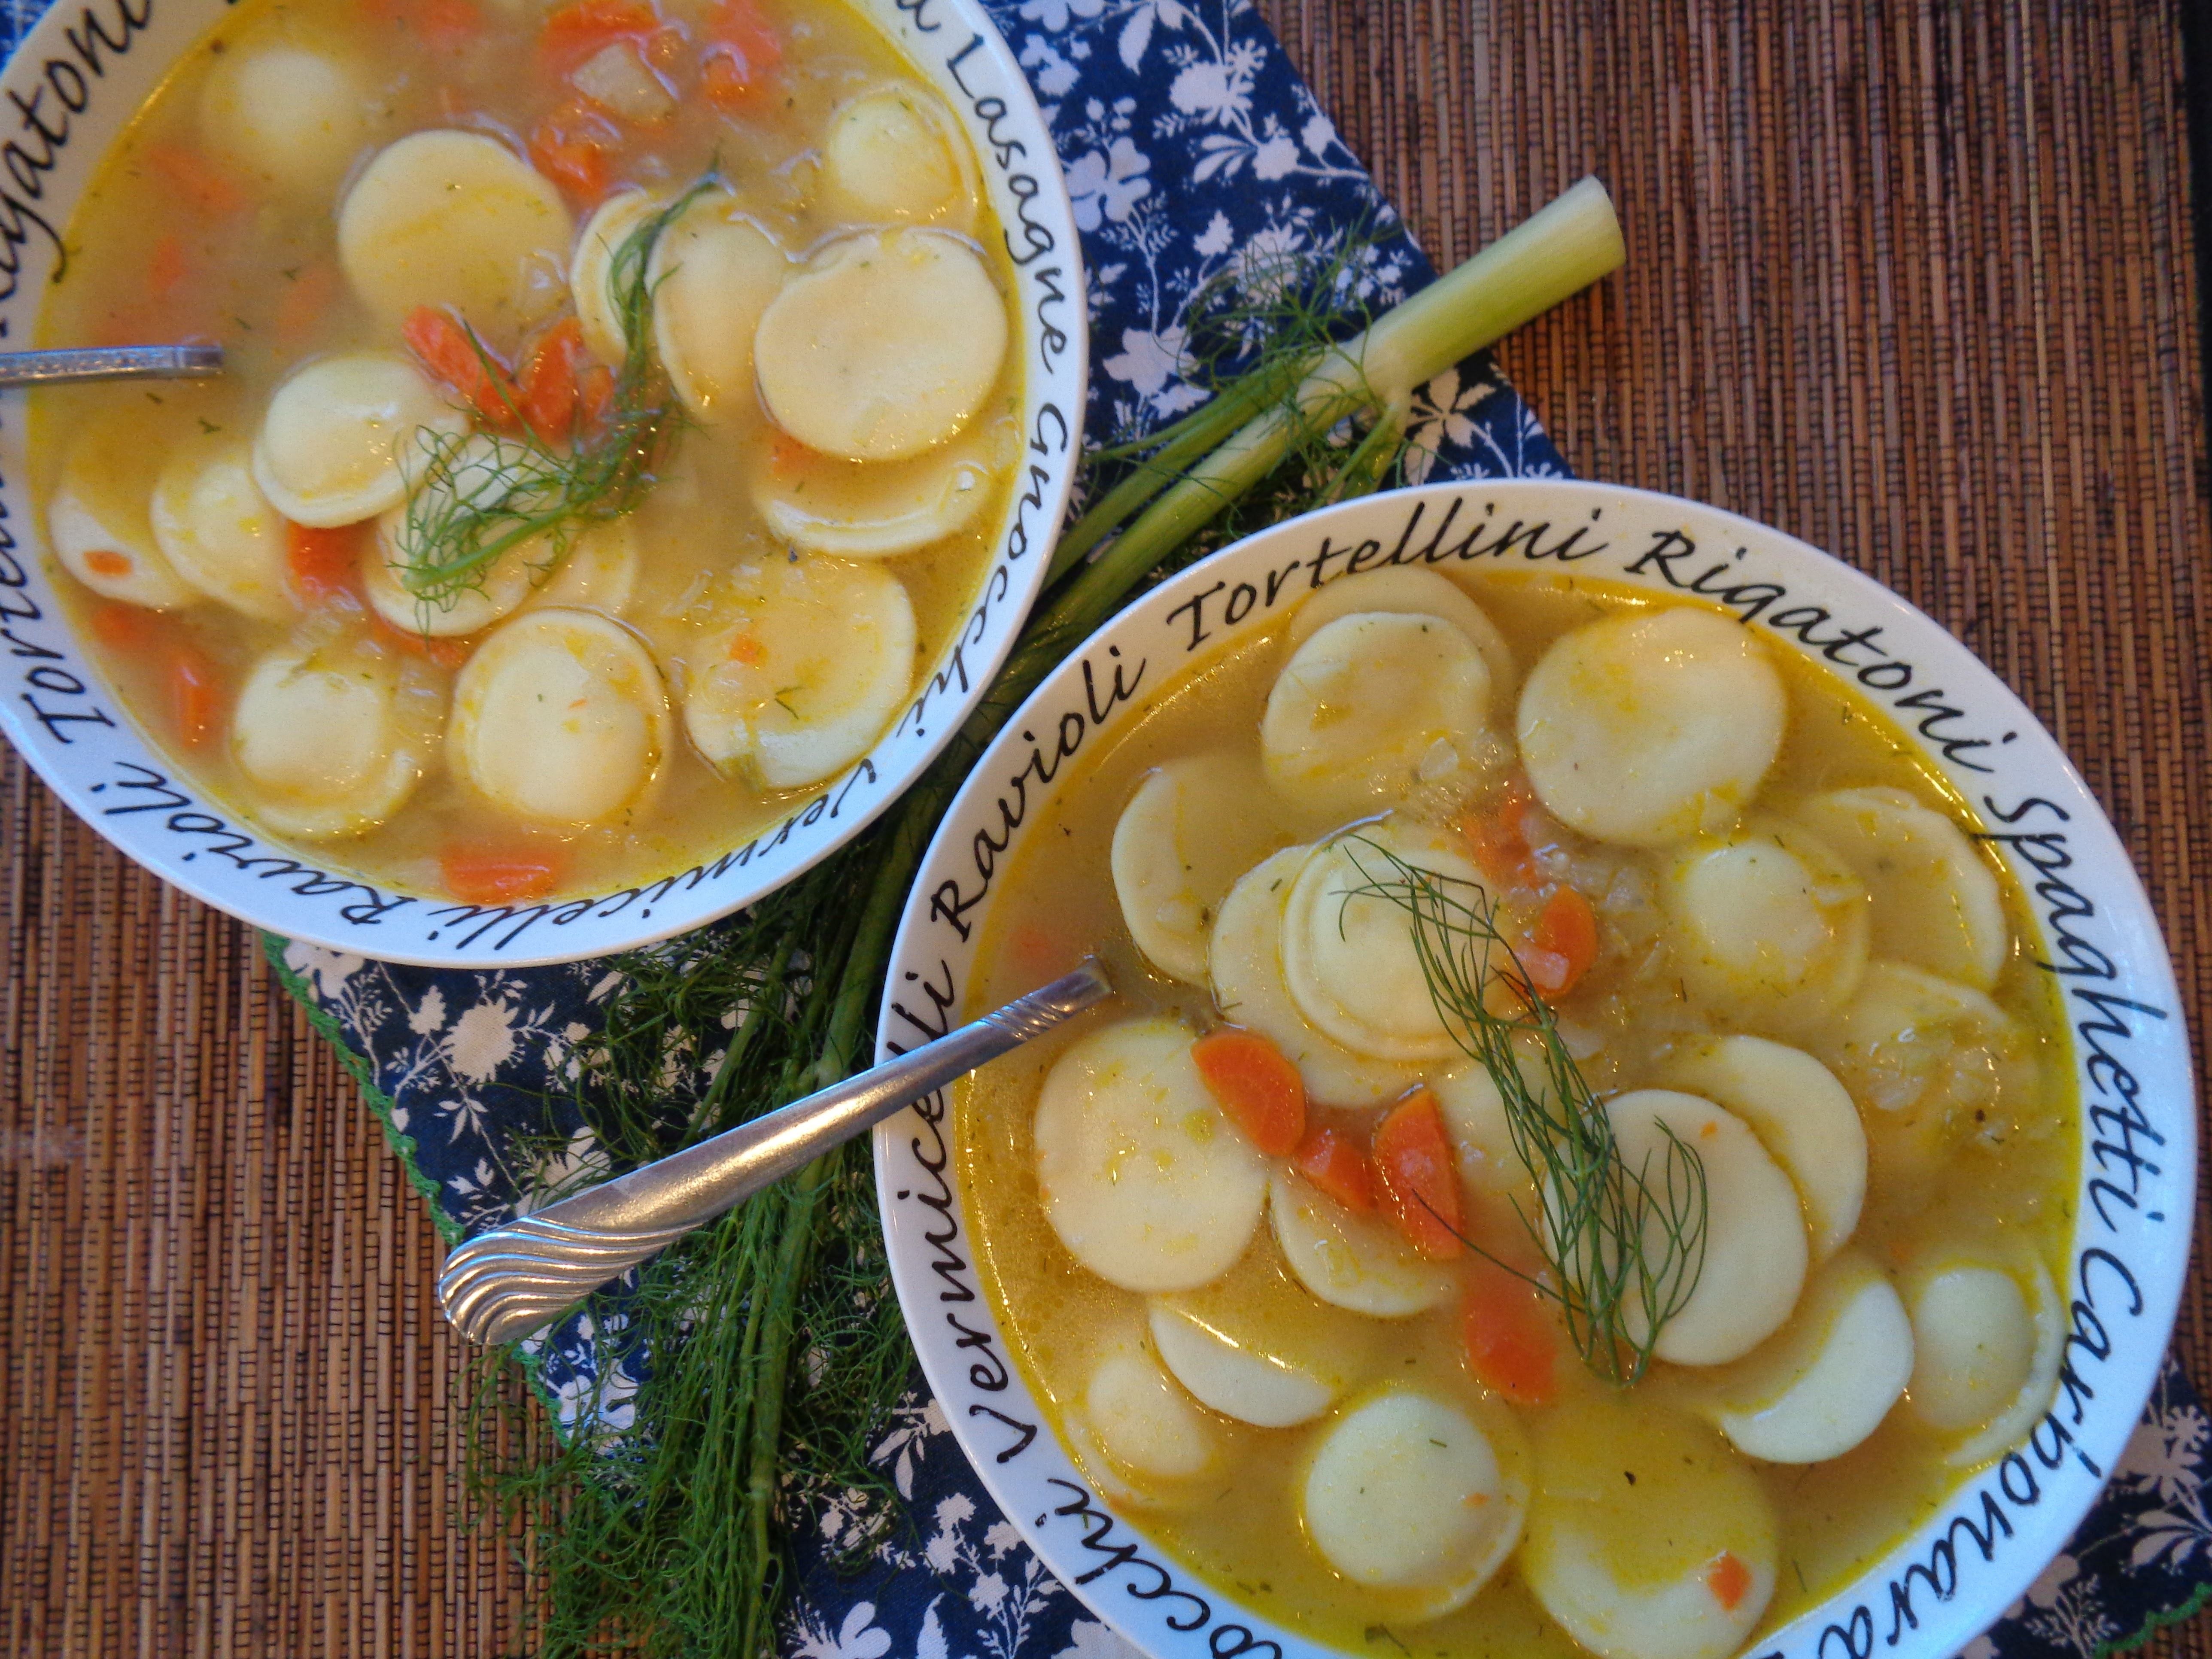
 I scored a copy of Ina Garten's latest cookbook, Go-To Dinners, and immediately couldn't wait to look through it. There is always one recipe that jumps out at me in every cookbook and this time around it was Ina's Ravioli En Brodo. Something about the time of year and a cozy bowl of ravioli in a light and flavorful broth just really spoke to me.

This recipe requires A LOT of chopping, but that is my favorite kitchen task, and once you're done, the rest is easy peasy. 

Two chopped onions, four chopped carrots, three ribs of chopped celery, and one bulb of diced fennel goes into a stockpot and cooks down and concentrates to make one of the tastiest broths. I was a little worried my husband wouldn't care for the fennel, but it wasn't overly pronounced and adds a subtle flavor that really just rounds out the broth.

Add a little Parmesan rind, or if you don't have one then just add some Parmesan. Add the chicken broth and eventually the ravioli and you have a really cozy and hearty meal that will really warm your bones and satisfy. We absolutely loved this and I will definitely be making it a lot! 

Ravioli En Brodo

Adapted from Go To Dinners 

by Ina Garten

Serves 4-6

olive oil

2 cups chopped yellow onions (2 onions)

2 cups (1/2" thick) diagonally sliced carrots, scrubbed (3 to 5 carrots)

1-1/2 cups (1/2"inch) diced celery (3 ribs)

1-1/2 cups (1/2"inch diced fennel, top and core removed

8 cups simmering chicken stock

1 Italian Parmesan cheese rind*

salt and freshly ground black pepper

1 pound cheese ravioli, fresh or frozen

freshly grated Italian Parmesan cheese, for serving

minced fresh dill or parsley, for serving

Freshly squeezed lemon juice, for serving

Note: I didn't have a Parmesan rind laying around in my freezer, so I just put in some Parmesan cheese. I also didn't feel like cooking the ravioli in a separate pot, so I just threw it in with the soup. I am not a fussy cook. I know that Ina does extra step so the ravioli don't get bloated with the liquid from the soup, but I also knew that my soup would be eaten up quickly and there would be no leftovers. Even if the ravioli got bloated up I was okay with that too. Of course, if I were entertaining or worried about presentation then I would opt for Ina's extra step. The choice is yours! Do what works for you! 

Heat 1/4 cup olive oil in a medium (10-11 inch) pot or Dutch oven, such as Le Creuset, over medium heat. Add the onions, carrots, celery, and fennel and saute for 10 to 15 minutes, stirring occasionally, until the vegetables are softened. Add the chicken stock, 2 cups water, the Parmesan rind, 1 tablespoon salt, and 1 teaspoon pepper. Bring to a boil, lower the heat, and simmer, partially covered, for 20 minutes, stirring occasionally. Remove the Parmesan rind and taste soup for seasonings.

Meanwhile, cook the ravioli in a large pot of boiling water with 2 tablespoons salt for 4 to 6 minutes (or according to pkg directions), stirring occasionally. Drain and spread out on a plate so they don't stick together.

For serving, place the warm ravioli in large soup bowls and ladle the hot soup over them. Sprinkle with Parmesan, dill, and a squeeze of lemon and serve hot. 

 Tasty Treats @ IHCC


Sunday, July 31, 2022

Grown-Up Tomato-Parmesan Pasta {AKA Homemade Spaghettios}


When I was little my parents were strictly healthy and I wasn't eating any "junk food." Until I met the next door neighbor. My friend next door was eating ALL the junk food!

My mom couldn't keep me away from my next door neighbor, Julie. Julie was a year older than me and when I would go to her house she would climb the cabinets, get on the countertops, and get out the Nesquick for chocolate milk, or the Hostess treats, like the Ho-Ho's and Twinkies. Most importantly, her parents made THE BEST BUTTERED NOODLES and served them in the old school Tupperware bowls.

Our families became fast friends and before too long our moms started part-time jobs. The moms decided to get opposite shifts and take turns watching us. During this time, my exposure to endless buttered noodles and treats was on high. Julie's house had all the good stuff.

Julie's mom, Sally, would watch me in the morning while my mom was at work. Soon after, Julie started Kindergarten and oh my...how I missed my friend terribly when she was away at school. I can remember sitting at her big picture window waiting to see her walking home from school. I always knew Julie was about to come home when Sally opened the can of Spaghettios for lunch. She would put two bowls of Spaghettios on the table right by the picture window and in no time at all Julie would come walking down the street.

That was about 42 years ago now, but I remember it like it was yesterday. Steaming bowls of Spaghettios and my friend walking down the street with a big smile on her face, running to the door to give me a hug and tell me all about Kindergarten. We loved each other fiercely.

Julie and me, Christmas 1979

The years passed and we both moved away, but kept in touch. At Julie's bridal shower her mom gifted her the old beat up buttered noodle pan that had been lovingly used over the years to cook us all our buttered noodles and Spaghettios. There wasn't a dry eye in the place.

Not too many years later, Mrs. Sally had a severe stroke, became wheelchair bound, and was unable to speak. Everyone was so upset and I remember my mom crying because Mrs. Sally was so active and hated sitting still. My mom couldn't bear the thought of it. Mrs. Sally lived several years this way and was able to meet her grandchildren before passing, but she deserved so much more. 

When I saw this recipe for Grown-Up Tomato-Parmesan Pasta I immediately thought of my old friend Julie and her mom, Mrs. Sally. 

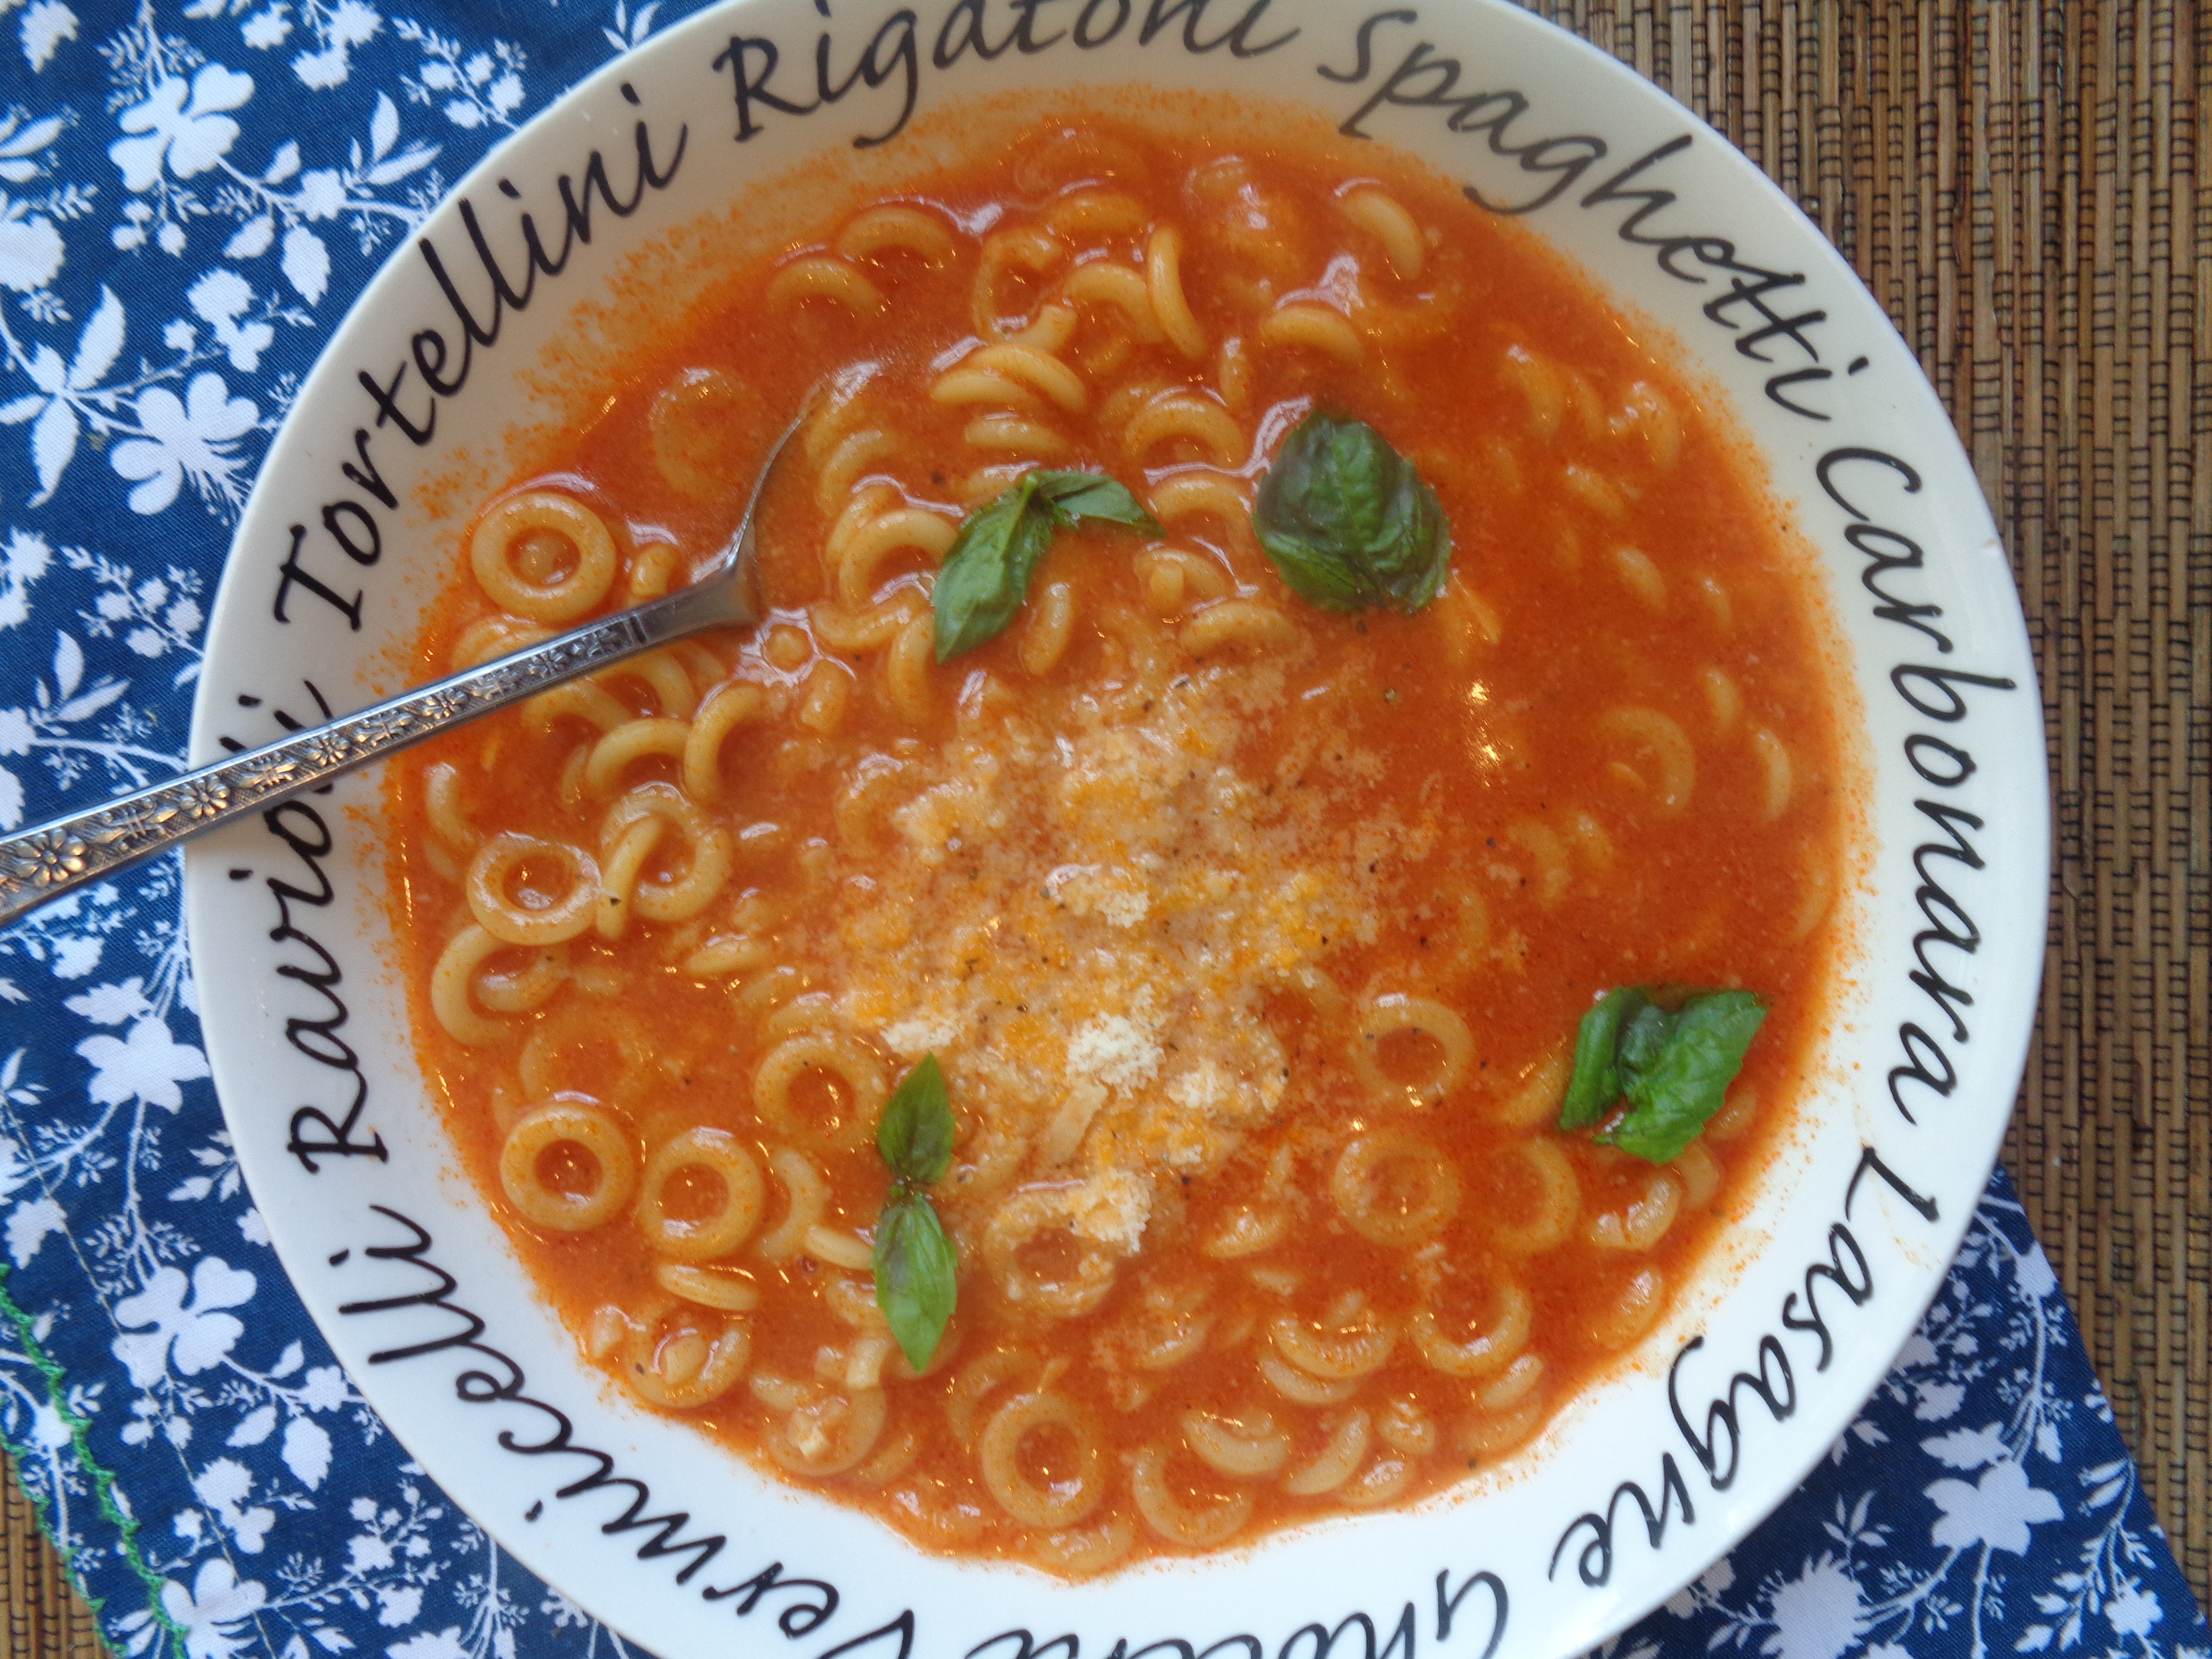
I also thought of my daughter, who also loves pasta, but has never had Spaghettios (my mom and I succeeded on that one). Well, I made her this homemade version and it was so easy. A little bit of olive oil and minced garlic and seasonings, then tomato paste and water to a boil, toss the pasta in, cook until al dente, throw in some Parmesan and you have Homemade Spaghettios. 

My daughter loved it, just like I expected. I thought the tomato flavor was a bit sharp, but I only like tomatoes (I don't love them), so this makes sense. Tieghan calls for 3 tablespoons of tomato paste and that might be a bit too much for me. I might try less tomato paste next time. Overall, it is a fast and family-friendly dish to make and I think kids would really love it.

This week my daughter moved into her very own place. I have been 'in my feels lately' and really missing my mom. She's been gone for almost 5 years now. As I was packing things up I got mom's old pasta pan and colander, grabbed a box of pasta from the pantry, and a stick of butter from the fridge and put it all in a box. It was time for me to part with mom's pasta pan and pass it on to my daughter. I loaded it in the car and it was the first box to cross the threshold into Olivia's new place. 

I set the pan, colander, pasta and butter on Olivia's new stove and stepped back feeling so much reverence. In that moment they were all there with me: mom, Mrs. Sally, and my friend Julie. I snapped a picture and sent the text to my old friend Julie with the caption "first things in Olivia's new place." A handful of words with a lifetime of meaning.

Later that night Olivia send me a text and it read, "Made the pasta and I'm having the time of my life."

A little while later Julie answered my text, "Our moms would love this."

In these moments life sure is beautiful.

 Grown-Up Tomato-Parmesan Pasta

Adapted from Super Simple

by Tieghan Gerard @ Half Baked Harvest

Serves 2

3 tablespoons extra virgin olive oil

1 garlic clove, smashed

2 teaspoons chopped fresh rosemary

crushed red pepper flakes

3 tablespoons tomato paste

3/4 cup anelli, or other short, tubular pasta*

salt and freshly ground black pepper

1/3 cup shaved Parmesan cheese

Fresh basil leaves, for garnish

In a medium saucepan, combine the olive oil and garlic over medium-low heat (*see note below). Cook, stirring occasionally, until the garlic is fragrant, about 2 minutes. Add the rosemary and a pinch of red pepper flakes and cook until toasted and fragrant, about 1 minute more.

Remove the saucepan from the heat. Stir in the tomato paste, then add 2-1/2 cups of water. Return the pan to high heat and bring to a boil. Add the pasta and season generously with salt. Cook, stirring often, until the pasta is al dente, about 12 minutes.

Remove the pan from the heat again and stir in the Parmesan. Taste and add more salt and pepper as needed.

Divide the pasta between two bowls and top with fresh basil. Serve immediately. Store any leftovers refrigerated in an airtight container for up to 3 days.

*Note: It's important to keep the olive oil at a low temperature throughout step 1. If the oil is too hot when you add the rosemary and tomato paste, the rosemary will burn and the tomato paste will splatter.


 Potluck @ IHCC

Sunday, August 22, 2021

Corn & Potato Chowder


The first week of school was incredibly intense and that's putting things mildly. 

Right out of the gate we had staff and students sick and absent with Covid. On day 2 of school we had SIX staff members out sick with Covid and on quarantine. We didn't have enough substitutes to cover the absences so I volunteered to go down to Kindergarten. 

In case you're wondering, the first few weeks of Kindergarten in a normal year are super tough. They are so little and there is SO MUCH to learn before they can even start learning!

 The first few weeks of Kindergarten during a pandemic...unimaginable! Imagine kids who have essentially spent extremely formative years largely at home. Some of these kids have parents who tried and those kids are doing ok. A lot of the kids have parents who were maybe struggling themselves. Either way, there has been no preschool. No real going out in public and learning how to behave. These kids have spent so much time inside, more than likely on electronics of some kind.

I'm not sure I have ever worked as hard as I did last week. It was all we could do to keep everyone safe, accounted for, and to the right place at the right time. It was absolutely exhausting and then at the same time...it became extremely clear to me that there is really no way we will be able to be in school all year. The virus is just too contagious and we just don't have enough staff and substitutes to keep it all running. The very thought of not being able to be in school again is so heartbreaking. I can't even go there right now.

I promised myself  I would do one thing for myself this week and make a trip to the farmer's market on Saturday morning. I'm so glad I dragged myself out of bed and went down there. I got some flowers, my favorite pickles, some fresh peaches, and some wonderful Peaches and Cream corn on the cob.

I knew straight away I wanted to make a comforting corn chowder that would just feel like a hug in a bowl. I didn't wanna spend forever looking for a recipe so I went straight to Mark Bittman's How To Cook Everything Vegetarian and found a great Corn Chowder recipe with a lot of variations. 

Bittman starts his corn chowder off by making a quick corn stock with the corn cobs. I have made corn cob stock once before and I really love it. It really adds that extra kick of corn flavor! Bittman's recipe was really basic and you can certainly keep things that way, but I wanted to use up some potatoes, jalapeno, tomatoes, scallions, and bell pepper so I went ahead and added all that in.

The end result was delicious! I am really going to look forward to taking my leftover Corn and Potato Chowder for lunch tomorrow. I have a feeling I'm going to need some soothing.

Corn & Potato Chowder

Adapted from How To Cook Everything Vegetarian

by Mark Bittman

Serves 4-6

Kernels from 6 ears fresh corn, cobs reserved

salt and pepper

4 tablespoons butter or oil

1/2 cup chopped scallion

2 roma tomatoes, chopped*

1 jalapeno pepper, chopped*

1 bell pepper, chopped*

1/2 teaspoon sugar

1/4 cup flour

1 or 2 potatoes, chopped 1/2" dice*

1 quart milk or half and half

Optional: Bacon, chips, herbs, cheese for garnish

Put the corn cobs and 2 cups water in a pan with a tight-fitting lid over medium-high heat. Sprinkle with salt and pepper. Bring to a boil, then lower heat so the water bubbles gently, cover, and cook, checking occasionally, for about 30 minutes. Leave the cobs in the pot until you're ready to make the soup, then remove them and save the broth (I only got about 1 cup of broth from this process, you may wish to add more water and get more broth). 

Put the butter or oil in a deep skillet or medium saucepan over medium-high heat. When the bugter is melted or the oil is hot, add the scallion, sugar, tomato, and peppers and cook until soft and tender. Turn the heat down to medium and stir in the flour. Cook, stirring constantly with a whisk or a wooden spoon, until the mixture starts to turn golden and the flour no longer smells raw, 5 to 10 minutes. Add the milk and the reserved broth and turn the heat up to medium-high. Stir or whisk constantly until the flour is dissolved and the soup starts to thicken, about 2 minutes.

Stir in the corn kernels and potatoes, if using, and bring to a boil, then lower the heat so that the soup bubbles gently. Cook, stirring occasionally, until the corn and potatoes are tender and the soup has thickened, 10 to 15 minutes. Taste, adjust the seasoning, garnish and serve.


Every Sunday @ Kahakai Kitchen

Sunday, January 17, 2021

Split Pea Soup with Crispy Kielbasa {And A California Tale}


Imagine this, it's the very early 00's and me and my husband are visiting California. We're leaving L.A and driving "the 5" all the way to San Francisco. Now, I don't know what we were expecting, but I can tell you this experience did not end up anywhere near anything we had dreamed up in our east coast minds. I don't know if "the 5" has changed much in the last 20 years, but at the time it was a lot of nothing: Six Flags, some brown mountains, nothing but brown dirt and maybe mountains, aqueducts, signs for orchards, windmills, thousands upon thousands of cows, and then a pea soup restaurant called Pea Soup Anderson's. Now, if you're gonna be making this drive you're gonna get hungry and you're probably not gonna be craving pea soup, but that's all you're gonna get. So pea soup it is!

Now, in all of my 45 years, I've never felt more like I was in an episode of The Twilight Zone more than the day we made that drive. So, in the middle of nowhere, we drove up to a pea soup restaurant thinking, "what in the absolute world is going on?" I can remember inhaling dust while walking into the restaurant, everything was so brown and so dry, and when we walked inside I was taken aback. The inside of the restaurant was pea green too! Mind blown. Still is. I remember being totally tripped out. I know we ate the pea soup and some bread. I just can't remember the pea soup because everything else was so darn out of place that day. I'm thinking I must've liked it because I remember buying pea soup and eating it at work in the years that followed.

Fast forward 20 years and me and my husband still laugh about our ride down "the 5". Then I came across Ina Garten's recipe for Split Pea Soup with Crispy Kielbasa and I thought, "why the heck not?" It took me weeks to find a ham hock and the rest was easy peasy.

I have to say we were not overly impressed. Don't get me wrong, the soup is good and if you love split pea soup then you would love this recipe! The crispy kielbasa is really great and the soup is A LOT better the second day, but it's just not something that we crave or feel we need to eat on a regular basis. So, if split pea soup is your jam, then you'd probably love this recipe and a drive up "the 5". But if split pea soup is not your jam, then you might wanna drive up the 101 if you're ever in California, and skip this recipe.


Split Pea Soup with Crispy Kielbasa

Adapted from Modern Comfort Food

by Ina Garten

Serves 6

olive oil

2 cups chopped leeks, white and light green parts, spun dried (2 leeks)

1-1/2 cups chopped yellow onion (1 large)

2 cups 1/2" diced, scrubbed carrots (3 large)

1 tablespoon minced garlic (3 cloves)

1 pound dry green split peas

8 cups good chicken stock (preferable homemade)

1 smoked ham hock

8 fresh thyme sprigs, tied with kitchen twine

2 large fresh bay leaves

salt and pepper

12 ounces smoked kielbasa, halved lengthwise and sliced diagonally in 1/4" thick pieces

minced fresh parsley, for serving

Heat 1/4 cup olive oil in a large (11 to 12") pot or Dutch oven, over medium-high heat. Add the leeks, onion, and carrots and cook for 7 to 8 minutes, stirring occasionally, until tender and starting to brown. Stir in the garlic and cook for one minute. Stir in the peas to coat with oil and cook for one minute. Add 8 cups of the chicken stock, 2 cups water, the ham hock, thyme bundle, bay leaves, 2 teaspoons salt, and 1 teaspoon pepper. Bring to a boil, lower the heat, and simmer, partially covered, for 1-1/4 hours, stirring occasionally, until the peas are very tender and falling apart. After 45 minutes, stir more frequently, scraping the bottom of the pot to be sure the soup doesn't burn.

Discard the thyme bundle, bay leaves, and ham hock. Transfer 2 cups of the soup to the bowl of a food processor fitted with the steel blade and puree. Return the puree to the pot, adding more chicken stock or water if the soup is too thick.

To serve, heat 2 tablespoons olive oil in a medium (10 to 11") saute pan over medium heat. Add the kielbasa and saute for 5 to 6 minutes, tossing occasionally, until the kielbasa is browned. Serve the soup hot with the kielbasa and parsley sprinkled on top.


Sunday, October 11, 2020

Giada's California Turkey Chili w/ Quinoa and Pine Nut Pilaf

 
Fall break is a glorious invention. An entire week off in the beginning of October to enjoy the most beautiful and wonderful time of year. It is simply the best! We went to the zoo, we caught up on appointments, we played board games, we read books outside, we binge watched shows, and we slept in! 

We are closing a beautiful week spent outdoors with a rather rainy gloomy day, but I am ok with that because it is perfect weather for making chili, Giada's California Turkey Chili w/ Quinoa and Pine Nut Pilaf to be exact. This is a recipe I've been wanting to make for ages and I'm so happy to finally be getting around to it.

Now, 99% of our world makes absolutely ZERO sense right now and to illustrate that, we are going back to "in person" school this week right as our state suffers the most coronavirus cases it has ever had! What the what? Does anything make sense anymore? Well, I'll tell you what does make sense: chili. Chili always makes sense. Chili is perfect for meat eaters, vegetarians and vegans. Chili works for everyone. 

So as I mask up and head back to the germiest place known to man, I will pack this chili and take delight in something that does actually make sense. A delicious and healthy chili packed with creamy white beans and chunky bits of savory turkey packed in an extremely flavorful broth served over the most delicious quinoa and pine nut pilaf, which helps to give the chili great texture. 

Now, I will confess that I am partial to Giada's recipes. We usually almost always love them, but this chili is a step above the rest. It really is SO GOOD! If you're wanting to try your hand at a new chili recipe, this one is solid gold. I absolutely loved all the flavors from the poblanos, onions, celery, tomato paste, and spices. You can add garnishes if you like, but really and truly this chili doesn't need anything added to it. It is simply perfect the way it is! Five stars, Giada! 


California Turkey Chili w/ Quinoa and Pine Nut Pilaf

Adapted by Food Network

by Giada DeLaurentiis

Serves 4-6

For the Chili

2 tablespoons olive oil

4 large cloves garlic, smashed, peeled and chopped

2 large poblano chiles, stemmed,seeded and diced

1 celery stalk, chopped

1 large onion, chopped

1-1/2 pounds ground turkey 

1 tablespoon all-purpose flour

4 tablespoons tomato paste

3 tablespoons chili powder

1 tablespoon ground cumin

2 teaspoons (packed) brown sugar

1 teaspoon dried Mexican oregano, crushed

salt and black pepper, to taste

1/2 teaspoon ground cinnamon*

1/8 teaspoon ground cloves*

3 cups chicken broth

One 15-16 ounce can cannellini beans, rinsed and drained

Simplest Quinoa and Pine Nut Pilaf, recipe below

Assorted garnishes, such as chopped onion, shredded Cheddar, chopped tomatoes, and/or sour cream

Simplest Quinoa and Pine Nut Pilaf

1-1/4 cups whole grain quinoa 

1-3/4 cups chicken broth

salt and pepper, to taste

1/3 cup chopped fresh cilantro or parsley

1/3 cup pine nuts

*Notes: I omitted the cinnamon and cloves because I don't care for those flavors in chili.

For the Chili: Heat the oil in a heavy, large pot over medium-high heat. Add the garlic, poblanos, celery and onions. Saute until the vegetables soften, 5 to 6 minutes. Add the turkey and saute until no longer pink, breaking up the turkey with the back of a spoon, about 7 minutes. Sprinkle the flour over and stir to blend. Add the tomato paste,chili powder, cumin, sugar, oregano, salt and pepper, cinnamon and cloves*. Cook 1 to 2 minutes, stirring to blend. Add the broth and beans. Bring to a simmer. Reduce the heat to medium-low and simmer until the flavors blend and the chili thickens to desired consistency, stirring often, 20 to 30 minutes. Season with more salt and pepper.

For the Quinoa Pilaf: Place the quinoa in a fine sieve. Rinse under cold running water 1 full minute. Set aside to drain. Bring the broth, salt and pepper to a boil in heavy, medium saucepan over medium-high heat. Stir in the quinoa. Cover, reduce the heat to medium-low and simmer until the quinoa is tender and all the broth is absorbed, about 15 minutes. Turn off the heat. Let the quinoa stand, still covered,for 10 minutes. Meanwhile, preheat the oven to 350F. Scatter pine nuts on a small rimmed baking sheet. Toast the nuts until golden, stirring occasionally, about 5 minutes. Cool on the baking sheet. Mix the parsley and pine nuts into the quinoa.

To Serve: Spoon Simplest Quinoa and Pine Nut Pilaf into deep bowls. Ladle chili over. Serve with garnishes, such as chopped radishes, pickled jalapeno, crumbled cheese, tortilla chips, and or pico de gallo. See list of garnishes above, as well.