Sunday, November 13, 2022

A Macaroni & Cheese Roundup!

Macaroni and cheese is one of our favorite side dishes here in the Stirring The Pot kitchen. Originally I wanted to make Ina's newest Macaroni & Cheese recipe this week, her Overnight Macaroni & Cheese.
 
You know what they say about the best made plans, right? Well...my daughter got real sick with covid, it's my son's 16th birthday tomorrow, and our upstairs heater broke so we have zero heat. I could go on, bu,t basically I forgot to prep the macaroni and cheese the night before and since it's overnight mac and cheese it was a total bust today.
 
I thought about it long and hard and decided that I've made a lot of macaroni and cheese over the years and I've never done a macaroni and cheese roundup, so here goes!

If you love macaroni and cheese like we do, you might want to try some of these! 

Click on the recipe title to be directed to the original post and recipe!

Ok, come on...doesn't this look delicious and perfect for your Thanksgiving dinner? Plus, you don't have to make the squash because it's already in the pasta. It's like a two-in-one!
Same kind of idea here...don't wanna make macaroni and cheese plus a green veggie? Just go ahead and put them both together. Look at us being multitaskers!
Tomato makes a great pairing with macaroni and cheese and Jacques Pepin will never steer you wrong with one of his gratins!
If you're feeling a little south of the border, then Rick Bayless's Salsa Mac n' Cheese is just as good as any! I love the idea of doing different salsa variations. 
If you're in the mood to be a little healthier with things, Ina's Crusty Baked Shells and Cauliflower is a terrific recipe. The cauliflower does a great job standing in for pasta and that crusty topping is oh so good!
 Once again, Pepin will never steer you wrong. He is pretty much a gratin genius! This mac and cheese is great if you have any leftover ham during the holidays that needs using up. This is a great way to do it and...everyone loves a one pot meal!

Sunday, November 6, 2022

Half Baked Harvest's Six Ingredient Pumpkin Butter

  The flu has been making the rounds here in Kentucky. I've been down for the count for two weeks now and am just now starting to feel human again. My school district and the surrounding school districts are all closed for illness. Flu came early this year and it is no joke!

I was looking for a seasonal and easy recipe this week and this pumpkin butter fits the bills nicely! You can put all the ingredients into a slow cooker or let it simmer for hours OR you can put them in a saucepan on the stovetop and have this ready in about half an hour, which is what I did.

Pumpkin butter simmering on the stovetop smells like the holidays and is great to gift to neighbors and friends. It pairs well with good gouda cheese and is great on toast, biscuits, and/or crackers. It's also a great ingredient to use for baking. A quick visit to the Half-Baked Harvest site and you will find all manner of cookies, breads, and baked goods containing pumpkin butter. You might even see some here next week!

Six Ingredient Spiced Pumpkin Butter 

Recipe adapted from 

Makes about 4 cups

2 cans (15 ounce) pumpkin puree

1/3 cup apple cider

1/2 cup real maple syrup, plus more if needed to sweeten

1 tablespoon vanilla extract

1 tablespoon pumpkin pie spice 

1 teaspoon cinnamon

1/2 teaspoon salt

Stovetop: In a medium saucepan, combine the pumpkin, cider, maple syrup, vanilla pumpkin pie spice, cinnamon, and salt. Bring to a gentle boil over medium heat. Cook, stirring often until the pumpkin thickens slightly, but is spreadable, about 20-30 minutes. Taste, adding more maple syrup if needed to sweeten. Remove from the heat and let cool (the pumpkin butter will thicken as it cools). Transfer to glass jars and keep stored in the fridge for up to 1 month or in freezer safe containers for up to 3 months.

Slow Cooker: In the bowl of your slow cooker, combine the pumpkin, cider, maple syrup, vanilla, pumpkin pie spice, cinnamon, and salt, Cover and cook on high for 3-4 hours. During the last 45 minutes of cooking remove the lid to allow the pumpkin butter to thicken. Taste, adding more maple syrup if needed to sweeten. Turn off the heat and let cool (the pumpkin butter will thicken as it cools). Transfer to glass jars and keep store in the fridge for up to 1 month or in freezer safe containers for up to 3 months.


October Potluck @ IHCC


Sunday, October 23, 2022

Jacques Pepin's Butternut Squash Gratin {The Perfect Fall Side Dish}

Butternut squash is a true fall favorite. Over the years we have come to absolutely love it! Back in 2011 I started things off simple with Tessa Kiros' Baked Butternut Squash. When that was a hit I moved on to Ina's Butternut Squash and Ricotta Bruschetta.The Bruschetta was addictive so I branched out further to Ina's Butternut Squash Hummus

The love affair was in full bloom so then we tried other favorites like Ruth Reichl's Butternut Squash, Sausage, and Walnut Lasagne and also Nigella Lawson's Butternut Squash Macaroni and Cheese. 

Now I'm furthering the love affair with butternut squash by trying my hand at Jacques Pepin's Butternut Squash Gratin

Pepin's gratin is so simple. It is right up my alley. Just a handful of ingredients.The hardest part is cutting the squash into 1/8-1/4" slices. Once that's done, you just boil the slices for about 2 minutes, then arrange them in a baking dish, top with salt and pepper, pour the cream on and cover with cheese. Bake for about 30-40 minutes and you have one delicious fall-inspired side dish or main dish.

You can arrange the squash slices artfully and really make the gratin beautifully arranged, but that's not really my style so I just threw the slices in the baking pan for a more 'rustic' look. I really love that word rustic, don't you?

My family walked in while this was cooking and they said "it smells like Thanksgiving in here." If that isn't the ultimate compliment then I don't know what is.

Butternut Squash Gratin

Adapted from Essential Pepin

Serves 6-8

1 large butternut squash (3-3/4 pounds)

1 teaspoon salt

1/2 teaspoon freshly ground black pepper

1 cup heavy cream

1/2 cup grated Jarlsberg or other Swiss-type cheese or Parmesan

Preheat the oven to 400F. Cut off the stem of the butternut squash and split it in two at the bottom of the neck; this will make it easier to peel. Peel the neck lengthwise with a sharp knife or vegetable peeler, removing enough skin so the orange flesh appears (there is a layer of green under the first layer of skin). For the body of the squash, remove the skin with a sknife by going around it in a spiral fashion (it is easier to peel a round object in this manner); then cut lengthwise in half and, using a sharp spoon, remove the seeds. With the slicing blade of a food processor or a knife, cut the squash into 1/8- to-1/4 -inch-thick slices. 

Put the squash in a saucepan, cover with water, and bring to a boil. Boil over high heat for 1-2 to 2 minutes, then drain in a colander; the pieces will break a little.

Transfer the squash to a gratin dish and add the salt, pepper, and cream, mixing with a fork to distribute the ingredients. Cover with the cheese. Bake for 30 to 40 minutes, until nicely browned. Serve. 


Vegetables Unleashed @ IHCC


Sunday, October 16, 2022

José Andrés' Sausage with Cabbage #RecipesForThePeople


There are dishes that serve a family and then there are dishes that serve an army. Sausage and Cabbage is a recipe that serves an army. I was thrilled to see that Jose Andres has a very loose recipe for Sausage with Cabbage on his website. Cooks can literally make the recipe however they choose using his bare bones recipe.

You need only four ingredients to make this hearty and satisfying dish: Italian sausage, cabbage, onion  and garlic. Jose calls for sesame seeds and Pimenton, and they do add some pizazz, but are not totally necessary.

Cut the sausages or leave them whole. Chop the cabbage or cut it into thin slivers. Peel the garlic or don't. I like Jose's plan. He doesn't give you explicit instructions about chopping or amounts. It's your kitchen, he says. You're the cook. You make it your own!

 We love Italian sausage in this house and really enjoyed this recipe. We found it hearty and satisfying and absolutely perfect for this time of year. Total comfort food and more than enough to go around.

Sausage and Cabbage

Adapted from Jose Andres

Serves many

What You'll Need:

Sausages

Onion

Garlic

Cabbage

Sesame seeds

Paprika

Olive Oil

The Recipe: You'll need some sausages, any kind. Then also onion, garlic, cabbage, sesame seed and paprika. The amounts are up to you (I used 5 sausages, 1 head of cabbage, 1 onion, 5 cloves of garlic, etc.) Start the oil in a large pan (the cabbage will need lots of space). Start with oil in the pan and lots of garlic (peeled or unpeeled, chopped onion. Add the sausage and saute so it's browned on all sides, and add some spices...pimenton, salt, anything old in your pantry that you want to get rid of.

Add the cabbage and keep stirring, then add some sesame seeds, if you have them. Saute until the sausage is cooked, and then at the end add some wine or whatever you're drinking. Write your own recipe he says! Then serve it!

Foods To Feed An Island @ IHCC
 

Sunday, October 9, 2022

The Recipe That Won Over Tiktok {The Best Way To Make Eggs by Chef Jose Andres}

 Dear People Of The World, 

Today I share with you Chef Jose Andres' Best Way To Make Eggs. Chef Andres is a big fan of making videos on Tiktok. In fact, his video sharing the best way to make eggs has been viewed over 2 million times! Try as a might, I cannot add the video here, but here is an article about Chef Andres' eggs.

Chef Andres begins with a pan that is ovenproof and he coats the bottom of the pan with a generous amount of butter.

He then layers in a generous amount of shredded mozzarella cheese, salt, pepper, 4 cracked eggs, and a layer of milk. He does not specify amounts. From what I could see, it was enough cheese and milk to coat the bottom of the pan each time. He tops that with some cheddar cheese and then coats pieces of bread in oil and throws it all in the oven at 350F for 5 minutes. I don't know what kind of oven Chef Andres has, but mine needed a little more time, closer to 15 minutes (toast is done in about 5 minutes). 

The result is a very quick ooey gooey cheesy egg dish that can be enjoyed on toast, dipping and enjoying straight out of the pan, if you so dare. 

Love, 

Kim

Welcome Chef Jose Andres to IHCC!
 

Sunday, October 2, 2022

Eggs with Bread and Butter

 Dear Reader,

Sometimes the ugliest of foods are the most memorable. Think of this dish as a big hug. Something that mom would have made for you. In fact, in her cookbook Apples For Jam, Tessa states, "This is what my mom gave us so often - it is one of my earliest food memories. I have only to smell it and it takes me sailing back in time and fills me with wonderful memories. It is amazing how an egg and slice of bread can do that."

Tessa's words echoed back to me each and every time I picked up this cookbook. I had leftover Hawaiian rolls so I decided to make the dish and decide whether it was blog worthy.

Three simple ingredients, but let's be real. These are pretty much three of everyone's favorite all-time ingredients. How can one go wrong? 

Butter the bread, tear it into bits, place it into a cup or bowl. Then boil the egg for about 2-4 minutes (closer to 4 minutes for me) and mix the soft-boiled egg into the bread and butter mixture. Serve with a spoon.

THIS MAKES THE CUT FOLKS! It is so comforting. So easy. So delicious. Like a giant hug from mom. I made it once. Then I made it again. Then I made it every morning until I ran out of the ingredients. Sometimes I added salt and pepper. Sometimes I added Everything But The Bagel seasoning. Another time I added cheese. Last time, I added a little dash of poultry seasoning and it gave the whole mixture a stuffing vibe.

So, dear reader, you really can't go wrong. If you want a quick breakfast. If you're feeling under the weather. If you have small children or even grown children. If you're missing mom. If you're in need of a hug...make this dish. Use whatever bread you have (ideally it will be a soft bread). Use whatever seasonings you like. Add cheese or herbs. Make it your own, but definitely make it.

Do take note, it would be just as delicious served in a bowl, but it is really special served in a small glass with a spoon. There is just something so special, fun, and youthful about eating this out of a glass with a spoon. It really ups the fun factor!

Take comfort,
Kim


Eggs with Bread and Butter

Adapted from Apples For Jam

by Tessa Kiros

Serves 1

1 egg

1 to 2 teaspoons soft butter

1 slice fresh soft white or brown bread or roll

Put the egg in a pan of cold water and bring to a boil. Cook for 2-1/2 minutes from when the water comes to a boil (the white should have just set and the yolk will still be soft and runny). Lift out the egg with a slotted spoon. Meanwhile, butter the bread, break it into small bits, and put in a little bowl or cup. Hold the egg over the bowl, give it a sharp crack through the middle with a knife, and scoop out the egg with a teaspoon. Add a little salt and mash together well with a fork. Serve immediately.

Notes: After I made this the first time I made some changes. Namely, you can literally use any bread for this. I had leftover Hawaiian rolls and those were perfect for this recipe. The biggest change I made was in buttering the bread prior to breaking it into small bits. That is quite messy on one's fingers. Instead, I simply broke the bread into bits and set a teaspoon or so of butter on top of the bread. I would place the egg on top of the bread and butter and the heat of the egg would melt the butter into the mixture just fine.  


Sunday, September 25, 2022

Tessa's Hassleback Potatoes


 Dear Tessa, 

On a lazy Sunday afternoon I like easy and quick recipes. When I first spotted your hassleback potatoes I thoutht they seemed quite simple. 

The ingredients were few. The directions were short. How hard could it really be to cut some slits in a few potatoes and throw them in the oven?

A quick trip to my pantry to grab some potatoes. I grab some russets and a sweet potato. These will be in the oven in no time I think to myself.

Then I realize you want me to peel the potatoes. I rewrite the recipe. No, I will not peel the russets, Tessa. I will, however, peel the sweet potato.

Then I read as you say, "Peel the potatoes and cut them in half lengthwise. Sit them, flat side, on a chopping board. Using a small, sharp knife, start at one end of the potato and cut down through the top, about a third of the way through. Make another tiny cut away from the first, slightly on the diagonal toward the first cut, and break away the little piece of potato to make a slit. Continue along the potato, making slits about 1/4 inch apart.

I'm puzzled right from the start because most people hassleback an entire potato and you want me to only hassle the back of half a potato? I do some quick research online and find that yes, I am not crazy, and yes, most recipe do hassle the entire back of an entire potato. 

Fine, Tessa. I will play your games and cut my potatoes in half lengthwise. I am only doing this because as I mentioned before; I am about easy and quick, and half a potato cooks faster than a whole potato.

However, I then realize that I will have to hassleback even more potato than if I had just hassled a whole potato? Do you understand where I'm going with this, Tessa?

So there I am rereading your directions about how to hassleback my potatoes when I realize that this recipe is quite a hassle! I wanted to blame it all on you, Tessa. However you did name them Hassleback Potatoes so I suppose it's my fault. 

How did I miss this? 

Let me tell you, Tessa. I didn't have very kind words to say as I was cutting quarter inch slits in all my potatoes, Tessa. When you call for large potatoes did you realize how many slits one would have to cut? It was rather tedious when it came to the russet potatoes and then it was damn near impossible when it came to the sweet potato, but cut away I did.

I put those hassles on the sheet pan and covered them in your mixture of butter, oil, salt, pepper, and sage and stuck them in the oven. I wanted to be done with them, but then I had to baste them with the butter/oil mixture about every 15 minutes.

These potatoes really are hassle, Tessa. A hassle right in the ol' back.

During the baking, I stopped to read reviews on hassleback and I found a lot of complaints, Tessa. People said they were overcooked and dry and too hard, etc. I started to get kinda angry, Tessa. After all that work....my potatoes better be delicious.

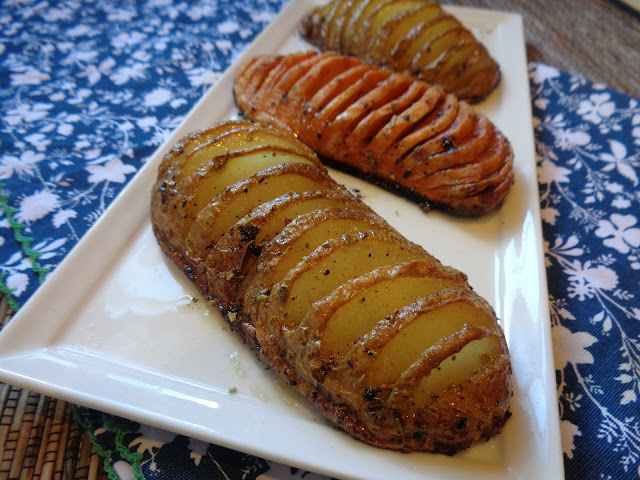
The time had come and I took my potatoes out and placed them on a plate. I noticed the potato bottoms (which you had me cut in half) were crusted over with a glorious golden brown crust. I noticed the tops of the potatoes were perfectly seasoned, with just the right amount of crispness. I also noticed the potato itself was still fluffy.

My son took a bite and was like, "This is way better than a normal baked potato. It has way more flavor and texture and I just love it. Do you have more?" Of course, I had more. I had hassled my way through 3 potatoes after all. I had 6 hassleback halves.

All that hassle, Tessa, and my potatoes were gone in a flash. Everyone ate them up quicker than I hassled them! Imagine that!

Anyway, they are now a family favorite, so thanks a lot. Looks like I will be hassling with potatoes a lot more in the future.

Thanks,

Kim

Hassleback Potatoes

Adapted from Falling Cloudberries

by Tessa Kiros

Serves 6

6 fairly large potatoes

3-1/2 tablespoons butter

2 tablespoons olive oil

a small handful of fresh sage

 Preheat your oven to 425F. Peel the potatoes and cut them in half lengthwise. Sit them, flat side side, on a chopping board. Using a small, sharp knife, start at one end of the potato and cut down through the top, about a third of the way through. Make another tiny cut away from the first, slightly on the diagonal toward the first cut, and break away the little piece of potato to make a slit. Continue along the potato, making slits about 1/4 inch apart.

Handling the potatoes carefully so that they don't break, arrange them in a baking pan. Add the butter and oil and season with salt and pepper. Scatter the sage leaves around and bake for 45 minutes to 1 hour, or until the potatoes are golden and crispy. Spoon a little of the butter pan juices over the top from time to time and gently toss them so they don't stick (but don't touch them for the first 15 minutes or so, or they will simply break). Serve immediately.


The Great Potato @ IHCC