Showing posts with label yeast breads. Show all posts

Saturday, January 28, 2012

La Pizza Rossa (The Bread Lover's Pizza)

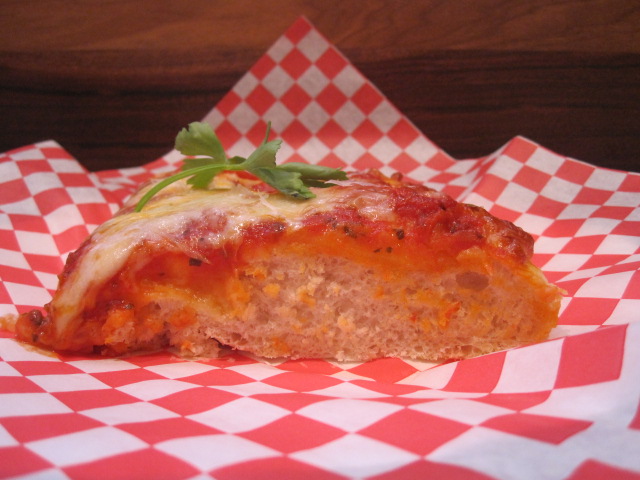
 We've all heard of the meat lover's pizza, the cheese lover's pizza, and the veggie lover's pizza.  Meet the new bread lover's pizza.  The crust on this pizza rossa is at least one and a half inches thick, giving a whole new meaning to thick crust pizza.  

The dough on this pizza is dimpled, which allows room for more toppings, creating a harmonious balance between the thick crust and what lies on top. Creating good dimples in your dough is the secret to this pizza.  Each dimple is like a secret holding extra little bits of sauce and cheese. 

 As written, this recipe called for topping only with a homemade tomato sauce. I wanted to make my pizza more of a main course pizza so I added the standard cheese and pepperoni.  Feel free to customize this pizza as you wish.  There are so many different variations that would be good with this thick crust.  This recipe makes a huge pizza that easily fills up a large sheet pan.  You will have enough pizza to feed a large family or a small crowd.  

La Pizza Rossa
Adapted from Apples for Jam by Tessa Kiros
Makes 12 to 15 pieces

Dough:
1-3/4 cups warm (comfortable to your fingers) water
1 (3/4-ounce) cake fresh yeast, crumbled or 1 (1/4-ounce) package active dry yeast
1 teaspoon honey
1-1/2 tablespoons olive oil
4-3/4 cups all purpose flour
1-1/2 teaspoons salt

Tomato Topping:
5 tablespoons olive oil
1 large clove garlic, peeled and squashed a bit
2 (14-ounce) cans diced tomatoes
1 teaspoon salt
3 basil leaves, torn

cheese, pepperoni, sausage, veggies (optional)
12 ounces of shredded mozzarella
pepperoni, to your liking
about 1/2 cup freshly grated Parmesan
sprinkle of parsley, basil, and/or any other herbs

Put the water, yeast, honey, olive oil, and 3 fistfuls of the flour in a bowl.  Mix with an electric beater until smooth.  Cover the bowl and leave for 20-30 minutes, until the mixture froths up and looks foamy on top.  Mix in the rest of the flour and 1-1/2 teaspoons of salt.  The dough will be very soft and sticky- don't be tempted to add more flour.  Now, using a dough hook, mix for about 4 to 50 minutes so everything is completely incorporated.  If you don't have a dough hook, just mix it with your hands, slapping it from one side of the bowl to the other as it will be too soft to knead.  Cover the bowl with a couple of cloths and leave it in a warm and draft-free place for about 1-1/2 hours, or until the dough has puffed up well.
Note:  I turn my oven on warm/lowest setting and leave the bowl on top of the oven.

Very lightly oil an 11 by 15 by 1-1/2 inch baking pan.  Punch down the dough with one firm blow to the center.  Spread the dough gently onto the pan, right out to the edges, working it with your palms to stretch it along the pan.  If it won't stretch easily, leave it to relax for another 5 minutes and then gently stretch out the dough, starting from the center and flicking your palms across it.  Make sure the dough doesn't break anywhere and that it is more or less evenly spread.  Put in a warm draft-free place.  Arrange four glasses around the pan and drape a couple of dish towels or a towels over them like a tent to completely cover the sheet (so that the dough doesn't stick to the cloth as it rises).  Leave for 45 minutes or so, until the dough has puffed up.
For the tomato topping, heat the oil with the garlic in a saucepan and, when you begin to smell the garlic, add the tomatoes, basil, and 1 teaspoon of salt.  Cook for about 15 minutes over fairly strong heat, until the sauce loses its wateriness and starts to look thick and bubbly.  If you like, you can whiz it a couple of times with a handheld blender to make it a little smoother, but still keep some chunks.  Meanwhile, preheat the oven to 450F.

Dimple the top of the dough here and there with your fingers so that the tomato has some nests to settle into (take care not to deflate your dough, though).  Scatter the tomato sauce over the top and gently spread it out with the back of the ladles.  It may seem like a lot of sauce, but it keeps the pizza lovely and moist.  Top with other toppings, if using.  Put the pan in the oven and bake for about 20 minutes (depending on the strength of your oven) until the pizza is golden and a bit crusty here and there.  Check that the bottom is crusty and crispy, too, and cook for longer if you need to.  Cut up into squares to serve.  I think this is best warm, but it can also be served at room temperature, or reheated.
Theme: Potluck 

Wednesday, September 28, 2011

Tessa Kiros' Finnish Cinnamon and Cardamom Buns


Last week at I Heart Cooking Clubs we said goodbye to Jamie Oliver.  This week we are welcoming in a new chef,  lady chef Tessa Kiros!  I couldn't be more excited to cook Tessa's recipes. 
I've owned my Tessa Kiros cookbooks for a long time and I'm so excited to have a reason to open them up and start cooking.  Tessa's cookbooks are so beautiful and her writing style is very personal, with many family stories and memories sprinkled throughout.  Tessa has a multi-cultural background and has traveled many places, therefore her recipes range from Finnish to Greek to Italian and even South African.  It is going to be a very exciting six months!
*photo credit Brenda Benoit

This week we are welcoming Tessa to I Heart Cooking Clubs and in my mind there is nothing more welcoming than the aroma of fresh baked bread and cinnamon. Throw in some cardamom and I'm completely in love! These are the perfect hand-held treat to enjoy first thing in the morning or for a leisurely afternoon break with a cup of tea or coffee. 
The dough is rolled out into a rectangle and spread with softened butter and cinnamon/sugar.


 Tessa says: "These gorgeous buns were always a part of my childhood.  They are found everywhere in Finland - and probably all over Scandinavia - in tearooms and houses.  Everyone makes their own and they freeze beautifully so you can just pull out a few when a craving sets in.  Don't be put off when you see that the buns needs to rise for a couple of hours.  You can get the dough together really quickly and then leave it alone without even a glance.  The rolling and cutting can be a little tricky the first time you do it, but the second time will be easy."
The dough is rolled into a log and cut on the diagonal

 Cinnamon & Cardamom Buns
Adapted from Falling Cloudberries by Tessa Kiros
Makes about 35 buns

For Dough:
1 cup lukewarm milk
1/2 cup sugar
1 (1-ounce) cake fresh yeast
1 egg, lightly beaten
1/4 pound plus 1 tablespoon butter, softened
2 teaspoons ground cardamom
1 teaspoon salt
5-1/4 cups all-purpose flour

For Cinnamon Butter:
2 teaspoons ground cinnamon
1/4 cup sugar, plus 1 tablespoon for sprinkling
5-1/2 tablespoons butter, softened
 1 egg, lightly beaten

Put the milk and sugar in a bowl and crumble in the yeast.  Let stand for 10 minutes, or until the yeast begins to activate.  Add the egg, butter, cardamom, and salt, and mix in.  Add the flour, bit by bit, mixing it in with a wooden spoon until you need to use your hands, and then turn it out onto the work surface to knead.  It may seem a little too sticky initially, but will become compact and beautifully soft after about 5 minutes. Put the dough back in the bowl, cover with a clean cloth and then a heavy towel or blanket, and leave in a warm place for about 2 hours, or until it has doubled in size. 

To make the cinnamon butter, mix together the cinnamon and sugar.  Divide the butter into four portions and set aside. 

Put the dough on a floured work surface and divide it into four portions.  Begin with one portion, covering the others with a cloth so they don't dry out.  Using a rolling pin, roll out a rectangle, roughly about 12 by 10 inches and 1/8 inch thick.  Spread one portion of butter over the surface of the dough with a spatula or blunt knife.  Sprinkle with about 3 teaspoons of the cinnamon mixture, covering the whole surface with quick shaking movements of your wrists.  Roll up to make a long dough sausage.  Set aside while you finish rolling out and buttering the rest of the dough, so tha tyou can cut them all together.

Line two large baking sheets with parchment paper, or bake in two batches if you only have on sheet. Line up the dough sausages in front of you and cut them slightly on the diagonal, alternating up and down, so that the slices are fat V shapes, with the point of the V about 3/4 inch and the base about 2 inches.  Turn them so they are all the right way up, sitting on their fatter bases.  Press down on the top of each one with two fingers, until you think you will almost go through to your work surface.  Along the sides you will see the cinnamon stripes oozing outward.  Put the buns on the baking sheet, leaving space for them to puff and rise while they bake.  Brush lightly with beaten egg and sprinkle a little sugar over top.

Let the buns rise for half an hour and preheat your oven to 350F.  Bake them for about 20 minutes or until they are golden.  Check that they are lightly golden underneath as well before you take them out of the oven.  Serve hot, warm, or at room temperature and, when they are cool, keep them in an airtight container so they don't harden.
Notes: This dough comes together like a dream and is so easy to work with.  This would be a good recipe for a beginner/novice bread baker.  We loved these rolls, but next time I would add a bit more butter and cinnamon/sugar mixture to the inside of the dough before rolling.  We found that we wanted a little more cinnamon flavor.  Other than that, they were really fun and just the right size for popping in your mouth!

Theme: Welcome Tessa!

Sunday, September 18, 2011

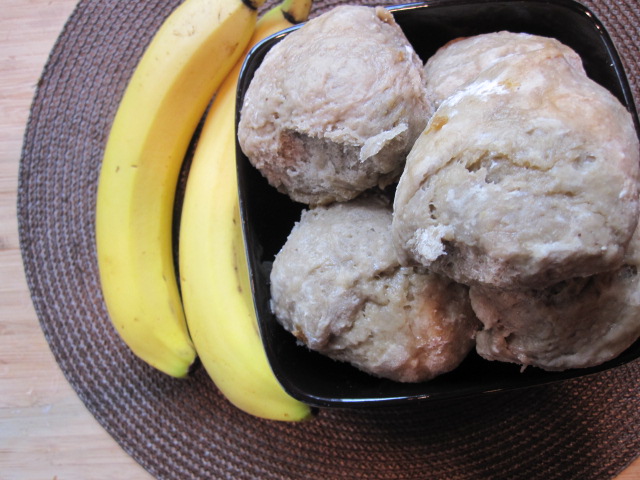
A Total Fail: Banana and Honey Rolls

Every once in awhile I have a total fail in the kitchen.  It's usually when I'm baking, as is the case with these banana and honey rolls.  I've had my eye on Jamie's banana and honey rolls since we first started cooking with him 6 months ago.  Instead of adding water to the dough Jamie adds a banana puree.  Instead of adding sugar, he adds honey.  It was something new and it really caught my eye. Since it's bread baking week at IHCC I thought I'd give them a go.  

It's possible that I messed up when I converted the recipe from metric.  It's possible that I over mixed the dough.  It's also possible that the recipe is flawed somewhere.  Either way, these rolls didn't achieve the desired golden brown color and they were very dense, too dense.  It was akin to eating a brick. 
  
Below is a picture of Jamie's banana and honey roll.  It looks perfectly fluffy and golden brown with gorgeous caramelized honey on top.  Nothing like my poor rolls. Oh well, you can't win them all.

Banana and Honey Rolls
Adapted from JamieOliver.Com
Makes 10

  1kg strong bread flour (about 7 & 1/2 cups)
  6 bananas, pureed into a liquid
8 tablespoons honey
  3 packets of yeast (7g each)
  1 level tablespoon fine sea salt
  extra flour for dusting
Optional: One handful of cracked almonds

Begin by making your banana puree:
*First of all, peel your bananas then purée them in a blender or food processor. The mix will be surprisingly wet. Pour it into a measuring cup, then top up with water until you have just over 2 cups.
Stage 1: making a well
 
Pile the flour on to a clean surface and make a large well in the centre. Pour half your banana puree into the well, then add your yeast, half the honey (4tbsp), salt and stir with a fork.
 
Stage 2: getting it together
 
Slowly, but confidently, bring in the flour from the inside of the well. (You don't want to break the walls of the well, or the banana puree will go everywhere.) Continue to bring the flour in to the centre until you get a stodgy, porridgey consistency – then add the remaining banana puree. Continue to mix until it's stodgy again, then you can be more aggressive, bringing in all the flour, making the mix less sticky. Flour your hands and pat and push the dough together with all the remaining flour. (Certain flours need a little more or less water, so feel free to adjust.)
 
Stage 3: kneading!
 
This is where you get stuck in. With a bit of elbow grease, simply push, fold, slap and roll the dough around, over and over, for 4 or 5 minutes until you have a silky and elastic dough.
 
Stage 4: first prove
 
Flour the top of your dough. Put it in a bowl, cover with cling film, and allow it to prove for about half an hour until doubled in size – ideally in a warm, moist, draught-free place. This will improve the flavour and texture of your dough and it's always exciting to know that the old yeast has kicked into action.
 
Stage 5: second prove, flavouring and shaping 
 
Once the dough has doubled in size, knock the air out for 30 seconds by bashing it and squashing it. You can now shape it or flavour it as required – folded, filled, tray-baked, whatever – and leave it to prove for a second time for 30 minutes to an hour until it has doubled in size once more. This is the most important part, as the second prove will give it the air that finally ends up being cooked into your bread, giving you the really light, soft texture that we all love in fresh bread. So remember – don't fiddle with it, just let it do its thing.  
 
Stage 6: cooking your bread
 
Very gently place your bread dough on to a flour-dusted baking tray and into a preheated oven. Don't slam the door or you'll lose the air that you need. Bake according to the time and temperature given with your chosen recipe. You can tell if it's cooked by tapping its bottom – if it sounds hollow it's done, if it doesn't then pop it back in for a little longer. Once cooked, place on a rack and allow it to cool for at least 30 minutes – fandabidozi. Feel free to freeze any leftover bread.• from Happy Days with the Naked Chef I’m still really mad about bread – I love it. It’s so exciting. It’s such a rewarding, therapeutic, tactile thing and you’ll be so proud of yourself once you’ve cracked it.

***
For the banana honey bread: 
At Stage 5 divide the dough into 10 balls. Then pack these next to each other in a flour-dusted baking pan where they will rise together. Before putting in the oven, drizzle generously with the rest of the honey so that the top of the bread will caramelize, going nice and golden. Bake in your preheated oven at 375°F for 20 minutes. Allow to cool for a little while, but it’s best served still warm with lots of butter and a glass of milk for breakfast while you read the paper. Also fantastic used in bread and butter pudding or simply heated up with a bit of ice cream.
 
Theme: Ready, Breadie?


Friday, October 15, 2010

World Bread Day: Italian Pub Burgers on Mini Ciabatta Rolls


The two-step bread making process has been intimidating me for a long time, but I finally decided to give it a whirl. I owe it all to World Bread Day. It was the final push I needed to get in the kitchen and just do it. No more procrastination. It was time to face my fears.

My inspiration for World Bread Day was Giada's Italian Pub Burgers, which are served on beautiful Ciabatta Rolls. Enamored with those little Ciabatta Rolls in Giada's book, I decided to make my own for World Bread Day. Having just received Nick Malgieri's new book, Bake!, I decided to use his recipe for Ciabatta dough and adapt it to make 16 Mini Ciabatta Rolls.

It all began with a simple yeast-based sponge dough. A simple combination of bread flour, water, and yeast. It took all of 5 minutes to prepare and couldn't have been simpler.

The next day, I mixed all of the sponge dough with more bread flour, yeast, salt and water to make the Ciabatta dough. From this point on, this dough was a huge labor of love.

I mixed the dough with my Kitchenaid for 3 minutes and let the dough rest for 10 minutes. Then I did it again. Mix the dough for 3 minutes, let it rest for 10. I oiled a large bowl and let the dough rest for 30 minutes. When the dough was removed from the oiled bowl, I formed a rectangle and folded the dough in to make three layers. I turned the dough 90 degrees and folded it, yet again, into 3 layers. After the first folding, the dough had to rest another 15 minutes. When I read the words "repeat this process" I wanted to scream. After resting for 15 minutes, I removed the folded dough and folded it into three layers two more times. Big surprise - yep! Another 15 minutes of resting. After lots of folding and resting, I turned the dough over so that the fold was underneath and formed it into a 10-inch square. I bet you can guess what happened next. Yep, the dough had to rest for another 30 minutes. Ugh! After the dough rested for 30 minutes, I cut the 10-inch square of dough into 16 mini rolls. I placed the rolls onto a baking sheet lined with cornmeal and covered them with a kitchen towel for yet another 30 minute rest.

In the end, we loved the rolls. They were amazingly light and delicate with a wonderful taste and texture. I did notice that my rolls were rather pale. I was terrified of overcooking them, but maybe I should have left them in the oven to develop more color? Not sure.
The Mini Italian Pub Burgers were unbelievably delicious. My favorite Giada recipe to date. The burger itself is a combination of beef, lots of Parmesan cheese, garlic, parsley, and tomato paste. It's topped with Taleggio cheese(I used Fontina) and a basil leaf. Not only is it pretty to look at, but it is cheesy wonderful deliciousness, especially when served on a homemade Ciabatta roll.
Italian Pub Burgers
Adapted from Giada at Home
Serves 8
Vegetable or canola oil, for the grill
2-1/4 pounds ground chuck
3/4 cup freshly grated Parmesan cheese
1/2 cup packed fresh flat-leaf parsley leaves, finely chopped
3 garlic cloves, finely chopped
3 tablespoons tomato paste
1-1/2 tsps. salt
1/4 teaspoon freshly ground black pepper
8 small ciabatta rolls, sliced in half
1/4 cup olive oil
8 slices (4-1/2 ounces) Taleggio cheese (I used fontina)
8 large basil leaves

Place a grill pan over medium-high heat or preheat a gas or charcoal grill. Lightly oil the grill pan or grilling rack with vegetable oil.

In a large bowl, combine the ground chuck, Parmesan cheese, parsley, garlic, tomato paste, salt and pepper. Using clean hands, gently mix the ingredients and form into 8 patties, each about 1 inch thick and 4 inches in diameter.

Grill the burgers for 3 minutes on each side, until coked to medium.

Brush the cut side of each roll with the olive oil and toast on the grill for 1 to 2 minutes, until slightly golden.

To serve, put 1 mini burger on the bottom half of each of the rolls. Divide the Taleggio cheese on top of the burgers. Place a basil leaf over the cheese and put the other half of each roll on top.

Note: I reduced the burger portion of this recipe in half to make 14 mini burgers.

Happy World Bread Day!

Wednesday, August 18, 2010

A Mario Batali Pizza Roundup!


If there was ever a reason to buy Mario's newest book, this is it!! Mario's pizza dough is definitely the star of Molto Gusto.I would go so far to say that pizza is probably the central focus of Molto Gusto, taking a full 30 pages of the book (pictures and recipes combined). If you're wondering whether Mario's pizza is swoon-worthy, have no doubts. It is superb!

Mario calls for "00" flour which I have a very hard time finding in these parts. I ordered both the Perfect Pizza Flour and also the Pizza Dough Flavor from the King Arthur website. There was definitely a difference in the pizza flour. It was ground very fine and was very soft, making for a very smooth and malleable dough. It was a joy to work with.

The coolest thing about Mario's pizza dough is that one batch of dough makes 8 little (personal-sized) pizzas which are first parcooked stovetop using a hot griddle. After the pizzas are parcooked on the griddle they are topped with the toppings of your choice and placed under the broiler for around 7-8 minutes each, or until desired doneness. The exciting part about this is that the parcooked pizzas keep very well in the refrigerator making it very easy for you to make homemade pizzas in less than 10 minutes. Genius!!

First up and extremely delicious is Mario's Pizza Bianca. The Pizza Bianca is a wonderful way to really appreciate the pizza dough itself. The pizza dough is parcooked on the griddle and then placed under the broiler for 1 -2 minutes, until lightly toasted. It is drizzled with extra virgin olive oil and sprinkled with salt.

Pizza Bianca is absolutely delicious on it's own. I love the way the dough bubbles up creating air pockets-yum! We loved this version so much that we enjoyed 3 out of 8 pizzas this way. It's the perfect example of simple and delicious.

The next pizza was Mario's Margherita D.O.P topped with Pomi strained tomatoes, 1 small ball of fresh mozzarella and fresh basil leaves. You can't beat those classic Italian flavors. This version was my pick for my personal pizza and I loved it!

Lastly, we have Mario's Pepperoni Pizza topped with some huge slices of pepperoni I found at a deli in Lexington. It was everything we wanted it to be and then some. We made a total of four pepperoni pizzas!

Notes/Results: This is an awesome recipe for pizza dough and I highly recommend buying the book. (I would love to share the recipe, but it is a full 3 pages long and would make for quite a long post). Mario has a wide range of pizza toppings in the book, from fun to adventurous. Molto Gusto is probably one of my top three favorite cookbooks this year. It is a very approachable book with gorgeous pictures and very tasty recipes. This pizza dough rocks and will be my new go-to pizza recipe. I simply can't get over the fact that you can parcook the pizzas and store them in the refrigerator. They are perfect to have on hand for after school snacks, perfect for family or game night, perfect for entertaining. I will be making another batch soon.

Sunday, February 14, 2010

King Cake from "My New Orleans"

Months ago, I received a copy of John Besh's new cookbook, My New Orleans, from a giveaway hosted by Deb of Kahakai Kitchen. My New Orleans is an amazing cookbook, full of stories, great photos and pure love for the city of New Orleans. There is an entire chapter devoted to Mardi Gras, with many wonderful recipes. I have always wanted to try a King Cake, so I chose this recipe to celebrate Fat Tuesday coming up this week.

The dough is enriched with butter and eggs and is wonderfully fragrant with cinnamon and nutmeg. Besh braids his cake, dividing the dough into three equal parts, and rolling into three equal ropes.
The ropes are braided and the ends pinched to seal the seams. The cake is baked for 30 minutes in a 375F oven

Once the cake has cooled for 30 minutes, it is time to decorate the cake. I took this opportunity to put the plastic baby in before decorating. Can you see his little head peeking out?
The icing is a delicious combination of powdered sugar, fresh lemon juice, and condensed milk.
While the icing is still wet, you top the cake with purple, gold and green decorative sugars. I couldn't find any decorative sugars, so I made my own using food coloring and normal granulated sugar.King Cake
adapted from "My New Orleans" by John Besh
Serves 10-12
For the Cake:
1 cup lukewarm milk, about 110F
1/2 cup granulated sugar
2 tablespoons dry yeast
3-3/4 cups all-purpose flour
1 cup melted butter
5 egg yolks, beaten
1 teaspoon vanilla extract
1 teaspoon grated fresh lemon zest
3 teaspoons cinnamon
Several gratings of fresh nutmeg
For the Icing:
2 cups powdered sugar
1/4 cup condensed milk
1 teaspoon fresh lemon juice
Purple, green, and gold decorative sugars
1 feve (fava bean) or plastic baby to hide in the cake after baking

For the cake, pour the warm milk into a large bowl. Whisk in the granulated sugar, yeast, and a heaping tablespoon of the flour, mixing until both the sugar and the yeast have dissolved.

Once bubbles have developed on the surface of the milk and it begins to foam, whisk in the butter, eggs, vanilla, and lemon zest. Add the remaining flour, cinnamon, and nutmeg and fold the dry ingredients into the wet ingredients with a large rubber spatula.

After the dough comes together, pulling away from the sides of the bowl, shape it into a large ball. Knead the dough on a floured surface until it is smooth and elastic, about 15 minutes.

Put the dough back into the bowl, cover with plastic wrap, and set aside in a draft-free place to let it proof, or rise for 1-1/2 hours or until the dough has doubled in volume.

Preheat the oven to 375F. Once the dough has risen, punch it down and divide the dough into 3 equal pieces. Roll each piece of dough between your palms into a long strip, making 3 ropes of equal length. Braid the 3 ropes around one another and then form the braided loaf into a circle, pinching ends together to seal. Gently lay the braided dough on a nonstick cookie sheet and let it rise until it doubles in size, about 30 minutes.

Once it's doubled in size, place the cookie sheet in the oven and bake until the braid is golden brown, about 30 minutes. Remove the cake from the oven, place on a wire rack, and allow to cool for 3o minutes.

For the icing, while the cake is cooling, whisk together the powdered sugar, condensed milk, and lemon juice in a bowl until the icing is smooth and very spreadable. If the icing is too thick, add a bit more condensed milk; if it's a touch too loose, add a little more powdered sugar.

Once the cake has cooled, spread the icing over the top of the cake and sprinkle with purple, green, and gold decorative sugars while the icing is still wet. Tuck the feve or plastic baby into the underside of the cake and, using a spatula, slide the cake onto a platter.

Whoever gets the piece of cake with the baby, or feve, is said to have good luck. However, they are also responsible for buying the King Cake next year. The kids go crazy for the baby!


Notes/Results: I have never made or tasted a King Cake before, but as soon as I smelled the dough I knew that I was going to love it. The dough smells of cinnamon rolls (yum) and is smooth, easy to work with, and wonderfully fragrant with cinnamon and nutmeg flecked throughout. The only change I made was to use about double the amount of condensed milk to achieve the right consistency. The icing itself is delicious and I had a very hard time keeping my daughter's hands out of the bowl. This is a very fun cake to make, with the decorative sugars and the whole idea of hiding the baby and all. My daughter was so excited to get the piece of cake with the baby. Definitely a kid-friendly recipe to make. I can see myself making this recipe again next year.

Friday, January 29, 2010

Long Boy Burgers

Long Boy Burgers. Have you ever heard of them? I hadn't. I happened across a recipe called "Long Boy Burgers" while flipping through my copy of Cook's Country. Very interested in new and different recipes, I read about the history of the Long Boy. In short, the Long Boy is a 1960's retro recipe that is much like an open-faced meatloaf sandwich, served atop a toasted sub roll or hot dog bun.

I knew I had to make this recipe for several reasons:
*We love meatloaf
*I wanted to use my brand new deli baskets and red checked liners
*it was quick, fun, easy and economical
*I had just made fresh homemade hot dog buns for my HBin5 group

Long Boy Cheeseburgers -adapted from Cook's Country Magazine
Serves 4 -8 **The Long Boys came out rather large. You could easily cut each Long Boy in half and have a very satisfying portion***(Be sure to spread the meat to the edges of rolls, or the bread will burn)
2 (6-inch) sub rolls split in half lengthwise
1-1/4 cups cornflakes, crushed
1/2 small onion, minced
1/3 cup whole or lowfat milk
6 tablespoons ketchup
1 tablespoon Worcestershire sauce
1 teaspoon minced fresh thyme
1/2 teaspoon garlic powder
1 large egg, lightly beaten
salt and pepper
1-1/2 pounds 90 percent lean ground beef
2 cups shredded cheddar cheese

1. Toast Rolls - Adjust oven rack to upper middle position and heat oven to 450 degrees. Bake rolls, cut side up, on wire rack set inside rimmed baking sheet until golden and crisp, about 5 minutes.

2. Make Meat Mix - Combine cornflakes, onion, milk, 4 tablespoons ketchup, Worcestershire sauce, thyme, garlic powder, egg, 1/2 teaspoon salt, and 1 teaspoon pepper in large bowl. Add meat and knead gently until well combined.

3. Bake Burgers - Top toasted rolls evenly with meat mixture, spreading meat to edges of rolls. Brush top of meat mixture evenly with remaining ketchup and bake until meat registers 160 degrees, 20 to 25 minutes. Top burgers with cheese and continue to bake until cheese melts, 3 to 4 minutes. Let rest 5 minutes and serve.

Results/Notes: This recipe was unique and fun! The kids loved the deli baskets and checked liners. The burgers were much like an open-faced meatloaf sandwich. All in all, it was a cute idea that made for a fun dinner. I really loved this batch of HBin5 dough. The soft sandwich bread was delicious and the hot dog buns were easy to form and baked up well. The soft whole wheat dough is definitely a recipe that I will enjoy over and over in my kitchen.

I recently joined up with a new group, hosted by Michelle of Big Black Dog, to bake my way through the Healthy Bread in Five Minutes a Day cookbook. Our challenge this time around was to make one recipe of Soft Whole Wheat dough, a great soft dough enriched with eggs. We were to make one loaf of Soft Whole Wheat Sandwich Bread, which I enjoyed with some peanut butter and jelly (my personal favorite). The bread was nice and soft and much more satisfying than that plain old white bread stuff.The other part of our challenge was to make either Hamburger Buns or Hot Dog Buns. Inspired by the Long Boy Burger, I chose the Hot Dog Buns and they worked perfectly in that recipe. Head on over the Michelle's site HERE on Feb 1st to check out any of the other bread bakers.

Have you ever heard of a Long Boy?

Tuesday, January 19, 2010

Pretzel Baguettes and Cheese of the Month: Red Dragon with Mustard Seeds and Ale


It's no secret that I love bread and cheese. I may have even shared my unnatural love for mustard a time or two. Imagine my surprise when I found this Red Dragon Mustard Seed and Ale Cheese for sale at my Whole Foods. There was only one wedge left and it had my name written all over it. As I stared at the cheese, admiring it's red casing and it's visual appeal, I started to daydream about all the ways I could use it. I must have been off in another world, which happens a lot by the way, because the cheesemonger was talking to me and I didn't hear him. He said "We have a pretzel baguette that goes great with that cheese." MAMA SAY WHAT?

Imagine my delight at the words he spoke! Pretzel baguette. That's genius, I thought to myself, as I squealed in delight running to the bread section. However, he also mentioned "if we have any left", which kinda of made my stomach sink a little. It must have been my lucky day because there were several pretzel baguettes sitting in the basket and I was in love with them. I picked up two baguettes at $1.99 each and went happily to see the cashier.
We know that pretzels pair well with mustard and we also know they pair well with cheese, but cheese with mustard - yum!

Results/Notes: This is a classic combination. Both the pretzel baguette and the mustard seed and ale cheese were wonderful. The baguette was just like a soft pretzel, but in loaf form; soft and chewy. The cheese is a tangy Welsh Cheddar, made from pasteurized milk, mixed with mustard seeds and ale. It is creamy and almost spreadable at room temperature. Besides pairing well with the pretzel baguette, this cheese would be a great addition to any sandwich that would otherwise call for mustard. I think it would also be great melted into Welsh Rarebit or even added into some homemade macaroni and cheese. This is a great combination for any Superbowl parties coming up. All in all, it was fairly inexpensive. The baguettes are only $1.99 each and my wedge of cheese was about $4. A somewhat healthy and unique snack for around $5. These two goodies get a definite "thumbs up" from me and I will seek them out each and every time I happen to get to Whole Foods.

If you don't happen to have a Whole Foods in your area, you can buy this cheese online at Amazon, here. More often than not, you can ask your cheesemonger for specific items and they will order them for you without the added shipping charges.

In case you would like to try your own pretzel baguette, there is a link to a recipe here. I haven't tried this recipe, but I would definitely like to.

This is the first in my series for Cheese of the Month. Each month I am going to try a new cheese and feature it alone or in a recipe.

Thursday, January 14, 2010

Red Pepper Hummus and Spicy Whole Wheat Crackers

What do you think of when you think of exotic destinations? When I think exotic destinations, I think of places far away, mysterious and unique. There is no place more mysterious and unique to me than the Egyptian pyramids. Wouldn't you love to see those ancient wonders? Along the way you might stop at a bazaar and bargain for spices, gold, copper, perfumes, and Egyptian cotton. When your stomach started to grumble you might find a place to sit and enjoy some hummus with pita or flatbreads. It would be a pleasant and warm 70 degrees and there would be a perfect breeze.

Or, you could wake up in Kentucky where the weather is a crisp 29F. Your toddler is screaming for juice, you have a cold and you realize that dreams of exotic destinations will have to wait for another day.

This Red Pepper Hummus is my contribution to Exotic Destinations week over at I Heart Cooking Clubs. I served this with some homemade spicy whole wheat crackers, which I baked for my Healthy Bread in 5 group.
Red Pepper Hummus - adapted from Nigella Express by Nigella Lawson
1 - 14 oz. can chickpeas
1 - 12 oz. jar roasted red peppers
2 tablespoons cream cheese
2 tablespoons garlic infused oil (I used 2 tbsp. olive oil and 1 clove of minced garlic)
1 teaspoon lime juice (I used 1 tsp. lemon juice)
1 teaspoon paprika
salt

Drain the chickpeas and peppers and put them into a food processor. (I used my blender with great results) Add the cream cheese, oil, lime juice, and paprika. Whiz to a hummus-like puree, and then add salt and perhaps more lime juice according to taste. Makes 2 cups

Notes/Results: While Nigella's addition of cream cheese is not authentic, it does make a very creamy hummus. The hummus was a beautiful orange color and paired very well with my spicy crackers. It was a little on the spicy side, although I'm not sure why and since I like spicy that is okay by me. Although I prefer traditional hummus, I am really enjoying Nigella's variation and would probably make it again if I had the ingredients on hand.

Head on over to I Heart Cooking Clubs to check out all the other exotic recipes this week.


As part of the Healthy Bread in 5, I also made the master recipe. A beautiful whole wheat boule, which will create some wonderful hummus sandwiches this week.

You can check out the HB in 5 group over on Michelle's site, Big Black Dog. We are going to be baking our way through the new HB in 5 book. This is our first group post, so there is still time to join along!

Wednesday, January 13, 2010

THIN CRUST PIZZA AND HOMEMADE PIZZA SAUCE

Yesterday I was searching RecipeZaar online and found they had listed their top 100 recipes in 2009. While browsing through, I found a recipe for Thin Crust Pizza Dough and another one for Homemade Pizza Sauce. I had very little ingredients around in the kitchen, but I did have everything I needed for both of these recipes. Don't you love it when a plan comes together?

The pizza dough came together quick and easy and only needed to rise one time for 20-30 minutes. In no time, my house smelled like a pizzeria. My daughter could hardly wait for the pizza to be finished.
As you can see, my picky eaters won out with their pepperoni pizza. I would've loved to do a spinach and artichoke pizza, but I was outnumbered. Maybe one day I can convince my husband and daughter that vegetables aren't evil. For now, I guess I'm lucky they eat tomato sauce.
HOMEMADE PIZZA SAUCE *
**MAKES ENOUGH TO TOP 2 - 12" PIZZAS**
2 tablespoons olive oil
1 tablespoon butter
1/2 cup onion chopped
1/4 cup celery, chopped
1 garlic clove, minced
1 - (8 ounce) can tomato sauce
1- (6 ounce) can tomato paste
2 tablespoons grated parmesan cheese
1 teaspoon dried basil
1 teaspoon dried oregano
1/2 teaspoon salt
1/2 teaspoon sugar
1/4 teaspoon black pepper
1 small bay leaf
1 teaspoon fennel seed

In a large skillet, melt butter with the oil. Add the onion, celery and garlic and saute until soft and transparent. Add tomato sauce and tomato paste and stir until smooth. Add remaining ingredients and bring to slow simmer. Simmer for 30-60 minutes (or not at all depending on your taste and time frame).

PIZZA DOUGH FOR THIN CRUST PIZZA
**MAKES 2 - 12" PIZZAS**
2-1/2 cups all purpose flour (may sub whole wheat flour for 1 cup of the all-purpose)
1 - (1/4 oz.) package active dry yeast
1/4 teaspoon salt
1 cup warm water
1/2 to 1 tablespoon olive oil
cornmeal for sprinkling

Mix a little sugar into the warm water. Sprinkle yeast on top. Wait for 10 minutes or until it gets all foamy. Pour into a large bowl. Add flour, salt, olive oil. Combine. Knead for 6-8 minutes until you have a moderately stiff dough that is smooth and elastic (add a bit more flour if you need to). Cover and let rest for 20-30 minutes.

Lightly grease two 12-inch pizza pans. Sprinkle with a little bit of cornmeal. Divide dough in half. Place each half on a pizza pan and pat it with your fingers until it stretches over the whole pan. Try to make it thicker around the edge. If desired, pre-bake at 425 F for 10 minutes (I don't always do this). Then spread with pizza sauce and use the toppings of your choice. Bake at 425 F for 10-20 minutes longer or until bubbly and hot. Makes 2 12-inch pizzas.

TO FREEZE THE DOUGH:
Take a portion of dough, form into a ball, rub olive oil over it and place it in a freezer bag (the oil makes it easier to take out of the bag). When you want to make a pizza, take dough out of freezer and allow to thaw before using.

NOTES/RESULTS: I was really pleased at how well this pizza turned out. The thin crust pizza dough works well with whole wheat, which I love. The dough comes together very quick and I love that it only has to rise once for only 20-30 minutes! How can you beat that? In addition, the dough was pliable and easy to roll into a 12 inch circle. The crust is perfectly thin and gets a little crispy on the bottom when baked on the pizza stone. The thin crust pizza dough is a definite keeper! The pizza sauce smelled terrific and was pretty tasty. I'm not sure if it was my favorite, but it is a good solid recipe, especially if you don't have any on hand and need to throw some together quickly. It was a little on the thick side, but full of flavor. In fact, I may want my pizza sauce a little more mild so that the toppings have a chance to shine. All in all, I'm really glad that I tried both recipes. I will definitely be making the pizza dough for thin crust pizza again!