Wednesday, May 18, 2011

Everyday Food's Raisin Bran Muffins

 I'm not the biggest muffin fan, but of all the muffins out there, I really love a good ol' bran muffin.  Strange, eh?  Not only do I love the flavor of the bran, but I also love the not so sweet quality of a bran muffin.  This recipe, from Martha Stewart's Everyday Food, produces a slightly sweet muffin using good 'ol Raisin Bran cereal.  The end result is a dense muffin with a nice crackly top.  The recipe is quite healthy, using whole wheat flour and only 1/4 cup brown sugar and oil each.  I also love that the recipe only makes 6 muffins, which is perfect because we all know what happens when we have extra muffins laying around.
 Raisin-Bran Muffins
Adapted from Everyday Food
Serves 6

1-1/2 cups raisin-bran cereal
3/4 cup milk
1/2 cup whole-wheat flour
1/2 cup all-purpose flour
2 teaspoons baking powder
1/2 teaspoon ground cinnamon
1/4 teaspoon salt
1/4 cup vegetable oil, such as safflower
1 large egg, lightly beaten
1/4 cup packed dark-brown sugar

Preheat oven to 400F.  Line 6 cups of a standard muffin tin with paper liners.  In a bowl, combine cereal with milk; let stand until softened, about 5 minutes.  In another bowl, whisk together both flours, baking powder, cinnamon, and salt.  Stir oil, egg, and brown sugar into cereal mixture, then fold in flour mixture.

Divide batter evenly among lined cups.  Bake, rotating tin halfway through, until golden brown and a cake tester inserted into the centers comes out clean, 20-25 minutes.

Cool in tin 5 minutes, then turn out muffins onto a wire rack to cool completely.  Serve warm or at room temperature.  Muffins can be store up to 3 days at room temperature, or frozen up to 3 months, in a large resealable plastic bag; thaw at room temperature and warm in the oven before serving.

Notes/Results:  I initially made these muffins for myself because I had a very busy week last week and wanted something semi-healthy to grab on the go.  Turns out that I was only able to have one because everyone else stole the rest.  I think this is a great recipe for bran muffins, but I do want to note that they do have a rather "healthy" taste (which I liked) and also that they are not very sweet (which I also liked). 

Sunday, May 15, 2011

Baked Camembert Pasta

Imagine a gorgeous little box of Camembert covered in sliced garlic, herbs and a little bit of olive oil.  Now imagine that gorgeous little box of Camembert coming out of the oven all bubbly and melty and gooey and lovely....and then pouring that gorgeous cheese all over a bowl of pasta. 

The best part is, you don't have to imagine.  You can make it too!
Baked Camembert Pasta
Adapted from Jamie Oliver's Food Revolution
Serves 4-6

1 x 8 ounce box of Camembert cheese
2 cloves of garlic
1 sprig of fresh rosemary (I used basil)
extra virgin olive oil
sea salt and freshly ground black pepper
1 pound dried rigatoni (I used shells)
6 cups (approx. 6 ounces) fresh spinach leaves (I omitted since I didn't have any on hand)
4 ounces Parmesan cheese

To prepare your pasta:
Preheat your oven to 350F. Open the box of cheese and unwrap it.  Place it back in the wooden container. Score a circle into the top of the skin, then lift it off and discard.  Peel and finely slice the garlic.  Pick the rosemary leaves off the woody stalk.  Lay the garlic slices on top of the cheese, sprinkle with some pepper and drizzle with a little extra virgin olive oil.  Scatter over the rosemary leaves and gently pat with your fingers to coat them in the oil.  Grate the Parmesan.

To cook your pasta:
Place the box of cheese on a cookie sheet and put it into the preheated oven for 25 minutes, until golden and melted.  Meanwhile, bring a large pan of salted water to a boil.  When your cheese has 10 minutes left to cook, add the rigatoni to the pan and cook according to the package instructions.  When the pasta is cooked, add the spinach to the pan - it only needs cooking for 10 seconds or so.  Drain the pasta and spinach in a colander over a large bowl, reserving some of the cooking water.  Return the pasta and spinach to the pan and let it wilt.  Drizzle with a couple of good lugs of extra virgin olive oil and add the grated Parmesan.  If the sauce is too thick for you, add a splash of the reserved cooking water to thin it out a bit.  Season with salt and pepper and give it a good stir.  Remove the cheese from the oven.

To serve your pasta:
Divide the pasta between your serving bowls.  Either drizzle the melted Camembert on top or pop the box of cheese on the table and let everyone help themselves to a lovely, gooey spoonful.


Wednesday, May 11, 2011

Ina's Panko-Crusted Salmon served on Couscous

You can always count on Ina Garten to deliver a fantastic recipe, and her recipe for Panko-Crusted Salmon is no exception.  It's a simple dish, easy to prepare, yet it delivers so much flavor.  I love the crunchy texture of the lemony breadcrumbs with the tender flaky fish.  I knew it was going to be a great dish, but it really exceeded our expectations. 

My non-fish eating family gobbled this up and asked for more.  They even asked me if we could have this meal once a week.  Now that's some magic!  I definitely suggest this recipe for salmon if you are trying to introduce more fish into your diet.  I think it would make a believer out of just about anyone.

Panko-Crusted Salmon
Adapted from Ina Garten's How Easy Is That?
Serves 4

2/3 cup panko 
2 tablespoons minced fresh parsley
1 teaspoon grated lemon zest
Kosher salt and freshly ground black pepper
2 tablespoons good olive oil
4 (6-8oz.) salmon filets, skin on
2 tablespoons Dijon mustard
2 tablespoons vegetable oil
Lemon wedges, for serving

Preheat the oven to 425 degrees.

In a small bowl, mix together the panko, parsley, lemon zest, 1/2 teaspoon salt, and 1/2 teaspoon pepper.  Drizzle with the olive oil and stir until the crumbs are evenly coated.  Set aside.

Place the salmon fillets, skin side down, on a board.  Generously brush the top of the fillets with mustard and then sprinkle generously with salt and pepper.  Press the panko mixture thickly on top of the mustard on each salmon fillet.  The mustard will help the panko adhere.

Heat the vegetable oil over medium-high heat in a 12-inch cast-iron skillet or large heavy, ovenproof pan.  When the oil is very hot, add the salmon fillets, skin side down, and sear for 3-4 minutes, without turning, to brown the skin.

Transfer the pan to the hot oven for 5-7 minutes until the salmon is almost cooked and the panko is browned.  Remove the oven, cover with aluminum foil, and allow to rest for 5-10 minutes.  Serve the salmon hot or at room temperature with lemon wedges.
Couscous with Toasted Pine Nuts
Adapted from Ina's How Easy Is That?
Serves 6-8

4 tablespoons (1/2 stick) unsalted butter
2 cups chopped yellow onion (2 onions)
3 cups chicken stock, preferably homemade
1-1/2 teaspoons kosher salt
1-1/2 teaspoons freshly ground black pepper
2 cups couscous (12 ounces)
1/2 cup pine nuts, toasted
1/2 cup minced fresh parsley

Note: To toast pine nuts, place them in a dry saute pan and cook over low heat for 10 minutes, toasting often, until lightly browned.

Melt the butter in a large saucepan.  Add the onion and cook over medium-low heat for 8-10 minutes, stirring occasionally, until tender but not browned.  Add the chicken stock, salt, and pepper and bring to a full boil.  Stir in the couscous, turn off the heat, cover, and allow to steam for 10 minutes.  Fluff with a fork, stir in the pine nuts and parsley, and serve hot.

Monday, May 9, 2011

Creole Meat Loaves with Trinity Gravy

This meal, Creole Meat Loaves with Trinity Gravy, is so fabulous it will convert any Rachel Ray skeptic into a believer.  And, if perhaps you're already a Rachel Ray fan, then you simply have to try this one.  My husband, who is a tough critic, said "This is one of your bests yet." 

Of course it helps that both my husband and I love meat loaf.  In addition, we love spicy food, so this spicy flavorful Trinity Gravy was right up our alley.  What's different about these meat loaves is that they are made completely from ground pork and oh...are they ever juicy and delicious!  And that Trinity Gravy......OH MY!  Rachel's Trinity Gravy is pure genius.  I could literally eat it on just about everything.  The gravy is started by making a roux, then adding onions, garlic, celery, and bell pepper.  Once the veggies are softened a little tomato paste is added, along with a little flour to thicken the mixture.  Then here comes the magic ingredient for the gravy:  hot sauce, and quite a bit of it!!  A totally swoon worthy and stunning meal.
 Creole Meat Loaves with Trinity Gravy
Adapted from Rachel Ray's Look + Cook
Serves 4, very generously

2 pounds sweet potatoes, peeled and cut into chunks (I used russet potatoes)
Salt
3/4 to 1 cup buttermilk
1 tablespoon EVOO, plus more for drizzling
1 large red or yellow onion, finely chopped
4 garlic cloves, finely chopped (I used more like 6 or 8)
2 pound ground pork
1 tablespoon sweet paprika
2 tablespoons fresh thyme leaves (I didn't have any so I left them out)
Black Pepper
1/4 cup grainy mustard
1/2 cup bread crumbs, a couple handfuls
1 egg
2 tablespoons butter
2 celery stalks, chopped
1 green bell pepper, seeded and chopped
2 tablespoons tomato paste (I subbed ketchup)
2 tablespoons all-purpose flour
1-1/2 cups chicken stock
2-3 tablespoons hot sauce (I used almost 3 tablespoons)
4-5 scallions, sliced on the bias, for garnish
Optional: 1-2 tablespoons Cajun seasoning (my addition)

Note: Rachel's recipe calls for sweet potatoes and I couldn't find any so I subbed regular baking potatoes.

For the Potatoes:
Cover the potatoes with water in a medium pot and bring to a boil, then season with alt and cook for 12-15 minutes until tender.  When the potatoes are ready, drain and return them to the hot pot and mash with the buttermilk to the desire consistency.  

For the Meat Loaves:
Preheat the oven to 375F.  Heat the tablespoon of EVOO in a medium skillet over medium heat, add one quarter of the onions and half of the garlic to the skillet, and cook to soften, 5-6 minutes.  Transfer the mixture to a bowl and cool.  To the cooled onion mixture add the pork, paprika, thyme, salt and pepper to taste, mustard, bread crumbs, and egg.  Mix to combine and for four 2-inch-thick loaves.  Arrange on a parchment-lined rimmed baking sheet and drizzle liberally with EVOO and Cajun seasoning (my add-in), then roast for 35-40 minutes until firm and golden.

For the Trinity Gravy:
To the same skillet add the butter and when it has melted, add the remaining onions and garlic, the celery, bell pepper, and salt and pepper to taste.  Cook to soften, 5-6 minutes.  Add the tomato paste and stir for 1 minute.  Sprinkle the flour (and Cajun seasoning if using) over the mixture and stir for another minute.  Stir in the stock, then the hot sauce, and cook to thicken over medium-low heat for a couple of minutes.  Turn the heat to the lowest setting to keep the gravy warm.  

To Serve:
Slice the meat loaves.  Arrange the sliced loaves alongside the buttermilk potatoes and pour the trinity gravy over both.  Garnish with the scallions and serve.

Notes/Results: 
This recipe totally rocks!  I'm so happy that my friend Brenda chose this recipe as part of our Rachel Ray Look+Cook cook along.  I wasn't really feeling in a meat loaf kind of mood  the day I made this, but I was very pleasantly surprised by how fabulous the meal was.  A definite repeat for sure.  In fact, I'm already craving it again soon!  Thanks Brenda for such a wonderful pick!!
I can't wait until my friend Brenda of Brenda's Canadian Kitchen gets a chance to make her Creole Meat Loves and will be sure to add the link to her post once it is up.  For the month of June I'm going to go with Rachel's Summer Corn Fettuccine.  So far I've made four recipes from Rachel's Look + Cook and each and every one of them has been wonderful.  I'm really impressed with the book so far.

Sunday, May 8, 2011

Shrimp and Avocado with an Old-School Marie Rose Sauce


Happy Mother's Day to all the mother's out there!  In order to beat the crowds, my Mom and I went out for lunch yesterday afternoon.  After lunch we did quite a bit of shopping and I found all sorts of things to buy: a purse, a top, a dress, flip flops, and a new suitcase....because after two years we're finally going on another vacation!  Woo hoo!  I love traveling just as much as cooking so I'm really excited about that.

Today is going to be a low key day, but Mum's the Word so my Mom and I did have a special lunch.  We had this slightly indulgent Shrimp and Avocado with Old-School Marie Rose Sauce. It was simple, quick (12 minutes), and loaded with lots of flavor and texture.

Shrimp and Avocado with an Old-School Marie Rose Sauce
Adapted from Jamie Food Revolution
Serves 2

1 or 2 ripe avocados
1 or 2 large handfuls of sprouted cress or alfafa 
all-purpose flour
1/2 pound large shrimp, peeled and cleaned
olive oil
2 cloves of garlic
1 heaped teaspoon paprika
extra virgin olive oil

For the Marie Rose Sauce:
1/4 cup mayonnaise
2 teaspoons tomato ketchup
1 teaspoon Worcestershire sauce
1 teaspoon whiskey
1 lemon
sea salt and freshly ground black pepper    

Carefully cut into your avocado until you hit the pit, then run the knife around it to halve it.  Gently twist the two halves and pull them apart.  Carefully remove the pit and discard, then peel the skin off and discard that too.  Cut the cress or alfalfa.  Put a handful or two of flour into a bowl.  Drop your shrimp into the bowl of flour and toss until they're completely coated.  To make your sauce, put your mayo into a bowl with the ketchup, a small splash of Worcestershire sauce, and the booze.  Halve the lemon and squeeze in the juice from one of the halves.  Cut the remaining half into wedges for serving.  Add a pinch of salt and pepper and mix well.  Give it a taste and add a touch more salt, pepper, and lemon juice if you think it needs it.

Get yourself a large frying pan and place it on high heat.  When the pan is hot, pour in 2 good lugs of olive oil. Bash and break up your garlic cloves with your hand and add these to the pan, immediately followed by your flour-dusted shrimp.  Toss them well to coat them in the hot oil.  Count to ten, then add a pinch of salt and pepper, and the paprika for flavor and color.  Keep tossing your shrimp, trying to keep them in a single layer in the pan so they cook evenly, for about 3-4 minutes, until crisp and golden.

Divide your avocado halves between your plates.  Divide the cress or alfalfa over the avocados an place the shrimp next to them.  Drizzle a few good spoonfuls of your Marie Rose sauce over the avocados.  Finish with a drizzle of extra virgin olive oil and a sprinkle of paprika.  Serve with wedges of lemon for squeezing over.  Fantastic!

Notes/Results:  Heaven!  Mom and I loved the creaminess of the avocado with the crispy coated shrimp.  I've seen a lot of recipes calling for Marie Rose sauce and had never tried it before today.  Marie Rose sauce is such a simple blend of ingredients, but compliments both the avocado and the shrimp extremely well.  This was an amazing lunch, one we are already craving again.

Note: I couldn't find sprouts so I subbed lettuce leaves. 


Thursday, May 5, 2011

Cookbook Review: Eva's Kitchen....and a Cinco de Mayo Party!!

Eva's Kitchen
Hardcover
224 pages 

When I ordered my copy of Eva's Kitchen I didn't realize there was a lot more to Eva Longoria than just a pretty face.  Don't get me wrong.  I've always been a fan.  I mean what 30-something woman hasn't seen an episode of Desparate Housewives? 

While I knew that Eva and Chef Todd English co-owned a restaurant named Beso; 6I did not know that Eva grew up on a ranch eating meals based on her family's fields.  I also didn't know that she was quite the philanthropist, working quite a bit with various charities, including her own charity, Eva's Heroes.

Eva's book is gorgeous, much in the style of Ina Garten's.  Beautifully photographed full-color pictures of food are interspersed throughout, as well as personal stories with each recipe. The book is broken down into ten chapters: Appetizers; Soups & Salads; Fish Main Courses; Poultry Main Courses; Beef Main Courses; Delectable Sides; Dressings & Sauces; Tortillas, Biscuits & Quick Breads; Desserts; and Drinks. 

Some recipes that I'd like to try are: Normandy Shrimp; Grilled Shrimp on Arugula; Dad's Shrimp Cocktail; Corn and Zucchini Salad, Lemon Fried Chicken; Borracho Beans; Veracruz Corn; Homemade Corn Tortillas; and Sweet Sun Tea.

Eva's cookbook reflects her Mexican heritage, as well as her travels around the world.  To review the book I decided on a Mexican-inspired menu just in time to celebrate Cinco do Mayo.  We sampled Aunt Didi's Carne Guisada; the Mexican Rice; Aunt Edna's Homemade Flour Tortillas; the Limeade; and for dessert, the No-Bake Peanut Balls.
Welcome to the Cinco de Mayo Party!
If you're going to throw a party, then you definitely need to have a special drink.  Made with the juice of 8 limes, water, and just a bit of sugar, Eva's Limeade was tart and refreshing without being overly sweet.  I would make this again, especially in the coming months.
It's not a Cinco de Mayo party without some homemade flour tortillas, so I opted to make Eva's Aunt Edna's Homemade Flour Tortillas. This is my third or fourth attempt at making homemade tortillas and I have to say that this is the first time I've been successful at it.  Hooray!  This recipe belonged to Eva's Aunt and it is a very easy recipe which produces a nice, smooth, easy-to-work-with dough.  Note:  I do not have a tortilla press, nor do I have a comal for cooking the tortillas BUT I did have great success rolling the dough out and using a cast iron skillet.
Next up is one of my very favorite side dishes, Mexican Rice.  If you're going to have a Mexican-inspired meal then you most definitely need to have Mexican Rice.  In her book, Eva shares a family saying "When you perfect the rice, you are ready to get married.  But not until then."  The key to Eva's Mexican Rice is toasting the long-grain white rice and also "not stirring" the rice during the cooking process.  Eva states that stirring the rice causes it to break down and become sticky.  While it isn't my all-time favorite recipe for Mexican Rice, it was a good recipe.  I wouldn't hesitate to serve it again.
I have to tell you that when it comes to the main course I was high disappointed.  I chose Eva's Aunt Didi's Carne Guisada, a classic Tex-Mex stew with tender chunks of beef.  Well, I should have been a little skeptical when the recipe called for 1 inch chunks of sirloin to be cooked a total of about 10-15 minutes.  In fact, I was a little skeptical.  I was worried that 10-15 minutes was too long for those little chunks of steak to cook and I was right.  I was also skeptical that the sauce wouldn't thicken properly in the 5-10 minute cooking time.  Turns out I was also right about that.  This is definitely a dish that need to be cooked on the stove at least an hour so that the beef has time to become tender and the sauce has time to thicken.  It wasn't terrible by any means, it's just that you expect more when you buy almost $20 worth of steak. 
here you can see the sauce sinks to the bottom of the bowl
After dinner I ended up cooking down the leftovers, until the sauce thickened and the beef became more tender.
 
Oh yeah, now that's more like it!  One extra hour of cooking time was just the thing to thicken the sauce and make the beef tender, flavorful, and delicious. 
And finally, for dessert, although not Mexican-inspired at all, are Eva's No-Bake Peanut Butter Balls.  You gotta love a quick and simple, four-ingredient, dessert that comes together in mere minutes and involves peanut butter.  Made with peanut butter, honey, crushed peanuts and a bit of sugar, we have been enjoying these for a not-so-bad-for you dessert and lunchbox treat all week.  Eva's no-bake peanut butter balls will be making a repeat performance for sure!

Even though the Carne Guisada didn't turn out as I'd hoped, I still ended up with 4 out of 5 recipes that were hits.  I'm looking forward to cooking more recipes from this book! 

Tuesday, May 3, 2011

Rainbow Cake with White Chocolate Buttercream

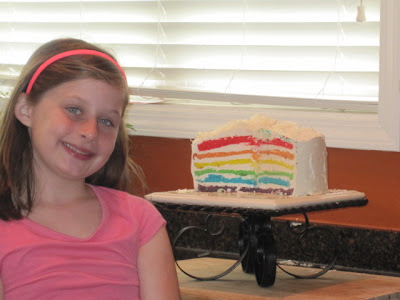
Today is my daughter Olivia's 10th birthday!  We've been celebrating Olivia's birthday for about a week now, giving her one present everyday for the week leading up to her birthday.  On Sunday we had a surprise birthday party and I made Olivia this Rainbow Cake. 

The cake itself is rather unsuspecting, until you cut into it, and then it is quite a beautiful surprise.  Trust me when I say that if I can do this, you can too!  Baking really isn't my forte, but this cake is pretty foolproof. 

Rainbow Cake with White Chocolate Buttercream
Adapted from Love and Olive Oil, original post found HERE
Serves 20
For Cake:
2 1/4 cups cake flour (9 ounces)
1 cup whole milk, at room temperature
6 large egg whites (3/4 cup), at room temperature
2 teaspoons almond extract
1 teaspoon vanilla extract
1 3/4 cups granulated sugar (12 1/4 ounces)
4 teaspoons baking powder
1 teaspoon table salt
12 tablespoons unsalted butter (1 1/2 sticks), softened but still cool
Red, orange, yellow, green, blue, and purple gel food coloring

For Frosting/Filling:
2 1/2 cups granulated sugar
10 large egg whites
2 pounds (8 sticks) unsalted butter, cut into tablespoons, softened
2 teaspoons pure vanilla extract
1 pound best-quality white chocolate, melted and cooled

Preheat oven to 350 degrees. Prepare your cake pans by first liberally buttering the pans, then line the bottoms with parchment paper rounds. Butter the rounds and set aside.

Pour milk, egg whites, and extracts into 2-cup glass measure, and mix with fork until blended. Mix cake flour, sugar, baking powder, and salt in bowl of electric mixer at slow speed. Add butter; continue beating at slow speed until mixture resembles moist crumbs, with no powdery streaks remaining. Add all but 1/2 cup of milk mixture to crumbs and beat at medium speed (or high speed if using handheld mixer) for 1 1/2 minutes. Add remaining 1/2 cup of milk mixture and beat 30 seconds more. Stop mixer and scrape sides of bowl. Return mixer to medium (or high) speed and beat 20 seconds longer.

Divide batter evenly between six medium bowls. Add enough of each color of food coloring to each bowl, whisking, until desired shade is reached. Transfer each color to an individual cake pan. Transfer to oven and bake until a cake tester inserted into the center of each cake comes out clean, about 15-25 minutes (working in batches if necessary).

Let cakes rest in pans for 3 minutes. Loosen from sides of pans with a knife, if necessary, and invert onto wire rack. Allow to cool completely. At this point, the layers can also be wrapped in plastic wrap and frozen.

To make frosting, put sugar and egg whites in the heatproof bowl of an electric mixer, and set over a pan of simmering water. Whisk constantly until sugar is dissolved and mixture registers 140 degrees on an instant-read thermometer.

Transfer bowl to an electric mixer fitted with the whisk attachment; beat on medium-high speed until fluffy and cooled, about 10 minutes. Continue beating until stiff peaks form.

Reduce speed to medium-low; add butter by the tablespoon, beating well after each addition. Beat in vanilla and white chocolate. (Any leftover frosting can be refrigerated in an airtight container up to 3 days or frozen up to 1 month.)

To assemble, using a serrated knife, trim tops of cakes to make level. Place four strips of parchment or waxed paper around perimeter of a cake stand or lazy Susan. Place the purple layer on the cake plate. Scoop a 1/2 cup (or more for a larger cake) buttercream filling over the first layer and spread with a small offset spatula so it extends just beyond edges. Repeat process with blue, green, yellow, and orange layers.
Place the remaining red layer on top, bottom-side up. Gently sweep away any loose crumbs with a pastry brush. Using an offset spatula, cover the top and sides with a thin layer of frosting (also use any of the excess frosting visible between the layers). Refrigerate until set, about 30 minutes.
Using a large offset spatula, cover cake again with remaining frosting.
Notes/Results:   I was stunned when I sliced into the cake.  I really didn't think I would be able to pull it off.  In fact, one of my layers fall apart but you couldn't even tell once the cake was cut.  The cake was a huge hit at the party!  It was very pretty with some white chocolate curls on top.

I do have a few notes to share about this recipe.  The original author used 6" cake pans and her cake layers were a nice thickness.  I used 8" cake pans, with about 1 cup of batter for each color and baked them 11-13 minutes each.  My cake layers were quite thin.  If I were to make the cake again, then I would definitely opt for the 6" cake pans so the cake layers themselves were a bit thicker.  The thin layers were pretty, but buttercream definitely stole the show when it came to tasting the cake.

HAPPY 10TH BIRTHDAY OLIVIA!