Showing posts with label COOKBOOK SUNDAYS. Show all posts

Saturday, February 5, 2011

Bucatini All'Amatriciana with Spicy Fontina Meatballs

This recipe is full of secrets.  Spicy little secrets.  Cheesy little secrets.  Delicious little secrets.  Fontina cheese oozes out of the meatballs to reveal a hidden center.  It doesn't end there.  The Amatriciana sauce is full of it's own secrets:  spicy toasted red pepper flakes, meaty chunks of pancetta, and handfuls of Romano cheese.  The end result is a very cheesy, slightly spicy, robust version of spaghetti and meatballs that will have everyone in your family singing your praises and asking for seconds.

In her cookbook, Giada notes that her Aunt Raffy likes to add a bit of wine to the simmering tomato sauce.  I tend to agree with Raffy on this one and added about 1 cup of white wine to my sauce as it was simmering.  Giada's recipe also calls for smoked mozzarella for stuffing the meatballs, but I'm not real fond of smoky cheese so I opted for creamy Fontina.
Yummy cheese oozing out of the baked meatballs

Bucatini All'Amatriciana with Spicy Fontina Meatballs
Adapted from Giada at Home
Serves 4-6

Sauce
2 Tablespoons olive oil
6 ounces pancetta, diced 
1 yellow onion, finely chopped
2 garlic cloves, minced
Pinch of crushed red pepper flakes
1 (14 oz) can crushed tomatoes
1/2 teaspoon salt, or more to taste
1/2 teaspoon freshly ground black pepper, or more to taste
1/2 cup grated Pecorino Romano cheese
Optional: About 1 cup wine (I used white)

Meatballs
1 small onion, grated
3/4 cup chopped fresh flat-leaf parsley leaves
2/3 cup plus 1/4 cup freshly grated Parmesan cheese
1/3 cup Italian-style seasoned dried bread crumbs
1 large egg
2 tablespoons ketchup
3 garlic cloves, minced
1/4 teaspoon crushed red pepper flakes
1 teaspoon salt, or more to taste
1/2 teaspoon freshly ground black pepper
8 ounces ground beef
8 ounces ground veal
2 ounces fontina cheese, cubed into 16 -1/2"- cubes

1 pound percatelli or other long pasta

For the sauce: In a large, heavy skillet, heat the oil over medium-heat.  Add the pancetta and cook, stirring constantly, until golden brown, 5-7 minutes.  Using a slotted spoon, remove the pancetta and set aside.

Add the onion to the skillet and cook for 5 minutes.  Stir in the garlic and red pepper flakes and cook until fragrant, about 30 seconds.  Add the tomatoes, salt, black pepper, and the cooked pancetta.  Simmer, uncovered, over medium-low heat until the sauce thickens, about 15 minutes.  Stir in the Pecorino Romano cheese and season with salt and pepper, if needed.


For the meatballs: Position an oven rack in the lower third of the oven and preheat the oven to 400F.  Line a rimmed baking sheet with parchment paper.

In a large bowl, combine the onion, 1/2 cup of the parsley, 2/3 cup of the Parmesan cheese, the bread crumbs, egg, ketchup, garlic, red pepper flakes, salt and pepper.  Add the beef and veal.  Using your hands, combine the ingredients gently but thoroughly.  Shape the meat mixture into 16 1-1/2-inch-diameter meatballs and place on the prepared baking sheet.  Make a depression in the center of each meatball and place a cube of fontina inside.  Re-form the meatball so that the fontina is completely covered with the meat mixture.

Bake the meatballs for 15 minutes, or until cooked through.

Meanwhile, bring a large pot of salted water to a boil over high heat.  Add the pasta and cook until tender but still firm to the bite, stirring occasionally, about 11 minutes (depending on the type of pasta used). 

Drain the pasta and place in a large serving bowl.  Add the sauce.  Toss gently and season with salt and pepper, if needed.  Sprinkle with remaining 1/4 cu parsley and 1/4 cup Parmesan cheese.  Put the meatballs in a separate bowl and serve alongside the pasta.
 
Notes/Results:  This recipe is the ultimate in cheesy as there is quite a bit of cheese in both the sauce and the meatballs. We all loved biting into the meatballs and tasting that cheesy center.  A good thing for sure! The sauce is slightly spicy which is a welcome break from the norm.  Of course, the meaty chunks of pancetta in the sauce were as tasty as can be.  This is a keeper recipe that I would be happy to make again. 


Now Celebrating the Recipes of Giada De Laurentiis

The First Sunday of Each Month @ Brenda's Canadian Kitchen

Friday, December 10, 2010

Mozzarella, Strawberry, and Brown Sugar Panini

Curiosity.   It's a funny thing.  It raises burning questions.  Burning questions like do jam and mozzarella really go together?  Rosemary and jam?  Brown sugar and cheese.......hmm.  Before we know it, we are knee deep in wonder and it's too late to turn back.  That curiosity, it gets the best of us. Keeps us doing things we might not otherwise do....
Mozzarella, Strawberry, and Brown Sugar Panini
Adapted from Giada at Home
4 servings
8 (1/2-inch-thick) slices bakery-style white bread
1/4 cup olive oil
1/2 cup raspberry jam (I used strawberry)
2 teaspoons chopped fresh rosemary leaves (I used basil)
8 ounces fresh mozzarella cheese, drained and patted dry
salt (optional)
2 tablespoons light brown sugar

Preheat the panini press or indoor grill.  

Using a pastry brush, brush the bread on both sides with the oil.  Spread one side of each slice of bread with the raspberry (strawberry) jam.  Sprinkle the rosemary (basil) over the jam.  Cut the mozzarella cheese into 8 slices.  Place 2 slices of cheese on each of 4 of the bread slices.  Season the cheese with a pinch of salt, if using.  Place the remaining slices of bread on top, jam side down.  Sprinkle the tops with the brown sugar.

Grill the panini for 3 to 5 minutes, until the cheese has melted and the bread is golden and crispy.  Cut the panini in half and serve.

Cook's Note: If you do not have a panini press or indoor grill, use a ridged grill pan:  Preheat the pan, add the sandwiches (in batches; if necessary), and put a weight (such as a brick wrapped in aluminum foil or heavy cast iron skillet) on top to press them down.  Grill for 2-3 minutes to brown the first side, flip the sandwich, replace the weight, and grill for 2-3 minutes to brown the other side and finish melting the cheese. 

Notes/Results:  All of the components actually come together really nicely in this sandwich.  The mozzarella was buttery and creamy, the strawberry jam is nice and sweet, and the brown sugar crusted bread.....whoa mama!  That crispy, crunchy, sugary, caramelized bread was some good stuff, the hit of the sandwich if you ask me.  This is one of those recipes that stays on your mind and keeps you thinking, which is good for the mind, if you ask me!

Making it Simple with IHCC

For Deb @ Kahakai Kitchen
For Brenda @ Brenda's Canadian Kitchen

Saturday, December 4, 2010

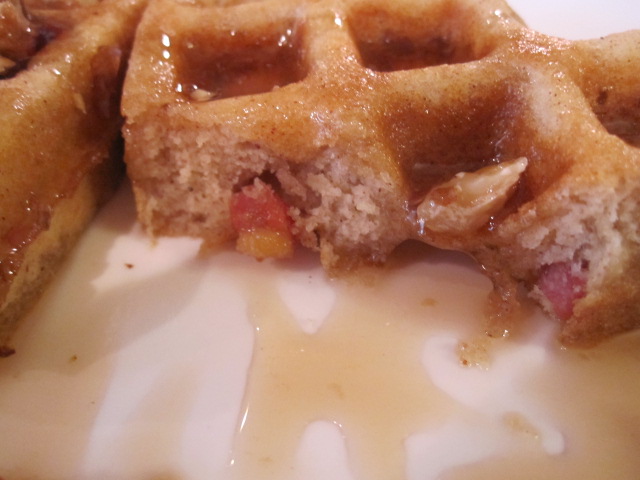
Pancetta and Cinnamon Waffles


I love waking up to a blanket of snow on the ground, watching the snowflakes hit the ground. The snow is like a blanket of magic and wonder, so pretty and captivating. On mornings like this, I love to open up my blinds and watch the falling snow as I cook in the peace and quiet of winter, one of my favorite seasons. The falling snow gives me all the reason I need to whip up a hearty breakfast, one that will warm the belly and fill the soul.

I'm talking about a full-on, carb-loving, food-coma-inducing plate full of Pancetta and Cinnamon Waffles. Yep! Grab a pillow-- because if you eat one, you're either going to be taking a nap or laying on the couch. Save playing in the snow for another day.

Pancetta and Cinnamon Waffles
Adapted from Giada At Home
Serves 4-6, depending on serving size
1/2 cup chopped walnuts
1 tablespoon olive oil
3 (4 ounce) slices of pancetta, each about 1/4 inch thick, diced into 1/4 pieces
3 cups Belgian Waffle Mix, such as Krusteaz
2 large eggs
1/3 cup vegetable oil for the waffles, plus more for the waffle iron
1-1/2 teaspoons ground cinnamon
1/2 teaspoon salt

Preheat the oven to 350F.

Spread the walnuts in an even layer on a rimmed baking sheet. Bake for 10 to 12 minutes, until toasted and fragrant. Set aside to cool.

Preheat and lightly grease a waffle iron.

Heat the olive oil in a medium skillet over medium-high heat. Add the pancetta and cook until brown and crispy, 3-5 minutes. Transfer the pancetta to a paper towel-lined plate to cool.

In a large mixing bowl, combine the waffle mix, eggs, vegetable oil, 1-1/2 cups water, the cinnamon, and salt. Using a whisk, blend the ingredients together until smooth. Stir in the pancetta. Pour batter, using the amount recommended by the waffle iron manufacturer's instructions, into the preheated waffle iron. Cook waffles for 3-4 minutes, or until golden brown.

Place the waffles onto serving plates. Sprinkle with the chopped walnuts and drizzle with the maple syrup. Serve immediately.

Notes/Results: These waffles are a real treat. Chock full of pancetta and perfectly spiced with cinnamon, they are the perfect way to start a lazy day. (Not that I would know anything about a lazy day). You believe me, right?

I Heart Cooking Clubs now celebrating the recipes of Giada De Laurentiis.

Also for Brenda's Cookbook Sundays event over @Brenda's Canadian Kitchen.

Last, but not least, for Roz @ La Bella Vita for her Fresh Fridays/Seasonal Saturdays event, which is open for the rest of the week.

Note: I've been getting messages that readers are unable to leave me comments. I'm not sure why this is happening. I have been getting this error message every time I try to publish a post. Anyone have any idea what that's all about? If you do, please shoot me an email at tony.tracy@att.net.

Your HTML cannot be accepted: Closing tag has no matching opening tag: A

Stop showing HTML errors for the body of this post

Saturday, November 6, 2010

Symon's Braised Short Ribs with Orange and Olive Salad


It was late in the evening when I started making these short ribs. My husband was out and the kids were in bed. Ah, quiet time. The perfect time to be in the kitchen. Like a good book, you can get lost in a recipe. The methodical chopping, the sizzling noises, and the intoxicating aromas. If you listen, those ingredients are telling you a story. The story of what's to come.

Last night, in the glorious peace and quiet, I listened. In the end, I didn't really have a choice. All at once, the seductive aromas came screaming at me from across the room. The scent was so promising, so glorious, and so inviting that I couldn't help but sit there and smile. I knew those ribs were going to be fantastic. They were definitely telling me a story. A story with a VERY HAPPY ENDING.

I've made many short ribs over the years and was never really bowled over by them. Symon's short ribs have made me a convert. I have to say that I absolutely loved them. Hands down one of my favorite things I've had lately. I say that a lot, don't I?


Braised Short Ribs

Serves 6
6 pounds meaty beef short ribs on the bone
kosher salt and freshly ground black pepper
4 tablespoons olive oil
2 celery stalks, coarsely chopped
1 carrot, peeled and coarsely chopped
1 large onion, coarsely chopped
1 fresno chile, halved
1/2 cup tomato paste
5 sprigs of fresh thyme
3 salt-packed anchovy fillets, rinsed (I use the equivalent in anchovy paste)
1 bay leaf
1 head of garlic, cloves peeled
1 quart (4 cups) Chicken Stock
2 cups dry red wine (I used Barefoot Cellars Cabernet Sauvignon, $6.99 a bottle)
1/3 cup red wine vinegar

The day before cooking the short ribs, season them with salt and pepper and refrigerate. NOTE: I did take note of this and season the night before. Is it possible that this step really makes a huge difference in flavor? Maybe so.

The next day, remove the ribs from the refrigerator 30 minutes before you want to cook them. (I'm definitely a big believer in letting the meat come down to room temp before cooking)

Preheat the oven to 325F. Heat 2 tablespoons of olive oil in a large enameled cast-iron Dutch oven over medium-high heat. Add half of the short ribs to the pan and cook on all sides until browned, a few minutes for each side. Transfer the ribs to a plate. Repeat with the remaining oil and ribs.

Pour off all but 2-3 tablespoons of fat from the pan. Add the celery, carrot, onion, and chile to the pan along with a large pinch of salt, and cook over medium heat until softened, about 7 minutes. Add the tomato paste and cook, stirring, until glossy, about 2 minutes. Add the thyme sprigs, anchovies, bay leaf, and garlic and cook, stirring, for 2 minutes. Add the stock, wine, and vinegar and bring to a boil. Return the short ribs to the pan, cover, and braise in the oven for 1 hour. (Note: I read in Symon's book that it is very important to use the correct pan when braising. The braising liquid should only cover 2/3rds of whatever you are braising. In my case, the tops of the ribs were peeking out over the sauce).


Lower the oven temperature to 225F and cook for 4 hours, or until the meat is very tender. Remove the ribs to a large bowl and strain the liquid into the bowl. Discard the solids. Refrigerate overnight.


To serve, skim the congealed fat off the liquid and reheat the ribs in the liquid. Remove the ribs to a serving platter and cover to keep warm while you simmer the liquid to reduce it by half. Pour the sauce over the ribs and serve. I served my short ribs over Symon's Soft Polenta with Mascarpone, which is perfectly delicious all on it's own.

Michael Symon's Orange and Olive Salad, recipe sourced by Natashya from Living in the Kitchen with Puppies
* 2 oranges, cut in segments
* 1 shallot, thinly sliced
* 1 cup pitted kalamata olives
* 2 tablespoons capers
* 1 cup packed parsley leaves
* 4 ounces olive oil
* 1 lemon, juiced

For the salad, place all ingredients in nonreactive mixing bowl and toss together.

Notes/Results: The meat on the short ribs was fall off the bone tender and the sauce was so succulent that you could just eat it with a spoon. Full of body and rich flavor, the short ribs went very well with the creamy and cheesy polenta. The salad of oranges and olives rounded out the whole meal, adding a little brightness. All in all, it was a fabulous meal with knock-out aromas. One of my favorite Symon dishes yet.
Note: I also think Symon's recipe for short ribs could easily be adapted to suit a beef roast(I like to use the shoulder cut). A tender beef roast is every bit as good as short ribs and often easier to find, easier to work with, and much more economical. I loved the flavors and the sauce on the short ribs and hope to make a version with a beef roast soon.

I am submitting this to Brenda at Brenda's Canadian Kitchen for her weekly Cookbook Sundays event. I am also submitting this to Ashlee of Veggie by Season for her bimonthly Symon Sundays roundup.

Also, my friend Arlene over at The Food of Love is looking for short rib recipes. If you have a favorite recipe, please send her a link. (You can find her site by clicking on The Food of Love link above.

Sunday, October 24, 2010

Symon Sundays meets French Fridays with Dorie


There were some wonderful selections for Symon Sundays this time around. The first one, Crab Tater Tots, was a delicious potato croquette loaded with crab meat, breaded in panko, and deep-fried. OH YEAH! These were delicious sprinkled with a little old bay seasoning and served with homemade tartar sauce. My Mom and I really enjoyed them!
Crab Tater Tots
Serves 6-8
Makes up to 35 tots (I halved the recipe with excellent results)
2 tablespoons unsalted butter
1/4 cup a/p flour
1 large egg
1 cup mashed potatoes
canola oil, for deep-frying
1/2 pound lump crab meat
Panko bread crumbs, for breading
kosher salt

In a small saucepan, combine the butter with 1/4 cup water over high heat. When the water comes to a simmer and the butter is melted, add the flour. Reduce the heat to medium and stir until the resulting paste pulls away from the sides of the pan, 1 to 2 minutes. Remove from the heat. Allow to cool for 5 minutes. Add the egg to the pan and stir vigorously until the egg is incorporated into the flour mixture. Stir in the mashed potatoes and let cool.

Pour enough oil into a medium pot so that the oil comes 3 inches up the sides. Heat the oil to 350F.

While the oil heats, gently fold the crab into the potato mixture; the lumpier the batter the better. Using two soup spoons, shape the mixture into quenelles, or 2-inch footballs. (You should end up with about 35). Roll in the panko. Deep-fry, working in batches and turning once, until crisp, brown, and heated through, 2 to 3 minutes. Drain on paper towels and season with salt.

The second selection for Symon Sundays was the Ohio Creamed Corn with Bacon. I was still able to find corn on the cob, but I paid a premium for it, $5 for 4 ears. My family and I loved this recipe though, so I have to say that it was worth the inflated price.
Ohio Creamed Corn with Bacon
Adapted from Live To Cook by Michael Symon
Serves 4-6
5 ears of corn
1 teaspoon EVOO
1/4 pound thick-cut bacon, cut into 1-inch strips
1 medium yellow onion, diced
1 garlic clove, minced
1 teaspoon kosher salt, or more to taste
1/2 recipe Corn Cob Stock (if you'd like the recipe, leave me a comment)
1/2 cup creme fraiche (I used 2% milk)
1 tablespoon unsalted butter
1/2 cup chopped fresh cilantro
Grated zest of 1 lime
Cut the kernels from the cobs and set the kernels aside. (Use the cobs to make the stock).

Heat a large saucepan over medium heat and glaze the bottom with the olive oil. Add the bacon and cook, stirring as needed, to render the fat and brown the pieces, 5 minutes. Add the onion and sweat it for about 45 seconds. Add the garlic and continue to cook, stirring, for another 30 seconds. Add the reserved corn and the salt and cook for 2 minutes.

Pour in the corn cob stock and bring to a simmer. Cook until the liquid reduces to approximately 1 cup, 10 minutes. Add the creme fraiche (milk, in my case) and simmer until the mixture begins to thicken, about 3 minutes. Stir in the butter. Remove the pan from the heat and stir in the cilantro and lime zest. Season with salt if needed before serving.

On Friday, I was supposed to post this Hachis Parmentier for French Fridays with Dorie. I tried. I wrote the post. I hit publish. I repeated these actions several times. Without using expletives, let's just say that Blogger had other plans.
Moving on, this is a wonderful French rendition of a meat and mashed potato pie, sans veggies. I opted to make a variation of Dorie's recipe using ground beef and 1/2 pound spicy sausage. The meat filling was exceptionally aromatic and flavorful and the mashed potato topping was light and airy. I topped mine off with a delicious French Comte cheese. Golden brown on the edges with cheese and butter, this was a definite family pleaser when placed on the dinner table.

I am submitting both Michael Symon recipes to both Brenda of Brenda's Canadian Kitchen for her Cookbook Sundays event and also to Ashlee of Veggie by Season who is the host of our wonderful Symon Sundays event.

Sunday, October 17, 2010

Trick-or-Treat Turnovers


These Trick-or-Treat Turnovers are lots of fun for the kids (and adults too)! Canned biscuit dough is flattened to a four inch circle and filled with a beef filling. A second biscuit is flattened into another 4 inch circle and carved just like a pumpkin. The carved biscuit is placed over the biscuit with the meat mixture and pinched to seal the edges. Each Trick-or-Treat Turnover is brushed with a lightly beaten egg and baked until golden, about 15 minutes.

The filling for the Trick-or-Treat Turnovers can easily be switched to anything your heart desires. The possibilities are endless. You could even build a little "build your own station" with lots of chopped up little fillings and different cheese so that each person could customized theirs to their own liking. Either way, it really is a very fun way to spend time together in the kitchen.

Trick-or-Treat Turnovers
Adapted from Taste of Home Ultimate Halloween Magazine, also found online HERE
Makes 8 very large turnovers
1/2 pound of ground beef (I used 95% lean)
1 tablespoon finely chopped onion
4 ounces cubed part-skim mozzarella cheese
1/4 cup prepared mustard (I subbed tomato paste)
2 tubes (16.3 ounces each) large refrigerated flaky biscuits (I used Grands Golden Wheat,Reduced Fat)
1 egg, lightly beaten

In a large skillet, cook beef and onion over medium heat until meat is no longer pink; drain. Add cheese and mustard; cook and stir until cheese is melted. Cool slightly.

Flatten each biscuit into a 4-in circle; place four biscuits in each of two greased 15-in x 10-in x 1-in baking pans. Spoon 2 heaping tablespoons of meat mixture onto each.

Using a sharp knife or cookie cutters, cut out jack-o'-lantern faces from remaining biscuit circles; place over meat mixture and pinch edges to seal tightly. Reroll scraps if desired and cut out stems for pumpkins.

Brush with egg. Bake at 350F for 10-15 minutes (mine took about 20 minutes) or until golden brown.

Notes/Results:
These turnovers are probably our favorite Halloween-inspired recipe so far. Everyone really had a great time and enjoyed customizing their own pumpkin. I'm thinking of making these for our neighborhood Halloween party and creating a build your own station for the kids. There are a couple of notes worth sharing. The turnovers themselves are quite big. I think it would be possible to cut one biscuit in half and use one one biscuit to make each turnover. Also, depending on the filling they can be a little on the dry side. I think they would be great served with a dipping sauce on the side. Depending on your filling you could use honey mustard, marinara, cheese sauce, or barbecue sauce.

I am submitting these little handheld Halloween treats to my friend Deb at Kahakai Kitchen for her Souper Sundays event. Happy 2nd birthday Souper Sundays!


I am submitting this to my friend Brenda at Brenda's Canadian Kitchen for her weekly celebration of cookbooks, Cookbook Sundays.

I am also submitting these turnovers to my friend Roz over at La Bella Vita for her Seasonal Saturdays event.

Sunday, September 26, 2010

Michael Symon Meets Mark Bittman Over One Delicious Breakfast


Michael Symon, the tattooed Iron Chef from Cleveland, Ohio. Mark Bittman, the respected author and minimalist.

On the surface, they really don't look to have much in common. However, we know that both of them can cook AND when you put them both together....YOU GET THE MOST AMAZING BREAKFAST!

Introducing Mark Bittman's Frittata with Michael Symon's Homemade Pork Sausage, topped with Creamy Mascarpone cheese and Symon's Red Pepper Relish. On the side, Bittman's addictive Boiled and Buttered New Potatoes. This breakfast was the bee's knees, an A+, a home run....knocked clear out of the park. Best thing I've ate in sometime.

The frittata couldn't be simpler yet it was absolutely dreamy and amazing. Loaded with garlicky homemade pork sausage, red pepper relish, and the creamiest Mascarpone cheese. It was so indulgent, rich, and creamy. I savored it down to the last bite.
Bittman's Basic Frittata with Symon's Homemade Pork Sausage, Mascarpone & Red Pepper Relish
Adapted from How To Cook Everything

2 tablespoons butter or olive oil
5 or 6 eggs
salt and freshly ground black pepper to taste
Minced fresh parsley leaves for garnish
Add in's :
1/2 pound of Michael Symon's Loose Pork Sausage*
About 4 ozs. Mascarpone Cheese
5-6 tablespoons Michael Symon's Red Pepper Relish*
Preheat the oven to 350F. Place the butter or oil in a medium-to-large ovenproof skillet, preferably non-stick, and turn the heat to medium. While it's heating, beat together the eggs, salt and pepper. When the butter melts or the oil is hot, pour the eggs into the skillet and turn the heat to medium-low. Crumble in 1/2 pound of Symon's loose sausage (reserving a few tablespoons for decorating top). Sprinkle about 2-3 tablespoons of Symon's Red Pepper Relish all across the top of the frittata. Spoon on 4-5 tablespoons of the Mascarpone Cheese all across the top of the frittata so that each serving has a dollop on top. Cook, undisturbed on the stovetop for about 10 minutes, or until the bottom of the frittata is firm.

Transfer the skillet to the oven. Bake, checking every 5 minutes or so, just until the top of the frittata is no longer runny, 10-20 minutes more. Garnish with reserved sausage, dollop with extra Mascarpone, and sprinkle on some more of the Red Pepper Relish. Enjoy!!

Michael Symon's Pork Sausage can be made in three ways: stuffed into casings, crumbled or made into patties. I chose to crumble mine and was astounded at the wonderful garlicky flavor. It is absolutely delicious and really easy too!
Symon's Pork Sausage
Adapted from Live To Cook
Makes about 2 pounds, or about 8 6-inch links; serves 6-8
1-1/2 pounds pork shoulder, diced
1/2 pound pork fatback, diced
1 tablespoon sugar
1 tablespoon kosher salt
3 garlic cloves, minced
1-1/2 teaspoons fennel seeds, toasted
4 feet of hog casings (optional) soaked in water for at least 30 minutes and then flushed with water
Combine the meat, fatback, sugar, salt, garlic, and fennel seeds in a bowl. Cover and refrigerate overnight. (NOTE: I used one pound fresh ground pork and reduced the recipe in half. I mixed all this together, chose to serve it crumbled and skipped the steps below because I don't have a meat grinder.)

About 30 minutes before grinding, place all the equipment in the freezer to get cold.
Grind the sausage mixture through a small die and return it to the refrigerator to cool for 30 minutes.

Using the paddle attachment on your mixer, mix the sausage on low speed for 30 seconds. Raise the speed to medium and add 6 tablespoons cold water. Mix for another minute or two and bring everything together.

At this point you have three options. You can stuff it into casings, form it into patties, or crumble it. The sausage will keep for up to 1 week covered in the refrigerator, or freeze for up to a month. Cook to an internal temperature of 150F before serving.

Symon's Red Pepper Relish is a wonderful condiment to have on hand for eggs, sandwiches, soup, fish and even chicken.
Symon's Red Pepper Relish
Adapted from Live To Cook
Makes 2 cups
1 tablespoon olive oil
1/2 small red onion, finely diced
2 garlic cloves, minced
kosher salt
2 red bell peppers, cored, seeded, and finely diced
2 jalapenos, seeded and diced
1 tablespoon coriander seeds, toasted
1/4 cup packed dark brown sugar
1/4 cup white wine vinegar
1/2 cup fresh orange juice (I used lemon juice)
1/2 cup chopped fresh cilantro
Heat a medium nonreactive saucepan over medium-low heat. Add the olive oil to glaze the bottom of the pan. Add the onion, garlic, and a pinch of salt and sweat until the onion begins to soften, about 2 minutes. Add the bell peppers and jalapenos and sweat for 2 more minutes. Add the coriander seeds and cook for another 30 seconds.

Add the sugar and vinegar and cook, stirring, until the sugar dissolves. Add the orange juice (lemon juice) and simmer, stirring occasionally, until the liquid completely reduces, about 10 minutes. Remove from the heat and allow the relish to cool to room temperature. Season with salt to taste and fold in the cilantro. Refrigerate for up to 1 month (it will never last that long)!

I am submitting Bittman's Frittata and his Boiled New Potatoes to I Heart Cooking Clubs for this week's Potluck Theme.

I am submitting Symon's Pork Sausage and Red Pepper Relish for the Symon Sundays even hosted by Ashlee of Veggie by Season. Head on over there later today to see how everyone enjoyed their sausage and relish.


Each Sunday, my friend Brenda at Brenda's Canadian Kitchen, hosts an event celebrating all cookbooks. I am also submitting this to her Cookbook Sundays.

Saturday, September 18, 2010

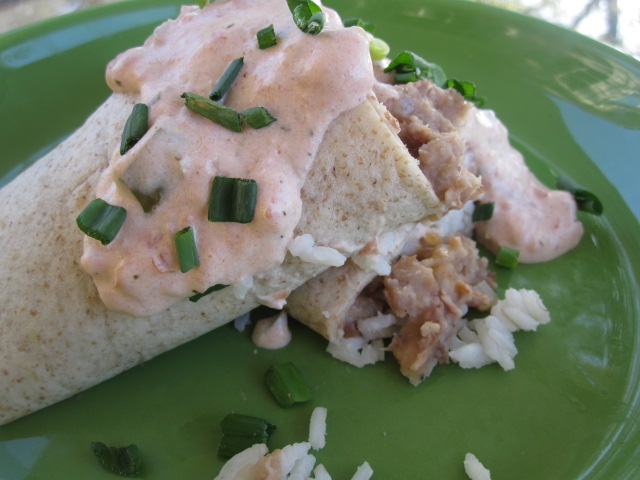
Bean & Rice Burritos with Cheesy Salsa


Do you have serious food cravings? Cravings that just won't go away until you do something about it? For some people it's chocolate. For others it might be salty, crunchy chips. For me, it's beans. Is that weird? It's not that I don't crave other things, but usually it centers around beans. Right now is one of those times. I'm on a roll. In fact, I've had them for almost every meal this week. They've found their way into my eggs, into my pasta and now into my burrito. And, I'm not done yet. I have another bean dish in the works for tomorrow.

Today I had to have a bean and rice burrito. I followed Mark Bittman's recipe for cooking beans, the quick soak way. The recipe takes 3-4 hours in total and yields one pound of cooked beans. I used 3 cups of my cooked pinto beans to make Bittman's Refried Beans. I've never made homemade refried beans from scratch before and they were delicious!
Twice-Cooked (Refried) Beans
Adapted from How To Cook Everything Vegetarian by Mark Bittman
Serves 4 (easily serves 6)
1/4 cup neutral oil, like grapeseed or corn (*I used 1/2 tablespoon oil*)
1 cup chopped onion
1 chopped jalapeno (optional)
2 cloves garlic (optional)
1 tablespoon ground cumin, plus more if desired
3 cups cooked pinto or red beans
salt and freshly ground black pepper
1/4 teaspoon cayenne, plus more if desired
**See note below** Also used 1-2 cups of liquid (stock, water, bean cooking liquid)
Put the oil in a large skillet over medium heat. When the oil is hot, add the onion (jalapeno & garlic if using) and cook, stirring, until golden brown, about 10 minutes.
Add the cumin and cook, stirring, for 1 minute more. Add the beans and mash with a large fork or potato masher. Continue to cook and mash, stirring, until the beans are more or less broken up (some remaining chunks are fine).
Sprinkle with salt and pepper and add the cayenne and more cumin if you like. Taste, adjust the seasoning and serve.
NOTE: To achieve a creamy consistency I used about 1-2 cups of chicken stock. You could also use veggie stock, beef stock, or even the leftover bean cooking liquid. The liquid allows the mixture to loosen up. It makes mashing the beans easier and also allows the beans to become very creamy.

To jazz up my burritos, I made a batch of long grain white rice and tossed in some chopped green onions. I had quite a few fresh tomatoes from my Mom's garden so I decided on Bittman's Fresh Tomato Salsa. Tomatoes, onion, garlic, jalapeno, cilantro, and lime juice. It was vibrant, fresh and healthy....right up until I added an entire block of cream cheese to it and created a cheesy salsa topping for my bean burritos!

What is a bean burrito without cheese? I say POUR IT ON!! Give your burrito a bath:)

Fresh Tomato Salsa
Modified from How To Cook Everything Vegetarian by Mark Bittman
2 large ripe fresh tomatoes, chopped
1/2 large white onion, minced
1 teaspoon minced garlic, or to taste
1 habanero or jalapeno chile (I used 2 jalapenos)
1/2 cup chopped fresh cilantro leaves
2 tablespoons freshly squeezed lime juice
salt and pepper
Combine all in a bowl, taste and adjust the seasoning. If possible, allow the flavors to meld for at least 15 minutes prior to serving

Cheesy Salsa

1 - 1-1/2 cups salsa (depending on taste)
1 block (8ozs.) cream cheese
Place both salsa and cream cheese in pan and cook over low heat until cheese melt and mixture becomes hot. Use as a topping, dip or filling.


I am submitting these cheesy burritos to I Heart Cooking Clubs for our Say Cheese theme.

I am also submitting this to Cookbook Sundays over at Brenda's Canadian Kitchen.

Saturday, September 11, 2010

Symon's Linguine with Heirloom Tomato, Capers, Anchovies, and Chile


On a day like today, I thought we could all benefit from a picture of the one and only super smiley Iron Chef Michael Symon. This is a guy who really knows how to enjoy himself. His smile. His laugh. It's infectious. Doesn't he look like he would be fun to have around in the kitchen?

Imagine this. Michael Symon is standing in your kitchen. He's making his recipe for egg yolk pasta dough which contains nine egg yolks. (You know that's some delicious pasta). You smell breadcrumbs toasting on the stove and you see colorful summery heirloom tomatoes, lots of sliced garlic, deliciously salty and briny capers, and anchovies. Could it get any better? After all, isn't pasta the way to anyone's heart?

Yes. I'm convinced that pasta is the way to anyone's heart. Man, woman, child, and maybe even the family dog. If you aren't lucky enough to find Chef Michael Symon in your kitchen, then this recipe for Linguine with Heirloom Tomato, Capers, Anchovies, and Chile is the next best thing. You're really not settling for less, right? One doesn't settle for pasta. Pasta is so much more than a consolation prize.

Linguine with Heirloom Tomato, Capers, Anchovies, and Chile
Adapted from Live To Cook by Michael Symon
Serves 4-6
Kosher Salt
1 cup dried bread crumbs, preferably homemade
1 tablespoon olive oil (I used one teaspoon)
3 garlic cloves, sliced (I say goodfellas thin)
1 teaspoon crushed red pepper flakes (I say live a little and add some more)
Egg Yolk Pasta Dough or one pound storebought linguine
1 large brandywine heirloom tomato, peeled, seeded, and diced (1 cup)
6 salt-packed anchovies, filleted, and minced
1 tablespoon salt-packed capers, rinsed and patted dry (I used 2 tablespoons)
1/4 cup extra-virgin olive oil (I used 1/8 cup)
1/4 cup sliced fresh flat-leaf parsley leaves

Bring a pot of water to a boil for the pasta and add salt until it tastes seasoned. Toast the bread crumbs in a dry skillet over medium heat, tossing as needed, until lightly browned, about 3 - 4 minutes. Remove from heat.

Heat the olive oil in a large saute pan over medium heat. When the oil is hot, add the garlic and sweat it for 2 minutes. Add the red pepper flakes and cook for another 30 seconds.

Drop the pasta in the boiling water and cook until al dente, about 2 minutes for homemade.

Meanwhile, add the tomato, anchovies, and capers to the saute pan, bring to a simmer, and cook for 2 minutes, or until the tomato has released its juices and the anchovies have melted into the sauce. Remove the sauce from the heat and add the extra-virgin olive oil and parsley.

Strain the pasta and add it directly to the sauce. Toss well before dividing among four bowls. Top with the bread crumbs.

Notes/Results:
Absolutely delicious! How could it not be? Fresh, summery, salty, spicy, light and totally addictive. I used regular store-bought pasta and reduced the olive oil for sauteing from 1 tablespoon down to 1 teaspoon. Instead of adding in 1/2 cup olive oil at the end, I reduced it down to 1/8 cup. This reduced amount of olive oil was more than enough. I would have loved to have made Symon's egg yolk pasta, but it's not really in the cards for me since I've been watching what I'm eating. Using the store-bought pasta helped to make this recipe healthier. If you're scared of anchovies, don't be. I like to use anchovy paste in place of real anchovies. All you need is 1/2 teaspoon anchovy paste in place of 2 whole anchovies. For this recipe I used 1-1/2 teaspoons anchovy paste. I didn't even tell my daughter or husband. They didn't notice - at all!

This is my submission to this round of Symon Sundays hosted by the lovely Ashlee of Veggie by Season.

I'm also submitting this pasta to the wonderful Brenda of Brenda's Canadian Kitchen for her Cookbook Sundays roundup.