Saturday, July 30, 2011

Smashed Spiced Chickpeas

While on vacation up in Ohio, my friends and I decided to take all 8 of our kids to the drive-in movie theater.  Even though we packed all kinds of snacks and drinks, the kids still wanted to go to the refreshment stand.  Surprise!  Surprise!

When I was younger there wasn't too much of a variety at the refreshment stand.  The usual popcorn, hot dogs, and maybe a corn dog if you were lucky.  Nowadays they have all manner of things: pizza, meatball subs, cheeseburgers, jalapeno poppers, deep-fried macaroni and cheese, nachos, chicken tenders, hot dogs, soft pretzels, and wait for it.......they even have hummus served with pretzel chips!  I admit, even I had to laugh when I spotted that hummus.  It hardly seems like drive-in food, but I had to have it.  Hummus is one of my all-time favorite things to eat.

So there I am, walking back to my friends with my goods.  I have a soft pretzel for my daughter, some fries for my son, an order of deep-fried macaroni and cheese to share, and an order of hummus with pretzels chips just for me.  Let me just go ahead and say right now that I'm probably never going to live down that hummus.  My friends thought it was hysterical that I ordered it and they gave me the hardest time.  In fact, they're still joking about it.  They were like "who eats hummus at the drive-in?"  Apparently I do and I would again.  I would eat it wherever, whenever, with whoever.  I would probably eat it everyday if I could.
 Smashed Spiced Chickpeas
*aka chunky hummus*
Adapted from The Naked Chef Takes Off
Serves 6 - yeah right!
One 14 oz. can of chickpeas or use 6 oz dried ones, soaked and cooked until tender
a good pinch of cumin seeds, pounded
1-2 small dried red chiles, crumbled
1 clove of garlic peeled and pounded to a paste (I used 3 cloves)
juice of 1 lemon (I used juice of half a lemon)
salt and black pepper
extra-virgin olive oil

Jamie says "This is so simple to make.  Really it's all about personal taste - the way I look at it is that chickpeas need a good kick up the backside to really get their flavors happening.  So by smashing them up and adding a good pinch of cumin for a bit of spice, a little dried chilli for a touch of heat, garlic for a bit of ooorrrggghhh, a good squeezing of lemon juice to give it a twang and seasoning to taste, you pretty much hit the nail on the head.  Then add extra-virgin olive oil to loosen and flavor.  Love it. "


Notes/Results:  Normally I like my hummus to be ultimately smooth and creamy, but I loved that this version didn't call for breaking out my food processor or my blender (I don't like cleaning either of those appliances).  This is a quick version of hummus that is fun to make.  I had fun using my mortar and pestle and was able to get out all my frustrations.  I added a bit more garlic and left it kinda chunky and I really enjoyed it with some store-bought garlic and chive pita chips.  I've determined that hummus is the perfect food to eat anytime, but is especially tasty in the summer months when the heat is oppressive and you can't imagine eating yet another salad.  Viva la hummus!

Theme: We Be Chillin'

Thursday, July 28, 2011

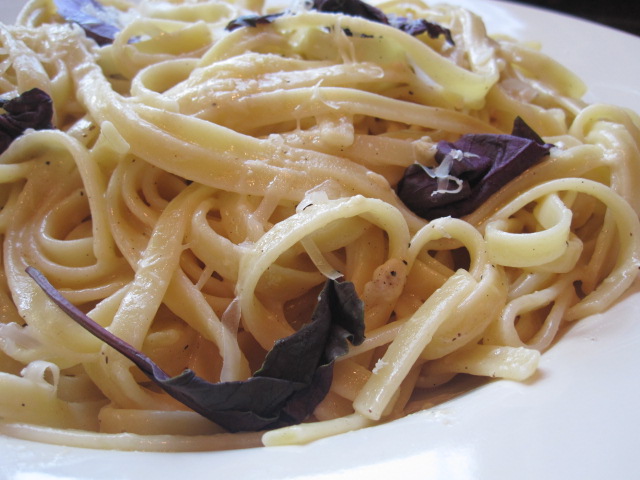
Fettucine Limone Parmeggiano

Sophie and her chef fiance, Victor, are going on a pre-honeymoon trip to Verona, Italy where they plan to spend some time together before their wedding.  Instead of the romantic vacation she planned, Sophie finds herself traipsing all over Italy with Victor while he does culinary research for his new restaurant.  It soon becomes clear to Sophie that Victor's top priority is not Sophie, but his new restaurant.  Poor Victor doesn't even realize his ways.  He's so obsessed with food and everything regarding it that he doesn't even realize he's losing Sophie.


As soon as I observed Victor's behavior I completely identified with it.  How hard would it be to love food and not get consumed by it while in Italy?  I don't really fault him.  I would most likely behave in a similar way.  Maybe not to the extreme he did, but still.  Poor Sophie.  If only she were a noodle, or a great vintage wine, or perhaps a truffle then maybe then she would get some attention from Victor.

The movie inspired me to keep my priorities in check and not be so consumed with food.  I decided to make a quick dish, one that can be made in the time it takes to cook the pasta.  Don't you just love those types of meals?  I've always wanted to make Pasta Limone, a dish redolent with lemons, parmesan, and lots of fresh basil.  I picture this as the type of thing I would eat if I traveled to Italy.

Fettucine Limone Parmeggiano
Adapted from Gwyneth Paltrow's My Father's Daughter
Serves 4

3/4 pound fettucine
Coarse salt
1 lemon
1-1/2 cups finely grated fresh Parmesan, plus extra for serving
1/2 teaspoon freshly ground black pepper
2-1/2 tablespoons extra virgin olive oil
3-5 tablespoons of pasta water, to thin
Handful fresh basil leaves

Boil the fettucine in salted boiling water, according to the package directions.  

Meanwhile, using a Microplane, grate the zest from the lemon into a large mixing bowl.  Cut the lemon in half and squeeze the juice into the bowl.  Add the 1-1/2 cups Parmesan, pepper, and a pinch of salt, and mix in the olive oil to form a wet paste.

When the fettucine is perfectly cooked, add 2 or 3 tablespoons of the cooking water to the lemon and cheese mixture.  Add the fettucine to the bowl and toss thouroughly, adding another tablespoon or 2 of pasta water if necessary so that the sauce coats each strand.  Roughly tear in the basil leaves.

Serve each portion with a sprinkle of coarse salt, a fresh grind of black pepper, and a few gratings of extra Parmesan.
Notes/Results:  This pasta dish was so fragrant.  The smell of lemon and basil just permeated the kitchen.  We could definitely taste the lemon, which we loved, and we found this dish to be refreshing and light.  At the same time, there was a certain creaminess to the pasta (from the cheese and the addition of pasta water) and it was very satisfying.  Another selling point was that I was finally able to showcase some of my opal (purple) basil.  Purple is one of my favorite colors and I searched high and low for purple basil this season.  I didn't notice a difference in the flavor of the basil, but the color sure does make me happy.  All in all, a great and quick pasta dish!

Food 'n Flix is being hosted right here at Stirring the Pot this month.  It's not too late to submit your recipe inspired by the movie Letters To Juliet.  For information regarding a submission, please click HERE.

Monday, July 25, 2011

Roasted Shrimp Salad

There were a couple of reasons why I was drawn to this recipe.  First and foremost, it's hot as hell here and for the first time in a long time I haven't really felt like standing over the stove.  Maybe more importantly though is the fact that I've never had shrimp salad before and I was really drawn to all the gorgeous flavors in this recipe.  Plus, I've watched and listened as Ina has went on and on about how roasting shrimp really brings out it's flavor and I was curious to give it a try.

The pictures of the salad in her book are gorgeous and I've grown to have high expectations for Ina's recipes.  She almost always delivers and I've never really had a recipe of hers be a "fail" for me, until now. 

So, did roasting the shrimp bring out any extra flavor? It was certainly an easier way to cook the shrimp, but I didn't feel like it added any additional flavor.  The shrimp were perfectly cook and they were good, it's just that I don't think the roasting really added anything.

The major problem with this recipe for me was that there was just too much flavor.  "Too much flavor" usually isn't ever an issue for me, but in this case I felt that the flavor of the shrimp was masked by the other ingredients.  While I love the flavors of orange zest, dill, capers, and red onion it was just a little too much for the delicate flavors of the shrimp.  However, this recipe has received a five star rating on the Food Network and quite a few people have sung it's praises, so it could be that it's just me.  Either way, I learned a good lesson in how I like to enjoy my shrimp and from now on I will be sure to pair it with more delicate flavors (unless of course we're talking about garlic and in that case I say the more the better).
Roasted Shrimp Salad
Adapted from Ina Garten's How Easy Is That?
Serves 6

2-1/2 pounds (16 to 20) per pound) peeled shrimp
1 tablespoon good olive oil
Kosher salt and freshly ground black pepper
1 cup good mayo
1 tablespoon grated orange zest (2 oranges)
2 tablespoons freshly squeezed orange juice
1 tablespoon good white wine vinegar
1/4 cup minced fresh dill
2 tablespoons drained capers
2 tablespoons small-diced red onion

Preheat the oven to 400 degrees.

Pat the shrimp dry with paper towels and place them on a sheet pan.  Drizzle with the olive oil, sprinkle with 1 teaspoon salt and 1/2 teaspoon pepper, and toss together.  Spread the shrimp in one layer and roast for 6 to 8 minutes, turning once while cooking, just until pink and firm and cooked through.  Allow to cool on the pan for 3 minutes.

Meanwhile, make the sauce.  In a large bowl, whisk together the mayo, orange zest, orange juice, vinegar, 1/2 teaspoon salt, and 1/2 teaspoon pepper.  When the shrimp have cooled, add them to the sauce and toss.  Add the dill, capers, and red onion and toss well.  The flavors will improve if you cover the salad with plastic wrap and allow it to sit at room temp for 30 minutes.  Otherwise, chill for up to 6 hours and serve at room temp.

Notes/Results:  We didn't care for this one too much, but that doesn't mean that it's not for someone else.  Many reviewers indicated that at first they weren't sure of the orange zest with the shrimp but then declared that they loved the combination.  Although I love the flavor of orange I really didn't care for the flavor when it was mixed with the shrimp.  Additionally, dill and capers are some of my favorite ways to flavor food but in the case of this recipe it was just too briney and too tangy.  I think the dill and capers could really be scaled back in this recipe.  That said, I'm glad I tried this one because I learned quite a bit about how I like to enjoy shrimp.

What about you?  Do you think you would enjoy these dominate flavors with shrimp OR are you more into delicate flavors when it comes to seafood and fish?

For Deb @ Kahakai Kitchen for Souper Sundays

Sunday, July 24, 2011

Banana, Peanut Butter, & Honey Smoothie

This week is Bevvies week at I Heart Cooking Clubs and my original plan was to buy some champagne and make peach bellinis, my favorite drink ever.  The problem is that I procrastinated and now it's Sunday and I live in a dry county.  The liquor store in the next county doesn't open up until 1 o'clock and by then I have other plans, which include sweating in the hot sun.  Perhaps one day I'll learn to stock some champagne here at the house.

Because it's a million degrees here in Kentucky no one really felt like having a hot breakfast so we opted for Jamie's banana smoothie with peanut butter and honey.  This was my first time making a smoothie with half and half and naturally I really liked it.  The half and half definitely makes the smoothie extremely thick and ultimately creamy, kinda like a milkshake.  I've also never added peanut butter to a smoothie before and wasn't quite sure what to expect but the peanut butter only lent a very light peanut butter flavor, kinda like a subtle little secret.  My husband and I really loved these smoothies and I would most definitely make them again.

 Banana, Peanut Butter & Honey Smoothie
Adapted from The Naked Chef Takes Off by Jamie Oliver
Serves 2-4

2 bananas (I used 1 frozen, 1 fresh)
1 cup light cream (I used half & half)
approx. 2-1/2 cups of ice
2 tablespoons honey
2 heaped tablespoons peanut butter

Place the banana into a blender and whizz for 30 seconds.  Add the ice and cream, honey, and peanut butter and whiz up until you get a semi-slushy milk shake consistency.

Theme: Bevvies

Friday, July 22, 2011

Buffalo Chicken Meatballs

 I ran across this recipe for Rachel Ray's Buffalo Chicken Meatballs when I was searching for recipes using ground chicken.  I thought the idea of buffalo chicken meatballs was totally genius and knew my husband would be absolutely crazy for them.  What man, or woman, wouldn't, right?

Rachel's recipe is more of an appetizer with the buffalo chicken meatballs being dunked into blue cheese with celery and carrots on the side.  I needed something I could serve for dinner so I decided to make the meatballs and serve them over rice.

I couldn't believe how easy this recipe was.  It's a matter of 5-6 ingredients, a quick mix and shaping of the meatballs, some time in the oven, a nice bath in buffalo sauce and you're totally done.  Not to mention the entire meal was less than $5 and serves four people easily.  Best of all, these meatballs are absolutely delicious and fun.  


 Buffalo Chicken Meatballs
Adapted from RachelRayshow.com


Serves 4
  • 1 pound ground white meat chicken
  • 1/2 small onion, grated
  • 2 cloves garlic, grated
  • 1/2 cup parsley, chopped
  • Salt and freshly ground black pepper
  • Extra-virgin olive oil (EVOO), for drizzling
  • 2 tablespoons butter
  • 1/2 cup hot sauce (such as Frank’s)

Preheat oven to 400ºF.

In a large mixing bowl, combine the ground chicken with the onion, garlic and parsley, and season with salt and freshly ground black pepper. Flatten out the meat in the bowl and score it into four portions using the side of your hand. Shape each portion into four balls – you should have sixteen meatballs in total.

Arrange the meatballs on a nonstick sheet pan and drizzle them with EVOO. Place in the oven and bake until the meatballs are cooked through and golden brown, about 10-12 minutes.

While the meatballs are baking, melt the butter in a large skillet over medium heat. Add the hot sauce and whisk to combine. Toss the baked meatballs in the hot sauce to coat.  Serve with blue cheese, carrots, and celery sticks as an appetizer OR serve over rice.

Notes/Results:  Not only were these meatballs delicious, but they were easy, quick, fun and economical to make.  I'd definitely like to serve these as an appetizer with the blue cheese, celery, and carrots BUT we really enjoyed them over rice for dinner.  My husband especially enjoyed them and has asked for them again.  A keeper recipe for sure and another Rachel Ray winner.  Rachel is definitely winning me over lately.

I submitting this post to Deborah over at Taste and Tell for her Saturdays with Rachel Ray event.

Wednesday, July 20, 2011

Ina's Fresh Peach Cake

 
Just a few blocks up the road from us is a very big orchard and farm that we love to visit.  This past weekend they were having a corn festival which meant that they had pony rides, craft booths, and live music.  The kids love going there and I don't mind taking them because I love visiting their farm stand.  It's a very quaint store, with an old-timely feel to it, and I could literally spend at least an hour, or more, walking around looking at everything.  They sell all kinds of decorations for the house, as well as beauty products, toys for kids, cookbooks, kitchen equipment, all sorts of local food mixes, jams, jellies, pickles, and lots and lots of gorgeous fresh produce.  

Anyway, this weekend I went a bit mad buying things while I was there.  A couple dozen ears of corn, all sorts of fresh peppers, gobs of peaches, cookies n cream fudge for my daughter, and a loud ass pop gun for my son (I'm already regretting that purchase).  Yep, I couldn't even carry it all to the car.  I had to use one of those wagons they provide to haul my goods.  When I got home I laid out 24 ears of corn on the counter and got "the look" from my husband.  It was the same look I got when he found out we had 28 boxes of pasta in our pantry. 


Needless to say, I shucked corn outside for a LONG time and when I was done I came in and saw the peck of peaches laying on the counter.  That's when I remembered Ina's recipe for her Fresh Peach Cake and decided to make it as a reward for shucking all that corn.  Surely shucking all that corn burned enough calories for a slice of cake? 
Fresh Peach Cake
Adapted from Ina Garten's How Easy Is That?
Serves 8

1 stick unsalted butter, at room temperature
1-1/2 cups sugar, divided
2 extra-large eggs, at room temp
1 cup sour cream, at room temp
1 teaspoon pure vanilla extract
2 cups all-purpose flour
1 teaspoon baking soda
1 teaspoon baking powder
1/2 teaspoon kosher salt
1 teaspoon ground cinnamon
3 large, ripe peaches, peeled, pitted, and sliced
1/2 cup chopped pecans

Preheat the oven to 350F.  Grease a 9-inch square baking pan.

In the bowl of an electric mixer fitted with the paddle attachment, beat the butter and 1 cup of the sugar for 3-5 minutes on medium-high speed, until light and fluffy.  With the mixer on low, add the eggs, one at a time, then the sour cream and vanilla, and mix until the batter is smooth.  In a separate bowl, sift together the flour, baking soda, baking powder, and salt.  With the mixer on low, slowly add the dry ingredients to the batter and mix just until combined.  In a small bowl, combine the remaining 1/2 cup sugar and the cinnamon.
Spread half of the batter evenly in the pan.  Top with half of the peaches, then sprinkle with two-thirds of the sugar mixture.  Spread the remaining batter on top, arrange the remaining peaches on top, and sprinkle with the remaining sugar mixture and the pecans. 

Bake the cake for 45-55 minutes (mine took more like 80 minutes), until a toothpick inserted in the center comes out clean.  Serve warm or at room temperature.

**You can make this recipe even easier; substitute 16 ounces frozen peaches, defrosted.
 Notes/Results:  I'm not usually the biggest fan of a coffee cake or breakfast cake, but Ina's Fresh Peach Cake is really fabulous!  Of course I might be a bit biased because peaches are my absolute favorite fruit, BUT saying that, I think this is exquisite.  My favorite part of the cake was how the bottom and the sides got all caramelized, sweet, and crunchy with the sugar and cinnamon mixture.  Of course the inside was moist and fragrant with peaches, AND I'm not usually a huge fan of nuts on my cakes/breads, but the pecans on top of this cake were really nice because they gave that added crunch and of course they paired perfectly with the peaches.  A slice of this cake warm with a little bit of cream poured over it is swoon-worthy.  I highly recommend this recipe if you love peaches and/or you have an abundance of peaches right now.


Note:  The only drawback to this recipe is that I think the baking time is off in the book.  Ina says to bake the cake for 45-55 minutes, but this is simply not enough time.  Mine was wobbly in the center and I found I had to bake it about 80-90 minutes total.  Not a big deal, but worth mentioning.

I submitting this to my friend Michelle @ Ms. enPlace for her Garden Variety Wednesday.

Monday, July 18, 2011

Chicken with Shallots

I've been in a little bit of a rut lately.  I haven't really felt like doing anything, much less cooking, which is pretty strange for me.  When I do get in the kitchen I don't really feel like being adventurous or making some grandiose recipe.  I just want easy, simple, classic recipes that I know I can count on to be great.  Whenever I'm feeling this way I turn to Ina Garten.  Ina never disappoints.

I pulled out my How Easy Is That? book by Ina and literally had a field day marking recipes that I wanted to try. This recipe for chicken with shallots was a standout for me, not only because the whole family can eat it (allergies, etc.), but also because I love the pan roasting method that Ina uses to cook the chicken and well, let's face it.....she tops off the chicken with a creamy buttery shallot sauce that is all kinds of heavenly.  That sauce was so good that I poured it over my potatoes and green beans too.  In fact, the entire meal was so good that I'm already thinking about when I'll make it again.
 Chicken with Shallots
Adapted from Ina Garten's How Easy Is That?
Serves 4

4 boneless chicken breasts, skin on (6-8 oz. each)
Kosher salt and freshly ground black pepper
3 tablespoons vegetable or canola oil
1/4 cup dry white wine (I used chicken stock)
1/3 cup freshly squeezed lemon juice (I used fresh orange juice)
1/4 cup minced shallots 
3 tablespoons heavy cream
4 tablespoons unsalted butter, diced at room temp

Preheat the oven to 425F.  Pat the chicken breasts dry with paper towels and sprinkle them generously on both sides with salt and pepper.  In a 12-inch cast-iron skillet, heat the oil over medium-high heat for 2 minutes,  until it begins to smoke.  Place the chicken breasts, skin side down, in the skillet and cook for 4-5 minutes without moving, until golden brown.

Using tongs, turn the chicken breasts skin side up, place the skillet in the oven, and roast for 12-15 minutes, until the chicken is cooked through.

Meanwhile, in a medium saute pan, combine the white wine, lemon juice, and shallots and cook over medium-high heat for about 5 minutes, until only 2 tablespoons of liquid remain in the pan.  If it reduces too much, add an extra splash of white wine or water.  Add the cream, 1 teaspoon salt, and 1/4 teaspoon pepper and bring to a full boil.  Remove from heat, add the diced butter, and swirl the pan until the butter is incorporated.  Don't reheat or the sauce will "break"!!  Sprinkle with salt and serve the chicken hot with the sauce spooned over it.
Notes/Results:  This is a terrific dish!  The subtlety of the shallots really shines in this velvety sauce.  We served the chicken with baby red potatoes and fresh green beans and it was magnificent.  I had to laugh when I looked up and everyone was topping their chicken, their potatoes, and their beans with the shallot sauce.  The sauce was so good that we wanted to put it on everything!!  I think this is a terrific family meal, but I also think it would make for an impressive meal to serve company.

I did make a few changes to the recipe, based on what I had on hand.  I didn't have any white wine so I subbed chicken stock.  I also didn't have any lemons so I used fresh orange juice.  I was a little nervous about using orange juice in place of lemon juice, but most of the juice reduced to nothing so I don't think it changed the flavor of the sauce overall.

Stay tuned for more Ina dishes....  I've got her Fresh Peach Cake getting ready to go in the oven now!!

Friday, July 15, 2011

Frozen Treats Week #4: Sorbetto di limone

Squeezing lemons 
is hard work
 for a four year old....
but I totally did it!
Sorbetto di Limone (aka Lemon Sherbet)
Adapted from Jamie's Italy
Serves 6
1 cup sugar
1 cup water
1 cup lemon juice (we used about 8 lemons)
zest of 1 lemon
1 heaping tablespoon mascarpone


Prefreeze a shallow 8-10 inch container.

Put the sugar and water into a pan and bring to a boil, then turn the heat down and continue to simmer for 5 minutes.  Once the liquid is clear and syrupy, remove it from the heat and allow it to cool for 15 minutes, then add the lemon juice and zest.  Next, add the mascarpone and stir until totally combined.  It's very important that you give it a taste at this point.  It all depends on the sourness of your lemons, and it's very hard to give an exact recipe that is going to hit it right on the head - all I can say is that the amount of sugar I have suggested should do the job.  If, on the other hand it's so sour that it makes your face totally curl up, you know you need to add a little more sugar until it softens the lemon juice.

Pour into your pre-frozen dish and return it to the freezer - leave it for at least an hour before you check it.  If it has started to freeze, fork it up a bit.  Do this maybe every hour or so for the next 3 hours, after which it will be ready to eat.  It can now be kept for a couple of days in the freezer, with plastic wrap over the top - any longer and it will start to get ice crystals in it.  Always a real treat served on its own in a bowl or glass, but also wicked served with whizzed up raspberries -like a fresh sauce - poured over the top.
Notes/Results:  Jamie's lemon sherbet is tart and refreshing, making a terrific light summertime treat and also a great palate cleanser.  This recipe makes 6 teensy weensy servings, but you really wouldn't want to eat much more than a small scoop because it's fairly tart.  In fact, we love lemon, but next time I would probably add a bit more sugar to help balance out the tartness of all the lemon.  This version ended up being a little too tart for the kids (which is a shame since Jackson worked so hard), but my husband and I really enjoyed it.

Theme: Potluck

Tuesday, July 12, 2011

Stuffed Hot Sausage Meatball Subs

Have you ever made the mistake of trying to do too many things in the kitchen at once?  For example, maybe you're silly enough to attempt making two or more blog-worthy recipes at one time?  Have you done this before?  It's insanity.  Hell, it's double-insanity, right?  You're standing in the kitchen with two different cookbooks laid out, following two different recipes, prepping two separate recipes, pots and pans and ingredients everywhere (including the floor), everyone is screaming that they are starving, it's hot as hell, and the pressure of trying to take multiple pictures of both recipes is enough to make you want to run and cry.  Oh, and just to add to the chaos, you remember that your son can't eat what you're making for dinner because he's allergic to it....you'll have to make him something else entirely.  Any of that sound familiar?

So, don't let the pictures of this ordinary-looking meatball sub fool you.  In my highly panicked state of frenzy I forgot to take pictures of the money shot, which would be the gooey mozzarella cheese oozing out of the meatballs. Yes, not only are these meatballs ginormous, but they are made with hot italian sausage, and they are stuffed with cubes of mozzarella.  This sub is like the King of Meatball Subs!

Stuffed Hot Sausage Meatball Subs
Adapted from Rachel Ray's Look + Cook
Serves 4, or 8 (depends on who's eating)

2 pounds bulk Italian hot sausage
1 pound smoked mozzarella, cut into 12 cubes 
Extra virgin olive oil for drizzling, plus 1 tablespoon
1 onion, finely chopped
2 garlic cloves, chopped
1/4 cup pitted kalamata black olives, chopped
1/4 cup softened sun-dried tomatoes, chopped
1 (28-ounce) can Italian crushed tomatoes
salt and black pepper
4 crusty sub rolls, ciabatta bread, or individual ciabatta rolls, 7-8 inches long
a handful of fresh basil leaves, torn or shredded
freshly grated Pecorino Romano cheese, for garnish

Preheat the oven to 425F.  Arrange a cooling rack on a rimmed baking sheet.  Dip your hands in warm water to prevent sticking.  Separate the 2pounds of sausage into 4 equal portions.  Each portion should form 3 meatballs.  Nest a cube of smoked mozzarella into the center of each meatball.  Coat the meatballs with EVOO and roast on the rack above the baking sheet until firm and cooked through, about 18 minutes.  While the meatballs cook, heat the tablespoon of EVOO in a sauce pan over medium heat.  Add the onions and garlic, ad cook until tender, 5-6 minutes.  Then stir in the olives, sun-dried tomatoes, and canned crushed tomatoes, season with salt and pepper, and bring to a simmer.  Take out the meatballs, turn off the oven, and crisp the rolls for a minute.  Split the rolls and fill each with 3 meatballs.  Top with some sauce, basil, and cheese and serve.

Notes/Results:  This is definitely a manly sub sandwich.  When my husband came into the kitchen and saw the nearly palm-sized meatballs sitting on the counter with the melting cheese oozing out he became rather excited.  What we both liked about this recipe is that the meatballs are made with hot italian sausage, which is quite a change from the normal beef meatball.  We are a family of cheese lovers, so we really loved that the meatballs were stuffed with cheese and then topped with even more cheese.  If you decide to make this, don't forget the fresh basil.  The fresh slivers of basil really helped add lots of fresh flavor to the sandwich.  A spicy, cheesy, gooey sandwich with lots of flavor!
Every Sunday @ Kahakai Kitchen

Thanks to Brenda of Brenda's Canadian Kitchen for another great recipe from Rachel Ray's Look + Cook!  My pick for August is going to be Rachel's Chinese Orange-Barbecue Cashew Chicken.

Sunday, July 10, 2011

Mexican-Style Corn and a shout out to my friends at Poppee's Popcorn

I buy fresh corn on the cob in obscene amounts.  We can't get enough of it.  The other day my husband and I watched as my 4 year old son dominated four ears of corn in a row.  We had to stop him from eating a fifth ear of corn.  We didn't want to find out what would happen if he ate five ears all at once.

While the kids like the corn with just butter and salt, my husband and I love our corn fried in a little bit of butter with some diced jalapenos thrown in.  When I spied Jamie's recipe for Mexican-style corn I knew it was something worth trying.  How can you go wrong with an ear of corn rolled in butter, then doused with cheese, and topped with diced jalapenos?


Mexican-Style Corn
Adapted from Jamie Oliver's Food Revolution
Serves 4

Boil 4 heads of corn on the cob in salted, boiling water for 8 to 10 minutes with a lid on the pan.  When tender, drain in a colander.  Grate 3/4 cup of Parmesan cheese over the surface of a large serving platter or over 4 individual serving plates.  Halve, seed, and finely chop 1 fresh red or green chile and sprinkle evenly over the cheese.  Place a little pat of butter on each cob and brush over the corn to coat.  When the butter has melted, roll each cob in the cheese and chile, so the flavors stick to the outside.  Season with a good pinch of salt and pepper.  Serve with lime wedges for squeezing over.

Notes/Results:  Loved it!  One of the things I like best about this recipe is that it allows you to please everyone at the table.  If you're serving picky eaters, children, or just people who like their corn plain then they can have it plain.  Everyone else can top their corn however they please and all is good.

*******************************

 Also, I have a really fun story for you.  While I was on my trip in Ohio visiting my friends and family I went to one of my favorite places in town:  Poppee's Popcorn, also known as Jenny's Popcorn.  When I walked into the store they asked me if my name was Kim.  At first I was a little perplexed, trying to figure out how they knew me, but then I figured that I'd probably went to school with them.  Then they pointed out that they'd recognized me because of my blog when I featured them on a blog post last summer (original post found here). Turns out they recognized my children from the picture in the blog post (picture shown below).
It was fun being recognized from my blog and I definitely have to say that it completely and totally made my day.  The girls working there were nice enough to give me the employee discount on my order, as well as a complimentary bag of their triple mix popcorn (butter, cheese, and caramel mixed) which we are all enjoying.  Thanks Poppee's!  My family and I agree that you have the best popcorn around.  Our all-time favorite is the ginormous five pound bag of popcorn, not only because it's delicious, but also because of the sheer giddiness we feel when we eat from a five pound bag of popcorn.
You can't help but smile and laugh when you see this big bag of popcorn!
If you live in the North Ridgeville/Elyria, Ohio area, or happen to be visiting, then you simply have to stop by and check out Poppee's for yourself.  Be sure to ask for the 5 pound bag.  You won't be sorry!


Theme: Fun in the Sun

Saturday, July 2, 2011

Jamie's Evolution Potato Salad

A quickie post to share Jamie Oliver's Evolution Potato Salad with you, just in time for the holiday weekend.  Jamie's recipe is rather free form in that he gives several variations of potato salad ranging from a potato salad with a light dressing to a potato salad that is decked out with herbs, yogurt, and bacon.  In true form, I chose the decked out version.  What can I say?  I'm not really a minimalist....at least not when it comes to food.

Evolution Potato Salad
Adapted from Jamie's Food Revolution
Serves 4

1-3/4 pounds baby potatoes
6 tablespoons extra virgin olive oil
2 tablespoons of lemon juice, reserve lemon for zest
sea salt and freshly ground black pepper
small bunch of fresh chives
zest of 1 lemon *see above
1/4 cup yogurt
2-3 slices of bacon or pancetta 

Bring a pan of salted water to a boil.  Peel 1-3/4 pounds of baby potatoes, if you like, or leave them unpeeled, chopping any larger ones in half; leaving the smaller ones whole.  When the water is boiling, add the potatoes to the pan and bring back to a boil for about 10-15 minutes, depending on the size of your potatoes.  Test them with the point of a knife to make sure they're cooked through.  As soon as they're ready, drain them well in a colander and put them into a bowl.  The trick is to dress the potatoes while they are still hot - mix 6 tablespoons of extra virgin olive oil and 2 tablespoons of lemon juice in a bowl.  Season with sea salt and freshly ground black pepper and stir well.  Toss the hot potatoes in the dressing.  Serve right away, as it is, or move on to the next steps...
Finely chop a small bunch of fresh chives and sprinkle them over the potatoes.  Toss well before serving.

Toss the dressed potato salad and chives with the zest of 1 lemon and 1/4 cup of yogurt.

Put a frying pan on the heat and add a splash of olive oil.  Thinly cut slices of smoked bacon or pancetta into small pieces and add to the pan.  Toss and cook for 2-3 minutes, or until the bacon is crispy and golden.  Remove from the heat.  Sprinkle over your potato salad and serve.

Notes/Results: We really enjoyed this potato salad.  It was quite tangy from the addition of the yogurt and the lemon, making it different than your standard potato salad.  I still prefer the traditional potato salad, but I would definitely eat this one again.  

Featured every Sunday @ Kahakai Kitchen            


I hope everyone is having a great holiday weekend! I am on vacation visiting my family in Ohio and will be taking a short break from blogging this week.  (I accidentally left my camera with all my pictures on it at home).  Have a great week!