Sunday, January 26, 2020

Pasta with a Creamy Smoked Bacon and Pea Sauce {Recipe Redux}


This recipe, Baby Farfalle with a Creamy Smoked Bacon and Pea Sauce, is a dish I made back in 2011 and it is AN ALL-TIME FAVE! My daughter, who was only 10 at the time, fell in love with this recipe and requests it often.

Over the years, I've made a few changes to this recipe and thought I would document them below for safekeeping. I will confess that my changes DO NOT make this recipe any healthier. In fact, my changes are to add more cream and cheese, but the result is nonetheless an improvement on the original, making the final product a creamy cheesy delight.

This dish is part of my regular rotation for three very simple reasons: it's delicious, it's done in the time it takes to boil pasta, and it's made with pantry ingredients. Everyone should always have the ingredients on hand to make this dish. Pasta, bacon, cream, frozen peas (or even any other green veggie, such as spinach and/or kale) Parmesan and/or Mascarpone.

This dish is highly adaptable. Don't have bacon? Use pancetta or bits of leftover ham. Don't have frozen peas? Use kale or spinach. Don't have the Mascarpone? Use cream cheese. I find that I always have a version of the ingredients on hand to make this dish work.
 
 Now, it's my opinion that the bacon or pancetta is essential here, but I suppose you could go ahead and make a veggie version. If that's the case I'd add a few more green veggies to amp things up a bit.

I'm now on my 11th year of food blogging and this is one of my family's all-time favorite dishes from my blog. I think that probably says it all.


Pasta with a Creamy Smoked Bacon and Pea Sauce
Adapted from Jamie Oliver's Food Revolution
by Jamie Oliver
Serves 4-6

8 -10 slices bacon or equivalent in pancetta
salt and black pepper, to taste
1 pound baby farfalle or small pasta
olive oil
pat of butter
2 cups frozen peas
1/4 - 1/2 cup heavy cream
4 ounces (1/2 cup) Mascarpone
4-6 ounces Parmesan cheese
Optional: herbs for garnish: mint, basil, sage, or parsley work well here

Notes: The ingredients in bold are the ones I've changed over the years. Originally the recipe called for 10 slices of bacon. I usually use around 8 slices but have been known to add more or less. The original recipe called for only 2 tablespoons of cream and it simply just wasn't enough to form a sauce so I find that I add anywhere from 1/4 -1/2, depending on the consistency. And finally, the original recipe didn't call for Mascarpone, but one time I had it on hand and wanted to use it up so I tossed it into the sauce and we found that it made the sauce even creamier and silkier.

Bring a large pan of salted water to a boil. Add the mini pasta and cook according to the package instructions. Slice the bacon. Get a large frying pan over medium heat and a good lug of olive oil and the butter (I've found this necessary as bacon is usually nowhere near as fatty as it used to be). Add the bacon to the pan, sprinkling with a little pepper and fry until golden crisp.

 Meanwhile finely chop any herb garnishes. As soon as the bacon is golden, add your frozen peas (and or any other veg) and give the pan a good shake. After a minute or so, add about 1/4 cup heavy cream and the Mascarpone to the bacon and peas. Before draining your pasta, save some of the pasta cooking water, about 1 cup to be sure. 

Now drain your pasta in a colander. Add the pasta to the frying pan. Incorporate the pasta with the sauce, watching as it comes together to see if it needs more cream. Now toss in the Parmesan cheese and stir to incorporate. Be sure to do all this over low heat. It's really important that the sauce is creamy, silky, and delicious but if it's too thick for you, add a splash of the reserved cooking water to thin it out a bit. Place into a large pasta platter and garnish with more cheese and/or herbs, if using. Serve immediately. This is lovely with a simple green salad.


Sunday, January 19, 2020

Mark Bittman's Curried Lentil and Potato Soup {An All-Time Fave}


Back in 2010, not long after I started my blog, I made Bittman's Curried Lentil and Potato Soup. This would turn out to be my very favorite lentil recipe and I would go on to make it countless times.

This is hands down one of the most comforting dishes on my blog. It is also extremely cheap, simple, and healthy. As a bonus, everyone should have these ingredients on hand in their pantry.

Lentils, potatoes, can of coconut milk, homemade broth or water, and curry powder. Years ago, when I made this for the very first time, I simply used water in place of broth and it was still delicious. This time around I used Mark Bittman's Quick Vegetable Stock that I made and shared last week.

The cost of this soup is so minimal. We're talking $3-4 for the entire pot of soup. Beyond the minimal cost, this soup is incredibly healthy, especially with the homemade veggie stock. It is vegetarian, vegan, gluten-free, and probably friendly for just about ANY diet. There's no butter or oil needed, so the only fat you get is from the coconut milk. Lentils are a powerhouse, low in calories, but rich in iron and folate, and an excellent source of protein. If you'd like, leave the skin on the potatoes to gain all the nutrients of the potato, full of vitamin B, vitamin C, iron calcium, and potassium.

This soup is soul-soothing. I find it so very delicious and comforting. It's thick and hearty, almost creamy, with incredible flavor. I absolutely adore it and have no problems eating the whole batch myself. In fact, it makes for a very tasty lunch at work and keeps very well in the fridge.

If you're fond of lentils, please do yourself a favor and make this recipe. I'm convinced this recipe is THE ONE as far as lentil soup goes. And, if this recipe appears too simple and you feel the need to change things up, do me a favor and don't. Make it just how it's written. The curry powder delivers the perfect amount of seasoning. If you do feel inclined to add another spice, a dash or so of coriander seed works well.


Curried Lentil and Potato Soup
Adapted from How To Cook Everything Vegetarian
by Mark Bittman
Serves 4-6

1 cup dried brown lentils, washed and picked over
3-1/2 cups mixture (one can of coconut milk + vegetable broth or water)
1 tablespoon curry powder
2 medium russet potatoes, chopped, skins on
salt and pepper, to taste
cilantro, for garnish, if you like

Combine the lentils, liquids, and curry powder in a stockpot and bring to a boil over medium-high heat. Turn the heat down to medium-low so that the mixture bubbles gently, cover partially, and cook, stirring occasionally, until the lentils start to absorb the water a bit, about 15 minutes.

Add the potatoes and cover the pan completely. Cook, undisturbed for 10 minutes or so, then stir gently and check to make sure the lentils aren't too dry. If so, add a little more liquid. Add the salt and pepper as the lentils become tender.

Cover and continue to cook until the lentils are sot and beginning to turn to mush and the potatoes are tender at the center, another 5-10 minutes (mine had to go longer); add liquid if necessary. The mixture should be moist but not soupy. Add lots of black pepper, stir, then taste and adjust the seasoning and serve, garnished with yogurt, if you like, and/or cilantro.

Souper Sundays @ Kahakai Kitchen

Sunday, January 12, 2020

Mark Bittman's Quick Vegetable Stock {Zero Food Waste}


The Zero Food Waste movement has been going strong for a while, but it's something that I've always practiced in my kitchen. I absolutely CANNOT STAND to watch anyone throw food away, let alone do it myself.

I have a couple tricks up my sleeve when it comes to using what I have. Quite often I have veggies and/or fruits that start to languish. When this happens I mostly cut them up, if need be, and freeze them for later. Other times, if I have enough veggies going off at the same time, I'll make vegetable stock.

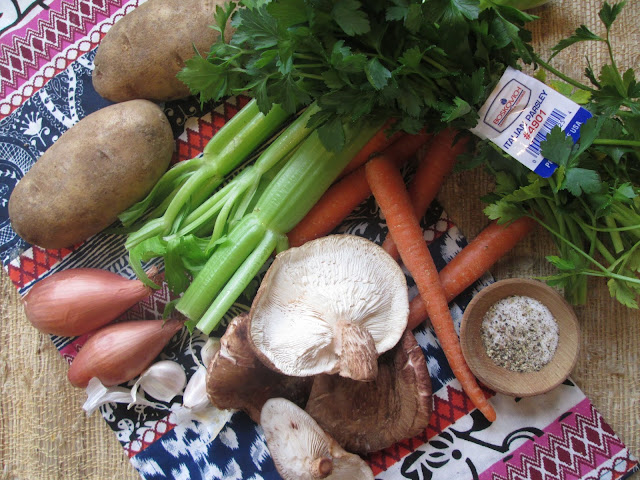
Today I gathered up some leftover veggies that have been looming around, plus some shitake mushrooms I bought at the farmers market yesterday. I don't care for the texture of mushrooms, but I am crazy about their savory earthy flavor and they make a wonderful addition to any stock.

I followed Mark Bittman's recipe, but as you can see below, there are endless combinations to choose from. Clean out your veggie bin and use what you have. That's the number one goal: zero waste.

I recommend making veggie stock to everyone I know because it is the best way to use up what you have. Simply throw it all in a large stockpot, add enough water to cover, and set to simmer. Walk away. It's one of the easiest things you'll ever make.

Now, a good question my friends ask is, "what do I do with the veggie stock?" Well, personally, I like to warm mine up in a mug and drink it. It's warm and cozy and full of vitamins, minerals, and nutrients. Another huge go-to for me is a hearty and comforting lentil soup, but any veggie-based soup would be a wonderful way to use your stock. I also like to keep some stock around to deglaze a pan when needed. However, once you make it, you will find many uses for it!


Quick Vegetable Stock
Adapted From The Food Matters Cookbook
by Mark Bittman
Makes about 2 quarts

4 carrots, cut into chunks
2 medium or 1 large onion, unpeeled and quartered*
2 potatoes, scrubbed and skins left on, cut into chunks
3 celery stalks, roughly chopped (leaves included)
3 or 4 garlic cloves
20 or so stems parsley, with or without leaves
salt and black pepper, to taste

Optional add-ins: dried or fresh mushrooms; fresh, or canned, tomatoes; root vegetables such as parsnips or turnips; winter squash; fresh herbs; leeks; lemon zest; cloves or other warm spices; gingerroot. Avoid bell peppers or eggplant, which are too bitter. If you use cabbage, cauliflower, or broccoli, their flavors will dominate.

Make sure all your produce is clean. Combine everything in a stockpot with 3 quarts water and salt and pepper, to taste. Bring to a boil and adjust the heat so the mixture bubbles steadily but gently. Cook until the vegetables are tender, about 30 minutes (cooking longer will improve the flavor, but a few minutes less won't hurt much either). I cooked mine about 45 minutes, tasting and seasoning occasionally to see if the flavors were where I wanted them to be.

Strain, then taste and adjust seasoning before using. Cool before refrigerating or freezing.


Sunday, January 5, 2020

Giada's Crispy Chicken Thighs with Peppers and Capers


The beginning of the new year is a time for clearing out the old and bringing in the new. You know... your freezer, your fridge, and your pantry. Over the holidays I accumulated a lot of ingredients: antipasto, cheeses, fresh herbs, various loaves of bread, and some odds and ends in my freezer.

Giada's recipe for Crispy Chicken Thighs with Peppers and Capers is a fabulous way to use up all those bits and pieces, while also eating more healthfully.

This chicken dish is inspired by Peperonata, a classic Italian dish consisting of sauteed peppers olives, and capers that melts in your mouth. This classic combination of flavors is the perfect bed for crispy chicken thighs. Make sure to get the chicken crackly and delicious by searing them in a very hot pan for a full 8 minutes - you are looking for a dark golden brown. You want the texture of the crispy skin against the tender meat with the melt-in-your-mouth flavors of the Peperonata. This dish tastes as delicious as it smells!


Crispy Chicken Thighs with Peppers and Capers
Adapted from Giada's Italy
by Giada De Laurentiis
Serves 4

1/4 cup olive oil
4 chicken thighs (about 2 pounds)
salt and pepper, to taste
1 anchovy fillet or 1/2 teaspoon anchovy paste
1 red bell pepper, cored, seeded, and sliced into thin strips
1 shallot, diced small
1/2 cup pitted kalamata olives, roughly chopped
2 tablespoons capers, drained and rinsed
1/4 teaspoon dried oregano
1 cup dry bread crumbs
1 tablespoon flat-leaf parsley leaves, chopped

Preheat the oven to 425F. Heat 2 tablespoons of the olive oil in a medium skillet over medium-high heat. Dry the chicken very well with paper towels and season evenly on both sides with salt and pepper. Place the thighs in the hot pan, skin-side down, and cook without moving for about 8 minutes, or until dark golden brown. Flip the thighs and cook an additional 3 minutes. Transfer the thighs to a baking sheet and roast for 10 to 15 minutes, or until an instant-read thermometer registers 160F. 

While the chicken roasts, place the same pan over medium heat and add the remaining 2 tablespoons olive oil. Add the anchovy and mash it with the back of a wooden spoon until it dissolves into the oil. Add the bell pepper and salt, to taste, to the pan and cook, stirring often, for 5 minutes, until cooked through and soft. Stir in the shallots and cook an additional minute. Add the olives, capers, and oregano to the pan and stir to combine.  

Sprinkle the bread crumbs over the pepper mixture and stir with a wooden spoon until the bread crumbs have soaked up all the flavored oil. Cook, stirring constantly until the bread crumbs are toasted and the flavors have married, about another 3 minutes. Stir in the parsley. Spoon the bread crumb mixture onto a platter. Top with the chicken thighs and drizzle with any accumulated juices from the baking sheet.