Thursday, May 30, 2013

Yotam Ottolenghi's Extremely Delicious Fava Bean Burgers

Okay, so I have a thing for veggie burgers.  We're talking a major kinda thing.  As in I like veggie burgers better than a big juicy cheeseburger kinda thing.  Especially if the veggie burger is made from beans.  So, right off the bat, there may be a bit of bias involved when I say these fava bean burgers are extremely delicious.  Even so, I think carnivores and vegetarians alike would agree that Yotam Ottoleghi's Fava Bean Burgers are incredible.  These are hands down the very best veggie burgers I've ever had.

Let's talk fava beans.  I don't think I've ever seen fresh fava beans available locally.  Not anywhere. Not at the farmer's market.  Not in the huge supermarkets.  Not in the gourmet grocery stores.  Not even in the freezer section.  I really wanted to make these burgers using fresh or frozen fava beans, but since that wasn't very likely I opted for canned fava beans.  I found the canned fava beans in the international section of my supermarket.  They were kinda pricey for beans, coming in at around $3.00 per can.  There were two different cans available, spicy and regular.  Since I needed 3 cups of beans for my recipe I bought two cans of fava beans, one of each.  It was the perfect amount. 

Now I mention fava beans because I don't think most people in the U.S. have tried them before.  I wanna take the time to tell you that this is a major injustice.  Fava beans are absolutely delicious!   So, before you think about subbing any other kind of bean in this recipe, PLEASE DO NOT!  The fava beans are so smooth and creamy and they really meld well with the flavors in this recipe.

Okay, so these burgers are definitely worth making.  A lovely mixture of fragrant spices, fava beans, chopped spinach, mashed potato, minced garlic, green chile, cilantro, egg and breadcrumbs come together to make one tasty burger.  Eat them on a bun or "naked" alongside a salad.  You simply can't go wrong!

Fava Bean Burgers
Adapted from Plenty
by Yotam Ottolenghi
Makes 6 burgers

3/4 teaspoon cumin seeds
3/4 teaspoon coriander seeds
3/4 teaspoon fennel seeds
1/2 pound (about 6 cups) spinach*
3 tablespoons olive oil
1 pound (about 3 cups) shelled fava beans, fresh or frozen*
3/4 pound potatoes, peeled and roughly diced
1/2 fresh green chile, seeded and finely chopped
3 garlic cloves, minced
salt and black pepper
3 tablespoons chopped cilantro
6 tablespoons dried breadcrumbs
1 egg
1/2 cup sunflower or canola oil
6 Buns, for serving

Optional/Topping/Garnish: Spinach, *preserved lemons (see recipe below), slivered red onion, mayo, cheese, etc.

Note:  If you make these burgers with fresh or frozen fava beans you may wish to add more cumin.  I think my version came out well because I used one can of spicy fava beans.  Had my fava beans not been spicy than I would have added another teaspoon of cumin. 

Put the whole seeds in a pan and dry-roast over high heat for 3 to 4 minutes, or until they start releasing their aromas.  Grind to a powder in a mortar and pestle and leave aside.

Wilt the spinach in a hot pan with 1 tablespoon of the olive oil.  When cool enough to handle, squeeze out any liquid, then chop roughly and set aside. (*Note: To save on money and time, you could buy one package of frozen chopped spinach.  Once defrosted, you will need about 1/2 cup to replace the fresh wilted spinach in the recipe.)

Blanch the fava beans in boiling water for about one minute; drain and refresh under cold running water.  Once cool enough to handle, remove and discard the skins. (*Note: Alternatively, buy two cans of fava beans, drain, and set aside).

Cook the potatoes in boiling water for about 15 minutes, or until tender.  Drain and tip into a large mixing bowl.  Immediately add the skinned fava beans, crushed seeds, chile, garlic, remaining 2 tablespoons of olive oil (I accidentally omitted the oil in my burgers and they were fine) and some salt and pepper.  Use a potato masher to mash it all up roughly; don't worry if some beans are not totally crushed.  Next, add the wilted spinach, chopped cilantro and breadcrumbs.  Taste to check the seasoning.  Lastly, mix in the egg.

Wet your hands and shape the mix into fat patties that are roughly 2 inches in diameter and 3/4 inches thick. Chill them for at least half an hour. (*Note: The burgers mentioned in the directions were simply too huge.  I was able to get 6 patties from my mixture.)

To cook, heat up the sunflower or canola oil and fry the burgers on high heat for 5 minutes on each side or until golden brown.  

Note: Keep these burgers in the fridge and fry as needed.  They will keep in the fridge for several days, making them perfect to have on hand for lunch or dinner as needed.  Alternatively, keep them in the freezer in a tupperware container with layers of wax paper or parchment paper between the burgers to prevent sticking.  You may wish to partially thaw if frozen or just cook them a bit longer (more like 8 minutes per side) if cooking from the frozen state.
 

Quick Pickled Lemons
Adapted from Jerusalem
by Yotam Ottolenghi & Sami Tamimi
Makes 1.5 quarts

1/2 red chile, chopped
3 tablespoons freshly squeezed lemon juice
3 small-medium unwaxed lemons, halved lengthwise and sliced widthwise as thinly as possible
3 tablespoons sugar
1-1/2 teaspoons salt
1 clove garlic, crushed
1 teaspoon sweet paprika
1/4 teaspoon ground cumin
1/2 teaspoon ground turmeric

Use a mortar and pestle to smash together the chile with 1 teaspoon of the lemon juice; you want to get a rough-looking paste.  Transfer this to a large bowl along with all the other ingredients.  Use your hands to mix everything together well so that all the flavors get massaged into the lemons.  Leave in a covered bowl overnight, then transfer to a sterilized sealed jar the next day.  The lemon will keep in the fridge for up to 2 weeks.
 
Theme: Pattycake, Pattycake!


Every Sunday @ Kahakai Kitchen

Saturday, May 25, 2013

Ottolenghi's Cheese, Garlic, Veggie and Herb Bread

I am absolutely crazy for homemade bread, but I really haven't felt like dedicating an afternoon to mixing, kneading, proofing, and baking bread from scratch.  That's where this recipe comes in.  It's a delicious recipe for quick bread that's rich with eggs, infused with garlic and herbs, with little pockets of cheese, thinly sliced sun-dried tomatoes, and a beautifully adorned top.  It's absolutely delicious, very impressive to look at, and can be made in around an hour.  Score!

This recipe is also highly adaptable.  You can use any variety of herbs, cheeses, and veggies that you like to create your own special loaf.  The original recipe called for cubes of gruyere cheese, but I used little cubes of sharp white cheddar because that's what I had on hand.  Ottolenghi infused his loaf with rosemary, but my family isn't crazy about rosemary so I opted for oregano instead.  Lastly, this loaf has thinly sliced ribbons of sun-dried tomatoes, but you can use capers, olives, roasted red peppers or any other veggie you like.  I can foresee many versions of this recipe in my near future.  I really don't think you could go wrong!


Cheese, Garlic, Veggie and Herb Bread
Adapted from Yotam Ottoleghi
via the Guardian

1/3 cup heavy cream
2 tablespoons roughly chopped rosemary leaves, plus 2 whole sprigs to decorate*
2 garlic cloves, crushed
6 eggs
1/3 cup olive oil
1 cup all-purpose flour, sifted
2 tablespoons ground almonds*
1/2 teaspoon salt
2 teaspoons baking powder
1/2 cup thinly sliced sun-dried tomatoes*
3-1/2 ounce Gruyere, diced into 1/2-inch cubes and tossed in 2 tablespoons all-purpose flour*
1 cup grated Parmesan 

*Notes: Use any variety of herbs, cheese, and/or veggies you like.  I used green onions in place of the rosemary.  I did use the sun-dried tomatoes; however, olives, capers, and roasted red peppers would also be great choices.  I didn't have Gruyere but I did have a nice sharp cheddar so I went with that.  I omitted the ground almonds because my son has a nut allergy and we try not to have any nuts in the house.  I garnished my loaf with oregano leaves, thinly sliced sun-dried tomatoes, slivers of garlic, and more parmesan cheese. 

Preheat the oven to 350F.  Line a 10 x 4 inch (8-cup) loaf pan with parchment paper.

Place the cream, rosemary (or herb of your choice), and garlic in a small saucepan and bring to a boil.  Turn off the heat and leave to infuse and cool for 15 minutes.

Meanwhile, whisk the eggs and olive oil together in a medium sized bowl.  In another medium-sized bowl, mix the flour, ground almonds, salt, and baking powder.  Make a well in the center and slowly add the egg mixture, whisking to avoid lumps, until you have a thick batter.

Pass the infused cream through a fine sieve directly into the bowl of batter, reserving or discarding the garlic and rosemary (I used this garlic to decorate the top of the loaf).  Add the sun-dried tomatoes, and Parmesan.  Toss the cubes of cheese (Gruyere or your substitute) with the 2 tablespoons of all-purpose flour.  Add the Gruyere tossed with the flour and mix well.

Pour the batter into the prepared loaf pan and decorate the top of the loaf as you wish.  I scattered fresh oregano leaves, thin slivers of sun-dried tomato, slivers of garlic, and additional Parmesan cheese on top.  Feel free to use your imagination here  

Bake for 35-40 minutes, or until golden and a skewer inserted in the center comes out clean.  Leave to cool for 5 minutes, then remove from the pan and place on a wire rack.  Once the loaf is completely cool, cut into serving slices using a serrated knife. 
Theme: Potluck

Sunday, May 19, 2013

Crispy Couscous with Tomato and Shallots

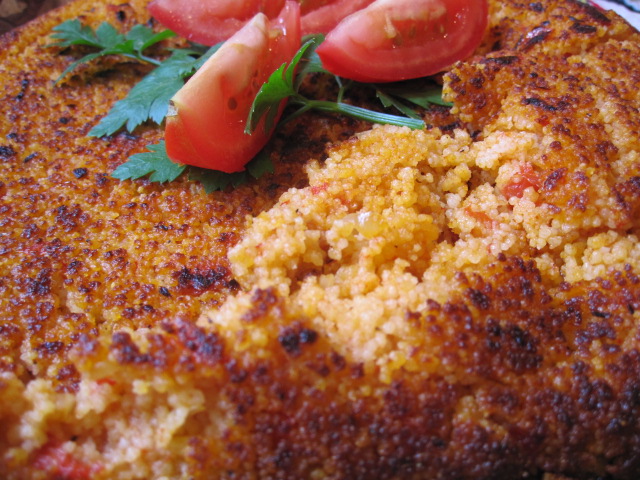
When my friend, Michelle of Ms. enPlace, shared her version of Couscous with Tomato and Onion I knew right away I had to make it for myself! The concept of a couscous cake with a crispy, buttery, golden brown crust and a fluffy interior was so very appealing.   

I rushed to the store for the ingredients, brought them home, and then began procrastinating. For days.  For some reason the idea of inverting the couscous onto a plate with the hopes of transferring a perfectly golden thing of beauty was causing me stress.  So I put it off.  All week.  Until today.  As you can see, the couscous cake did fall apart when I inverted it.  I'd like to tell you that I handled this in a classy way, but that would be a lie.  After having a little bit of a hissy fit, I realized the couscous actually looked good a little broken up because it reveals the texture difference between the crusty exterior and the fluffy interior.  Or at least that's what I told myself.  

Either way, this dish is absolutely delicious.  It's crispy, buttery, and fluffy with a very mild flavor making this a great side dish to serve with nearly anything you'd like.  The next time I make this I'd probably add just a touch of minced garlic, but only because we love garlic.  I will definitely be making this again!


Crispy Couscous with Tomato and Shallots
Adapted from Jerusalem
by Yotam Ottolenghi and Sami Tamimi
Serves 4

3 tablespoons olive oil
1/2 cup chopped shallots (or one medium onion, chopped)
1 tablespoon tomato paste
1/2 teaspoon sugar
1-3/4 cups very ripe diced tomatoes
1 cup couscous
1 cup boiling chicken or vegetable stock
2-1/2 tablespoons butter
 salt and pepper, to taste 

Notes: I decided to sub shallots in place of onions because I prefer the subtle flavor of shallots over onions.  I wanted this to be a mild and kid-friendly dish that everyone would eat. 

 Pour 2 tablespoons of the olive oil into a nonstick pan about 8-1/2 inches in diameter and place over medium heat.  Add the shallots (or onion) and cook for about 3-5 minutes, until softened but no colored.  Stir in the tomato paste and sugar and cook for 1 minute.  Add the tomatoes and salt and pepper to taste.  Cook down until you have a chunky looking tomato sauce, about 3 minutes or so.

Meanwhile, put the couscous in a shallow bowl, pour over the boiling stock, and cover with plastic wrap.  Set aside for 10 minutes, then remove the cover and fluff the couscous with a fork.  Add the tomato sauce and stir well.

Wipe the pan clean and heat the butter and the remaining 1 tablespoon olive oil over medium heat.  When the butter has melted, spoon the couscous into the pan and use the back of the spoon to pat it down gently so it is all packed in snugly.  (At this point, Ottolenghi's instructions say to cover the pan, reduce the heat to its lowest setting, and allow the couscous to steam for 10 - 12 minutes, until you can see a light brown color around the edges).  I didn't really like the idea of covering the pan and trapping all that moisture so I decided to leave my couscous uncovered.  I cooked it for about 10-12 minutes until it was golden brown on the edges.  Use an offset spatula or a knife to help you peer between the edge of the couscous and the side of the pan; you want a really crisp edge all over the base and sides.

Invert a large plate on top of the pan and quickly invert the pan and plate together, releasing the couscous onto the plate. Serve warm or room temperature.  Garnish with tomato, herbs, etc.
Theme: Use Your Noodle!

Sunday, May 12, 2013

Ottolenghi's Pasta and Fried Zucchini Salad

At the beginning of each week I like to make a healthy salad to keep in the fridge for snacking, lunches, and quick little nibbles here and there.  I find that if I have something ready and waiting I am much less likely to eat impulsively.   

This week I made Ottolenghi's Pasta and Fried Zucchini Salad, which is a completely different take on pasta salad than what I'm accustomed to.  First of all, this salad is brimming with shades of green: glorious rounds of fried zucchini, pale green edamame, and an herby pesto-based sauce. The salad is brightened up with lemon zest, capers, and a splash of red wine vinegar then tossed with the pasta and soft chunks of fresh mozzarella.  I must admit, my favorite part are those squishy little bites of fresh mozzarella (I am a cheese lover after all).  This is definitely a keeper!

Pasta and Fried Zucchini Salad
Adapted from Plenty
by Yotam Ottolenghi
Serves 4

1/4 cup vegetable oil
3 medium zucchini, cut into 1/4 inch thick slices
1-1/2 tablespoon red wine vinegar
3/4 cup frozen edamame
2 cups basil leaves, shredded ocarsely
1/4 cup parsley leaves
1/3 cup olive oil
9 ounces penne
grated zest of 1 lemon
1-1/2 tablespoon capers
7 ounces buffalo mozzarella, torn by hand (or any fresh mozzarella)
salt and pepper, to taste

Bring a large pot of salted water to a boil.  Add the pasta and cook until al dente; drain and rinse under a stream of cold water.  Return to the pan in which it was cooked.

Fry the zucchini slices in a few batches in a large saucepan over medium-high heat, about 3 minutes or until they are golden brown.  As they are cooked, transfer to a colander to drain.  Tip the zucchini slices into a bowl, pour over the vinegar and stir, then set aside.   

Blanch the edamame for 3 minutes in boiling water; drain, refresh under running cold water and set aside to dry.   

Combine half the basil, all of the parsley and the olive oil in a food processor, adding a bit of salt and pepper.  Blitz to a smooth sauce.

Pour the zucchini and their juices over the pasta.  Add the edamame, pesto, lemon zest, capers and mozzarella.  Stir gently together, then taste and season with plenty of salt and pepper.  Before serving, stir in the remaining basil. 

Theme: A squash is a squash, of course of course
Every Sunday @ Kahakai Kitchen


Sunday, May 5, 2013

Farro and Roasted Pepper Salad with Smoky Paprika Dressing

Farro is an ancient grain that has a high content of protein, fiber, magnesium, vitamins, and amino acids.  It has a nutty, almost earthy flavor, with a chewy texture making it ideal for soups, salads, and stuffing.  Farro can be rather hard to find, but I was lucky enough to locate a bag in a health food store.

My first attempt at cooking with farro was back when I made Giada's Cheesy Baked Farro.  It was okay, but I didn't love it.  Since then I've been looking for another way to enjoy farro and I've finally found it.  This Farro and Roasted Pepper Salad with Smoky Paprika Dressing from Yotam Ottolenghi is really delicious. 

The farro is chewy and nutty and really holds up well to all the components of the salad (roasted red peppers, olives, green onion, and feta cheese).  I wanted to make my salad more of a main course so I took a tip from my friend Joanne, at Eats Well With Others, and added beans to my salad.  The addition of beans was genius, making the salad even more healthy and filling.  My favorite part of the salad, however, was the smoky paprika dressing.  The dressing was rather complex with a hint of smokiness from the paprika, a refreshing zing from the lemon juice, and a touch of sweetness from the honey.  I felt like the dressing really brought everything together.  Thanks to all the flavors and textures I found this salad very addictive.  

Farro and Roasted Pepper Salad
Adapted from Plenty
by Yotam Ottolenghi
Serves 4

Dressing:
Juice of 1 medium lemon
3 tablespoons olive oil
1 tablespoon honey
1/4 teaspoon ground allspice
1/4 teaspoon smoked paprika, plus extra to garnish
1 garlic clove, minced
1/4 teaspoon salt

Salad:
1 cup farro
2 red bell peppers*
1 can cannellini beans, drained
10 pitted black olives, quartered lengthways
1 tablespoon chopped fresh oregano or thyme
3 green onions, sliced
4 ounces feta, crumbled

*Note: I'm all about quick and easy lately, so I bought a jar of roasted bell peppers instead of making them as directed below. Either option will work.  It is entirely up to you.

To make the dressing:  Whisk together all the ingredients in a bowl and set aside.  I like to make the dressing a few hours in advance if at all possible.  The extra time allows the flavors to blend.

Bring a large pot of water to a boil (you will need to use lots of water as the farro absorbs quite a bit).  Add farro and simmer until tender.  I noticed the farro took a between 40-45 minutes until it reached a tender but slighty chewy texture.  Drain in a sieve, rinse under cold water and set aside.  

To make the roasted red peppers:  Preheat a grill pan to high.  Use a small, sharp knife to cut around the stem of each bell pepper and lift it out with the seeds attached.  Put the peppers on the grill pan and grill, turning them every now and then, until they are totally black on the outside; this will take 30 minutes or more.  When ready, remove the pan from the heat and cover it with foil.  Once peppers are cool enough to handle, remove and discard the skin.  Tear them by hand into roughly 3/8-inch-wide slices.  Note: I wanted my roasted bell peppers to be the same size as the farro so I diced them rather small.

Place the cooked farro in a large mixing bowl and add the peppers, olives, oregano or thyme, green onions and most of the feat, reserving some to finish.  Pour over the dressing and gently mix everything together.  Taste and add more salt, if you like.

To serve, pile up the salad on a plate or in a bowl and finish with the reserved feta and a sprinkle of paprika. 

Note:  Take care when dressing this salad. Depending on the juiciness of your lemon you may end up with a little more dressing than is needed for the salad.  Add the dressing to taste, reserving some for later if you wish.

Theme: Going WITH the Grain!
Souper Sundays @ Kahakai Kitchen