Sunday, September 25, 2022

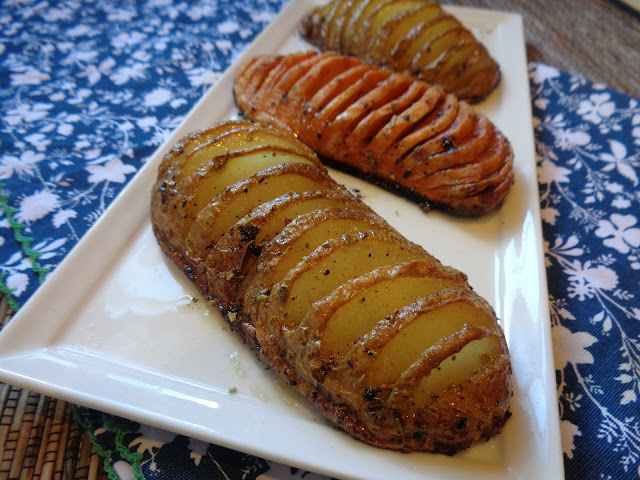
Tessa's Hassleback Potatoes


 Dear Tessa, 

On a lazy Sunday afternoon I like easy and quick recipes. When I first spotted your hassleback potatoes I thoutht they seemed quite simple. 

The ingredients were few. The directions were short. How hard could it really be to cut some slits in a few potatoes and throw them in the oven?

A quick trip to my pantry to grab some potatoes. I grab some russets and a sweet potato. These will be in the oven in no time I think to myself.

Then I realize you want me to peel the potatoes. I rewrite the recipe. No, I will not peel the russets, Tessa. I will, however, peel the sweet potato.

Then I read as you say, "Peel the potatoes and cut them in half lengthwise. Sit them, flat side, on a chopping board. Using a small, sharp knife, start at one end of the potato and cut down through the top, about a third of the way through. Make another tiny cut away from the first, slightly on the diagonal toward the first cut, and break away the little piece of potato to make a slit. Continue along the potato, making slits about 1/4 inch apart.

I'm puzzled right from the start because most people hassleback an entire potato and you want me to only hassle the back of half a potato? I do some quick research online and find that yes, I am not crazy, and yes, most recipe do hassle the entire back of an entire potato. 

Fine, Tessa. I will play your games and cut my potatoes in half lengthwise. I am only doing this because as I mentioned before; I am about easy and quick, and half a potato cooks faster than a whole potato.

However, I then realize that I will have to hassleback even more potato than if I had just hassled a whole potato? Do you understand where I'm going with this, Tessa?

So there I am rereading your directions about how to hassleback my potatoes when I realize that this recipe is quite a hassle! I wanted to blame it all on you, Tessa. However you did name them Hassleback Potatoes so I suppose it's my fault. 

How did I miss this? 

Let me tell you, Tessa. I didn't have very kind words to say as I was cutting quarter inch slits in all my potatoes, Tessa. When you call for large potatoes did you realize how many slits one would have to cut? It was rather tedious when it came to the russet potatoes and then it was damn near impossible when it came to the sweet potato, but cut away I did.

I put those hassles on the sheet pan and covered them in your mixture of butter, oil, salt, pepper, and sage and stuck them in the oven. I wanted to be done with them, but then I had to baste them with the butter/oil mixture about every 15 minutes.

These potatoes really are hassle, Tessa. A hassle right in the ol' back.

During the baking, I stopped to read reviews on hassleback and I found a lot of complaints, Tessa. People said they were overcooked and dry and too hard, etc. I started to get kinda angry, Tessa. After all that work....my potatoes better be delicious.

The time had come and I took my potatoes out and placed them on a plate. I noticed the potato bottoms (which you had me cut in half) were crusted over with a glorious golden brown crust. I noticed the tops of the potatoes were perfectly seasoned, with just the right amount of crispness. I also noticed the potato itself was still fluffy.

My son took a bite and was like, "This is way better than a normal baked potato. It has way more flavor and texture and I just love it. Do you have more?" Of course, I had more. I had hassled my way through 3 potatoes after all. I had 6 hassleback halves.

All that hassle, Tessa, and my potatoes were gone in a flash. Everyone ate them up quicker than I hassled them! Imagine that!

Anyway, they are now a family favorite, so thanks a lot. Looks like I will be hassling with potatoes a lot more in the future.

Thanks,

Kim

Hassleback Potatoes

Adapted from Falling Cloudberries

by Tessa Kiros

Serves 6

6 fairly large potatoes

3-1/2 tablespoons butter

2 tablespoons olive oil

a small handful of fresh sage

 Preheat your oven to 425F. Peel the potatoes and cut them in half lengthwise. Sit them, flat side side, on a chopping board. Using a small, sharp knife, start at one end of the potato and cut down through the top, about a third of the way through. Make another tiny cut away from the first, slightly on the diagonal toward the first cut, and break away the little piece of potato to make a slit. Continue along the potato, making slits about 1/4 inch apart.

Handling the potatoes carefully so that they don't break, arrange them in a baking pan. Add the butter and oil and season with salt and pepper. Scatter the sage leaves around and bake for 45 minutes to 1 hour, or until the potatoes are golden and crispy. Spoon a little of the butter pan juices over the top from time to time and gently toss them so they don't stick (but don't touch them for the first 15 minutes or so, or they will simply break). Serve immediately.


The Great Potato @ IHCC

Sunday, September 18, 2022

Ina's Cinnamon Baked Doughnuts

As fall arrives, I always think of baked goods. I am in love with baked goods in all the typical fall flavors: pumpkin, apple, pear, cinnamon, salted caramel, you name it! I have lists upon lists of fall baking projects; yet, year after year, I never seem to get around to any of them. That needs to change.

A quick look through my fall baking list and I settle on Ina's Cinnamon Baked Doughnuts. They seem easy enough, problem is I don't have any doughnut pans. A few quick clicks on Amazon and a day or so later I have doughnut pans delivered right to my door.

These doughnuts come together in no time at all and bake up quickly. They get a quick dunk in melted butter, followed by a quick bath in the cinnamon sugar mixture we've all come to love. They remind me of the doughnuts you buy at your local apple orchard in the fall...EXCEPT they're even better since they're homemade and served warm right from the oven. The texture is nice and light and we found them to be completely delightful! I would definitely make them again!  


Cinnamon Baked Doughnuts

Adapted from Food Network

by Ina Garten

Makes 12

For The Doughnuts:

baking spray

2 cups all-purpose flour

1-1/2 cups sugar

2 teaspoons baking powder

1 teaspoon ground cinnamon

1/2 teaspoon ground nutmeg

1/2 teaspoon kosher salt

1 extra large egg, lightly beaten

1-1/4 cups whole milk

2 tablespoons butter, melted

2 teaspoons pure vanilla extract

For the Topping:

8 tablespoons butter

1/2 cup sugar

1/2 teaspoon ground cinnamon

 Preheat the oven to 350F. Spray 2 doughnut pans well.

Into a large bowl, sift together the flour, sugar, baking powder, cinnamon, nutmeg, and salt. In a smaller bowl, whisk together the egg, milk, melted butter, and vanilla. Stir the wet mixture into the dry mixture.

Spoon the batter into the baking pans, filling each one a little more than three-quarters full. Bake for 17 minutes, until a toothpick comes out clean. Allow to cool for 5 minutes, then tap the doughnuts out onto a sheet pan.

For the topping, melt the 8 tablespoons of butter in an 8-inch saute pan. Combine the sugar and cinnamon in a small bowl. Dip each doughnut first in the butter and then in the cinnamon sugar, either on one side or both sides.


Bake Sale @ IHCC!

Sunday, September 11, 2022

Tessa's Vanilla Cake

 On September 11, 2001 my daughter, Olivia, was 6 months old. I had waited and waited for the day to arrive because that afternoon Olivia had her 6 month check up. If everything looked good, the doctor was going to give me the okay to start feeding her baby food.

As a new mom I was so excited. I had a special outfit all planned out. There was even a bonnet involved. This was a big deal to me because I was a foodie even back then.

I read all the articles and books about feeding babies for the first time. I had planned to start with green beans because it was recommended to start with veggies at the time. All the information said DO NOT start with sweet fruit or your baby will develop a sweet tooth.

On the morning of 9/11, I was so excited because I had taken a half day from work and was leaving at noon to take Olivia to the doctor. I laid out the green beans, her outfit, and her bonnet.

I had no idea a tragedy would occur that day. When the attacks began my husband came to find me at my cubicle (we worked together back then). We were in utter shock as attack after attack unfolded. I remember my mom calling me terrified as the plane flew into the Pentagon and then the field in Pennsylvania. At the time, it seemed the attacks would go on and and on and were getting closer and closer. No one really knew if or when the attacks would stop.

At the time I lived in a small town right outside Cleveland, Ohio and I will never forget when an announcement came over our loudspeaker at work stating that "there was a plan flying over Cleveland airspace with a suspected bomb on it." They let us leave work early. Everyone wanted to be reunited with their family and be together.

I called my mom to tell her that I was leaving work to get Olivia and my mom begged and begged me to just go home and stay safe. However, I was bound and determined to take Olivia to her doctor's appointment.

I can remember what a beautiful day it was outside. The sky was so blue and it seemed at such odds with what was happening in the world. Everyone was out and people were waving the American flag. I passed lines and lines of people waiting at the American Red Cross building to donate blood. I have never seen such a show of patriotism and unity as I did that day.

I hugged Olivia tight. I dressed her up in her cute little outfit with a bonnet. I turned the news on. In my excitement I grabbed a jar of peas instead of the green beans and I fed her food for the first time.

Olivia was happy and giggling and I was so thankful for her. I felt so sad for everyone who had lost a loved one that day and I remember feeling helpless and thinking that I had to do a better job of being thankful. I had to soak up all the good times and enjoy my family as much as I possibly could in my life. This was something I could do and would do.

Years later I would remember the vow I made that day. To be thankful and not take anything for granted. I started to get everyone to gather together as a family on that day. We would always tell Olivia how that was the day she first started eating real food. Over time it morphed into a tradition to celebrate that fact that it was Olivia's food anniversary. We started making dishes with peas in honor of her first food every year.

Over time we found the perfect pea dish, Jamie Oliver's Pasta with a Creamy Smoked Bacon and Pea Sauce and we serve it every year. All these years later and we are still gathering together. Olivia has now been eating real food for 21 years now.

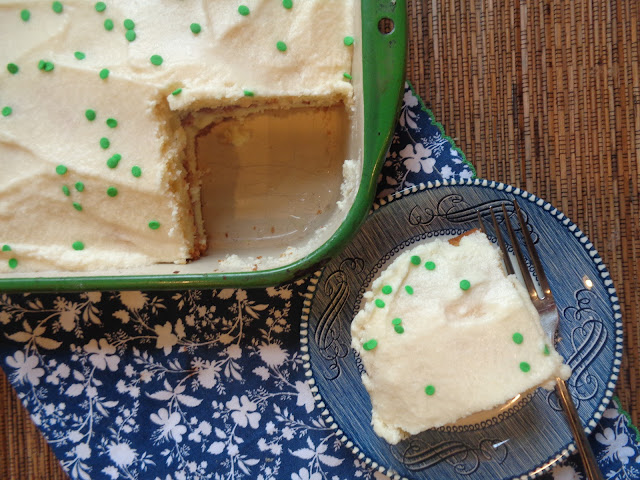
This year I even made a cake. Tessa's Vanilla Cake with a layer of Strawberry Jam and Vanilla Frosting and also with green circle sprinkles to imitate peas!

It has been 21 years since the 9/11 attacks, but I will never forget. Both of my kids are almost grown, but I'd like to think that one day my kids will carry on this tradition without me. I like to think of them gathering together and cherishing one another on this day every year, smiling and laughing as they eat peas and celebrate Olivia eating real food for hopefully many, many years.

Vanilla Cake

Adapted from Apples For Jam

by Tessa Kiros

Makes 10-12 slices

 Cake:

1/2 pound, plus 2 tablespoons (2-1/4 sticks) butter, softened

1 cup plus 1 tablespoon sugar

3 eggs

1 teaspoon vanilla extract

2-1/4 cups all-purpose flour

1-1/2 teaspoons baking powder

3/4 cup half and half or milk

Frosting:

7 tablespoons butter, softened

1-2/3 cups confectioners' sugar

1 teaspoon vanilla extract 

about 4 tablespoons milk

Preheat the oven to 350F and grease a 9-1/2" springform cake pan. Beat the butter and sugar together very well in a large bowl. Add the eggs one at a time, beating well after each one goes in. Add the vanilla and then sift in the flour and baking powder. Beat well, adding the half and half or milk a little at a time. You will have a thick and creamy batter. Scrape it out into the cake pan and bake for about 45 minutes, or until a skewer poked into the center comes out clean. Leave to cool completely before filling and frosting.

For the frosting, put the butter into a bowl and gradually beat in the confectioners' sugar. Add the vanilla and 3 tablespoons of milk and beat well, then slowly beat in the rest of the milk, stopping when you have a smooth but fairly stiff frosting. Gently spread it all over the cake - it doesn't have to be perfect! 


Casual Cookout @ IHCC

Sunday, September 4, 2022

Ina's Orecchiette with Farm Stand Pasta Sauce {Farewell To Summer}

 The farmer's markets are coming to a close here in my county, so I made a run and got some last minute things. Namely, tomatoes...because I feel compelled to make at least one fresh tomato sauce each season.

Years ago I made Hugh Fearnley-Whittingstall's Roasted Tomato Sauce and it was so delicious it was quite literally out-of-this-world! I'm not sure if any tomato sauce recipe could top that; but in my mind if one could, then it would be an Ina Garten recipe. So, this is how I arrived at Ina's Orecchiette with Farm Stand Pasta Sauce

Now, make sure you're in the mood for some time in the kitchen if you make this, because you're going to be blanching and peeling and coring and chopping and stirring for a couple hours.

Ina's Farm Stand Pasta Sauce is a combination of blanched, peeled and cored fresh tomatoes combined with olive oil, red onion, celery, carrots, garlic, full-bodied red wine, tomato paste, fresh basil and parsley, a touch of sugar, red pepper flakes, and salt and pepper that is cooked down for about an hour or more, before being blended to the consistency you like.

You can see here in this picture that is can be quite chunky or blended up until smooth. Your choice!

I chose to to keep my sauce somewhere in the middle (with some chunks so that it would still look fresh). Upon finishing the sauce I could tell that I had enough sauce for two pounds of pasta so I bottled up half in a mason jar. I've noticed over the years that all Ina's recipes for sauce make at least double or more than what's really necessary and I am not sure why that is.

However, this is important information in regards to this particular recipe because the pasta finishes cooking in the tomato sauce. If I didn't remove half of the sauce then I would have had tomato and pasta soup. So, if you chose this recipe, remove half the sauce (you can always add some back in).

Lastly, be sure to use the orecchiette called for in this recipe and/or pasta shells. The orecchiette or shells are like little cups that hold the sauce quite well, making the perfect vessel for the sauce.

If you like a very fresh tasting tomato sauce that screams of summer, then this recipe is for you!

Orecchiette with Farm Stand Pasta Sauce

Adapted from Cooking For Jeffrey

by Ina Garten

Serves 6

5 pounds good red summer tomatoes

good olive oil

1-1/2 cups chopped red onion

1-1/2 cups medium-diced celery

1-1/2 cups scrubbed and medium-diced carrots (2 to 4 carrots)

2 tablespoons minced garlic (6 cloves)

1/2 cup full-bodied red wine, such as Chianti or California Syrah

1/4 cup tomato paste

1/2 cup shopped fresh basil leaves, lightly packed

1/4 cup minced fresh parsley leaves

1 tablespoon sugar

1/2 teaspoon crushed red pepper flakes

salt and freshly ground black pepper

1 pound orecchiette pasta, such as De Cecco

Freshly grated Italian Pecorino and/or Parmesan cheese

Bring a large pot of water to a full boil. Plunge the tomatoes into the water for 15 to 45 seconds (depending on their ripeness), drain, and immerse in a large bowl of cold water. Remove the cores and peel the tomatoes with a small paring knife. Cut the tomatoes into 1-1/2" dice and set aside.

In a large heavy pot or Dutch oven, such as Le Creuset, heat 1/3 cup olive oil over medium heat. Add the onion and cook for 5 minutes. Add the celery and carrots, and cook, stirring often, for 10 to 12 minutes, until the vegetables are tender. Add the garlic and cook for one minute.

Add the tomatoes, wine, tomato paste, basil, parsley, sugar, red pepper flakes, 1 tablespoon salt, and 1 teaspoon black pepper. Bring to a simmer, lower the heat, and cook, almost totally covered, for 1 hour, stirring occasionally. In batches, pour the sauce into a food processor fitted with the steel blade and pulse 2 to 3 times, until roughly chopped.

To serve, cook the orecchiette in a large pot of boiling salted water, following the directions on the package, and drain. Pour the pasta sauce into the pasta pot and reheat over medium heat, until simmering. Stir in the cooked pasta and 1 tablespoon salt and cook over medium heat for 5 to 10 minutes, until hot. Taste for seasonings and ladle into large, shallow pasta bowls. Sprinkle with Pecorino and/or Parmesan (I combine the two) and serve hot with extra cheese on the side.