Showing posts with label tyler florence. Show all posts

Sunday, January 6, 2019

Stirring the Pot Turns Ten Years Old {and My Top Ten Recipes Ever}!!


My passion for cooking started when I was barely big enough to stand on a stool and help my mom in the kitchen. Thankfully she never lost patience with me. I learned a lot. I fell in love.


Fast forward about 30 years. This picture was my first blog post back on January 6, 2009. We had just moved into our dream house. My daughter was 7 and my son was only 2 years old. I was a young stay at home mom with a passion for cooking and I was ready to go on an adventure. A food blogging adventure. This is the Stirring The Pot kitchen 10 years ago, brand new. It's 10 years later and that kitchen is definitely showing some wear.

The inspiration for Stirring the Pot came from reading food blogs and watching the movie Julie & Julia. Julie & Julia had just hit the movie theatre and it was all the inspiration I needed to choose a cookbook of my own to cook through. At the time I was really into Tyler Florence and had just received his newest cookbook, Stirring the Pot. This was the one. I only had one dilemma. Tyler's cookbook had lots of dishes I knew my family wouldn't eat. My husband and daughter were picky eaters and my son was allergic to all sorts of things. I needed someone who enjoyed food like I did and I knew just the person.


I called my mom and explained what I wanted to do. She agreed to eat whatever I cooked and Stirring The Pot was born. My first blog dish was Tyler's Roasted Tomato Soup with Fresh Basil. I knew nothing about taking pictures (see below), but we enjoyed the soup and I did manage to make over 60 recipes from the book before I got distracted by other chefs and recipes and started branching out. Mom and I were having a wonderful time cooking and eating together. She held to her promise.  She ate everything and always had the best feedback.


Along the way, I met so many people who were just as passionate about food. This has been, without a doubt, the best part of this journey. I love and appreciate all of my foodie friends. I really enjoy talking about food and life with you!

I was lucky enough to join in with a bunch of sweet ladies and form a cooking group called I Heart Cooking Clubs where we would choose one chef and focus on cooking their recipes for a six month period. Now it's 10 years later and my great friend Deb and I are still going strong. Together with a group of wonderful friends we've managed to cook the food of 19 chefs!


I've also had the chance to meet a few celebrity chefs. I was able to catch Tyler Florence at a book signing and have him sign my copy of Stirring The Pot. I was also able to meet Giada De Laurentiis at a book signing. However, the best celebrity experience was meeting Bobby Flay.

He came to town and did a live cooking show. He was working on making an apple dessert and took questions from the audience as he did so. I managed to get in line and be the last one to speak. I confessed my crush, told him he was gorgeous, and then he gave me a hug and handed me the dessert. My own dessert made by Bobby Flay himself. I still remember how ecstatic I was.


I never imagined starting a food blog would be one of the best things I could do for myself. This is my 892nd post! I've cooked over 900 recipes! I was able to share them with my mom and my family and I have it all recorded! I've made the most wonderful like-minded friends, I've met celebrities, I've participated in many cook along groups and food challenges, done guest posts, wrote cookbook reviews, received cookbooks, cookware, and ingredients for free, I've had big kitchen failures, and I've learned so much. Most of all I was able to realize my goals and then some, and that is such a great feeling! I would encourage anyone with a passion to start small. The sky really is the limit and you have no idea where your journey will take you.

Now let's get to the good part...THE RECIPES!

These are the best of the best. The consistent crowd pleasers. The tried and true. The ones I turn to again and again. My approach was to remove any emotion or bias towards the food and focus solely on which recipes were written perfectly and produced the best results each and every time. I'm so happy with this list. I didn't plan it, but there is a mix of everything: breakfast, soup, pasta, main courses, and even a dessert! There may be a lot of chicken in this roundup, but it's not because it's our favorite. It's simply because the recipes are outstanding and have proven to be tried and true. These are gems. Consistently delicious recipes that turn out perfectly each and every time and that, my friends, is what it's all about. The search for go-to recipes that stand the test of time!

Madhur Jaffrey's Delicious Chicken Bits
 These Delicious Chicken Bits are hands down the #1 recipe that is requested in my house. My family refers to this dish as Indian Chicken and I have made it at least 50 times since making it the first time in 2012. The chicken marinates in a mixture of black pepper, turmeric, cayenne pepper, cumin, thyme, garlic powder, paprika, salt and oil and then it gets a quick sear and finishes cooking in the oven for 8 minutes. It is easy, quick, and the chicken bits are little flavor bombs. Jaffrey says to serve the chicken bits on their own as an appetizer, but we enjoy them over rice with a green veggie on the side. If I had to pick only one top favorite recipe on Stirring The Pot for all 10 years, it would hands down be this one. If you are a meat eater, you simply MUST MAKE this recipe!
Jamie Oliver's Farfalle with a Smoked Bacon and Pea Sauce
 I first made Jamie Oliver's Farfalle with a Smoked Bacon and Pea Sauce back in 2011 for my pasta-loving daughter. It was an instant hit and has been a dish that has been requested over and over. I have taken the liberty to adapt the recipe a touch over the years. I like to make it a little more luscious by adding a touch more cream, Parmesan, and about 4 ounces of  Mascarpone. This makes the final dish very creamy and flavorful. This is definitely a family-friendly dish and I love how quick and easy it is. My daughter has literally grown up eating this one. So hard to believe she will turn 18 soon and graduate from high school.
Tyler Florence's Big Fat Chocolate Chip Cookies
 This one is from way back in the archives, 2009, to be exact. I made these cookies just a few months into blogging and I have made them ever since. If I were to pick one baking recipe to share with the world, it would be these cookies. Oh my goodness, they are so good! If you've never made these then run to the store and grab the ingredients right now. Buy the best chocolate you can get your hands on. Tyler's recipe uses dark chocolate. Use whichever chocolate is your favorite. I use semi-sweet chocolate and I prefer making these cookies with Ghiradelli sold in the block and cut into big chunks. This recipe makes 8 giant cookies. They will be the best cookies you ever had. You will be SO proud of them. They will disappear before you know it. They will be your go-to recipe for everything: potlucks, birthdays, bake sales, gatherings, etc. Just make them!
 Yes, I'm sharing chicken legs on my Top Ten Recipes Ever list, BUT these are SO GOOD. This is a recipe to put in your back pocket when you're looking for something easy and delicious that will please your family. This recipe is a home cook's best-kept secret. Put it in your back pocket. I try to buy quality chicken legs, organic, if possible. You'll need 2-3 for each person you're serving. Drizzle them with oil and dust them with a hefty dose of Lawry's seasoning and salt and pepper and roast at 400F for about an hour or so (depends on size and quantity). Prepare for your house to smell absolutely amazing! The chicken is crispy on the outside, extremely flavorful, and the interior is fall-off-the-bone tender. These Easy Peasy Chicken Legs pair well with just about anything, are very budget-friendly, and people will go on and on about them.
 I love shrimp and if you've been following me for any time at all then you know I've shared a lot of shrimp recipes. They have all been delicious, but this one is THE BEST. What makes Bayless' Quick-Fried Shrimp with Sweet Toasty Garlic so much better than the rest? Well, the answer is simple. It's his Mojo de Ajo, a garlic oil that is made by chopping two entire heads of garlic and slow cooking it in oil for around 30 minutes before adding chiles for heat and a touch of lime zest for brightness. These shrimp are completely irresistible! The first time I made them I accidentally ate all of them straight from the pan. This is the best recipe I've found if you love the classic pairing of shrimp and garlic. Just be sure to cook the garlic low and slow!
Yotam Ottolenghi's Hummus Kawarma with Lemon Sauce
 If you love hummus then this is YOUR RECIPE. I knew Ottolenghi's hummus would be delicious, but I had no idea how perfect this recipe was going to be. The creamiest hummus cooked from scratch topped with crispy bits of ground lamb, garbanzo beans, buttered and toasted pine nuts, and the most refreshing and tangy lemon sauce. Wow...this is the stuff of dreams. The hummus to end all hummus. I could eat it every day for the rest of my life.
Jacques Pepin's Egg and Onion Gratin
 Cooking with Jacques Pepin was so inspiring and I learned so many new ways to prepare food. Prior to making this Egg and Onion Gratin, I had never thought of making a gratin out of hard-boiled eggs, but this dish blew my mind. Hard-boiled eggs and sauteed onions topped with a Gruyere cheese bechamel sauce. It's a departure from the regular old breakfast and it's so delightful served on toast. I knew it was one of my top favorite recipes ever as soon as I took the first bite!
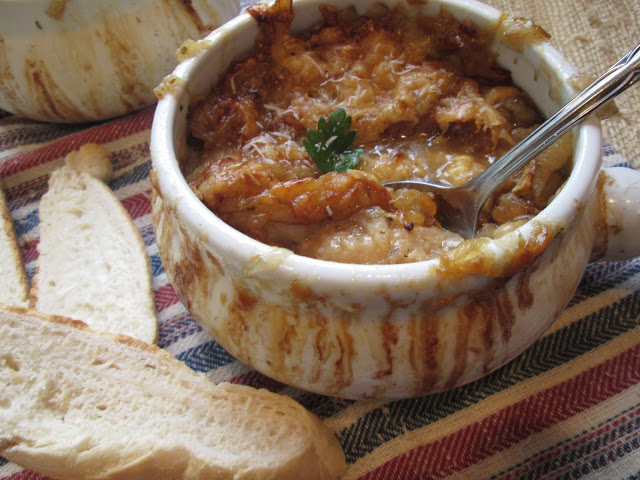
Jacques Pepin's Onion Soup Lyonnaise-Style
 This recipe is perfection. Completely perfection. Pepin's Onion Soup Lyonnaise-Style. First of all, Pepin is a genius and if anyone knows French Onion Soup it's him. Second of all, it has not just one layer of bread and cheese, but two. Third of all, this is a restaurant-quality dish and people will literally sing your praises.
Nigel Slater's Roast Chicken Wings
 We love chicken wings and this recipe was game-changing for us! Prior to trying this recipe, I had no idea that roasting wings resulted in superior results. I'm convinced the roasting enhances the flavor of the chicken itself while also lending a perfectly crispy exterior. When I first made Slater's recipe I made his Lemon and Cracked Pepper version, but now we follow his recipe and change up the flavors all the time. My husband and kids think roast chicken wings at home are far better than the fried wings you eat at any restaurant. I have made these and taken them to potlucks and parties and I can never seem to make enough. They fly off the plate in minutes.
Ina Garten's Engagement Roast Chicken
  Odds are you've heard of Ina Garten's Engagement Roast Chicken over the years and I'm here to tell you that it's for good reason.  I've made a number of roast chickens over the years and this one is by far the VERY BEST. If you're going to make a roast chicken, this should be the one. A perfectly crispy golden brown chicken that is juicy and tender and topped with flavorful onion gravy. I recommend this to all of my friends when they ask me for recipe ideas. Ina knows chicken and this recipe cannot be beaten. This recipe should be in every home cook's arsenal!
 Thank you to everyone who has been a part of my journey! I'm looking forward to the next 10 years!

*This post is dedicated to my mom, the best taste-tester there ever was. Thank you, mom!

Wednesday, February 9, 2011

Recipe #60 - Stirring the Pot: Slow-Roasted Pork Shoulder with Salsa Verde

I don't know about you all, but sometimes there are just posts that I don't want to write.  This post is one of them.  Theoretically, this meal should have been wonderful.....but it wasn't.  The pork shoulder, while wonderfully seasoned and slow cooked, should have been meltingly tender and mouth-watering.  It wasn't. I'm not faulting Tyler's recipe at all.  If anything, the blame is on me.  Somehow or another, I chose a bad cut of meat that was tough, fatty, and almost impossible to cut.

Does this ever happen to you all?  Do you occasionally make a recipe to find out that you're working with a bad cut/piece of meat?  It doesn't happen often, but I seem to experience this at least once or twice a year. At any rate, I really wish this recipe had not turned out so poorly because the pork roast smelled so heady with aroma as it cooked in the oven.  I think this recipe, when done correctly, would be fantastic.

Tyler's recipe for the pork consists of rubbing a herb paste made from toasted ground fennel, garlic, rosemary and sage all over the pork to create a crispy and flavorful outer coating.  Tyler pairs what should be a wonderfully tender pork shoulder with grainy mustard mashed potatoes and tangy and sweet salsa verde.  With the right pork shoulder, this would be an incredible meal. The recipe can be found on Tyler's blog, HERE.
Slow-Roasted Pork Shoulder with Salsa Verde and Grainy Mustard Mashed Potatoes
Adapted from Stirring the Pot
Serves 6-8

1 4lb. boneless pork shoulder
2 tablespoons fennel seeds
4 garlic cloves, peeled
1/4 cup chopped fresh rosemary leaves
1/4 cup chopped fresh sage leaves
4 tablespoons kosher salt (1 tablespoon for every lb. of meat)
1 tablespoon freshly ground black pepper
1/4 cup extra virgin olive oil
1 recipe Salsa Verde (see recipe, below)
1 recipe Grainy Mustard Mashed Potatoes (see recipe, below)
1 sprig fresh Italian flat-leaf parsley, for garnish

Place the pork, fat side up, in a roasting pan fitted with a rack insert.  For the rub, toast the fennel seeds in a small saute pan over medium heat until fragrant.  In a food processor combine the toasted fennel seeds, garlic, rosemary, sage, salt, and pepper.  Pulse to combine.  With the motor running, gradually pour the oil through the feed tube to form a paste.  Rub the herb paste on the pork.  Cover the pork with plastic wrap and marinate in the refrigerator for at least 3 hours or overnight.

Preheat oven to 325F  Allow the meat to stand at room temperature for 3o minutes.  Loosely cover pork with aluminum foil; roast about 3 hours, until juices run clear (160F).  Let the meat stand for about 15 minutes before slicing.  Serve with Salsa Verde and Grainy Mustard Mashed Potatoes and garnish with parsley.

Salsa Verde
Soak 1/2 cup golden raisins in warm water until softened; drain.  Rinse 1/2 cup salted button capers.  In a food processor combine raisins; caper; 1/4 cup finely chopped shallots; 1 cup fresh Italian parley; the  juice of 2 lemons; 1 tablespoon Dijon mustard; 1 teaspoon lemon zest; and 3/4 cup extra-virgin olive oil. Pulse for 30 seconds, until combined.  Season with kosher salt and freshly ground black pepper.  Refrigerate for 30 minutes.

Grainy Mustard Mashed Potatoes
Heat 1 cup whipping cream and 4 tablespoons unsalted butter in a saucepan over medium heat until the butter melts; set aside and keep warm.  Place 3 large peeled Yukon gold potatoes in a saucepan; add cold water to cover.  Place saucepan over high heat; bring to boil.  Add 1 teaspoon kosher salt; reduce heat.  Simmer for 15-20 minutes, until the potatoes are tender.  Drain.  Pass potatoes through a food mill into a bowl.  Stir in cream and butter mixture.  Season with salt and freshly ground black pepper.  Stir in a 1/4 cup olive oil and 3 tablespoons whole-grain mustard.


Notes/Results:  The herb paste created a wonderfully flavorful and crispy coating on the outside of the pork shoulder.  Unfortunately, my pork shoulder was pretty much inedible.  As a lover of all things mustard, I did enjoy the grainy mustard mashed potatoes, although it's hard to knock plain old mashed potatoes.  The Salsa Verde was a nice accompaniment, sweet and tangy.

Monday, January 24, 2011

Recipe #59 - Stirring the Pot: Veal Braised in Milk and Honey with Buttered Turnips

  
In effort to continue cooking my way through Tyler's Stirring the Pot, I will have two recipes from the book to share with you this week.  I've been trying to work my way through Tyler's book for two years now and one of the constant problems I have is finding all the specialty ingredients.  Take this recipe for instance, veal shoulder?  Have you ever seen it in your market?  I've searched high and low for about 2 years now and never found it.

I decided just to bite the bullet and use beef shoulder.  I'm sure veal shoulder is great, if you can find it.  Also, let's talk about turnips.  I've had them.  I like them.  I couldn't find them in my local market, so I subbed yukon gold potatoes.  So basically, instead of having Veal Braised in Milk and Honey with Buttered Turnips, we really had Beef Braised in Milk and Honey with Buttered Potatoes.  How's that for a stretch?

 I'd like to think the main point of this particular recipe is the unique use of milk and honey as a braising liquid, not necessarily the focus on whether or not you use beef or veal and/or turnips and potatoes.  I have to say that I was somewhat reluctant about braising anything in milk as I'd never done it before.  This was yet another dish that really surprised me, in a very pleasant way.  The milk and honey braising liquid turns into a rather creamy gravy with a savory and slightly sweet taste that enhances the richness of the meat.  I would definitely use this method again when braising.
Beef Braised in Milk and Honey with Buttered Potatoes
Adapted from Tyler Florence's Stirring the Pot
Serves 6-8

Extra virgin olive oil
4 pounds beef shoulder (or veal)
Kosher salt and freshly ground black pepper
4 garlic cloves, peeled
1/4 bunch fresh thyme sprigs (about 4 sprigs)
4-5 dried porcini mushrooms
1/2 gallon milk
3 tablespoons honey
1 recipe Buttered Potatoes (or turnips)*recipe follows

Preheat oven to 350F.  In a large heavy pot or Dutch oven heat a 3-count of olive oil (about 3 tablespoons) over medium-high heat.  Season beef (or veal) with plenty of salt and pepper.  Add beef (or veal) to pot, cook and turn  until brown all over and a crust forms.  Add garlic, thyme, and mushrooms.  Pour in the milk and stir in the honey.  Cover and braise about 3 hours, until the beef (or veal) is fork-tender.

Remove beef (or veal) from pot and set aside.  Carefully pour small batches of the braising liquid, along with garlic and mushrooms, into a blender.  Tightly hold the lid in place with a kitchen towel and puree until slightly thickened and silky smooth.  Continue with the rest of the braising liquid, mushrooms, and garlic.  Season to taste with pepper and pour over meat.  Serve with Buttered Potatoes (or Turnips).

Buttered Potatoes (Turnips): Preheat oven to 350F.  Peel and quarter 6 medium potatoes.  Place potatoes on a roasting tray; drizzle with EVOO and season with kosher salt.  Roast for 25-30 minutes until just tender.  Toss roasted potatoes in a large bowl with 2 tablespoons unsalted butter and 2 tablespoons chopped fresh Italian flat-leaf parsley so they are evenly coated and glossy.  Season with kosher salt. 

Notes/Results:  We really enjoyed this recipe.  I will probably still keep my eye out for a veal shoulder, just because I'm sure the veal is much more tender, and a little more sweet, than the beef.  Also, I like that this was a really quick and easy recipe that took little to no time to prepare.  

I do have some notes to share.  Braising liquid is suppose to cover the meat by 2/3rds.  You should be able to see the top half of the meat peeking out.  With this recipe, using a Dutch oven and 1/2 gallon of milk, the meat would be completely covered.  I made the mistake of using only 1/4 gallon of milk (so as not to cover the meat completely) and all the braising liquid evaporated out of the pan.  I caught my mistake in time and was able to pour the other half of the milk in the pan.   Next time I would just pour all the milk into the pan, even if it completely covered the meat.  I guess it pays to follow directions sometimes. 

One more recipe down!

Wednesday, November 17, 2010

Recipe# 57 & 58 -Stirring the Pot: Crab Cakes and Zucchini Crab Fritters


Working my way through Tyler's Stirring the Pot has presented different challenges along the way. Now that I'm more than halfway through the book, one of the biggest challenges has been sourcing some of the more "specialty" items. I suspect this was the reason why I never made them in the first place. It wasn't that Lobster Cakes with Lemon Aioli and Bacon Frisee Salad didn't sound good or that I feared no one would like Zucchini Crab Fritters with Grapefruit Aioli. It was simply because I never found fresh lobster and never ran across fresh crab that looked good enough to use.

When Crab Tater Tots came due for Symon Sundays I knew it was time to get serious and get my hands on some crab. I hightailed it to the city, going to 3 specialty stores, and only found two cans of pasteurized crab in all my searches. One can contained one pound of lump crab meat, $26.99 and the other can contained one pound of claw meat, $8.99. The lump crab meat is ideal, but since I was going to be frying most of my recipes, I opted for the can of claw meat. Eager to make the most of my crab, I spread it out and made three crab recipes. The first recipe was Symon's Crab Tater Tots, the second was Tyler's Zucchini Crab Fritters, and the third was Tyler's Lobster Cakes, which I had to turn into crab cakes simply because I don't think I'll ever find fresh lobster anywhere around here.

Let's talk about these tasty little morsels known as Zucchini Crab Fritters with Grapefruit Aioli. Well worth getting out the deep fryer, these are a real treat! First, zucchini is sliced thinly with a powerfully sharp mandoline. The thinly sliced zucchini is salted and set aside so that they moisture is drawn out and the slices become pliable. Crab is mixed with egg white and seasoned simply with salt and pepper. A spoonful of crab is placed on one end of each zucchini slice and rolled up, starting with the end that has the crab meat. Each zucchini fritter is rolled in flour, dipped in egg, and finished in panko. Tyler always advises to let your coated items set aside in the refrigerator for at least 10-15 minutes. He says that this added step helps the coating to set up. I use this tip constantly, applying it to all coatings, and have had lots of success with it.

After resting, the fritters are ready to be fried for 3-4 minutes and dipped in a delicious grapefruit aioli. Everyone loved these fritters, including my husband who isn't the biggest fan of crab. We ate them up in record time!

Saving the best for last are these fabulous Lobster turned Crab Cakes with Lemon Aioli and Bacon Frisee Salad. (NOTE: In all my travels I didn't find frisee either, so I used a mix of field greens) The crab cakes were very simple and delicately flavored with sliced white bread, egg white and mayo. Panfried until crisp, they were served with the most delicious and bacony salad and an equally delicious and complimentary lemon aioli. I found this recipe to be my favorite of all three crab recipes.

Although I would've enjoyed having fresh crab, the pasteurized canned claw meat worked well in all three applications. I would buy it again if I couldn't find fresh.

Both recipes can be found on Tyler's blog, or by clicking on the links below:
Zucchini Crab Fritters with Grapefruit Aioli
Lobster/Crab Cakes with Lemon Aioli and Bacon Frisee Salad

I'm submitting my Crab Cakes with Lemon Aioli and Bacon Frisee Salad to Beth at The Seventh Level of Boredom for The Bacon Games, a very tasty and promising new foodie adventure.

Wednesday, October 27, 2010

Recipe #56 - Stirring the Pot: Tempura Green Beans with Chile, Garlic & Sesame Aioli


I can't even tell you how many times I bought the green beans for this recipe and then ended up using them for something else. I lost track. I wanted to make them while I could still find fresh green beans, yet I was afraid I'd love them too much to stop eating them. I was right! Tyler's Tempura Green Beans with Sesame Aoili are absolutely fantastic. I told myself that I would only eat 5 of them. Yeah, right! One bite of that green bean in a light, crispy, crunchy coating sent me over the edge. Scattered with crispy bits of garlic, ginger, and chile these green beans are beyond fantastic dipped in the sesame aioli. This appetizer is sure to be a hit!

Tempura Green Beans with Chile, Garlic, and Sesame Aioli
Adapted from Stirring the Pot
Serves 2-4
Time: 35 minutes
Aioli
1/4 cup toasted sesame oil
2 teaspoons minced ginger
1 teaspoon minced red chile (I used one cayenne pepper)
1/2 cup store-bought mayo
1/2 cup sour cream
1 teaspoon lemon juice
Kosher salt and freshly ground pepper
Tempura Green Beans
1 bunch green beans (about 1lb), root-end trimmed (1 pound usually equals 2 handfuls)
3/4 cup all-purpose flour
1/4 cup cornstarch
2 tablespoons baking powder
1 teaspoon kosher salt
1 egg yolk
3/4 cup club soda, chilled
vegetable oil, for deep-frying
Kosher salt
1 lime, cut into wedges, for garnish
1/4 bunch fresh cilantro (about 4 sprigs), for garnish

For the aioli, heat sesame oil in a small pan over low heat. Add ginger, garlic, and chile and saute until fragrant and crispy. Drain ginger, garlic and chile and set aside, reserving the oil.

In a blender combine mayo, sour cream, and the reserved sesame oil. Add lemon juice and season with salt and pepper. Puree until smooth. Set aioli aside.

For the Tempura Green Beans, in a large bowl combine flour, cornstarch, baking powder, and the 1 teaspoon salt. Make a well in the center and add yolk. Gradually whisk in club soda, slowly working your way out from the center to form a smooth batter.

Pour 2-3 inches oil into a large heavy pot and heat to 375F. Dip green beans into batter, shake off excess, and fry a few at a time for 4-5 minutes, until golden and puffy. Drain on paper towels; sprinkle with crispy fried ginger, garlic, and chile. Garnish with lime wedges and cilantro and serve with Aioli.

Notes/Results: These were a huge hit and everyone loved them. The green beans remained somewhat firm, yet tender, and the tempura batter was extremely light and crispy. At times sesame oil can be a bit strong and I was concerned that the aioli would be overpowering, but that was not that case at all. It was a wonderful accompaniment to the beans. The crispy bits of chile, garlic, and ginger really added to the flavor of the dish. We kept trying to sprinkle those bits over our beans and finally decided to add the crispy bits to the aioli so that we wouldn't miss out on the flavor. A total hit all around. I would make these again when I wanted to splurge.

Thursday, August 12, 2010

Recipe #55 - Stirring the Pot: Fried Chicken with Buttermilk Cherry Tomatoes


About a year and a half ago I decided that I was going to cook my way through Tyler's book, Stirring the Pot. I liked the way Tyler's book was broken down into rather unique chapters, each chapter celebrating a specific cooking technique: Roast; Saute; Braise; Fry; Grill; Bake; Steam; Fresh and Raw. At that time I was pretty good at roasting,sauteing, braising and baking. Fresh and raw...no problem! However, when it came to frying, grilling, and steaming I had no experience......and I still don't! Somehow I have managed to put off the recipes in those chapters (I'm definitely one to procrastinate).

Well, I'm procrastinating no longer. Awhile back my husband bought a deep fryer because we thought it would be easier to regulate the temperature of the oil that way. The deep fryer makes things easier for me and I like the fact that it frees up the stove top. I practiced my deep-frying by making french fries in the fryer and learned that it ran on the hot side. If a recipe calls to fry at 375F, I've learned to turn my fryer down to around 325F. After some practice I thought I had a pretty good handle on frying......but that was not the case.

My first batch of fried chicken cooked all the way through but the coating was very dark. I turned the oil down and decided to cook the chicken a little longer on the second batch. When the second batch came out the coating was perfect, but the chicken was still pink inside..........really not good! I turned the temperature back up a tad and fried the third batch. You know what they say about the third time being a charm? Well, thank God the third time was a charm! Each batch fried for about 20 minutes, meaning that I stood in the kitchen lording over the fryer for an hour and I was in no mood for raw or burnt chicken.

Tyler's fried chicken is marinated in buttermilk and hot sauce which makes the chicken very tender. The coating is made from all purpose flour, garlic powder, onion powder, sweet paprika, and cayenne pepper and has quite a bit of flavor. He serves his fried chicken with ancho cress or any other peppery lettuce, as well as sliced cherry tomatoes and a homemade buttermilk blue cheese dressing. In the book Tyler pours the buttermilk blue cheese dressing over the fried chicken. We decided to serve ours on the side. Overall I would say that this is a solid recipe for fried chicken. The chicken was tender and the coating was flavorful with all the spices. I don't know if I would make it again, but then that might not be a fair statement since I'm not much on frying. You can find the recipes online HERE and HERE.

Next up from Stirring the Pot is Tempura Green Beans with Chile, Garlic, and Sesame Aioli! I think I nabbed the last of the fresh green beans and I'm really looking forward to this one.

Tuesday, August 3, 2010

Recipe #54 - Stirring the Pot: Salmon "Slashed and Stuffed" with Basil Butter


I took a big break cooking from Tyler's Stirring the Pot, but now I'm back in the kitchen with Tyler and I'm loving it! My goal is to crank out several of Tyler's summer-inspired recipes that highlight fresh and seasonal produce while it is still available. This Salmon "Slashed and Stuffed" with Basil Butter is the perfect recipe to utilize seasonal produce: lots of garden fresh basil, cherry tomatoes, zucchini, onion, fennel and red bell pepper. I was lucky enough to find all these ingredients at the Farmer's Market. This recipe is gorgeous when plated and really flavorful and delicious. It really exceeded my expectations!

Salmon "Slashed and Stuffed With Basil Butter (recipe also found HERE on Food Network)
Ratatouille:
Extra-virgin olive oil
3 garlic cloves, peeled and minced
pinch crushed red pepper
4 sprigs fresh thyme
1 red sweet bell pepper, thinly sliced
1 large fennel bulb, thinly sliced
1 zucchini, thinly sliced into rounds
1 medium onion, sliced
2 cups cherry tomatoes
Kosher salt and freshly ground black pepper
Herbed Bread Crumbs:
2 cups panko
1 bunch fresh basil sprigs (about 16 sprigs), leaves only
1/2 bunch fresh Italian flat-leat parsley (8 sprigs), leaves only
Salmon:
1 bunch fresh basil sprigs (16 sprigs), leaves only
2 sticks unsalted butter, room temperature
1 whole side of salmon, cleaned and scaled (about 2 pounds total)

For the Ratatouille, place a large pan over medium heat and add a 3-count of oil (about 3 tablespoons). Add garlic, crushed red pepper, thyme, and the vegetables, gently squeezing the tomatoes as you add them. Season with salt and pepper. Saute for 5-7 minutes until vegetables wilt. Pour vegetables onto a sheet tray and set aside.

For the Herbed Bread Crumbs, in a food processor combine panko, basil, and parsley. Pulse until the crumbs are green. Set aside.

To make the Basil Butter, roughly chop the basil. In a food processor combine basil and butter. Pulse until fully combined and creamy. (Note: Tyler's basil butter appears green but does in fact turn green until the salmon is removed from the oven and served).

Preheat oven to 400F. Using a chef's knife, make slits on the skin side of the fish. Paint the skin side of the fish with the Basil Butter. Carefully place the fish, skin side up, on top of the sheet tray covered with Ratatouille. Bake about 15 minutes, until top is golden and bubbly. Top the fish with Herbed Bread Crumbs and switch on the broiler. Broil for 5 minutes, until golden and crispy.

Notes/Results: A whole side of salmon was not available so I opted to use 4 salmon fillets. I made the whole batch of Ratatouille, which was phenomenal. I quartered the recipe for the Herbed Bread Crumbs and halved the recipe for the Basil Butter. These adaptions worked out well and everyone REALLY enjoyed this dish. I was expecting it to be good, but it was sensational. The salmon was tender, buttery and delicious and the Ratatouille was out of this world delicious. The farm fresh flavor of the vegetables and fresh really stood out. This would be a wonderful meal to entertain with and serve to company this summer.

I am submitting this to my friend girlichef who is a co-host of the wonderful new foodie event, Two for Tuesdays.

Thursday, April 8, 2010

Recipe #53 - Stirring the Pot: Baked Lime Pudding Cakes


My Mom's Birthday is today and she is not excited. Some women have no problem getting another year older, my Mom is not one of them. For example, I remember the year she turned 30. I was only five years old and I remember it well. My Dad and Grandpa tried telling her that 30 wasn't old, she wouldn't buy into it. Today Mom is turning 57 and even though my parents have been divorced for years, they still love each other deeply. A couple days before Mom's birthday, I always receive an endearing phone call from my Dad. First, he reminds me it is Mom's Birthday. Next, he asks me a million questions about what gift I'm buying. He always follows that up with another million questions about what special things we are going to do for her birthday. He asks me if I have enough money to do everything I want to do. He always wants to make sure there is enough. Bless his heart, my Dad is the sweetest man alive. When my Dad finally feels satisfied with my plans, he'll end the call.

Dear Dad:
We celebrated Mom's birthday all week. Tuesday morning I took her and the kids to breakfast and then we went to the zoo. It was pretty fun, but the weather was unseasonably hot and we all got a little sunburnt, but only on the left side of our body. Don't worry, we laughed about it. We bought her a new blue shirt. Yes, I remember that blue is her favorite color. We also bought her a pair of new blue pants. Mainly because you said just buying a shirt wasn't enough. I know you wanted me to buy bubble bath, but I opted for lotion and some soap she's been wanting. Since you were worried that all of that wasn't going to be enough, I made her these little lime pudding cakes. Yes, I remember that she doesn't like chocolate. Yes, I remember that she likes pies. Instead I opted for these little lime pudding cakes because lately Mom loves limes and she's always a fan of a light dessert. Don't worry because I think these pudding cakes are worthy of her. I wish you could be here to have one. You would probably like them too. Oh, yes, I will make sure to tell her you said "Happy Birthday". I know it will make her happy.


Baked Lime Pudding Cakes
Adapted from Tyler Florence's Stirring the Pot
1 tablespoon unsalted butter
superfine sugar
2 eggs, separated
2/3 cup reduced-fat buttermilk
1 tablespoon lime zest
2 tablespoons lime juice
1/4 cup all-purpose flour
2/3 cup superfine sugar
1/4 teaspoon kosher salt
Lime halves and leaves, for garnish

Preheat oven to 325F. Butter and lightly sugar four 6-ounce ramekins. Using the paddle attachment on a kitchen stand mixer, beat yolks, buttermilk, lime zest, and lime juice on medium speed until well combined. Reduce the speed to low and slowly add flour, the 2/3 cup sugar, and the salt, until just combined. Transfer to another large bowl. Thoroughly wash mixing bowl with soap and hot water; return to stand mixer. Using the whisk attachment, beat egg whites in the clean bowl until stiff peaks form. Gently fold the beaten egg whites into the yolk mixture, a little at a time.
Divide mixture evenly among ramekins. Place ramekins in a roasting pan and fill the pan with hot water halfway up the sides of the ramekins. Bake about 1 hour, until the top springs back when gently pressed and the cakes have a light golden color. Remove ramekins from water; allow to cool slightly. Carefully invert each onto a plate.

Notes/Results: Definitely a dessert worth serving Mom on her birthday. These cakes are light, soft and delicate. They have a wonderful light lime flavor and I really enjoyed the one I ate this morning (quality control, right) I had to try one before I fed it to my Mom. I would definitely make these again. I think my Mom is going to love them.

Sunday, April 4, 2010

Recipe #52 - Stirring the Pot: Baked Fresh Ham with Apple-Cranberry Chutney


It has been an absolutely gorgeous Easter Sunday in the Bluegrass. The weather is a sunny 70 degrees and I'm writing this post from a lounge chair in my driveway. The country music is blaring, the kids and my husband are playing basketball and the sun is going down. The sound of the kids laughter is infectious. What more could you ask for?


Well, a delicious dinner would've topped the day perfectly, but it didn't happen. Cooking my way through Tyler's Stirring the Pot is a lot of fun, but some of the recipes like this fresh ham are somewhat seasonal and need to be prepared for a special day, such as Christmas or Easter. This recipe for Baked Fresh Ham has somewhat haunted me. I had tried to prepare the ham for Christmas but was told that I wouldn't be able to get any fresh ham until Easter. I started looking for fresh ham at the beginning of March and never found it. Desperate, I called the butcher in Lexington. He explained to me that I couldn't just buy a 5-6 pound fresh ham but that I would have to buy an entire leg of pork. Twenty pounds of pork! He was kind enough to tell me that he would cut the ham and butcher the rest, free of charge. Thirty dollars later, I left his shop with a 6 pound fresh ham, 11 pounds of ground pork and two ham hocks. This is how Project Pork began.


After much planning I was hopeful that Tyler's recipe for Baked Fresh Ham with Apple-Cranberry Chutney would be a winner. High hopes. Need I say more? High hopes get me almost every time.

Notes/Results: Tyler's recipe is about as simple as it gets. You simply oil, salt and pepper the fresh ham and baked it covered for 2 hours. After 2 hours, the ham is uncovered and baked for another hour. Simple enough, right? Well, the ham was flavorless, bland and chewy. My ham never achieved the pinkish hue that Tyler's ham has in the cookbook. Also, the outside of the ham was overcooked and dry while the inside of the ham was still undercooked. It was just plain gross. My father in law and my husband were the only ones who choked it down. I took one bite and pushed it to the corner of my plate. Luckily, we had enough side dishes that it all worked out okay. I have a ton of the ham leftover and I think it is rather inedible. When a recipe fails, I always try to think of what I could have done wrong, but I don't see where I could have gone wrong with this. I bought the ham from a very reputable butcher, it was extremely fresh, I followed all the directions, but it just wasn't very good at all. I have quite a bit of the ham left and I don't foresee us eating the leftovers. While I enjoyed the chutney, which tasted like a spicy applesauce, I did not enjoy it with this ham. I have chose not to post the recipe based on the fact that none of us cared for it very much.


Even though we did not enjoy the fresh ham, I am excited about the 11 pounds of ground pork and the two ham hocks. Project Pork is still happily underway. I have been having fun thinking of ideas for all the ground pork and will have a Throwdown featuring breakfast sausage coming up this week.

I hope you all had a wonderful Easter Sunday. Even though the fresh ham didn't work out we had an absolutely wonderful day!

Tuesday, March 16, 2010

Recipe #51 - Stirring the Pot: Slow-Roasted Beef Ribs with Mushroom Stroganoff


Tyler won us over with this version of beef stroganoff. It was rich, meaty, indulgent and comforting.

The recipe calls for 3 pounds of beef short ribs, cut into 2 ribs apiece. I halved the recipe, buying one and a half pounds of beef ribs and opted not to cut them, leaving them whole. The ribs are simply placed in a roasting pan, drizzled with olive oil, salt and pepper and roasted for 3 hours in a 300F oven. You can hardly get more simple than that.


When the 3 hours time frame is closing in, start preparing your sauce. You'll need mushrooms, garlic, shallots, to start. Once the mushrooms have browned, add the garlic and shallots. When the garlic and shallots are fragrant, remove from heat and add the cognac, scraping to deglaze the pan.

Return the pan to heat and add whipping cream. Reduce and simmer, until reduced by half. Turn off heat and stir in mustard and sour cream. Season with salt and pepper and keep warm until serving. This is one thick and luxurious sauce.

Meanwhile, cook one pound of egg noodles (I chose egg pappardelle noodles from Trader Joe's) in a pot of salted water. Drain well, toss with butter and chopped parsley. Pile buttered parsley noodles high on a plate, top with ribs, and finish with stroganoff sauce. Garnish with parsley. (I really wish I had parsley on hand for this dish. As it was, I was out of parsley and all other green herbs).


You can find the recipe HERE on Recipe.com

Notes/Results: This recipe is actually one of the easier Tyler recipes I've tried. I had concerns about not searing the short ribs first and I also worried that they would dry out, but they didn't. The end result was richly colored short ribs with almost crispy, crackly edges that pair wonderfully with the rich and luxurious stroganoff sauce. The stroganoff sauce was like liquid gold! I really wish I had the fresh parsley on hand because I think the dish definitely needed that fresh pick me up, which only fresh herbs can deliver. I think this is a tasty, comforting, quick and easy Tyler recipe that would be great for family dinners or entertaining. No hard to follow instructions, no long list of ingredients, and best of all: NO BIG MESS to clean up! All in all, this is a great recipe.

I still have two rather heavy recipes to post this month:
Baked Fresh Ham with Apple-Cranberry Chutney, which I will probably prepare for Easter and Slow-Roasted Pork Shoulder with Salsa Verde and Grainy Mustard Mashed Potatoes. After that, I will be posting some seafood and salads. There are still 39 recipes left for me to cook in Stirring the Pot.

On another note: I was hoping to cook up some Irish fare for St. Patrick's Day in celebration of my Irish roots, but turns out the kids and I are feeling a bit under the weather this week. Happy St. Patrick's Day to you all!