Wednesday, September 28, 2011

Tessa Kiros' Finnish Cinnamon and Cardamom Buns


Last week at I Heart Cooking Clubs we said goodbye to Jamie Oliver.  This week we are welcoming in a new chef,  lady chef Tessa Kiros!  I couldn't be more excited to cook Tessa's recipes. 
I've owned my Tessa Kiros cookbooks for a long time and I'm so excited to have a reason to open them up and start cooking.  Tessa's cookbooks are so beautiful and her writing style is very personal, with many family stories and memories sprinkled throughout.  Tessa has a multi-cultural background and has traveled many places, therefore her recipes range from Finnish to Greek to Italian and even South African.  It is going to be a very exciting six months!
*photo credit Brenda Benoit

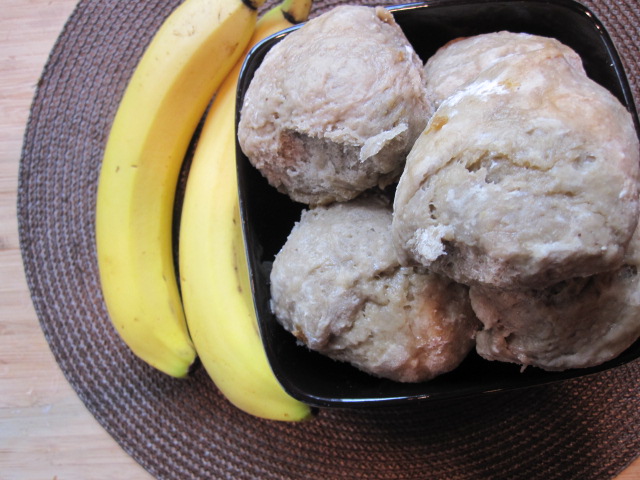
This week we are welcoming Tessa to I Heart Cooking Clubs and in my mind there is nothing more welcoming than the aroma of fresh baked bread and cinnamon. Throw in some cardamom and I'm completely in love! These are the perfect hand-held treat to enjoy first thing in the morning or for a leisurely afternoon break with a cup of tea or coffee. 
The dough is rolled out into a rectangle and spread with softened butter and cinnamon/sugar.


 Tessa says: "These gorgeous buns were always a part of my childhood.  They are found everywhere in Finland - and probably all over Scandinavia - in tearooms and houses.  Everyone makes their own and they freeze beautifully so you can just pull out a few when a craving sets in.  Don't be put off when you see that the buns needs to rise for a couple of hours.  You can get the dough together really quickly and then leave it alone without even a glance.  The rolling and cutting can be a little tricky the first time you do it, but the second time will be easy."
The dough is rolled into a log and cut on the diagonal

 Cinnamon & Cardamom Buns
Adapted from Falling Cloudberries by Tessa Kiros
Makes about 35 buns

For Dough:
1 cup lukewarm milk
1/2 cup sugar
1 (1-ounce) cake fresh yeast
1 egg, lightly beaten
1/4 pound plus 1 tablespoon butter, softened
2 teaspoons ground cardamom
1 teaspoon salt
5-1/4 cups all-purpose flour

For Cinnamon Butter:
2 teaspoons ground cinnamon
1/4 cup sugar, plus 1 tablespoon for sprinkling
5-1/2 tablespoons butter, softened
 1 egg, lightly beaten

Put the milk and sugar in a bowl and crumble in the yeast.  Let stand for 10 minutes, or until the yeast begins to activate.  Add the egg, butter, cardamom, and salt, and mix in.  Add the flour, bit by bit, mixing it in with a wooden spoon until you need to use your hands, and then turn it out onto the work surface to knead.  It may seem a little too sticky initially, but will become compact and beautifully soft after about 5 minutes. Put the dough back in the bowl, cover with a clean cloth and then a heavy towel or blanket, and leave in a warm place for about 2 hours, or until it has doubled in size. 

To make the cinnamon butter, mix together the cinnamon and sugar.  Divide the butter into four portions and set aside. 

Put the dough on a floured work surface and divide it into four portions.  Begin with one portion, covering the others with a cloth so they don't dry out.  Using a rolling pin, roll out a rectangle, roughly about 12 by 10 inches and 1/8 inch thick.  Spread one portion of butter over the surface of the dough with a spatula or blunt knife.  Sprinkle with about 3 teaspoons of the cinnamon mixture, covering the whole surface with quick shaking movements of your wrists.  Roll up to make a long dough sausage.  Set aside while you finish rolling out and buttering the rest of the dough, so tha tyou can cut them all together.

Line two large baking sheets with parchment paper, or bake in two batches if you only have on sheet. Line up the dough sausages in front of you and cut them slightly on the diagonal, alternating up and down, so that the slices are fat V shapes, with the point of the V about 3/4 inch and the base about 2 inches.  Turn them so they are all the right way up, sitting on their fatter bases.  Press down on the top of each one with two fingers, until you think you will almost go through to your work surface.  Along the sides you will see the cinnamon stripes oozing outward.  Put the buns on the baking sheet, leaving space for them to puff and rise while they bake.  Brush lightly with beaten egg and sprinkle a little sugar over top.

Let the buns rise for half an hour and preheat your oven to 350F.  Bake them for about 20 minutes or until they are golden.  Check that they are lightly golden underneath as well before you take them out of the oven.  Serve hot, warm, or at room temperature and, when they are cool, keep them in an airtight container so they don't harden.
Notes: This dough comes together like a dream and is so easy to work with.  This would be a good recipe for a beginner/novice bread baker.  We loved these rolls, but next time I would add a bit more butter and cinnamon/sugar mixture to the inside of the dough before rolling.  We found that we wanted a little more cinnamon flavor.  Other than that, they were really fun and just the right size for popping in your mouth!

Theme: Welcome Tessa!

Monday, September 26, 2011

Eggland's Best Pink Party and Giveaway!

Pictured Above: My Daughter and My Mom, the best sous chefs


About a month ago I was invited to be part of "Eggland's Best Double Dozen" to help raise awareness and funding for the fight against breast cancer.  Eggland's Best offered to sponsor a brunch/pink party for up to 15 of my friends and also to donate $100 to Susan G. Komen For The Cure in my name.  I was absolutely thrilled to have the opportunity to host a brunch, but was overjoyed that my little blog had a chance to help such a good cause, such as Susan G. Komen For The Cure.  I jumped on the opportunity.

 I love Eggland's Best Eggs, and prefer to use them if at all possible, so I was thrilled to receive my goody box filled with kitchen gadgets, ramekins, a cute little plush egg for the kids, and loads of coupons for a free dozen.  I cashed in coupons for a few dozen eggs right away and set about making this Mexican Fried Potato Skillet and these fantastic Breakfast Tacos.

Soon it came time to plan a menu for my Eggland's Best Brunch & Pink Party and wow did I have a hard time deciding what to serve.  In the end, I knew that I wanted the food to be as PINK as possible and I also knew that I wanted everything to be able to be served at room temperature and still be delicious.  Finally I was able to narrow things down and this is what I came up with. (Recipes will be shared sometime in the next week).

BRUNCH AND PINK PARTY MENU
Hot Ham and Cheese Sliders
Bacon Cheddar Deviled Eggs
Exotic Fruit Salad with Passion Fruit Dressing
Cardamom and Cinnamon Buns
Strawberry Sheetcake
(Closewise from top: Exotic Fruit Salad with Passion Fruit Dressing, Cardamom and Cinnamon Buns, Bacon Cheddar Deviled Eggs, and Hot Ham and Cheese Sliders)


And for dessert a beautifully rich and dense Strawberry Sheetcake that was very pretty in pink!

The guests and I had lots of fun celebrating women and all things pink.  It was a wonderful opportunity and I'm so glad to have been chosen.  I want to give a big thank you to Eggland's Best for allowing me to host such a wonderful event.  I also want to take this time to urge you to think about Breast Cancer Awareness, both for yourself and others.

From now until November 15, Eggland's Best will be stamping all of their farm-fresh eggs with the Susan G. Komen Pink Ribbon Running stamp in support of breast cancer awareness. Additionally Eggland's Best will be donating $50,000 to support Susan G. Komen in their pledge to end breast cancer forever.  You can read about it on their site HERE

My friends: Tara, Megan & Joy

The folks at Eggland's Best are so great they agreed to host a giveaway for one of my readers!

GIVEAWAY
Open to US residents only 
One lucky reader will receive the following:
  • 2 Free EB Dozen Coupons (Any variety - classic, cage-free, or organic)
  • 1 Free EB Hard Cooked & Peeled Variety Coupon
  • 4 EB Ramekins
  • 1 EB Apron
  • 1 EB Whisk
  • 1 EB Spatula
  • 1 EB Egg Timer
  • 1 EB Eco Bag
  • 1 EB Plush Egg

In order to qualify for the giveaway:
  • Please share an inspiring comment OR comment on how you have helped to raise awareness or funding for breast cancer.
  • For an additional chance to win, please LIKE Eggland's Best on Facebook and leave a comment here on this post to let me know that you did.
  • The giveaway will be open until Friday, September 30th at midnight EST.
    Disclosure:   Eggland’s Best provided me with VIP coupons, a gift card, information and a prize pack for a giveaway

      Friday, September 23, 2011

      Cookbook Review: The Homesick Texan

      I'm not going to do a traditional cookbook review for The Homesick Texan.  Instead, I'm going to just come out and say that this book is my absolute favorite right now.  I'd even go as far to say that it's my absolute favorite cookbook so far this year!  I would highly recommend this book to anyone who loves down home country cooking and/or Tex Mex favorites.  It is wonderful.

      I literally cannot quit cooking from this cookbook. I'm obsessed with it!  Every new recipe we try is so wonderful that I find myself wanting to cook another, and another, and another.

      My family doesn't pay much attention to my cookbook collection, but when they see this book out on the counter they do cheers.  They know that whatever I'm going to make is going to be wonderful.

      I'd cook my way through the entire book if I could, but for now some of the recipes I'd like to try 
      are:  Chorizo Empanadas; Queso Cookies; Queso Flameado; Green Chile Chowder; Carne Guisada; Cheese Enchiladas with Chile Con Carne; Soft Cheese Tacos; Tamales with Rajas; Pasilla Tomatillo Braised Short Ribs; Tex-Mex Meat Loaf with a Chipotle-Tomato Glaze; Pasilla Garlic Shrimp with Tomatillo Cheese Grits; Tex-Mex Squash Casserole; and Chorizo Asadero Bread.  


      Below is a quick roundup of all The Homesick Texan recipes I've made so far.
      Pork Tacos, Dallas Gas Station Style

      Austin-Style Black Beans

      Poblano Macaroni and Cheese

      Carnitas

      Jalapeno Pinto Beans

      Red Chile Rice

      Mexican Fried Potatoes w/ Chorizo and Eggs

      Breakfast Tacos

      The Most Amazing Refried Beans Ever

      Chorizo-Stuffed Jalapenos

      Chipotle Pimento Cheese

      Tomato Cobbler
      Last night we made Lisa's Tomato Cobbler, using fresh tomatoes and jalapeno from our garden and as was expected it was absolutely wonderful. 

      Words really cannot express how much I love this cookbook.  I've made twelve recipes and each recipe has been a huge hit. 

      If you would like to see my posts for each of the recipes above, please click HERE.

      Thank you to Lisa Fain for such a wonderful cookbook.  Thank you to Heather of girlichef for asking me to be a part of such a wonderful cookbook spotlight and cook-off, and thank you to Hyperion for sponsoring such a wonderful event. 


      Tuesday, September 20, 2011

      My Top Five Jamie Oliver Recipes

      I've always had a soft spot for Jamie Oliver.  He's a little bit quirky and unique, but he's definitely his own person, and I really admire that.  Sadly, this is our last week with Jamie at I Heart Cooking Clubs. I thought I would celebrate Jamie's last week with a countdown of my Top Five Jamie Oliver Recipes.  

      These are in order, starting with our very favorite.
      (Click on the boldfaced recipe title to be directed to the original blog post).

      First up is Jamie's recipe for Fish and Chips.  This is hands down the very best recipe for fish and chips that I've tried so far.  The beer batter was nice and light and puffed up beautifully in the hot oil.  My husband is a very tough critic, but he absolutely loved this meal and asks for it on a regular basis.  I am done looking for any other great fish and chips recipes, this is THE one.
      Totally and completely head over heels in love with pasta, this is by far one of my daughter's favorite meals. She loves Jamie's Baby Farfalle with Creamy Smoked Bacon and Pea Sauce and is always asking me when I'll make it again.  I've made this recipe at least five times since I originally posted it and it always gets gobbled up.  The kids (and adults) go absolutely crazy over this dish.  The best part is that it's made with mostly pantry ingredients and is a real quick one pot meal.  This has become a go-to dish for us.
      This is where my list gets a little biased.  My love for mustard definitely sprung this next recipe to the top of the list.  However, Jamie's Simple Cheesy Mustard, was enjoyed by everyone in my house (even the ones who don't particularly love mustard).  This sauce is so good I can't even describe it.  I loved this mustard sauce over broccoli, loved it even more with potatoes, and I can't wait to serve it on fish, burgers, or steaks.  Every last bit of this sauce was scraped out of the bowl.  I will definitely be making this sauce over and over.
      Jamie's Chicken and Zucchini Kebabs were an all-around family favorite.  There was absolutely nothing boring about this chicken dish.  It was packed with tons of flavor and we pretty much inhaled it.  The herby, spicy, garlicky marinade would be good for almost any meat and/or veggie.  Healthy, pretty, and easy, this is a winner of a chicken dinner.
       
      Lastly, this Shrimp and Avocado with an Old-School Marie Rose Sauce was a fantastic play of texture and flavor.   The hot crunchy shrimp with the cool creamy avocado, together with the crunch of the lettuce and the cool creamy Marie Rose sauce was a flavor and texture match made in heaven.  This is a dish that my Mom and I enjoyed for lunch and have continued to talk about ever since.


      Some other honorable mentions were Jamie's One-Minute Berry Ice Cream, his Banana, Peanut Butter, and Honey Smoothie, and his Smashed Spiced Chickpeas.
      Theme: Cheerio, Mate!

      Sunday, September 18, 2011

      A Total Fail: Banana and Honey Rolls

      Every once in awhile I have a total fail in the kitchen.  It's usually when I'm baking, as is the case with these banana and honey rolls.  I've had my eye on Jamie's banana and honey rolls since we first started cooking with him 6 months ago.  Instead of adding water to the dough Jamie adds a banana puree.  Instead of adding sugar, he adds honey.  It was something new and it really caught my eye. Since it's bread baking week at IHCC I thought I'd give them a go.  

      It's possible that I messed up when I converted the recipe from metric.  It's possible that I over mixed the dough.  It's also possible that the recipe is flawed somewhere.  Either way, these rolls didn't achieve the desired golden brown color and they were very dense, too dense.  It was akin to eating a brick. 
        
      Below is a picture of Jamie's banana and honey roll.  It looks perfectly fluffy and golden brown with gorgeous caramelized honey on top.  Nothing like my poor rolls. Oh well, you can't win them all.

      Banana and Honey Rolls
      Adapted from JamieOliver.Com
      Makes 10

        1kg strong bread flour (about 7 & 1/2 cups)
        6 bananas, pureed into a liquid
      8 tablespoons honey
        3 packets of yeast (7g each)
        1 level tablespoon fine sea salt
        extra flour for dusting
      Optional: One handful of cracked almonds

      Begin by making your banana puree:
      *First of all, peel your bananas then purée them in a blender or food processor. The mix will be surprisingly wet. Pour it into a measuring cup, then top up with water until you have just over 2 cups.
      Stage 1: making a well
       
      Pile the flour on to a clean surface and make a large well in the centre. Pour half your banana puree into the well, then add your yeast, half the honey (4tbsp), salt and stir with a fork.
       
      Stage 2: getting it together
       
      Slowly, but confidently, bring in the flour from the inside of the well. (You don't want to break the walls of the well, or the banana puree will go everywhere.) Continue to bring the flour in to the centre until you get a stodgy, porridgey consistency – then add the remaining banana puree. Continue to mix until it's stodgy again, then you can be more aggressive, bringing in all the flour, making the mix less sticky. Flour your hands and pat and push the dough together with all the remaining flour. (Certain flours need a little more or less water, so feel free to adjust.)
       
      Stage 3: kneading!
       
      This is where you get stuck in. With a bit of elbow grease, simply push, fold, slap and roll the dough around, over and over, for 4 or 5 minutes until you have a silky and elastic dough.
       
      Stage 4: first prove
       
      Flour the top of your dough. Put it in a bowl, cover with cling film, and allow it to prove for about half an hour until doubled in size – ideally in a warm, moist, draught-free place. This will improve the flavour and texture of your dough and it's always exciting to know that the old yeast has kicked into action.
       
      Stage 5: second prove, flavouring and shaping 
       
      Once the dough has doubled in size, knock the air out for 30 seconds by bashing it and squashing it. You can now shape it or flavour it as required – folded, filled, tray-baked, whatever – and leave it to prove for a second time for 30 minutes to an hour until it has doubled in size once more. This is the most important part, as the second prove will give it the air that finally ends up being cooked into your bread, giving you the really light, soft texture that we all love in fresh bread. So remember – don't fiddle with it, just let it do its thing.  
       
      Stage 6: cooking your bread
       
      Very gently place your bread dough on to a flour-dusted baking tray and into a preheated oven. Don't slam the door or you'll lose the air that you need. Bake according to the time and temperature given with your chosen recipe. You can tell if it's cooked by tapping its bottom – if it sounds hollow it's done, if it doesn't then pop it back in for a little longer. Once cooked, place on a rack and allow it to cool for at least 30 minutes – fandabidozi. Feel free to freeze any leftover bread.• from Happy Days with the Naked Chef I’m still really mad about bread – I love it. It’s so exciting. It’s such a rewarding, therapeutic, tactile thing and you’ll be so proud of yourself once you’ve cracked it.

      ***
      For the banana honey bread: 
      At Stage 5 divide the dough into 10 balls. Then pack these next to each other in a flour-dusted baking pan where they will rise together. Before putting in the oven, drizzle generously with the rest of the honey so that the top of the bread will caramelize, going nice and golden. Bake in your preheated oven at 375°F for 20 minutes. Allow to cool for a little while, but it’s best served still warm with lots of butter and a glass of milk for breakfast while you read the paper. Also fantastic used in bread and butter pudding or simply heated up with a bit of ice cream.
       
      Theme: Ready, Breadie?


      Friday, September 16, 2011

      Chipotle Pimento Cheese

      Pimento cheese, of any kind, is one of my favorite things to eat so when I saw this recipe for Chipotle Pimento Cheese in Lisa Fain's new cookbook, The Homesick Texan, I simply had to try it.

      Usually pimento cheese is made with sharp cheddar cheese, mayo, and pimentos.  Lisa's version is different in that it contains both cheddar and monterey jack cheese, which makes for a great combination.  The pimento cheese is brought to life with onion, garlic, cumin, chipotle, cilantro, and brightened with a squeeze of lime juice.  It's the perfect appetizer for the weekend coming up and it would be absolutely terrific on top of a burger.  We loved it!

       Chipotle Pimento Cheese
      Adapted from The Homesick Texan
      Makes 2 cups

      1 cup freshly grated Cheddar cheese (4oz.)
      1 cup freshly grated Monterey Jack cheese (4 oz.)
      1 teaspoon grated yellow onion
      1 garlic clove, minced
      1/2 cup mayonnaise
      1/4 cup jarred sweet pimentos, diced
      1 canned chipotle chile in adobo, diced
      1/2 cup chopped cilantro
      1/4 teaspoon ground cumin
      1 teaspoon lime juice
      salt and black pepper, to taste

      In a large bowl, mix together the cheddar cheese and the Monterey Jack cheese, onion, garlic, mayonnaise, pimentos, chipotle, cilantro, cumin, and lime juice.  Taste and add salt and black pepper as needed.

      Chill for one hour before serving.  Serve with tortilla chips, crackers or celery sticks.  Also makes a fine filling for a whole-hollowed out jalapeno.  Will last a week in the refrigerator.


      This post is part of The Homesick Texan Cookbook Spotlight and Cook-Off sponsored by Hyperion and hosted at girlichef

      Thursday, September 15, 2011

      Chorizo-Stuffed Jalapenos

      Do you wear gloves when you work with peppers?  I don't.  Never have, probably never will.  I guess I'm willing to pay the price.

      Twelve jalapenos sat before me, begging to be halved and deseeded.  It crossed my mind to wear some gloves and then in true "Kim" fashion I totally dismissed the idea.  I'm not one to be hassled.

      I should have noticed the jalapenos were hot when the fumes from slicing them had me choking, but I chugged right along, stopping for a brief moment to apply my chapstick with my fingertips (whoops)!  By the time those twelve peppers were halved and deseeded both my hands and my lips were on fire. My hands felt as though I had actually grabbed the handle of a hot pan and held on for a second or two. 

      I'd like to say my husband and I loved these stuffed jalapenos, but the truth is the jalapenos from my garden were so hot we really couldn't eat them.  We choked down 4 jalapenos each and then started chugging milk.  It was somewhat strange and we were really surprised.  My husband and I love spicy food and usually we can't make it spicy enough.  I have no idea why my jalapenos were so hot, but I do know I'm not eating anymore straight up like that.  Whew!

      I would give these jalapenos another chance because the filling was delicious.  Next time I'll be testing my jalapenos first to make sure they're not little atomic bombs.  Also, I may even broil/roast the jalapenos first before adding the filling.  As the recipe was written the jalapenos were still fairly raw/uncooked and had a bit of a crunch to them.  This is just a matter of personal preference, but I would like them a little more on the softer side.
      Chorizo-Stuffed Jalapenos
      Adapted from The Homesick Texan
      Serves 4-8

      12 medium jalapeno chiles (check their heat first by tasting a sliver)
      1/4 pound chorizo, cooked and drained of excess fat
      8 ounces cream cheese, room temp
      2 ounces goat cheese, room temp
      1 tablespoon chopped cilantro
      1 teaspoon dried oregano
      1 teaspoon ground cumin
      2 cloves garlic, minced
      1/4 teaspoon cayenne (be careful if your peppers are hot)
      1 teaspoon lime zest
      salt, to taste

      Preheat the broiler and line a baking sheet with foil.  

      Take each jalapeno and cut in half, lengthwise.  With a knife or small spoon scoop out the seeds and white pith and discard.  (Wear gloves if you don't want to hurt yourself.  Don't wear gloves if your name is Kim and you're stubborn).

      Mix together the cooked chorizo, cream cheese, goat cheese, cilantro, oregano, cumin, garlic, cayenne, and lime zest.  Adjust seasonings and add salt to taste.

      Fill each of the jalapeno halves with about 2 teaspoons of the cheese filling.  Place stuffed jalapenos on the sheet and place under the broiler for 8-10 minutes or until brown and bubbling.

      Note:  I drained my chorizo, but when I mixed the chorizo with the cheeses the filling turned orange.  I knew it was bound to happen.  If you want your jalapenos to look pretty, like the picture in the book, you'd have to keep your cheese and chorizo separate.  Fill the jalapeno with cheese and then top with the chorizo.


      As for me, it's two days later and my hands are still burning.  You would think I would learn from my lesson, but I can guarantee you that I won't.  When it comes time for slicing and dicing hot peppers you can be sure to find me in my kitchen using my bare hands and applying chapstick with my fingers.  Yes, even having swollen red hands for two days is not enough to convince me to take the two seconds to put on a pair of gloves. What can I say? I'm a real hardheaded like that. 

      This post is part of The Homesick Texan Cookbook Spotlight and Cook-Off sponsored by Hyperion and hosted at girlichef

      Wednesday, September 14, 2011

      Breakfast Tacos and The Very Best Refried Beans

       So, once you start cooking from The Homesick Texan you realize that one beautiful meal turns into another and so on and really, that's just part of the genius of this book. These breakfast tacos were born with leftover carnitas and leftover jalapeno pinto beans. Oh the joy of it!

      I was able to use my leftover jalapeno pinto beans to make Lisa's refried beans and let me just tell you now....these refried beans are without a doubt the very best refried beans I've ever tasted.  And, not to brag, but I do consider myself a bean connoisseur (okay, don't laugh at me). 

      To make the breakfast tacos you need to have some refried beans, flour tortillas (Lisa says always use flour tortillas), meat of your choice (in this case I used leftover carnitas), eggs, cheese, and salsa for serving.

      I began by converting Lisa's Jalapeno Pinto Beans into refried beans.  After pureeing the beans in the blender I cooked them down in a cast iron skillet with a tablespoon of canola oil, diced onion, and 2 huge cloves of garlic.  I can't believe how very different they tasted from the original Jalapeno Pinto Bean recipe.  These beans are phenomenal.  I couldn't keep my spoon out of the skillet.

       Refried Beans
      Adapted from The Homesick Texan
      Serves 8

      4 cups cooked Jalapeno Pinto Beans
      1/4 cup lard, bacon grease, or canola oil (I reduced this to 1 tbsp.)
      1/4 medium yellow onion, diced
      2 cloves garlic, minced (don't be shy)
      Salt, to taste

      In a blender, place the beans along with 1/4 cup of their cooking liquid (I forgot save the liquid and used water).

      In a large cast-iron skillet, on medium-low heat melt the lard (or grease/oil).  Add the onions and cook until translucent, stirring occasionally, about 5 minutes.  Add the garlic and cook for 30 more seconds.  Pour in the bean puree and while stirring cook the beans until the oil is well incorporated and the refried beans are a little darker in color, about 5 minutes.  Taste and add salt.

       There are many versions of breakfast tacos out there, but with these homemade beans and the succulent leftover carnitas this was truly the ultimate breakfast taco.

      Breakfast Tacos
      Adapted from The Homesick Texan
      Serves 4 (4 tacos)

      1 tablespoon butter
      4 large eggs, beaten
      4 pieces of bacon, cooked and sliced or any other meat desired
      salt and black pepper, to taste
      4 flour tortillas
      1 cup refried beans, heated
      1 cup grated cheddar cheese
      Salsa, for serving

      Heat a large skillet, preferably cast-iron, on medium high, and melt the tablespoon unsalted butter.  When butter is melted, add the eggs and cooked bacon (or meat of your choice) to the skillet and gently scramble for about 3 minutes or until done to your liking.  Taste and add salt and black pepper.

      Heat up the flour tortillas either in a skillet or by laying them on top of a gas burner turned on to a low flame.  When a tortilla starts to puff (about 20 seconds) turn it over and cook for another 20 seconds. 

      Take a tortilla and spread 1/4 cup of refried beans in the center of the tortilla.  Add a quarter of the scrambled egg and top with 1/4 cup of cheese and salsa.  Fold in the bottom 1 inch of the tortilla and then roll from left to right until self-contained.

      Note: This is a basic recipe, which you can experiment with and change to your heart's desire.  The variations on breakfast tacos are endless- you can also add breakfast sausage, chorizo, Mexican fried potatoes (see Monday's post), or leftover brisket.


      This post is part of The Homesick Texan Cookbook Spotlight and Cook-Off sponsored by Hyperion and hosted at girlichef