Showing posts with label breakfast. Show all posts

Wednesday, July 16, 2025

Southern Summer Series: Just A Few Miles South: #8 {Down Home Buttermilk Biscuits with Country Ham & Sorghum Butter}!


Every summer I like to chose a cookbook or a special focus and do a summer cooking series. Some of the summer series that I've done in the past are: popsicles; ice creams; cookies; salads; and healthy recipes. One series I've always wanted to do is a series of southern summer recipes. So, this summer I chose a local cookbook from James Beard Nominee, Ouita Michel. Each week I will be cooking recipes from Ouita's Just A Few Miles South Cookbook.

Well, we're on our 8th week of the summer series and nearing the end of summer. I have a couple more weeks until I'm back at school and I'm gonna try and live it up tthe best of my ability! 

This week we have a really good few recipes to share: Buttermilk Biscuits with Country Ham & Sorghum Butter. We're talking real down home Kentucky food now.

If you're not familiar with Sorghum, let me learn ya a few things. Sorghum is an ancient and gluten free grain that came from Asia and Africa and is grown and enjoyed in Kentucky. It's not a major crop, but Kentucky farmers still cultivate it and it's a popular ingredients in local cuisine. The sap is extracted from the stalks and boiled down to create a syrup. Sorghum is used on biscuits and pancakes and in dressings and tastes like a cross between maple syrup, brown sugar,  and molasses. It is thick and dark with a mild earthy and somewhat nutty flavor. 

Country ham is a type of dry-cured ham produced in the Southern United States and it is known for its intense, salty flavor and dry texture. It's made by rubbing the ham with salt and other ingredients and then aging it for several months, often with smoking. Sometimes it is in the refrigerated section of the supermarket and sometimes it is shelf stable, which would work well if you wanted to have it shipped. All you need to do is griddle it up in a cast iron pan with a little butter until it gets a little color or becomes golden brown, as pictured above and below.

What makes a Buttermilk Biscuit with Country Ham and Sorghum Butter so dang good? Well, you've got the whole sweet and salty combo going on. The fluffy, flaky biscuit with the sweet Sorghum butter and the salty and savory Country Ham. It's truly a heavenly combination. Anyone would love to wake up to this one!  

Buttermilk Biscuits

Recipe adapted from Just A Few Miles South

by Ouita Michel

Makes 14 small or 8 large biscuits

2 cups all-purpose flour, sifted

2 teaspoons baking powder

1/2 teaspoon baking soda

1/2 teaspoon iodized salt

1 teaspoon sugar

1/2 cup (1 stick) butter, frozen

2/3 cup buttermilk

Preheat oven to 375F. In a large bowl, whisk together flour, baking powder, baking soda, salt, and sugar. Grate frozen butter directly into the flour mixture. Stir in buttermilk and form a dough. Turn out dough onto a floured surface and knead once or twice. Roll out the dough on a floured surface to 1/2" thick and cut into rounds. Use a 2" cutter for cocktail biscuits and a 2-1/2 to 3" cutter for large biscuits. Bake 11-12 minutes for cocktail biscuits and 13-14 minutes for larger biscuits. 

 Sorghum Butter

Adapted from Just A Few Miles South

by Ouita Michel

Makes a generous 1/2 cup butter

1/2 cup (1 stick) butter, softened

1/4 cup sorghum

Blend butter and sorghum in a food processor until well blended and creamy. You can also mix this by hand, if you wish. Just make sure everything is blended well.

Southern Summer Series: Just A Few Miles South


Sunday, July 13, 2025

It's Peach Season: Heavenly Baked Peaches and Cream Oatmeal!

I'm a fan of waking up during the work week and enjoying a nice warm bowl of baked oatmeal. It kinda feels like a warm hug in a bowl and I like that it keeps well enough to enjoy all week. 

The trouble is, I always feel like I never have the ingredients. I'm always needing old-fashioned oats when I have quick oats, or I'm always needing a fruit jam I don't have on hand, or some kinda of chia seed or flaxseed I'm never gonna have or carry in my house.

I'm here to tell ya...no more! I finally found a recipe that will work for me just about all the time. How Sweet Eat's Baked Peach and Cream Oatmeal! Score! 

It calls for really basic ingredients: old-fashioned oatmeal, brown sugar, baking powder, salt, eggs, milk, peach jam, vanilla, and one peach! I'd like to think that I could use this recipe in a versatile way, substituting any kind of fruit jam and any kind of fruit. So Baked Blueberry and Cream Oatmeal? Strawberry and Cream Oatmeal? Buy some fresh jam from your farmer's market and go nuts! Why.not? It's versatile like that! 

But, for now, PEACHES. Give me all the ripe, juicy, fresh peaches! They are my favorite! In fact, my absolute favorite is peaches with raspberries so I could totally see a Peach Melba version of this oatmeal where we add some fresh raspberries to the top with some swirls of raspberry jam. The sky really is the limit here.

You can eat your baked oatmeal as is without toppings, but why would you? Some people would top this with milk or heavy cream and then whipped cream, more peaches, and some toasted nuts. I'm going in with a dollop of vanilla Greek yogurt and fresh peach slices. You really can't go wrong. 

Baked Peach and Cream Oatmeal

Adapted from How Sweet Eats

by Jessica Merchant

Makes 6 servings

1/4 cup butter

3 cups old-fashioned rolled oats

1/2 cup brown sugar

2 teaspoons baking powder

1/2 teaspoon salt

1 cup whole milk

2 large eggs

1/2 cup peach jam or peach butter

1 tablespoon vanilla extract

1 large peach, thinly sliced

for topping: milk, heavy cream, whipped cream, yogurt, toasted nuts 

Preheat the oven to 350F. Place the butter in an 8x8 baking dish and set it in the oven until the butter just melts. Remove the pan once melted.

In a large bowl, whisk together the oats, sugar, baking powder, salt and nutmeg. In a small bowl, whisk together the milk, eggs, peach jam and vanilla extract. Add the wet ingredients to the dry ingredients, stirring until everything is combined and wet. Scrape the mixture into the buttered dish and stir until most of the butter is incorporated, but leave some pockets of butter in the corners. Smooth out the top and add the peach slices. 

Bake for 30 minutes or until golden brown around the edges. Serve hot with a splash of heavy cream, whipped cream, yogurt, extra peaches, and/or toasted nuts.  


 Fresh From The Orchard @ IHCC!

Sunday, May 4, 2025

For Cinco de Mayo: How Sweet Eats Crispy Cheesy Breakfast Tacos with Carnitas {So good and easy}!

Doesn't everyone want to wake up to a breakfast taco crisped up with crunchy fried cheese?


This looks like it takes a lot of effort and it does not! All you need to do is scramble some eggs. Make a quick pico de gallo and chunk up some avocado. Or, make this however you wish. Buy some pico and guacamole if you want to make things easier on yourself.

After you scramble your eggs, all you need to do is put some grated cheese in your skillet and let it start melting before topping it with a flour tortilla, fill the tortilla with more cheese, scrambled egg, any kind of meat or veggie. Like I said, make it whatever you want!

Let the cheese underneath cook and crisp and let the insides cook, warm through, and melt. Then fold the taco in half, crisp up both sides (it helps you have a really good pan that is either cast iron or nonstick), and serve! Top with whatever toppings float your boat. 

We had carnitas the night before, so I added some carnitas to my scrambled eggs and I already had homemade pico de gallo, cilantro, red onion, and guacamole on hand for topping.

This makes for a delightful weekend breakfast and one that I will make again and again! 


Crispy Cheesy Breakfast Tacos

Adapted from How Sweet Eats

by Jessica Merchant

Serves 2-4, depending

1 pint cherry tomatoes, quartered

1/2 sweet onion, diced

1/4 cup cilantro, chopped

1 lime, juiced

1 avocado, cubed

1 tablespoons butter

6 large eggs

1 tablespoon milk or cream

salt and pepper, to taste

3 green onions, thinly sliced

8 small (4-inch) flour tortillas

8 ounces sharp cheddar cheese, freshly grated

In a large bowl, combine the tomatoes, onion, cilantro, lime juice and a big pinch of salt and pepper. Set aside - don't add the avocado until right before serving.

Heat the butter in a large skillet over medium-ow heat. Whisk together the eggs, cream and a big pinch of salt and pepper until combined. Whisk in the green onions. Swirl the melted butter around the pan and pour the eggs in the skillet. Add carnitas, salsa, or whatever you desire. Push gently with a spatula often, until the eggs are cooked to your liking. Transfer to a bowl.

Keep the same skillet over medium heat. To make the tacos, sprinkle cheddar in the skillet. You want enough cheddar to essentially cover the outside circumference of your tortilla. The cheese should start to melt right away. Place your tortilla directly on top of the cheese.  Add another bit of cheese to the inside of the tortilla. Top with scrambled egg mixture. Let the tortilla cook until the cheese is golden and getting crispy on the outside edges. Fold the tortilla in half and make sure each side of the tortilla is golden and crispy cheesy goodness!

Put the taco on a serving plate and garnish with pico de gallo, onions, cilantro, avocado or guacamole.  

April IHCC Potluck!


Sunday, April 13, 2025

Marcela Hazan's Pancetta Frittata

When I think of Italian food I don't always think of pasta.  I think of really simple fare. Dishes with a handful of ingredients. I think of things like a frittata. A simple egg dish with no more than five ingredients and no fussy presentation.

Marcela Hazan's Pancetta Frittata is probably one of the most simple yet delicious frittata I've ever made. It is simply 1 cup of pancetta cooked until it gets some color, 6 eggs, 6 tablespoons of Parmigiano-Reggiano, butter, and salt and pepper. It is so simple it doesn't call for herbs, so I didn't try to jazz it up and make it look fancy. It doesn't need to look fancy. It's peasant food at best, but you could entertain with it. It's easy and simple and Super Italian, our IHCC theme for this week, and it is absolutely creamy and delicious.

Do yourself a favor and make this simple dish sometime during this Easter season. It's perfect for an Easter Brunch and it is great served hot, warm, and room temperature. 

This is the epitome of the simple food we need to eating more.

Pancetta Frittata

Adapted from Marcela Cucina

by Marcela Hazan

Serves 4 as main or 8 as appetizer

1 cup finely chopped pancetta

6 eggs

6 tablespoons freshly grated Parmigiano-Reggiano cheese

salt and black pepper, to taste

1 tablespoon butter

Turn on your broiler. Put the chopped pancetta in a small skillet, turn on the heat to medium, and cook, stirring from time to time, until it becomes deeply colored and has shed much of its fat. Do not let it become crisp. Lift the pancetta from the pan using a slotted spatula in order to separate it from the liquefied fat, and put it into a medium-sized bowl. Discard the fat in the pan.

To the bowl with the pancetta, add the eggs, grated Parmesan, salt, and liberal grindings of pepper to the bowl and mix thoroughly with a fork or whisk.

Put 1 tablespoon of butter in a 12-inch nonstick skillet, turn on the heat to medium. Do not let the butter become colored, but as soon as it begins to foam, pour the egg mixture into the pan. Turn the heat down to very low. When the eggs have set and thickened, and they are creamy only in the center of the pan, run the skillet briefly under the broiler. Take frittata out the moment the surface of the frittata has set, but not browned. 

Super Italian @ IHCC!


Sunday, December 22, 2024

Ina Garten's Buttermilk Cheddar Biscuits {Last Recipe of 2024}!

Teens and older kids love to be up all hours of the night on Christmas Eve, which means Santa can't come until early morning hours. By that time, Santa has been riding around on his sleigh all night eating cookies and he's ready for something savory and breakfasty!

I think Santa would wholeheartedly appreciate Ina Garten's Buttermilk Cheese Biscuits all on their own, or with some eggs and bacon! Who wouldn't?

These biscuits come together really easy and bake up in no time! Perfectly golden brown from an egg wash with pockets of sharp cheddar cheese....these are the way to wake up!

Merry Christmas and Happy New Year to all who celebrate!

Buttermilk Cheddar Biscuits

Adapted from Food Network

by Ina Garten

Makes 8 biscuits

2 cups all-purpose flour, plus more as needed

1 tablespoon baking powder

1-1/2 teaspoon kosher salt

12 tablespoons (1-1/2 sticks cold unsalted butter), diced

1/2 cup cold buttermilk, shaken

1 cold egg

1 cup grated extra sharp Cheddar

1 egg, beaten with tablespoon water or milk

Maldon sea salt, optional

Preheat the oven to 425F. Place 2 cups of flour, the baking powder, and salt in the bowl of an electric mixer fitted with the paddle attachment. With the mixer on low, add the butter and mix until the butter is the size of peas.

Combine the buttermilk and egg in a small measuring cup and beat lightly with a fork. With the mixer still on low, quickly add the buttermilk mixture to the flour mixture and mix only until moistened. In a small bowl, mix the Cheddar with small handful of flour and, with the mixer still on low, add the cheese to the dough. Mix only until roughly combined.

Dump out onto a well-floured board and knead lightly about 6 times. Roll the dough out to a rectangle 10 by 5 inches. With a sharp, floured knife, cut the dough lengthwise in half and then across in quarters, making  8 rough rectangles. Transfer to a sheet pan lined with parchment paper. Brush the tops with the egg wash, sprinkle with salt, if using, and bake for 20 to 25 minutes, until the tops are browned and the biscuits are cooked through. Serve hot or warm. 

For Santa @ I Heart Cooking Clubs!


Saturday, September 28, 2024

Ina Garten's Easy Sticky Buns {An Easy and Fun Autumn Treat}!

Ina Garten's Easy Sticky Buns are the epitome of easy. There is no need to make any dough because you simply use puff pastry. Puff pastry is so easy to work with and the recipe comes together in no time.

First you make a mixture of butter and brown sugar and smear it into the bottom of a muffin tin. The butter and brown sugar mixture is topped with chopped nuts - feel free to use any nut you have. The recipe called for pecans, but I had walnuts so I used those!

Then you roll out the puff pastry dough, brush it with melted butter and top that with brown sugar and cinnamon. At this point you can add raisins or really anything else you'd like. I chose to forego the raisins.

Then you roll the dough up lengthwise and cut each roll into sixths. Place each sixth on top of the butter and brown sugar mixture with the nuts and bake!

I would advise to watch these closely. The butter and brown sugar mixture will rise up around the puff pastry and you don't want it to over cook or it will become to hard and sticky and start to take on a burnt sugar flavor. Ina says to bake these for 25-30 minutes, but I found that just under 20 minutes was the right amount of time for my oven!

These rolls are in fact sticky and delicious. Fair warning though, they are not a soft cinnamon roll sort of pastry. Instead they are buttery, flaky, crispy, sticky and almost verging on too sweet. Which reminds me to point out that you could do with using less brown sugar, especially if you don't like desserts that are cloyingly sweet. Otherwise, they are delicious and fun to make!


Easy Sticky Buns

Recipe adapted from Barefoot Contessa

by Ina Garten

Serves 12

12 tablespoons (1-1/2 sticks) butter, at room temp

1/3 cup light brown sugar, lightly packed

1/2 cup pecans, chopped in large pieces*

1 package (2 sheets) frozen puff pastry, defrosted)

For the Filling:

2 tablespoons butter, melted and cooled

2/3 cups light brown sugar, light packed

3 teaspoons ground cinnamon

1 cup raisins* 

*Note: You can make this recipe with nuts and without nuts. With raisins and without raisins. You can use pecans or walnuts, or use any nut. The point is, feel free to tuck any nut or dried fruit in this mixture. You could even sub chocolate chips or caramel chips. Make it your own!

Preheat the oven to 400F. Place a 12 cup standard muffin tin on a sheet pan lined with parchment paper.

In the bowl of an electric mixer fitted with the paddle attachment, combine 12 tablespoons of butter and 1/3 cup brown sugar. Place 1 tablespoon of the mixture in bottom of each of the 12 muffin cups. Distribute the pecans evenly between the 12 muffin cups on top of the butter and sugar mixture.

Lightly flour a wooden board or stone surface. Unfold one sheet of puff pastry with the folds going left to right. Brush the whole sheet with half the melted butter, leaving a 1 inch border on the puff pastry, sprinkle each sheet with 1/3 cup brown sugar, 1-1/2 teaspoons cinnamon and 1/2 cup of raisins (if using). Starting with the end nearest to you, roll the pastry up snugly like a jelly roll around the filling, finishing the roll with the seam-side down. Trim the ends of the roll about 1/2 inch and discard. Slice the roll in 6 equal pieces. Place each piece, spiral side up, in 6 of the muffin cups. Repeat with the second piece of puff pastry.I

Bake for 25 to 30 minutes, until the buns/rolls are golden brown on top and firm to the touch. Be careful- they're hot! Allow to cool for 5 minutes only, invert the buns onto the parchment paper (ease the filling and nuts out onto the buns with a small spoon) and cool completely! Enjoy!

September Potluck @ I Heart Cooking Clubs!


Sunday, June 16, 2024

Ina Garten's Zucchini Flower and Leek Frittata {A Thing of Beauty}

I am my Lost Kitchen Era, where I am obsessed with Erin French's The Lost Kitchen show, restaurant, food, plating, and all the edible flowers she uses to garnish her dishes! I love how Erin goes to the local farms and is inspired by what is in season to make beautiful dishes. 

I wanted to create a Lost Kitchen dish in my own kitchen, so I went to the Lexington, Kentucky Farmers Market and I found zucchini flowers! I was so excited because I had never cooked with zucchini flowers before.

So I turned to the one and only queen, Ina Garten and I found her recipe for Zucchini and Leek Fritatta. This was a major win as it allows me to really channel the whole edible flowers vibe of The Lost Kitchen.

I searched the market for the rest of the ingredients needed: pancetta, leeks, baby zucchini, fresh thyme, eggs, half and half, Gruyere, and fresh basil. This added up to be a pricier dish than most recipes I cook, but that's ok, because as I shared above, I'm in my Lost Kitchen Era and I have a major need to cook with edible flowers.

This was more laborious than most dishes, with a lot of prep, as I had to clean the zucchini flowers, removing the stamen, and dry them. I had to cut and wash the leeks, which was a rather sandy and dirty task.I had to cut and wash the basil, the thyme, the zucchini. Cut and cook the bacon. Shred the cheese. Crack and beat 8 eggs. Cook the frittata filling. It was more involved than your regular everyday frittata, but no worries, this was THE FRITTATA to end all fritattas! It was going to be adorned with the most beautiful zucchini flowers. Doesn't it look gorgeous going into the oven?

Doesn't it look gorgeous coming out of the oven? I mean wow...It's stunning! Ina says to allow the frittata to cool for five minutes and then cut into it. I am dying to see how it all tastes.

The frittata slices perfectly and each person gets their own zucchini flower with their portion, how brilliant! The frittata is brimming with zucchini, zucchini flowers, bacon, leeks, and my favorite...Gruyere cheese. I love all these ingredients so much!

I go to take a long awaited bite and the zucchini flower is soft and baked into the frittata. It is an odd texture, soft and hard to cut into, the whole flower wants to stay together. Something about the flavor and texture is not appealing. I push the flower off and take a bite of the egg and filling, the flavors are too strong and overpowering. I take another bite and something here is just not working. I keep taking bites because I love all the ingredients, it appears to have baked up perfectly, and Ina Garten has never let me down, but the dish just didn't work for me. I am, however, very happy to have made the dish and finally get a chance to work with zucchini flowers. I like to try new things even if they don't work out. I do have another zucchini flower recipes up my sleeve, so stay tuned for that. The verdict is still out!

 Seasonal and Local Produce @ IHCC


Sunday, March 17, 2024

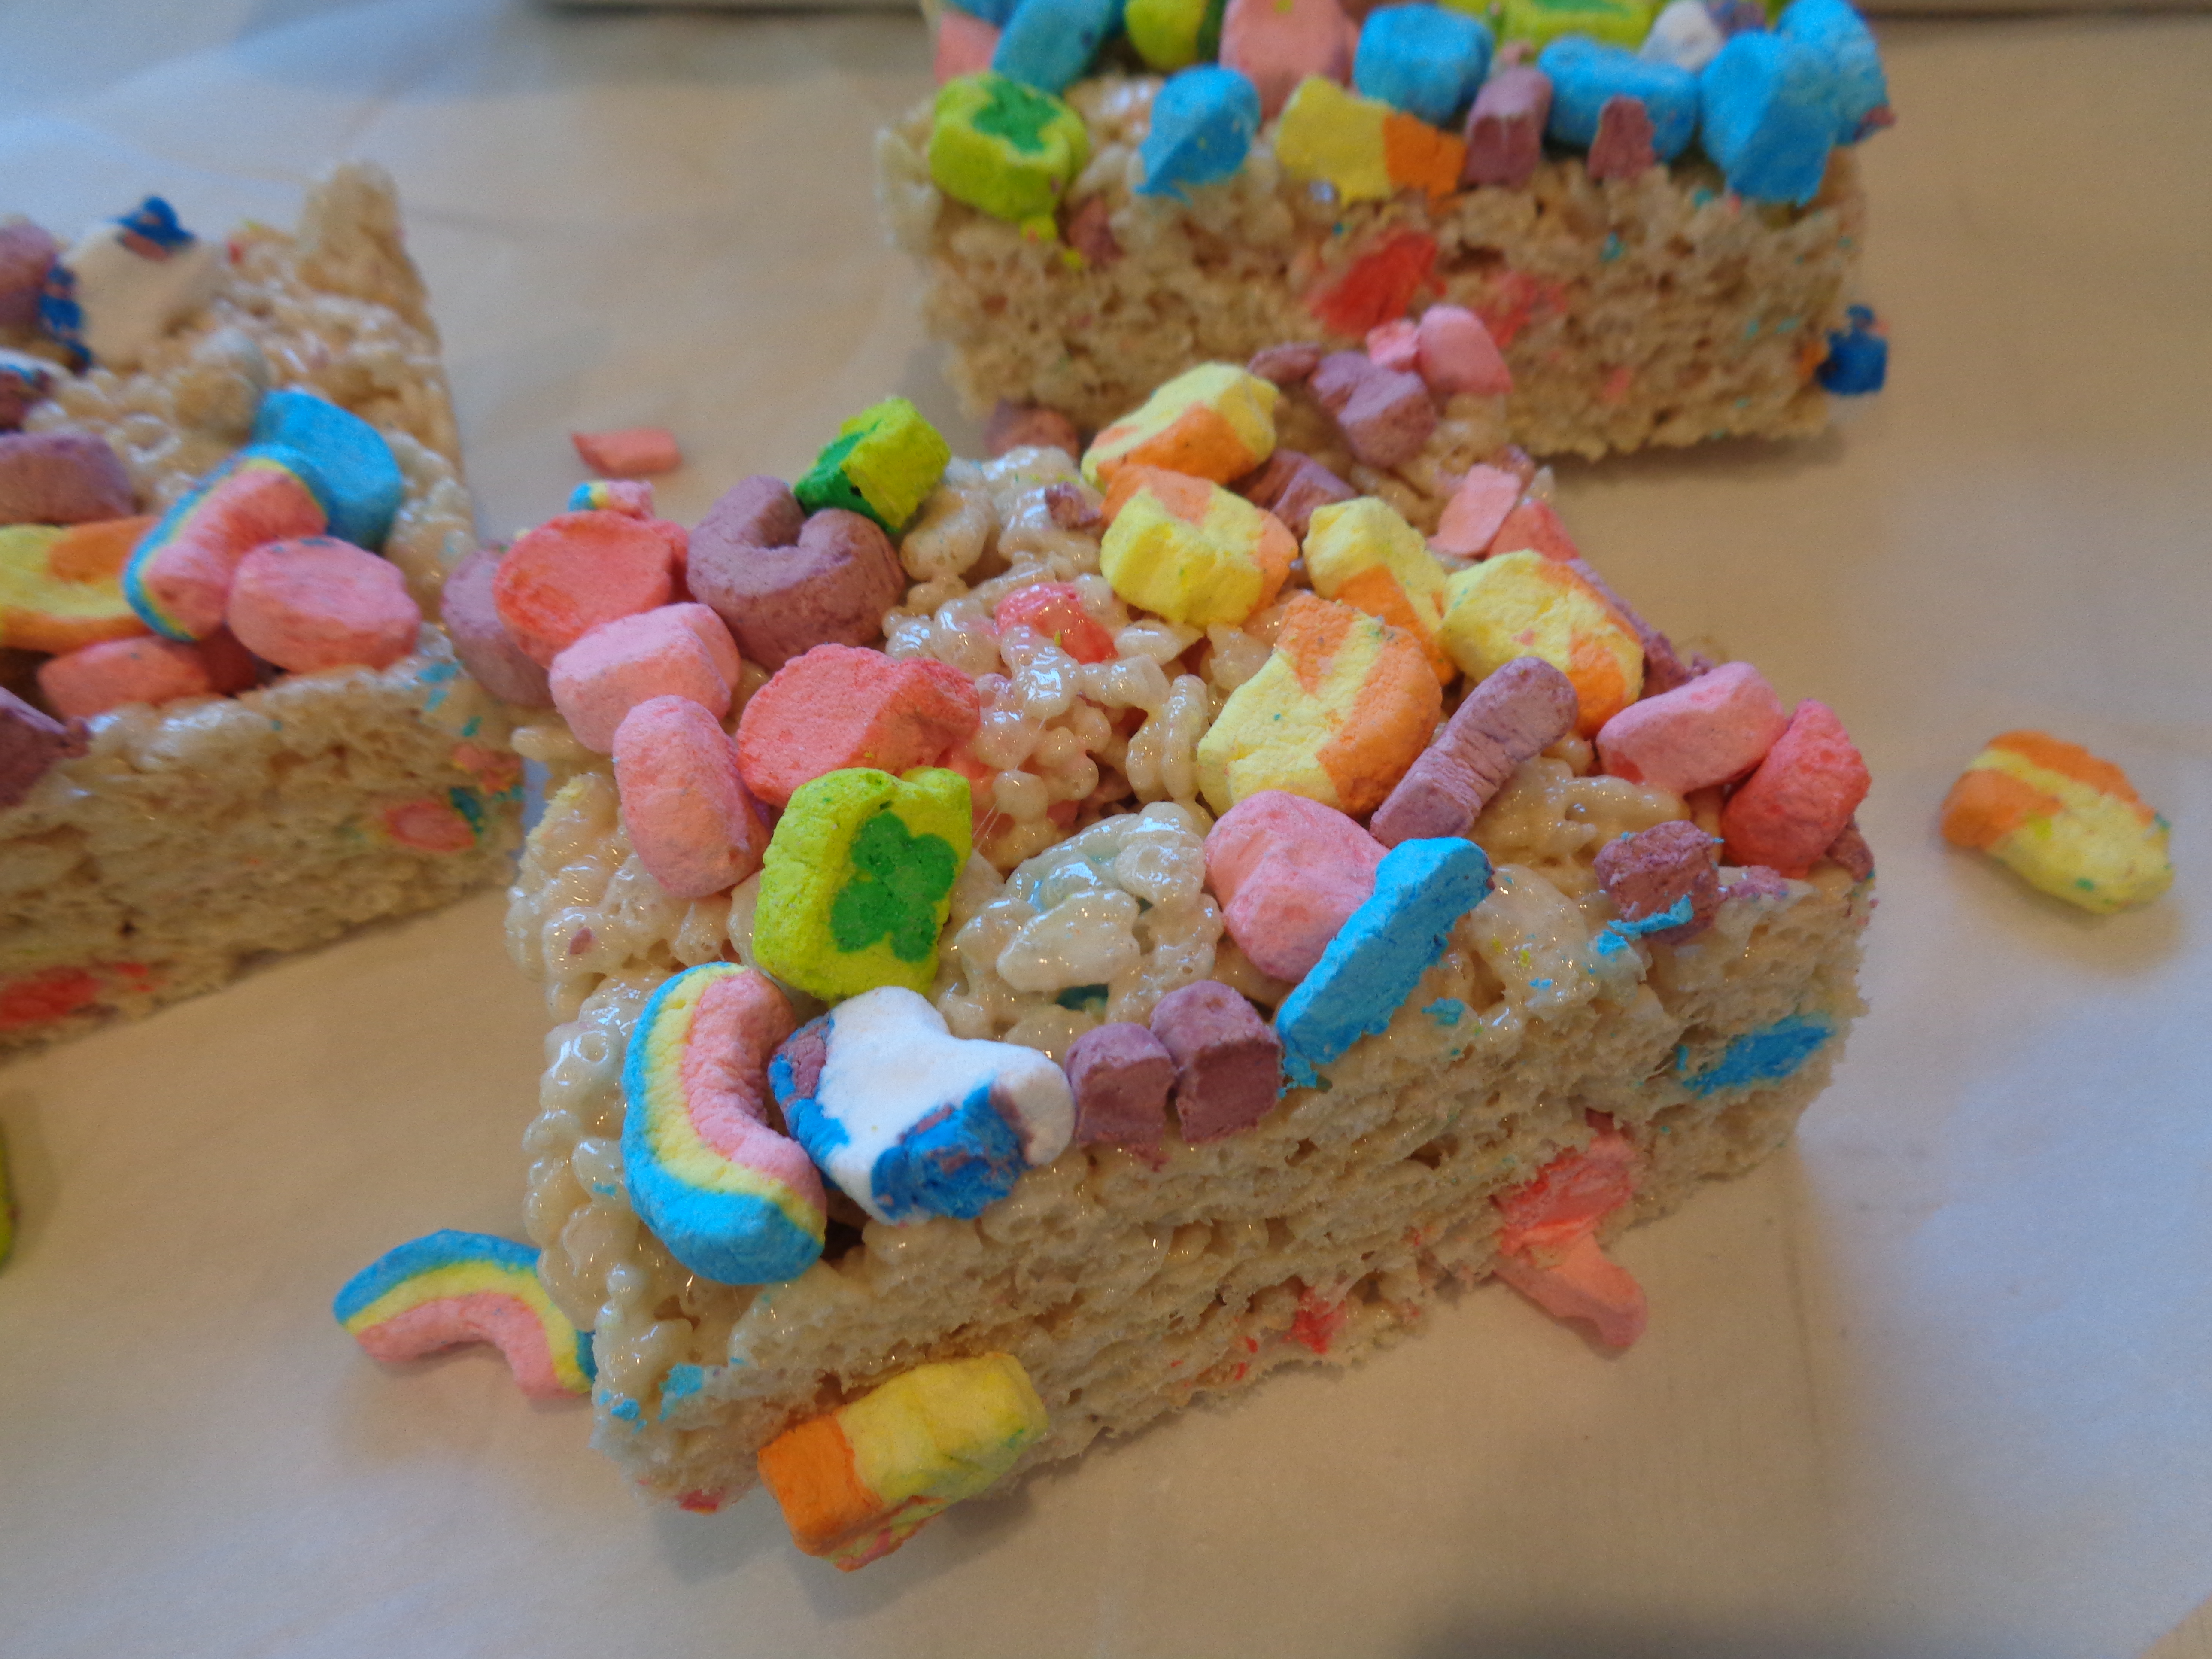
Lucky Charms Rice Krispie Treats {They're Magically Delicious}


It takes certain amount of patience to pick out all the marshmallows from a big box of Lucky Charms. But on a St. Patrick's Day Sunday morning, when all is calm and rather lazy, one has time for sticky fingers and long projects.

These treats are just like everyone's favorite Rice Krispie Treats except they have Lucky Charms marshmallows on the inside and on top. So they're extra marshmallowy, extra colorful, and extra sugary. I don't have to tell you that this spells d-e-l-i-c-i-o-u-s. 

Is it healthy? Well, of course not. But every once in awhile, on a lucky green holiday, it's fun to have an extra special treat!

The real question is: Do you have the patience to dug out all the marshmallows from a cereal box? Then after that, do you have the patience to artfully place 2 cups of marshmallows on top of the Rice Krispie Treats?

I did not. By the time the treats were ready to be topped with the marshmallows, I just threw them all on top and called it a day.

Lucky Charms Rice Krispie Treats

Adapted from How Sweet Eats

by Jessica Merchant

Serves 12-16

4 tablespoons butter

1 (10-ounce) bag of mini marshmallows

6 to 7 cups rice cereal

3 cups Lucky Charms marshmallows (get the big box)

Line a 9x9 inch baking dish with parchment paper or spray it with nonstick spray. You can also use a 9x13 inch baking dish, the squares just won't be as thick!

In a large pot, melt the butter over low heat. Once the butter is melted and even a little browned, stir in the mini marshmallows. Stir until the mixture is creamy and the marshmallows have melted.

Turn off the heat and fold in the rice krispies. Completely mix until all the rice cereal is mixed in. Stir in 1 cup of the Lucky Charms marshmallows and fold them in for a few minutes. Press the mixture into the dish. I like to press it down with a piece of parchment paper so it gets super smooth on top and it doesn't stick to the spoon. Then I press the remaining Lucky Charm marshmallows into the top. Let them set for about an hour. Slice into squares and serve.

Something Green @ IHCC


Sunday, March 10, 2024

Puff Pastry Breakfast Pizza {Perfect for Spring Brunch}

  It's no secret that I'm a fan of How Sweet Eat's puff pastry pizzas. They are a real go to for me. Always delicious. Always impressive. Always quick and easy. Always minimal ingredients. This is my kind of recipe!

This breakfast version is a real favorite and all you need is about five ingredients: puff pastry, shredded cheese, bacon, eggs, something green (chives, green onion, chopped spinach), and salt and pepper.

Listen folks...this is so easy. Spread out the thawed puff pastry, spread with egg wash, sprinkle with cheese, top with bacon, eggs, and greenery, sprinkle with salt and pepper and bake.

When you pull this out of the oven people will ooh and ahh and start taking pictures with their phone. This is so impressive coming out of the oven. The pastry puffs up real big, the bacon baked into the pastry, and the eggs look so very inviting.

The pizza is light and airy, the eggs cook perfectly, and the cheese and bacon bake right into the puff pastry. It is a truly incredible dish and again, it is so easy. There's no reason not to make it!

Puff Pastry Breakfast Pizza

Adapted from How Sweet Eats

by Jessica Merchant

Serves 4-6

2 sheets thawed puff pastry

8 slices bacon+1 teaspoon water whisked together, for egg wash

6 ounces sharp white cheddar cheese, freshly grated

6 large eggs, 

freshly ground black pepper

3 tablespoons fresh snipped chives for topping

Preheat the oven to 425F. Set the puff pastry out to thaw if it has been in the freezer.

Heat a skillet over medium-low heat and cook the bacon. You can chop it up to cook quicker or you can fry it in slices. You want it almost completely cooked - the fat rendered - but not burnt or crispy because it will still cook in the oven.

Place the puff pastry sheets on a baking sheet lined with parchment paper. Very slightly roll up the edges of the pastry to create a bit of an edge for the crust. Brush the pastry with the egg wash.

Sprinkle the grated cheddar over the pastry. Add on chopped spinach, if you like. Add on the bacon. Crack each egg separately into a bowl, then gently pour it onto the pastry. Sprinkle everything with black pepper. 

Spring Forward @ IHCC


Sunday, November 19, 2023

Maple Brown Sugar Applesauce

 
If you're spending a lazy day at home, there is nothing like the smell of homemade applesauce bubbling away on the stove. The scent of fresh apple mingling with the caramel notes of brown sugar and maple syrup is so comforting.

This is an autumn-spiced applesauce with a good dose of cinnamon, clove, ginger, and nutmeg. It's perfect for enjoying all on it's own, with oatmeal, or even with vanilla ice cream and/or yogurt for dessert! 


Maple Brown Sugar Applesauce

Adapted from How Sweet Eats

Serves 4-6

4-6 apples, chopped

1 teaspoon lemon zest

1/8 - 1/4 cup maple syrup*

2 tablespoons brown sugar

1 teaspoon cinnamon

1/2 teaspoon vanilla extract

pinch of ground cloves

pinch of ground ginger

pinch of nutmeg

vanilla ice cream, if you wish

Notes: I used 6 mini Honeycrisp apples for this, but feel free to use any apple you like. I also decreased the amount of maple syrup by half, but feel free to use the whole 1/4 cup, if you like!

Add chopped apples to a pot and just cover with water. Add sugar, syrup, lemon zest, vanilla and spices and bring to a boil, then simmer uncovered until apples are mushy, about 45-60 minutes. Add more water if needed. Turn off heat and mash apples. Serve as is or with vanilla ice cream.

 Comfort Food @ IHCC