Sunday, December 25, 2022

Ina Garten's Lemon Bars


Lemon desserts have been a part of Christmas all throughout my life. My Gramps loved lemon meringue pie something fierce, so mom would make two pies,  one for us to eat on Christmas and one for Gramps to take home.

I've now had more years without Gramps than I had with him, but some people have such a presence they never escape you. I can still picture him sitting at the head of the table taking that first bite of lemon meringue pie. He always had a rather mischievous twinkle in his eye and without fail, almost on cue, he would throw his head back and close his eyes savoring that first bite before exclaiming how good the pie was. It was a little slice of heaven to him and we all felt it.

So, in honor of Gramps, and everyone else who is no longer physically with us, may we all have our own slice of heaven as we give thanks and praise to all the special moments over the years, old and new, for those are theses are the very best moments. The ones we hold onto. 

Lemon Bars

Adapted from Food Network

by Ina Garten

Makes 20 squares or 40 triangles

For The Crust

1/2 pound butter, at room temperature

1/2 cup granulated sugar

2 cups flour

1/8 teaspoon salt

For The Filling

6 extra large eggs at room temperature

3 cups granulated sugar

2 tablespoons grated lemon zest (4 to 6 lemons)

1 cup freshly squeezed lemon juice

1 cup flour

Confectioners' sugar, for dusting

Preheat the oven to 350F. 

For The Crust: Cream the butter and sugar until light in the bowl of an electric mixer fitted with the paddle attachment. Combine the flour and salt and, with the mixer on low, add to the butter until just mixed. Dump the dough onto a well-floured board and gather into a ball. Flatten the dough with floured hands and press it into a 9 by 13 by 2" baking sheet, building up a 1/2" edge on all sides. Chill.

Bake the crust for 15 to 20 minutes, until very lightly browned. Let cool on a wire rack. Leave the oven on.

For The Filling: Whisk together the eggs, sugar, lemon zest, lemon juice, and flour. Pour over the crust and bake for 30 to 35 minutes, until the filling is set. Let cool to room temperature.

Cut into triangles and dust with confectioners' sugar. 


Sunday, December 18, 2022

Ina's Giant Crinkled Chocolate Chip Cookies

The I Heart Cooking Clubs group started out as Tyler Florence Fridays way back about 12-14 years ago. Back then Tyler's Big Fat Chocolate Chip Cookie recipe was all the rage. I think every group member made it, and for good reason. They are some award-winning cookies! In fact, to this day, after all the Tyler Florence recipes I've tried, his Big Fat Chocolate Chip Cookie recipe is my fave!

Ina's Giant Crinkled Chocolate Chip Cookie recipe from her Modern Comfort Food book reminded me of Tyler's recipe and I knew I needed to give them a try. The ingredients and size of the cookies are similar, but the difference is Ina takes turns baking and banging her cookies on the counter every 3 minutes to give them the crinkled appearance. Then she sprinkles them with sea salt.

Chocolate chip cookie recipes are a very personal preference kind of thing. I had to find out if Ina's recipe would trump Tyler's. Does the baking and banging and crinkling of the cookies make them better or worse? Do we prefer them with sea salt, or not? 

Well, it turns out both cookie recipe are very similar and both taste amazing. However, we all voted and said that we preferred Tyler's recipe better because we like thick chewy cookies and Ina's were thinner and cripser. Turns out the baking and banging does create crinkles in the cookies and the crinkles add a crisp texture to the cookie. Ina's cookies were also sprinkled with sea salt and were saltier. I am a huge fan of salt, but surprisingly I prefer the cookies without the salt. 

Again, it comes down to personal preference. If you prefer thick chewy cookies then Tyler's Big Fat Chocolate Chip Cookies recipe would be the one for you. If you prefer thin crisp cookies, then Ina's Giant Crinkled Chocolate Chip Cookies would be the one for you. Either way you can't go wrong! 

Merry Christmas and Happy New Year to all who are celebrating!


Giant Crinkled Chocolate Chip Cookies

Adapted from Barefoot Contessa

by Ina Garten

Makes 12

1/2 pound (2 sticks) butter, at room temp

1-1/2 cups granulated sugar

1/4 cup light brown sugar, lightly packed

1 extra large egg, at room temp

1-1/2 teaspoons pure vanilla extract

2 cups all purpose flour

1/2 teaspoon baking soda

1 teaspoon kosher salt

8 ounces bittersweet chocolate, chopped, such as Lindt*

Fleur de sel or sea salt, for sprinkling

Note: Ina calls for bittersweet chocolate and I never use that in my cookies. We prefer semisweet so I always opt for that. You should always make recipes to suit your own tastes! Also worth noting is that even though I froze the cookies for the required 15 minutes and set them wide apart on the cookie sheet, they spread and and ran together. I think they may need to bake 2-3 per cookie sheet to avoid them spreading.

Preheat the oven to 350F. Arrange three racks evenly spaced in the oven (see note). 

In the bowl of an electric mixer fitted with the paddle attachment, beat the butter on medium speed for 3 minutes, until creamy. Add the granulated sugar and brown sugar and beat on medium speed for 2 to 3 minutes, until light and fluffy. Scrape down the bowl with a rubber spatula. Add the egg, vanilla, and 2 tablespoons of warm water and mix on low speed just to combine. In a medium bowl, whisk together the flour, baking soda, and kosher salt. With the mixer on low, slowly add the flour mixture, then the chocolate (including the fine chocolate dust) to the batter until combined. Mix well with a rubber spatula.

With a 2-1/4" standard ice cream scoop (or 1/3 cup measure), make 12 rounded scoops of dough and place them on a sheet pan. Freeze the dough for exactly 15 minutes, then arrange 4 balls of dough - spaced wide apart - on each of three sheet pans lined with parchment paper. Bake for 10 minutes, until the cookies are slightly puffed in the center. Remove the pans from the oven and bang them on the stove top, until the center of the cookies deflate. Bake for 3 minutes, then bang the pans again, repeating baking and banging every 3 minutes, for 18 to 20 minutes total, until the edges of the cookies are golden brown. (The centers will be lighter and not fully cooked.) Rotate the sheet pans in the oven so the cookies bake evenly. Sprinkle the cookies with fleur de sel and cool completely on the pans.

If your oven has only two racks or you have only two sheet pans, or less, bake these in batches but don't freeze any batch of dough for more than 15 minutes.

Spirit of Giving @ IHCC

Sunday, December 11, 2022

Ina Garten's Parmesan Chipotle Popcorn {The Perfect Holiday Snack}!


I know what you're thinking...did she really post popcorn on her blog? Well, yes. Yes, I sure did, and let me tell you something, and I'll say it in bold so you don't miss it. DO NOT SLEEP ON THIS POPCORN! 

This popcorn is rated 5 stars of the Food Network and for good reason! It is simply coated in flavor: cheesy and buttery with a slight kick of chile. It is simply addictive and just plain impossible to stop eating. We inhaled it!

Right now we are in the thick of the holiday season and everyone is dithering about and shelling out money in a herculean effort to beat the clock and be ready for the big day. This popcorn takes all of 5 minutes to make and only cost a few dollars, if that, so I've declared it THE PERFECT HOLIDAY SNACK!

What are you waiting for? Get poppin'!


Parmesan & Chipotle Popcorn

Adapted from Food Network

by Ina Garten

Serves 3-4

1 bag microwave popcorn, such as Newman's Own Natural 

4 tablespoons (1/2 stick) butter, melted

1/2 cup finely grated Italian Parmesan cheese

1/2 teaspoon chipotle chile powder

2 teaspoons fleur de sel

Microwave the popcorn for 3 to 5 minutes, according to the directions on the package, until the popcorn stops popping. Carefully pour the hot popcorn into a large bowl and immediately pour on the butter, then the Parmesan, chile powder, and salt. Toss well and serve hot.

Tree Trimming Party @ IHCC


Sunday, December 4, 2022

Ina's Hasselback Kielbasa

I seldom see chefs use kielbasa in their recipes, but I am thrilled to see Ina Garten use it in several of her latest cookbooks. 

We loved Ina's Kielbasa with Mustard Dip from her last book, Modern Comfort Food, and also her Split Pea Soup topped with Kielbasa. It stands to reason that we would love her Hasselback Kielbasa! 

This method of cooking kielbasa is new to me, but I am beyond eager to give it a go! The kielbasa is cut every 1/4" to create crusty golden tops, as well as texture and flavor. Ina calls for the kielbasa to be brushed with a homemade honey mustard that adds a nice subtle flavor.

The hasselback kielbasa roasts atop a bed of sliced onions, fennel, peppers, garlic, thyme and fennel seeds. The vegetables serve as a nice accompaniment to the kielbasa. We really loved this dish and think it would be wonderful served alongside some pierogies or potatoes, but in the interest of trying to "healthify" the meal we served ours with some steamed broccoli.

I can definitely see making this again and adding it to the rotation as a comforting dish this winter!

Hasselback Kielbasa

Adapted from Go-To Dinners

by Ina Garten

Serves 6

3/4 pound yellow onions (2 to 3 onions)

1 (1-pound fennel bulb, stalks removed)

1 each red, yellow, and orange bell pepper

good olive oil

2 tablespoons minced garlic (6 cloves)

2 teaspoons minced fresh thyme leaves, plus extra sprigs

1 teaspoon whole fennel seeds, chopped

salt and black pepper

2 pounds fully cooked, smoked kielbasa

1/4 cup Dijon mustard

1/4 cup liquid honey

Preheat the oven to 425F. Cut the onions in half, slice them crosswise in 1/2 inch thick half rounds, and place them in a large bowl. Cut the fennel bulb in half lengthwise, cut the halves in 1-inch thick wedges through the core (to keep the wedges intact) and add to the bowl. Cut the peppers in 1-inch wide strips, discarding the stems and seeds, and add to the bowl. Toss with 4 tablespoons olive oil, the garlic, thyme, fennel seeds, 2 teaspoons salt, and 1 teaspoon black pepper. Transfer the vegetables to a very large (14 x 18") roasting pan or two sheet pans, spread them evenly in a single layer, and roast for 20 minutes, tossing once with a large metal spatula.

Meanwhile, cut the kielbasa crosswise in 1/4" thick slices, being careful to cut only two thirds of the way through. When the vegetables are ready, toss them again, discard the thyme branches, and place the kielbasa on top. Combine the mustard and honey and brush the top and sides of the kielbasa. Roast for 30 minutes, brushing the kielbasa with the honey mustard every 10 minutes, until it is crispy and browned (Reserve extra honey mustard for serving.) Sprinkle the vegetables with salt and serve hot with the reserved honey mustard on the side. 


Sunday, November 27, 2022

Ina's Overnight Macaroni & Cheese

 I've got endless reasons to be thankful and this Overnight Macaroni & Cheese is one of them! 

We are all looking for those delicious make ahead dishes that are perfect for holiday dinners. Anything to help ease the workload on the big day, right?

Well, when I laid my hands on Ina Garten's latest cookbook, Go-To Dinners, her Overnight Macaroni & Cheese recipe just jumped off the page. I just knew I would be serving it for Thanksgiving!

Now I've never made an overnight macaroni and cheese before, but I have total trust in Ina's recipes so I was willing to risk making this recipe for the first time on Thanksgiving day. This recipe was so very easy - anyone could, and should, do it!

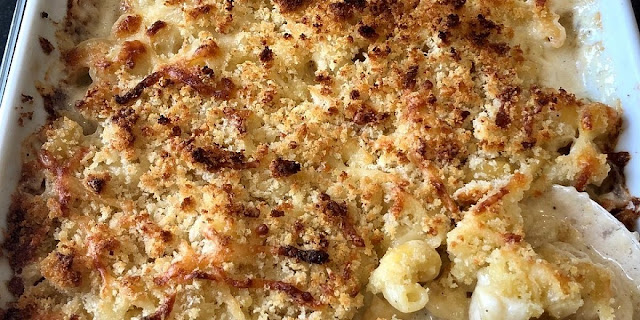
You simply cook your pasta for about 4 minutes. While the pasta is cooking, you get a rather large bowl and fill it with 4-1/2 cups of heavy cream and the Gruyere and Sharp Cheddar cheeses. You season with salt and pepper and then stir in the drained, hot pasta. Ina grates some nutmeg in there. I didn't. Then you refrigerate the mixture for 24 hours. Don't fret when you uncover the macaroni 24 hours later to see that all the cream has been soaked up (picture below). It is going to be okay. I added a splash of whole milk to loosen things a touch and then transferred all the macaroni to the baking dish.

The macaroni needs to sit out for about an hour so that it can come to room temperature before being baked. Top it with the remaining Gruyere and Sharp Cheddar and then make some fresh white breadcrumbs. Use some good bread because these breadcrumbs are THE BOMB.... holy cow, they totally make the dish. Mix the breadcrumbs with some melted butter and cover the top of the macaroni and cheese. Put this baby in the oven and in about 25-30 minutes you are in for the most indulgent, creamy, cheesy, most delicious breadcrumb topped macaroni and cheese of your life! Seriously, those fresh breadcrumbs are total perfection and make the whole dish.

This Overnight Macaroni & Cheese was the hit of the entire Thanksgiving meal. Everyone raved about it and requested it again for next Thanksgiving! Thanks, Ina!

Overnight Macaroni & Cheese

Adapted from Go-To Dinners

by Ina Garten

 Serves 6

salt and black pepper

12 ounces cavatappi pasta*

4-1/2 cups heavy cream

3 cups Gruyere cheese, divided (8 ounces)

1-1/2 cups grated sharp white Cheddar, such as Cabot, divided (4 ounces)

1/2 teaspoon ground nutmeg

3 tablespoons melted butter, plus extra for the dish

2-1/2 cups fresh white breadcrumbs

A day before you plan to serve, bring a large pot of water to a boil. Add 2 tablespoons salt and the pasta and cook for 4 minutes (it will be undercooked). Drain (don't rinse) and set aside.

Meanwhile, in a medium (10-inch) bowl, combine the cream, 1-1/2 cups of the Gruyere, 3/4 cup of the Cheddar, the nutmeg, 1 tablespoon salt, and 1-1/2 teaspoons pepper. Stir the hot pasta into the cream mixture, cover the bowl with plastic, and refrigerate for 24 hours. The pasta will absorb the cream and expand.

When ready to bake, allow the mixture to sit at room temperature for about one hour. (You can also microwave it for 4 minutes) Preheat the oven to 400 degrees.

Butter a 9x 13 x 2-inch baking dish. Stir the pasta mixture well, transfer it to the dish, and spread it evenly. Combine the remaining 1-1/2 cups Gruyere and 3/4 cup Cheddar and sprinkle evenly on top. Combine the breadcrumbs and the 3 tablespoons melted butter and sprinkle evenly over the cheese. Bake for 20 to 25 minutes, rotating halfway through, until golden brown. Serve hot! 

Thankful @ IHCC


Sunday, November 20, 2022

Ina Garten's Ravioli En Brodo

 I scored a copy of Ina Garten's latest cookbook, Go-To Dinners, and immediately couldn't wait to look through it. There is always one recipe that jumps out at me in every cookbook and this time around it was Ina's Ravioli En Brodo. Something about the time of year and a cozy bowl of ravioli in a light and flavorful broth just really spoke to me.

This recipe requires A LOT of chopping, but that is my favorite kitchen task, and once you're done, the rest is easy peasy. 

Two chopped onions, four chopped carrots, three ribs of chopped celery, and one bulb of diced fennel goes into a stockpot and cooks down and concentrates to make one of the tastiest broths. I was a little worried my husband wouldn't care for the fennel, but it wasn't overly pronounced and adds a subtle flavor that really just rounds out the broth.

Add a little Parmesan rind, or if you don't have one then just add some Parmesan. Add the chicken broth and eventually the ravioli and you have a really cozy and hearty meal that will really warm your bones and satisfy. We absolutely loved this and I will definitely be making it a lot! 

Ravioli En Brodo

Adapted from Go To Dinners 

by Ina Garten

Serves 4-6

olive oil

2 cups chopped yellow onions (2 onions)

2 cups (1/2" thick) diagonally sliced carrots, scrubbed (3 to 5 carrots)

1-1/2 cups (1/2"inch) diced celery (3 ribs)

1-1/2 cups (1/2"inch diced fennel, top and core removed

8 cups simmering chicken stock

1 Italian Parmesan cheese rind*

salt and freshly ground black pepper

1 pound cheese ravioli, fresh or frozen

freshly grated Italian Parmesan cheese, for serving

minced fresh dill or parsley, for serving

Freshly squeezed lemon juice, for serving

Note: I didn't have a Parmesan rind laying around in my freezer, so I just put in some Parmesan cheese. I also didn't feel like cooking the ravioli in a separate pot, so I just threw it in with the soup. I am not a fussy cook. I know that Ina does extra step so the ravioli don't get bloated with the liquid from the soup, but I also knew that my soup would be eaten up quickly and there would be no leftovers. Even if the ravioli got bloated up I was okay with that too. Of course, if I were entertaining or worried about presentation then I would opt for Ina's extra step. The choice is yours! Do what works for you! 

Heat 1/4 cup olive oil in a medium (10-11 inch) pot or Dutch oven, such as Le Creuset, over medium heat. Add the onions, carrots, celery, and fennel and saute for 10 to 15 minutes, stirring occasionally, until the vegetables are softened. Add the chicken stock, 2 cups water, the Parmesan rind, 1 tablespoon salt, and 1 teaspoon pepper. Bring to a boil, lower the heat, and simmer, partially covered, for 20 minutes, stirring occasionally. Remove the Parmesan rind and taste soup for seasonings.

Meanwhile, cook the ravioli in a large pot of boiling water with 2 tablespoons salt for 4 to 6 minutes (or according to pkg directions), stirring occasionally. Drain and spread out on a plate so they don't stick together.

For serving, place the warm ravioli in large soup bowls and ladle the hot soup over them. Sprinkle with Parmesan, dill, and a squeeze of lemon and serve hot. 

 Tasty Treats @ IHCC


Sunday, November 13, 2022

A Macaroni & Cheese Roundup!

Macaroni and cheese is one of our favorite side dishes here in the Stirring The Pot kitchen. Originally I wanted to make Ina's newest Macaroni & Cheese recipe this week, her Overnight Macaroni & Cheese.
 
You know what they say about the best made plans, right? Well...my daughter got real sick with covid, it's my son's 16th birthday tomorrow, and our upstairs heater broke so we have zero heat. I could go on, bu,t basically I forgot to prep the macaroni and cheese the night before and since it's overnight mac and cheese it was a total bust today.
 
I thought about it long and hard and decided that I've made a lot of macaroni and cheese over the years and I've never done a macaroni and cheese roundup, so here goes!

If you love macaroni and cheese like we do, you might want to try some of these! 

Click on the recipe title to be directed to the original post and recipe!

Ok, come on...doesn't this look delicious and perfect for your Thanksgiving dinner? Plus, you don't have to make the squash because it's already in the pasta. It's like a two-in-one!
Same kind of idea here...don't wanna make macaroni and cheese plus a green veggie? Just go ahead and put them both together. Look at us being multitaskers!
Tomato makes a great pairing with macaroni and cheese and Jacques Pepin will never steer you wrong with one of his gratins!
If you're feeling a little south of the border, then Rick Bayless's Salsa Mac n' Cheese is just as good as any! I love the idea of doing different salsa variations. 
If you're in the mood to be a little healthier with things, Ina's Crusty Baked Shells and Cauliflower is a terrific recipe. The cauliflower does a great job standing in for pasta and that crusty topping is oh so good!
 Once again, Pepin will never steer you wrong. He is pretty much a gratin genius! This mac and cheese is great if you have any leftover ham during the holidays that needs using up. This is a great way to do it and...everyone loves a one pot meal!

Sunday, November 6, 2022

Half Baked Harvest's Six Ingredient Pumpkin Butter

  The flu has been making the rounds here in Kentucky. I've been down for the count for two weeks now and am just now starting to feel human again. My school district and the surrounding school districts are all closed for illness. Flu came early this year and it is no joke!

I was looking for a seasonal and easy recipe this week and this pumpkin butter fits the bills nicely! You can put all the ingredients into a slow cooker or let it simmer for hours OR you can put them in a saucepan on the stovetop and have this ready in about half an hour, which is what I did.

Pumpkin butter simmering on the stovetop smells like the holidays and is great to gift to neighbors and friends. It pairs well with good gouda cheese and is great on toast, biscuits, and/or crackers. It's also a great ingredient to use for baking. A quick visit to the Half-Baked Harvest site and you will find all manner of cookies, breads, and baked goods containing pumpkin butter. You might even see some here next week!

Six Ingredient Spiced Pumpkin Butter 

Recipe adapted from 

Makes about 4 cups

2 cans (15 ounce) pumpkin puree

1/3 cup apple cider

1/2 cup real maple syrup, plus more if needed to sweeten

1 tablespoon vanilla extract

1 tablespoon pumpkin pie spice 

1 teaspoon cinnamon

1/2 teaspoon salt

Stovetop: In a medium saucepan, combine the pumpkin, cider, maple syrup, vanilla pumpkin pie spice, cinnamon, and salt. Bring to a gentle boil over medium heat. Cook, stirring often until the pumpkin thickens slightly, but is spreadable, about 20-30 minutes. Taste, adding more maple syrup if needed to sweeten. Remove from the heat and let cool (the pumpkin butter will thicken as it cools). Transfer to glass jars and keep stored in the fridge for up to 1 month or in freezer safe containers for up to 3 months.

Slow Cooker: In the bowl of your slow cooker, combine the pumpkin, cider, maple syrup, vanilla, pumpkin pie spice, cinnamon, and salt, Cover and cook on high for 3-4 hours. During the last 45 minutes of cooking remove the lid to allow the pumpkin butter to thicken. Taste, adding more maple syrup if needed to sweeten. Turn off the heat and let cool (the pumpkin butter will thicken as it cools). Transfer to glass jars and keep store in the fridge for up to 1 month or in freezer safe containers for up to 3 months.


October Potluck @ IHCC


Sunday, October 23, 2022

Jacques Pepin's Butternut Squash Gratin {The Perfect Fall Side Dish}

Butternut squash is a true fall favorite. Over the years we have come to absolutely love it! Back in 2011 I started things off simple with Tessa Kiros' Baked Butternut Squash. When that was a hit I moved on to Ina's Butternut Squash and Ricotta Bruschetta.The Bruschetta was addictive so I branched out further to Ina's Butternut Squash Hummus

The love affair was in full bloom so then we tried other favorites like Ruth Reichl's Butternut Squash, Sausage, and Walnut Lasagne and also Nigella Lawson's Butternut Squash Macaroni and Cheese. 

Now I'm furthering the love affair with butternut squash by trying my hand at Jacques Pepin's Butternut Squash Gratin

Pepin's gratin is so simple. It is right up my alley. Just a handful of ingredients.The hardest part is cutting the squash into 1/8-1/4" slices. Once that's done, you just boil the slices for about 2 minutes, then arrange them in a baking dish, top with salt and pepper, pour the cream on and cover with cheese. Bake for about 30-40 minutes and you have one delicious fall-inspired side dish or main dish.

You can arrange the squash slices artfully and really make the gratin beautifully arranged, but that's not really my style so I just threw the slices in the baking pan for a more 'rustic' look. I really love that word rustic, don't you?

My family walked in while this was cooking and they said "it smells like Thanksgiving in here." If that isn't the ultimate compliment then I don't know what is.

Butternut Squash Gratin

Adapted from Essential Pepin

Serves 6-8

1 large butternut squash (3-3/4 pounds)

1 teaspoon salt

1/2 teaspoon freshly ground black pepper

1 cup heavy cream

1/2 cup grated Jarlsberg or other Swiss-type cheese or Parmesan

Preheat the oven to 400F. Cut off the stem of the butternut squash and split it in two at the bottom of the neck; this will make it easier to peel. Peel the neck lengthwise with a sharp knife or vegetable peeler, removing enough skin so the orange flesh appears (there is a layer of green under the first layer of skin). For the body of the squash, remove the skin with a sknife by going around it in a spiral fashion (it is easier to peel a round object in this manner); then cut lengthwise in half and, using a sharp spoon, remove the seeds. With the slicing blade of a food processor or a knife, cut the squash into 1/8- to-1/4 -inch-thick slices. 

Put the squash in a saucepan, cover with water, and bring to a boil. Boil over high heat for 1-2 to 2 minutes, then drain in a colander; the pieces will break a little.

Transfer the squash to a gratin dish and add the salt, pepper, and cream, mixing with a fork to distribute the ingredients. Cover with the cheese. Bake for 30 to 40 minutes, until nicely browned. Serve. 


Vegetables Unleashed @ IHCC


Sunday, October 16, 2022

José Andrés' Sausage with Cabbage #RecipesForThePeople


There are dishes that serve a family and then there are dishes that serve an army. Sausage and Cabbage is a recipe that serves an army. I was thrilled to see that Jose Andres has a very loose recipe for Sausage with Cabbage on his website. Cooks can literally make the recipe however they choose using his bare bones recipe.

You need only four ingredients to make this hearty and satisfying dish: Italian sausage, cabbage, onion  and garlic. Jose calls for sesame seeds and Pimenton, and they do add some pizazz, but are not totally necessary.

Cut the sausages or leave them whole. Chop the cabbage or cut it into thin slivers. Peel the garlic or don't. I like Jose's plan. He doesn't give you explicit instructions about chopping or amounts. It's your kitchen, he says. You're the cook. You make it your own!

 We love Italian sausage in this house and really enjoyed this recipe. We found it hearty and satisfying and absolutely perfect for this time of year. Total comfort food and more than enough to go around.

Sausage and Cabbage

Adapted from Jose Andres

Serves many

What You'll Need:

Sausages

Onion

Garlic

Cabbage

Sesame seeds

Paprika

Olive Oil

The Recipe: You'll need some sausages, any kind. Then also onion, garlic, cabbage, sesame seed and paprika. The amounts are up to you (I used 5 sausages, 1 head of cabbage, 1 onion, 5 cloves of garlic, etc.) Start the oil in a large pan (the cabbage will need lots of space). Start with oil in the pan and lots of garlic (peeled or unpeeled, chopped onion. Add the sausage and saute so it's browned on all sides, and add some spices...pimenton, salt, anything old in your pantry that you want to get rid of.

Add the cabbage and keep stirring, then add some sesame seeds, if you have them. Saute until the sausage is cooked, and then at the end add some wine or whatever you're drinking. Write your own recipe he says! Then serve it!

Foods To Feed An Island @ IHCC
 

Sunday, October 9, 2022

The Recipe That Won Over Tiktok {The Best Way To Make Eggs by Chef Jose Andres}

 Dear People Of The World, 

Today I share with you Chef Jose Andres' Best Way To Make Eggs. Chef Andres is a big fan of making videos on Tiktok. In fact, his video sharing the best way to make eggs has been viewed over 2 million times! Try as a might, I cannot add the video here, but here is an article about Chef Andres' eggs.

Chef Andres begins with a pan that is ovenproof and he coats the bottom of the pan with a generous amount of butter.

He then layers in a generous amount of shredded mozzarella cheese, salt, pepper, 4 cracked eggs, and a layer of milk. He does not specify amounts. From what I could see, it was enough cheese and milk to coat the bottom of the pan each time. He tops that with some cheddar cheese and then coats pieces of bread in oil and throws it all in the oven at 350F for 5 minutes. I don't know what kind of oven Chef Andres has, but mine needed a little more time, closer to 15 minutes (toast is done in about 5 minutes). 

The result is a very quick ooey gooey cheesy egg dish that can be enjoyed on toast, dipping and enjoying straight out of the pan, if you so dare. 

Love, 

Kim

Welcome Chef Jose Andres to IHCC!