Showing posts with label Vegan. Show all posts

Sunday, July 16, 2023

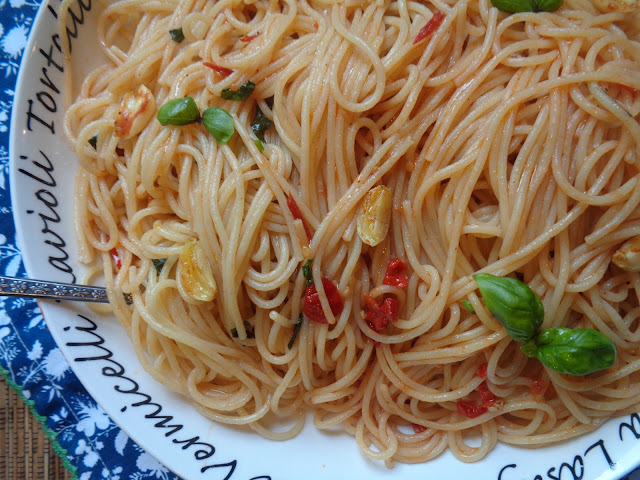
Garden Fresh: Pasta alla Bersagliera {Pasta Aglio, Olio e Peperoncino}

 Disclaimer: I watch a fair amount of YouTube. The kids at school think they have a claim on YouTube and that adults and/or teachers just don't watch it. They are always so surprised to hear me talk about it.

I love the cooking and travel vlogs, among others. This week I discovered the Pasta Grammar channel and I watched them make a dish called Pasta alla Bersagliera, which is a pasta dish based off Spaghetti Aglio e Olio (Spaghetti with Garlic and Oil). The Bersagliera sauce is just like Spaghetti with Garlic and Oil, except they add in little red Italian peppers (peperoncino) and a couple tablespoons of tomato paste. The YouTube video that inspired this dish is below if you'd like to give it a watch!


I was so glad to discover this dish because I have some of the ingredients out in my garden: little red peppers, basil, and I decided to add some cherry tomatoes.  
It's real simple! You place the olive oil in the pan with the cherry tomatoes, tomato paste, sliced red peppers and cook that down for a little bit. Then add the garlic and cook over low heat (being careful not to burn the garlic) until the garlic imparts its flavor and is a slightly golden brown. Some people toss the garlic, but I kept it and garnished my dish with it! The sauce will look broken, but that's okay. It will come together when you add the pasta and the pasta cooking water.
I researched many Spaghetti Aglio e Olio recipes prior to making this. Some called for one garlic clove, some called for 3, and others called for 8. I decided on 3 garlic cloves and 3 little hot peppers. I like that you can vary the ingredients based on your personal taste. Some people might want to add less garlic, or maybe more. Some might only like 1 pepper while others prefer more. It's up to you! The beautiful thing about cooking in your own kitchen is making it your own! This is a spicy and flavorful delight and tastes quite fresh and delicious! If you have the ingredients on hand you might want to try it!

                         Pasta alla Bersagliera or Pasta Aglio, Olio e Peperoncino 

                     Adapted from Pasta Grammar/Youtube and Giada De Laurentiis

                                                          1 pound spaghetti

1/2 cup extra virgin olive oil

3 cloves garlic, germ removed

1-2 red peppers (pepporicino) 

handful of cherry tomatoes

2 tablespoons tomato paste

1 tablespoon chopped fresh basil leaves

reserved pasta water, amount depending on how you like your sauce

Notes: This recipe and the measurements is based off of Giada De Laurentiis' Spaghetti Aglio e Olio and I have simply substituted the red pepper flakes for red peperoncino and added 2 tablespoons of tomato paste. I got this idea from watching Pasta Grammar on Youtube and since I had the red peperoncino on hand I decided to adapt Giada's recipe and give it a go! This is a combination of their recipes with a little personal touch of my own with the cherry tomatoes. I don't claim it was authentic!

Place 6 quarts of salted water in a a large pot and bring to a boil.

In a medium to large skillet place the olive oil, cherry tomatoes, tomato paste, sliced peppers, and garlic (garlic should be left whole with the germ removed). Cook the mixture over low heat until the garlic becomes slightly golden brown. You do not want to burn the garlic! Remove the garlic. Add about 1 cup of hot water from the pasta pot and set aside.

When the pasta pot comes to a boil, add the pasta and cook about 2 minutes less than package directions. When the pasta is almost done, reserve about 1 cup of the pasta water. Drain pasta and add the pasta to the pan with the oil and tomato sauce. Stir and decide how much pasta water you need to make your sauce and pasta come together. Garnish with basil or other herbs, if you like and serve. 


 From The Garden @ IHCC


Sunday, March 7, 2021

Ottolenghi's Balilah {The Perfect Healthy Snack}

Ottolenghi writes, "In Jerusalem, Balilah is a popular Palestinian street food consisting of fresh chickpeas seasoned with cumin and lemon juice and it makes the most gratifying snack." He also states, "On the corner of the souk in the Old City stood the very popular balilah man. He had large piles of freshly cooked chickpeas on his stall, steaming and beautifully decorated with parsley and lemon. Like a magician, he used to whip the balilah into a newspaper cone in a flash and serve it to the eager customer."

I don't know about you, but I am a bean lover and that sounds heavenly. I have wanted to make this recipe forever and I am so glad I have finally got around to it! It is the perfect snack!

This balilah is so quick and easy to whip together, especially with canned chickpeas. Simply drain the beans, add chopped parsley, sliced green onions, chopped lemon, olive oil, cumin, salt and pepper. Give it all a mix and you are good to go. Of course, I feel this is better even the next day when the flavors have had a chance to meld together. You can even add chopped tomato or cucumber, or even feta cheese. You can eat this as a snack on its own, or served in pita or with pita chips. You can eat it warm, room temp, or cold straight from the fridge. It is also great served over chicken or fish or thrown into a salad. It is so versatile and delicious and it certainly won't last long!


Balilah

Adapted from Jerusalem

by Yotam Ottolenghi & Sami Tamimi

Serves 4, or more

1 cup dried or 2 (15oz.) cans  chickpeas

1 teaspoon baking soda, if using dried beans

1 cup chopped parsley

2 green onions, thinly sliced

1 large lemon

3 tablespoons olive oil

2-1/2 teaspoon ground cumin

salt and freshly ground black pepper

If Using Dried Beans: The night before, put the chickpeas in a large bowl and cover with cold water at least twice their volume. Add the baking soda and leave at room temp to soak overnight. Drain the chickpeas and place them in a large saucepan. Cover with plenty of cold water and place over high heat. Bring to a boil, skim the surface of the water, then decrease the heat and simmer for1 to 1-1/2 hours, until the chickpeas are very soft but still retain their shape. 

If Using Canned Beans: Use two 15.5 oz. cans! Drain the chickpeas and place in a large bowl.

To Make The Balilah: Put the parsley and green onions in a large mixing bowl. Peel the lemon by topping and tailing it, placing on a board, and running a small sharp knife along its curves to remove the skin and white pith. Discard the skin, pith, and seeds and coarsely chop the flesh. Add the flesh and all of the juies to the bowl.

Once the chickpeas are ready, drain and add them to the bowl while they are still hot (If you are using canned beans you can heat them up if you like). Add the olive oil, cumin, 3/4 teaspoons salt, and a good grind of pepper. Mix well. Allow to cool down until just warm, taste for seasoning, and serve.


Sunday, February 28, 2021

Ina Garten's Baked Sweet Potato Fries

It's been one heck of a week. We went back to in person classes after not having school for two weeks due to Snowmageddon. Going back to work after you've been off for any length of time is so difficult, you forget the routine, you forget what you were doing, you just can't get into the swing of things. 

Then on Friday we had the day off so that all staff could get their 2nd dose of the Moderna Covid-19 vaccine. I was starting to feel achy and tired a few short hours later, so I was going to have a light meal and go to bed, but then I broke my molar eating grapes. Yes, I know. I have no idea how that happened. I didn't get to go to bed early though.

Instead I was up half the night feeling achy with a low grade fever and chills and although I was unbelievably tired I couldn't sleep because I was stressed out about my broken tooth. I thought I'd feel better the next day, but no. In fact, I ended up feeling the worst the next night, shivering and laying under tons of blankets all night. Don't get me wrong, I am grateful to have had the vaccine, but I will warn you, almost everyone I work with was feeling pretty bad all weekend. If you get the vaccine, plan to have a couple down days.

I am feeling a little better today, but I'm going to go right back to resting after I share this recipe for Ina's Baked Sweet Potato Fries. I had this recipe set aside to make this week because I had two huge sweet potatoes that I've had for sometime and this recipe is less than 5 ingredients, which is my favorite kind of recipe to make. Even though I'm not feeling well, I can definitely put together this recipe which is about as easy as they come. Plus, as a bonus, you can totally chew these sweet potato fries with one side of your mouth, which is required when one is in need of a dentist.

I'm not reinventing the wheel here, but if you have some sweet potatoes lying about then these make a fun and delicious side. I've seen a lot of savory sweet potato fries, but Ina goes the sweet route, using light brown sugar. The fries get a coating of olive oil, brown sugar, salt and pepper and I have to say I do love how the brown sugar caramelizes on the sweet potato fries creating this rather sweet and sticky goodness. If you like sweet potato recipes that are on the sweet side, then this are worth a shot!


Baked Sweet Potato Fries

Adapted from Food Network

by Ina Garten

Serves 4-6

 2 medium sweet potatoes, peeled

2 tablespoons good olive oil

1 tablespoon light brown sugar

1/2 teaspoon kosher salt, plus extra for sprinkling

1/2 teaspoon freshly ground black pepper

Preheat the oven to 450F. Halve the sweet potatoes lengthwise and cut into 3 long spears. Place them on a sheet pan and toss with the olive oil. Spread the potatoes in one layer. Combine the brown sugar, salt, and pepper and sprinkle on the potatoes. Bake for 15 minutes and then turn with a spatula. Bake for another 5 to 0 minutes, until lightly browned. Sprinkle lightly with salt and serve hot. 


Sunday, October 18, 2020

Giada's Spiced Pumpkin-Raisin Cookies


'Tis the season for pumpkin spice everything....so, Spiced-Pumpkin-Raisin Cookies it is! And guess what? They're healthyish cookies (minus the sugar). And vegan! That's right...there's no butter or eggs in these cookies. What are you waiting for? Get on your pumpkin game and start making these now!

You begin by mixing together the dry ingredients: flour, old-fashioned oats, cinnamon, baking soda, and salt. Then you add the dry mixture to a wet mixture of: canned pumpkin, sugar, maple syrup, vanilla, and oil. Then you sprinkle the raisins in! It's simple and delicious! Plus, you probably already have all the ingredients on hand right now!

These cookies are just about perfect. They have a mild pumpkin flavor, the spice is just right (not overpowering), and the raisins add a wonderful chew! If you can only get your hands on one can of pumpkin this year, give this recipe a try! I cannot say enough good things about them, and I'm not the only one. They have a 5-star rating over on the Food Network too! Check out the video below.


Spiced Pumpkin-Raisin Cookies

Adapted from Food Network

by Giada De Laurentiis

Makes 15 or so cookies


1 cup all-purpose flour

2/3 cup old-fashioned oats

1 teaspoon cinnamon

1/2 teaspoon baking soda

1/2 teaspoon fine salt

1/4 teaspoon ground allspice

3/4 cup sugar, plus additional for sprinkling

1/2 cup canned pumpkin puree

1/3 cup vegetable oil

1 tablespoon pure maple syrup

1 teaspoon vanilla extract

1/2 cup raisins

Position a rack in the center of the oven and preheat to 350F. Line 2 heavy large baking sheets with parchment paper.

In a medium bowl, combine the flour, oats, cinnamon, baking soda, salt and allspice. Stir to blend well. In a large bowl, combine the sugar, pumpkin puree, oil, syrup and vanilla; whisk to blend. Using a flexible rubber spatula, gradually stir the dry ingredients into the pumpkin mixture. Stir in the raisins.

For each cookie, drop 1 generous tablespoon of batter onto the prepared baking sheet, spacing the mounds about 1 inch apart. Using moistened fingertips, flatten each to a  2-inch diameter round, Sprinkle each cookie with a bit more sugar.

Bake the cookies until brown and a bit firm to the touch, 17 to 20 minutes. Using a metal spatula, transfer the cookies to a rack and cool completely. 


Sunday, February 2, 2020

Madhur Jaffrey's South African Natal Red Kidney Bean Curry


Let the mustard seeds start popping! Last weekend I traded in some books at Half Price Bookstore, and it was must have been my lucky day, because I found a copy of Madhur Jaffrey's From Curries to Kebabs Recipes From The Indian Spice Trial from 2003. It was a massive score because I didn't even know this book existed and let me tell you, it is FULL of the most delicious and comforting curries, not to mention some delectable looking kebabs, and everyone loves a kebab.

There is sure to be one curry after another here on Stirring the Pot this winter. A quick look through the cookbook had me making a list of specialty ingredients my store doesn't carry.  Plus I needed to stock up on some necessary spices. Sometimes Amazon is a necessary evil and I reluctantly placed an order for some dried red hot chiles, dried curry leaves, cumin, hot curry powder, and some cumin seeds. A few days later I had all the necessary ingredients on hand to make several dishes in this book.

I set about by soaking my red kidney beans and adding baking soda to them, which was a trick I learned from Yotam Ottolenghi. The baking soda tenderizes the beans. The next day I set about cooking the beans so they would be ready the following day when it was time to make the curry. The baking soda trick worked because my beans only needed about half the cooking time suggested, around an hour. I saved my bean cooking liquid just in case. I was glad I did.

The next day I was making a delicious and comforting bean curry in under a half-hour.  I set about making the tomato mixture, adding all the fragrant spices and chiles, testing and tasting the mixture along the way. While taste testing, I found that while delicious, I wanted and craved more garlic, green chile, dried red chile, ginger. So I doubled all those ingredients.

The result was an extremely spicy, fragrant, flavorful, and comforting vegan curry that was an absolute dream over rice. I highly recommend this recipe. Again, it is perfect for people on all diets, healthy and nutritious, plus also vegetarian, vegan, and gluten-free.

I can already tell this Madhur Jaffrey cookbook is going to be one of my all-time faves. We've cooked with 19 chefs at I Heart Cooking Clubs and I can honestly say that Madhur's recipes have been the most reliable and are always a hit. I've yet to cook one that wasn't remarkable.


Natal Red Kidney Bean Curry
Adapted From Curries to Kebabs
by Madhur Jaffrey
Serves 6

1-1/2 cup dried kidney beans
1 teaspoon baking soda
3 tablespoons olive oil
3 whole dried hot red chiles
1/2 teaspoon whole brown mustard seeds
1/2 teaspoon whole cumin seeds
a generous pinch of ground asafetida*
10 to 15 fresh curry leaves, if available*
3 medium tomatoes (about 1 pound), grated on the coarsest part of a grater
1/4 teaspoon ground turmeric
1 teaspoon ground coriander
1 teaspoon ground cumin
1 to 2 fresh hot green chiles, finely chopped
1 clove garlic, crushed
1 teaspoon peeled fresh ginger, grated to a pulp
1 teaspoon sugar
1-1/2 teaspoons salt, to taste

Note: I used dried curry leaves because it was all I could get my hands on. I feel as though they worked fine. I did remove them prior to eating. Ground thyme can be substituted for ground asafetida. I have done it numerous times. I added double the garlic and ginger listed above for additional flavor and also for their immune support. The original recipe did not mention the bean cooking liquid, but I saved mine and added about a cup to the curry. I feel as though you would want to do the same as the tomato mixture isn't enough to create a comforting base without it.

Cover the beans generously in water, add the baking soda (helps to tenderize them), and leave to soak overnight. Drain the next day, put in a medium-large pan, add 6 cups of water, and bring to a boil. Partially cover with a lid, reduce the heat to low, and cook gently for 2-2-1/2 hours, or until the beans are tender. You will notice that you should have about a cup of bean cooking liquid leftover. Save this and use this later on when you add the tomato mixture.

Meanwhile, pour the oil into a medium pan and set over medium-high heat. When the oil is hot, put in the red chiles, mustard seeds, cumin seeds, and asafetida. As soon as the mustard seeds begin to pop, add the curry leaves, and tomatoes. Stir once, then add the turmeric, coriander, cumin, green chiles, garlic, ginger, sugar, and salt. Stir and bring to a boil. Reduce the heat to low and simmer gently for 5 minutes.

When the beans are tender, pour the spiced tomato mixture into the pan with the beans and the remaining bean liquid. Note: If you have over a cup or so of bean cooking liquid you may wish to strain some. Bring to a simmer, and cook, uncovered, on very low heat, for 20-25 minutes. 


Sunday, July 28, 2019

Two Summer Sippers To Help Cool You Down {Berry Spa Water & Cucumber and Lemon Verbena}


 Are you really posting water, Kim? Yes, yes I am. You see, I'm not a fussy person by any means.  I drink plenty of plain old water and I love it just the way it is. Lots of my friends have been troubling themselves by sprucing up their water for years. Lemons, limes, oranges, cucumbers, berries and all kinds of fussy preparations. I always think it looks pretty. I always think, "sure I'll make some of that fancy flavored water too." Then I just never do probably because I forget about it, but then also because I don't really care. I just like water.

So, since I've had spa waters, or flavored waters, on my to-do list for years, you can bet I'm sharing them. Look Ma, I finally did it! And not just one fancy water...I've got two!

The first version is Giada's Spa Water and it's basically lots of quartered strawberries, blueberries, and water. My daughter and I really liked both of the waters, but if I had to pick my favorite this one would be it. I love that it's a bit different and the skewer of fruit on top goes a long way in selling it for me. Plus, I took to spearing the fruit inside the glass with the skewer which upped the satisfaction of the water greatly.


 Spa Water
Adapted from Food Network
by Giada De Laurentiis
Serves 4-6

1 pound strawberries
1 cup blueberries
10 cups cold water

Hull the strawberries, set aside 4 whole small berries (for garnish) and quarter the rest. Add the quartered strawberries to a large pitcher. Set aside 8 blueberries (for garnish) and add the remainder of the cup to the pitcher. Top with the cold water and allow it to sit for 30 minutes in the refrigerator.

On 4 small skewers or toothpicks, thread 1 blueberry, then a strawberry, followed by 1 more blueberry. Set aside until ready to serve.

Pour the spa water into four 16-ounce water glasses filled with ice. Serve garnished with the fruit skewers.
 

Whilst (I really like that word) vacationing in Gettysburg, our hotel had some lovely cucumber lemon water in the lobby and I was rather fond of it! I will confess that I liked it so well  I actually poured two glasses each and every chance I got.  

Giada's Cucumber and Lemon Verbena Water reminded me of the water I had in Gettysburg, so I wanted to give it a try. I didn't have lemon verbena, but I do have lemon mint that my mom planted years ago. It grows very well, like all mint, so I gave it a good haircut and put it in the pitcher with some cucumber. It wasn't quite lemony enough, and I really wanted to add lemon slices anyway, so I added a sliced up lemon to the pitcher as well. Delicious and refreshing, much like the water on vacation. This water was my daughter's favorite and she took to eating the cucumbers right out of her glass with her hands. Don't we sound classy?

So there we have it. I finally made flavored waters. We liked them, and I would definitely drink them again, but I don't know if I'd fuss enough to make them myself. Nothing against them.  I'm just not that fussy when left to my own devices.


Cucumber and Lemon Verbena Water
Adapted from Food Network
by Giada De Laurentiis
Serves 4-6

1 small cucumber, thinly sliced
6 sprigs fresh lemon verbena, torn
2 quarts (8 cups) water
1 lemon, thinly sliced* (optional)

Put the cucumber slices in the bottom of a large pitcher. Gently roll the lemon verbena sprigs back and forth a few times in your hands to release the scent, then add them to the pitcher along with the water. Add sliced lemon, if using. Cover and refrigerate for at least 30 minutes before serving.

Theme: Summer Sippers & Icy Cold Treats

Sunday, July 14, 2019

Ottolenghi's Hummus with Ful


Hummus is one of my very favorite things to eat.

If I had to guess, I'd say hummus is beloved the world all over the world. How do I know that? They sell over 20 variations and dedicate an entire refrigerator case to it in the supermarket.

If you love hummus as I do, then leave that storebought hummus at the supermarket because NO ONE will ever write a better hummus recipe than Yotam Ottolenghi. I've made several versions, and all of them are good....come on, it's hummus people, HOWEVER Yotam Ottolenghi takes hummus to a whole new level. EVERY SINGLE TIME!

Years ago I made Ottolenghi's Hummus Kawarma with Lemon Sauce which is his basic hummus recipe with chunks of seasoned lamb, toasted buttered pine nuts, and the most flavorful lemon sauce. It was heaven on earth, and to this day, it remains one of the best dishes I've ever made on my blog. You probably already know this because I have not stopped talking about it and I likely never will.

Ottolenghi's Heavenly Hummus Kawarma with Lemon Sauce

Today's hummus recipe is much different than Ottolenghi's Hummus Kawarma, starting with the hummus itself. Ottolenghi's Hummus with Ful begins with a tahini-based hummus, much thicker and heartier than his basic hummus. This hummus with the tahini is like velvet. It's so smooth and creamy and decadent. Top that hummus with ful, a paste made of fava beans, olive oil, garlic, lemon juice, and cumin. The ful is delightfully zingy from the hefty dose of lemon juice and carries a punch of flavor from the garlic and the cumin. When you pour the ful over the hummus you are in for a double bean flavor explosion. Then come more toppings: whole cooked chickpeas for texture, chopped parsley to add that herbaceous quality, a good dusting of paprika to add some earthiness, and more olive oil and lemon juice to round things out.

Proceed to have your hummus loving mind blown. This hummus was very good warm, but my eyes nearly rolled back in my head when I tasted it chilled. How in the world can something as humble as beans taste so very extrodinary? Is it just me?

Ottolenghi says to serve this hummus with onion wedges and quartered hard-boiled egg, which was very different than anything I've served with hummus before. I like onions, so I dunked an onion wedge in to the hummus and used it as a scoop...different, delicious, and not overwhelmingly oniony. Goes very well together. I love hard-boiled eggs and hummus, but thought they were just OK together so I'm not sure I'd mix the two together again. However, I absolutely LOVED eating this hummus with some warmed naan bread that I tore up and dunked right in. The naan bread is so soft and fluffy and it is so wonderful for dunking into this rich, decadent, heavenly hummus.

So, what are you waiting for? You have hummus to make! Go look up ANY Yotam Ottolenghi hummus recipe and get busy. It will change your life!


Hummus with Ful
Adapted from Plenty
by Yotam Ottolenghi
Serves an army

For The Hummus:
2-1/2 cups dried chickpeas
1-1/2 tablespoons baking soda
1-1/4 cups tahini paste
3 tablespoons lemon juice*
6 garlic cloves, crushed*
salt and pepper, to taste

For the Ful:
1-1/2 cups dried fava beans
1/3 cup olive oil
1/3 cup lemon juice
1 tablespoon ground cumin
4 garlic cloves, crushed
1 teaspoon salt

For the Garnish:
1/3 cup olive oil
1/3 cup lemon juice
1 teaspoon sweet paprika
6 tablespoons roughly chopped parsley
3 eggs, hard-boiled and quartered
1 medium red onion, cut into 6 wedges

Optional:
Pita, naan, crackers, and/or veggies for dipping and dunking

Soak the chickpeas and fava beans overnight. Place them in two separate bowls and cover with double their volume of cold water. Add 1 tablespoon baking soda to the chickpeas. Set both aside. The next day, drain and rinse both.

Place the soaked chickpeas and remaining baking soda in a medium saucepan and cover with double their volume of cold water. Bring to the boil, then simmer very gently for 2 to 3 hours (mine were cooked in less than 2 hours), or until totally soft and easy to mush. Add more water during cooking, if necessary, to keep them immersed. Drain them, retaining the cooking liquid**

Transfer the warm chickpeas to a food processor, reserving a few to garnish at the end, and add the tahini, lemon juice, garlic, and salt to taste. Blitz for a minute or two until totally smooth. Add some of the cooking liquid and blitz again. You want the mixture to be very soft, almost runny, but just holding its shape. Taste and add more salt if you like. (I found that I needed to add another clove of garlic and a few more tablespoons of lemon juice for more flavor). 

To make the ful place the fava beans in a medium saucepan and cover with double their volume of water. Simmer gently for about 3 hours (they may take longer), adding more water if necessary. By the end of the cooking time, hardly any liquid should be left in the pan (drain it out if needed) and the beans should have begun to disintegrate, or will do so easily when crushed with a fork. Remove from the heat and add the olive oil, lemon juice, cumin, garlic, and salt. Taste and adjust the seasoning.

To serve, spread the warm hummus in small individual plates. Spoon the ful in the center and drizzle the olive oil and lemon juice on top and around. Sprinkle with paprika, garnish with the reserved chickpeas, plenty of parsley, and serve egg and onion on the side. 


Sunday, February 11, 2018

Ellie Krieger's Mediterranean Braised Green and White Beans


I love to cook, but I DO NOT LOVE WASHING DISHES! So, I look for recipes that are delicious, but simple, and don't require a sink full of dishes. One-pot meals are a favorite for this reason.

In the winter time, when you're looking for something hearty to warm you up from the inside out, a comforting one-pot meal is just about the best thing on the planet. Unfortunately, these dishes tend to be heavy in fat and calories and leave you feeling like you need to take a nap and/or cuddle up with a blanket on the couch with some Netflix. There's a time and place for all of these things, but since I've done a lot of that lately, I was looking for something a bit lighter and healthier.

Ellie Krieger's Mediterranean Braised Green and White Beans was the perfect dish.  A slow-cooked blend of green beans and white beans simmering away in a flavorful tomato sauce would serve as a satisfying vegetarian entree or a side dish. The good thing is that this recipe makes quite a bit, and only tastes better with time, so you can serve it both ways throughout the week.

Now, I must admit that I am very partial to beans, so I knew that I would absolutely love this bean dish. However, I was not prepared for how delicious it really was! It really does taste like something that's simmered for an hour, with incredible flavor. This is incredibly comforting and hearty, somewhat like a chili, and perfectly eatable all on its own. In fact, I did serve it up just like a chili in a bowl and enjoyed it as a main. Since the recipe made quite a large batch I also divided it up and will be enjoying it along with some chicken for my lunch in the next few days. I would most definitely make this again! It's a perfect 10!


Mediterranean Braised Green and White Beans
Adapted from You Have It Made
by Ellie Krieger
Serves 8

2 tablespoons olive oil
1 large onion, thinly sliced
4 cloves garlic, minced
2 tablespoons tomato paste
One 28-ounce can whole, peeled tomatoes
2 pounds of green beans, trimmed
1/3 cup chopped parsley
One 15-ounce can white beans, drained and rinsed
salt and pepper, to taste
Optional: Red chili flakes, if you like a little heat

Heat the oil in a large heavy pot, such as a Dutch oven, over medium heat. Add the onion and cook, stirring, until softened, eight minutes. Add the garlic and cook, stirring, one minute more. Stir in tomato paste and cook until the tomato paste is lightly caramelized, one minute more. 

Add the tomatoes with their juices, crushing each tomato with your hand over the pot before adding it. Add 1/2 cup water and bring to a boil. Then, add the green beans, parsley, salt, and pepper. Cover, lower the heat to low and simmer for 30 minutes.  Add the white beans and continue cooking, covered, until the green beans are very tender, 30 minutes more. Serve.


Sunday, March 5, 2017

A Simple Carrot Soup


The color orange is sunny and appealing. It reminds me of all things bright and happy. It's for that very reason I find carrot soup so appealing. For years now, I've had my eye on carrot soup. I knew I wanted to make it, but I just couldn't find the right recipe. Until now.

This carrot soup is simple enough to make; but, there are a few touches that take it to the next level, without making it too fussy.  Firstly, I love the addition of coconut milk which makes things a little creamier and thick.  However, the thing that sold me on this soup was the addition of red curry paste.  Red curry paste is a lovely and very aromatic paste made with red chili pepper, garlic, lemongrass, galangal, shallot, kaffir limes and various spices. When the paste hits the pan it is rather seductive and for that reason I am always looking for a reason to use it. While both the coconut milk and red curry paste add consistency and remarkable flavor to the soup, it is the condiments that initially drew me in to this recipe. I can assure you these condiments are not just for looks. The toasted almonds lend a wonderful crunch and flavor to the dish and they definitely steal the show in this soup. In fact, they are a must if making this soup! I also love the brightness that a squeeze of fresh lime adds, as well as the subtle spiciness from a couple shakes of chili oil. The cilantro does it's part to help the dish look colorful, while adding the touch that only herbs can. This, my friends, is the carrot soup to try. It is sure to brighten your day like a ray of sunshine.


A Simple Carrot Soup
Adapted from 101 Cookbooks
by Heidi Swanson
Serves 4

2 tablespoons butter or oil
1 onion, chopped
scant 1 tablespoon red curry paste, or to taste
2 pounds carrots, peeled and chopped - 1/2-inch chunks (about 10-11 medium-sized carrots)
1 (14 oz) can full fat coconut milk
salt and pepper, to taste
1-1/2 cups water, or to cover
1 lemon or lime
To serve: micro greens, cilantro, chopped & toasted almonds, chile oil, etc.

In a large soup pan over medium-high heat add the butter and onion.  Stir until the onions are well-coated, and allow to saute until translucent, a few minutes. Stir in the curry paste, and then the carrots. Allow to cook another minute or two, and then add the coconut milk, salt, and water, adding more water to cover if needed. Allow to simmer until the carrots are tender, 10 - 15 minutes, and then puree using a blender or hand blender until the soup is completely silky smooth.  This next part is important (with any soup)- make any needed adjustments. Add more water if the consistency needs to be thinned out a bit. After that taste for salt, adding more if needed.  I also like to season this soup with a great big squeeze of lemon or lime juice. Serve topped with whatever you have on hand. I like it with a little something crunchy (almonds), and a lot of something green (micro greens & cilantro).


Every Sunday @ Kahakai Kitchen

Sunday, February 5, 2017

Heidi Swanson's Cherry Smoothie


Cherries are one of my favorite fruits, so when I saw this recipe for a Cherry Smoothie over on 101 Cookbooks, I jumped at the chance to make it. Not only is it packed full of nutritionally-dense sweet dark cherries, but it is also loaded with all sorts of fruity goodness, including an orange, a banana, and pineapple.  You're nearly getting your five a day all in one delicious smoothie!

When cherries are in season it's safe to say my hands are usually stained dark red. I buy them, and eat them, like crazy. Not only are they sweet, juicy, and nutritious; but, they are also known to have anti-inflammatory properties and also are a natural source of melatonin, which aids in sleeping. Since I need help with both sleeping and inflammation, cherries are a win-win for me!

Since cherries aren't usually in season, I buy them frozen and stock them year-round. Needless to say, I used frozen cherries for this recipe. However, since we like our smoothies thick I almost always use frozen fruit, even if fresh is available. In fact, all of the fruit in this recipe, with exception to the orange, was frozen.

I was making this smoothie for my whole family, so I used regular milk and omitted the nut butter because my son is allergic to all nuts. Since I was using mostly frozen fruit, my smoothie was a little too thick so I needed more water to help thin it out. The addition of water is completely fine, but next time I would probably use apple juice or grape juice to sweeten things up a touch. This smoothie had no additional sugar added to it, and I noticed that a little dose of sugar, in the form of juice or honey, would send this smoothie over the top. Just enough sugar to make the flavors stand out a bit more and sweeten the smoothie up a touch.

The incredible thing is that the entire family loved this smoothie, which is a good thing because this made 48 ounces! I can see us enjoying this smoothie over and over again and I think it's a wonderfully nutritious way to start your day!


Cherry Smoothie
Adapted from 101 Cookbooks
Serves 2-3

1-1/2 cups sweet cherries, pitted
1/2 cup water, possibly more depending on desired consistency
1 banana, peeled
1/3 cup milk (cow, almond, coconut)
1 orange, segments and flesh only
1 cup cubed pineapple
Optional: 1 heaping tablespoon almond (or nut) butter

Combine all the ingredients in an upright blender and process until smooth. If you find the smoothie too thick, carefully add more water, slowly, through the feed hole on the lid with the motor running. Pour into glasses and enjoy! 


Theme: Something To Sip!

Sunday, January 18, 2015

Kayi Korma Curry

 The sound of mustard seeds popping in a pan always reminds me of Madhur Jaffrey.  Back when we spent six months cooking with Madhur Jaffrey I swear I went through an entire container of mustard seeds.  I was popping mustard seeds like no one's business in those days.   

While this recipe starts off like a Madhur Jaffrey recipe that's where the comparison ends for me.  Madhur's recipes were always full of spice and lots and lots of flavor. This recipe for Kayi Korma Curry is courtesy of Diana Henry and it's an extremely mild vegetable curry.  It's packed with onions, garlic, chilis, carrots, tomatoes, potatoes, peas, and green beans. These ingredients usually produce big flavors but not so much in this case. This was an extremely mild curry that just didn't deliver the big flavors I was craving.  nstead I found myself adding more chili, ginger, garlic, coriander, and lots of pepper and salt.  I never seemed to find a good balance and in the end it just fell flat for me.  That's okay though.  I enjoy learning what works for me and what doesn't.
Kayi Korma Curry
by Diana Henry
Serves 4-6
 
1½ tsp black mustard seeds
2 onions, finely chopped
4 cloves garlic, crushed
4cm (1½in) cube fresh ginger root, peeled and grated
1-2 green chillis, halved, deseeded and chopped
1 tsp ground coriander
½ tsp ground turmeric
200g (7oz) tomatoes, cut into chunks
250g (9oz) carrots, cut into chunks
350g (12oz) potatoes, waxy or floury (peeled if floury)
250ml (9fl oz) coconut cream
100g (3½oz) frozen peas
125g (4½oz) French or dwarf beans, topped and halved
juice of 1 lime
1 tbsp chopped coriander, plus extra sprigs to serve 

 Heat the oil in a pan and add the mustard seeds. As soon as they start to pop add the onions. Fry over a medium heat until they are a good brown colour. Do watch to make sure they don’t burn. Add the garlic, ginger and chilli and cook for a further five minutes or so, then add the ground coriander and turmeric and cook for a minute to release the spices’ fragrance. Add the tomatoes, carrots and potatoes, stir everything round and cook for about four minutes to soften the tomatoes, then add enough water just to cover the vegetables, followed by the coconut cream. Season and bring to just under the boil. Turn down to a simmer and allow the vegetables to cook until they are almost tender. You may have to add more water. The sauce should just coat the vegetables. The peas and beans only need to cook for about three minutes, so add them towards the end of the cooking time. Add half the lime juice, taste, adjust the seasoning and decide whether you want more lime juice. Stir in the chopped coriander just before serving and decorate with a few whole sprigs. Serve with plain boiled basmati rice.

Theme: Along The Spice Trail

Sunday, May 25, 2014

Vegetable Rolls with Chile Yogurt Sauce

I'm not going to sit here and lie to you.  This is a "somewhat fussy" recipe.  Fiddling around with rice paper can be a little frustrating.  In fact, I'd be willing to go out on a limb and say even the most experienced cook is going to tear one or two of those pesky little wrappers.  So just expect a few rips here or there and remind yourself that your rolls don't have to be perfect! Or at least that's what I tell myself.

I'm also not going to tell you this recipe is "speedy" whatsoever.  There's lots of washing, chopping, boiling, mixing, dipping, and delicate handling involved.  Towards the end you might even feel as though these little rolls took entirely too long. I will confess to being totally over them by the time I was done making them. 

However, all those negative thoughts will fly right out the window as soon as you take that first bite.  These little veggie rolls are pretty much screaming with flavor.  Bright pops of red, orange and yellow veggies add color and crunch.  The chile yogurt sauce is fiery hot and lends a decadent creaminess that makes these rolls feel truly indulgent.  The soft soba noodles make for a pillowy soft center that is rather addictive.  I found two of these rolls very satisfying.  We loved these and I would most definitely make them again!

 Vegetable Rolls With Chile Yogurt Sauce
Adapted from Feel Good Food
by Giada De Laurentiis
Makes 8/Serves 4

Sauce
1/3 cup plain nonfat 0% Greek yogurt
1 tablespoon Asian chile sauce
1 tablespoon soy sauce or fish sauce
1 garlic clove, minced* 
1 tablespoon light agave nectar

Rolls
4 ounces dried soba buckwheat noodles
1 red bell pepper, thinly sliced
1/2 yellow bell pepper, thinly sliced
1 large carrot, shredded
8 (8-inch) rice paper rounds
8 fresh lettuce leaves, ribs removed
8 fresh basil leaves
8 fresh mint leaves

For the Sauce:
In a medium bowl, mix together the yogurt, chile sauce, lemon juice, fish/soy sauce, garlic, and agave.

For the Rolls: Bring a large saucepan of water to a boil over high heat.  Add the noodle and cook until tender, about 8 minutes.  Drain and rinse with cold water. Using scissors, cut the noodles into 2-inch pieces.  Add the noodles, red bell pepper, yellow bell pepper, and carrot to the yogurt sauce and toss until coated.

Lay a damp kitchen or paper towel on a work surface.  Soak a rice paper round in warm water until softened, 20 to 30 seconds.  Put the rice paper on the damp towel.  Lay a lettuce leaf in the middle of the rice paper and spoon 1/3 cup of the noodle mixture on top.  Put 1 basil leaf and 1 mint leaf on top of the noodle mixture.  Roll the rice paper around the filling and seal the ends with a little water.  Repeat with the remaining ingredients.   

If not serving immediately, drape the finished veggie rolls with damp paper towels, wrap with plastic wrap, and store in the refrigerator for up to 6 hours.
Per Serving (2 rolls): Calories: 110; Protein: 4g; Carbs: 24g; Fiber; 1g; Sugar: 4g; Fat: 0g
Theme: May Potluck!