Saturday, July 21, 2018

Eric Ripert's Pesto with Fettuccine, Heirloom Cherry Tomatoes, Marinated Fresh Mozzarella, and Purple Basil


This summer I found peace and healing down a winding country road. As pretty as they come, the road is lined with lush green horse farms on both sides and a canopy of trees above. In the late afternoon when the sun peeks through the trees, and you're the only one on the road, it is a spiritual experience. I swear it heals your soul.


It's almost sad when the road comes to an end. Almost. For a fairytale awaits. The Kentucky Castle.


There is an allure to this castle. You see, for years, no one was allowed inside the castle, or on the grounds of the castle, so everyone would drive by pointing and remarking how pretty it was. We wondered and we imagined. Then recently the castle opened up. Now it is a boutique hotel, a farm to table restaurant, and they host special events.


This summer one of the events at the castle is The Farmer's Market at The Castle. It is extremely popular and for good reason. Who would pass up the chance to walk around the grounds of a castle shopping for produce while sipping a cocktail, or an iced coffee, and listening to live music?

I have been living for Wednesday afternoons and The Farmer's Market at The Castle. It is my happy place! The drive, the castle, the goods at the market, and the farmers. The only thing that could make the experience any better would be if my mom could join me. I can't help but feel a little sad each time because I know that she would absolutely love The Farmer's Market at The Castle just as much as I do, maybe even more. Still I go faithfully, every Wednesday, and I'll tell you... I swear I feel the healing process at work when I'm riding there on that winding country road under the canopy of trees.


My mom's passing taught me many things. One of them is to be sure to do all the things you want while you can. One thing I've always wanted to do is sign up for a CSA box, or a Farmer's Box. The Salad Days Farm (pictured above) is my favorite, so a few weeks ago I signed up to receive a weekly Farmer's Box. The Salad Days Farm is certified organic and her box is only $20 for the week. It's the most beautiful produce and I always feel like I'm getting way more than I paid for.


I am always bursting at the seams to see what goodies I get for the week. This week I received beautiful heirloom tomatoes, green and purple basil, cilantro, beets, okra, cucumbers, garlic, summer squash, zucchini, and some beautiful red peppers. I knew right away that I wanted to use the basil and garlic to make pesto. I also decided to combine the pesto with some pasta, the heirloom tomatoes, some fresh mozzarella or burrata, and garnish it all with the purple basil.


The final dish turned out beautifully! Ripert's pesto is hands down the best pesto I've ever made. All of the ratios are just right. Some recipes have too much basil, or too much oil, while others skimp on the cheese. Not this one. Ripert's recipe is just the right amount of everything.

When I plated the dish and stepped back to take pictures I paused and thought about my mom. She would love this dish with all the beautiful colors and fresh ingredients. I could hear her say, "wow, look how fresh and beautiful that looks." Then we would sit down to eat and I know she would go on and on about how much she loved eating fresh food in the summer and how "special" this dish was. It was her tagline. Anytime she was really impressed, or a dish had a beautiful presentation, she would always say it was "so special."

So this one is for you, mom. You are always with me in the kitchen. You would love the sweet pop of the cherry tomatoes and the beautiful color they give the dish. We would fight over the creamy pieces of marinated mozzarella, or maybe we would've just added more. I can see you now ripping chunks of fresh mozzarella over your plate. You would go on and on about how special the purple basil looked on top. We would enjoy the dish together and laugh about how everyone else in the house was crazy for being so picky and not liking pesto, and tomatoes, and so many other things. We would make plans for the leftovers and talk about them the next day. All these moments play out in my mind as I enjoy this dish and I find myself so thankful to know, without a doubt, what would be.


Pesto with Fettuccine and Heirloom Cherry Tomatoes, 
Marinated Fresh Mozzarella, 
and Purple Basil
Adapted from Avec Eric
by Eric Ripert and a Stirring the Pot Original
Serves 4-6

For Eric Ripert's Basil
2 cups basil leaves, loosely packed
1 tablespoon minced garlic
1/2 cup grated Parmesan
1/2 cup extra virgin olive oil, plus more if necessary
1/4 cup toasted pine nuts
sea salt and black pepper, to taste
crushed red pepper flakes, to taste *

Place the basil, garlic, Parmesan, 1/2 cup of olive oil and pine nuts in a food processor or blender; add salt and pepper to taste. Add crushed red pepper flakes if you like your pesto with a little kick. Process or blend until smooth adding more olive oil as necessary.

For The Pasta
1 pound fettuccine, or another pasta shape
a handful of heirloom cherry tomatoes
1/2 cup fresh mozzarella or burrata, cut or broken into pieces
a handful of basil or purple basil, chopped
1 tablespoon olive oil
salt and pepper, to taste
crushed red pepper flakes, to taste*
Note: crushed red pepper flakes are optional*
 Cook the pasta according to package directions.  While pasta is cooking, place the mozzarella or burrata in a medium bowl and cover with the oil, some of the chopped basil, salt and pepper, and crushed red pepper flakes if using. Allow to marinate while the pasta cooks. Cut the heirloom cherry tomatoes in half, or quarters, if necessary.  

When the pasta is done, toss all but 1/4 cup of the pesto with the pasta and place the tossed pasta in a large pasta serving bowl. Top the pasta with the remaining pesto, the marinated cheese, the cherry tomatoes, and the chopped basil. Serve immediately!

Sunday, July 15, 2018

Jamie Oliver's Bad-Ass Cheesy Corn On The Cob {Plus My Top Favorite Corn Recipes}


Corn on the cob is one of my favorite things to eat in the summer. When I saw Jamie Oliver's recipe for Bad-Ass Cheesy Corn On The Cob it looked rather crave-worthy and I simply had to give it a try! This is Jamie's take on the popular Mexican corn dish, elote.

Elote is a Mexican corn dish where the corn on the cob is rolled in mayonnaise, chile powder, cayenne powder, and cheese. Quite often elote is served with a wedge of lime for squeezing over the top.

Jamie's recipe is a touch different because he squeezes the lime juice into the mayo mixture. He also calls for adding paprika to the mayonnaise in place of chile powder. This was a good dish, and I loved how Jamie named the dish, but I think I would prefer any elote type dish with chile powder or cayenne with the wedge of lime on the side. I needed a little more spice and definitely way less lime.

 Next time I make elote, I will probably add a touch more spice and forego the lime altogether. I enjoy lime, but not so much when cheese is involved. With those changes, this would be the perfect recipe!

Below are my top four recipes for fresh summer corn! Please check them out if you happen to have fresh corn on hand and are looking for some ways to prepare it!


Bad-Ass Cheesy Corn On The Cob
Adapted from www.jamieoliver.com
by Jamie Oliver
Serves 4

6 corn on the cob, with or without husks
4 tablespoons mayonnaise
olive oil
2 limes
1 teaspoon paprika or cayenne pepper
90 grams hard cheese, such as Parmesan or Pecorino

Soak the corn (husks and all) in cold water for at least 30 minutes - if you can't find cobs with the husks intact, you don't need to do this. Meanwhile, place the mayo into a bowl with a drizzle of extra virgin olive oil, the zest from the limes and the juice from 1. Mix well, taste and add a squeeze more juice, if needed. Spread the mayo onto a plate, then dust with the paprika or cayenne pepper and put to one side. Grate the cheese onto another large plate, then set aside also.

Preheat a griddle pan over a high heat. Add the corn and griddle for 12 to 15 minutes, or until the husks are black and charred all over, turning occasionally - the husks will help to steam the corn until tender.

Peel back the husks, keeping them intact at the base, then roll each cob into the lime-spiked mayo, before rolling into the cheese. Shake off any excess and get stuck in.


This corn was out of this world delicious, but it was a total pain to make. If you want a good laugh, click on the link above and read my letter to Curtis. If you make this, don't fool with the husks. Just peel those husks off and throw them straight in the trash.


Holy cow, these muffins are insanely addictive. Fluffy, cheesy, with bits of fresh corn and delicious bacon. You simply cannot eat just one!


Chowder might not be something you think about eating on a hot summer day, but when it's this good you make an exception! Rick Bayless has worked his magic with this recipe and it is simply summer in a bowl.


Corn is just about every kid's favorite veggie so this Bowtie Pasta with Corn, Fresh Herbs, and Parmesan is super kid-friendly. Cute bowtie pasta, fresh corn, cheese, cream, and fresh herbs are bound to make everyone at the table smile!


Sunday, July 8, 2018

Ripert's Potato Goat Cheese Royale


I think it's safe to say that just about everyone loves a creamy and cheesy little potato bite. I suppose that's why Eric Ripert's Potato Goat Cheese Royale stood out to me the very first time I laid eyes on them. I knew I had to have them. Plus, the recipe is only five ingredients. It doesn't get much better than that!

Grab some baby yukon potatoes, a good-quality goat cheese, some cream, an egg and some chives. Boil the potatoes until tender, scoop out some of the flesh into a bowl to enjoy another time, add a dollop of goat cheese, and fill the potatoes with the egg and cream mixture. Top with chives and bake for about 15 minutes. These are delightful!

Here are some tips I learned along the way. My potatoes were a little smaller than Chef Ripert's so I halved the custard (1/2 cup cream and 1 egg). I still had some custard leftover. I would suggest doing the same. If you need more you can always make the rest, but I doubt you will need to. Next, potatoes require a lot of salt. Boil them in overly salted water. After scooping the flesh out sprinkle them with a little more salt. Add salt and pepper to your custard. Prior to baking sprinkle with even more salt. Trust me. I did all this and still had to salt them when they came out of the oven.

Please make these. They are delight little bites and they really hit the spot. They are delicious served hot right out of the oven, but they are also just as good warm, or at room temperature. This is the kind of thing that gets better when it has a chance to sit and the flavors meld together. I bet you could even make them ahead of time and reheat them and they would have a little more flavor.

Feel free to change up the recipe and use different kinds of goat cheese and herbs. Personally, I think a sun-dried tomato goat cheese with a little bit of basil on top would be my favorite! Just make them. You can't go wrong!


Potato Goat Cheese Royale
Adapted From Avec Eric
by Eric Ripert
Serves 6-8

15 baby Yukon Gold potatoes (about 1-1/2-2 inches in diameter)
4 ounces fresh goat cheese
1 cup cream
2 eggs
 salt and pepper, to taste
1/4 cup sliced fresh chives

Note: You probably only need about half of the custard mixure (1/2 cup cream and 1 egg). Also, you will need to use quite a bit of salt to season these potatoes. Feel free to experiment using different varities of goat cheese and herbs!

Cook potatoes in heavily salted water until tender. Drain and let cool.  

Preheat the oven to 375F.

Cut the potatoes in half and scoop out some of the flesh. Place the potato halves on a baking tray and spoon a little goat cheese into the center.

Whisk together the cream and eggs and season with salt and pepper.

Fill the potatoes with the custard mix (I used a small squirt bottle to do this) and sprinkle with chives on top.

Bake the potato custards in the oven for about 12-15 minutes, until set. Serve immediately. They are also good luke warm.

Unfortnately this particiular potato didn't have as much of the cream mixture as the others. Most of them were creamier!


Sunday, July 1, 2018

Giada's Fourth Of July Pizza


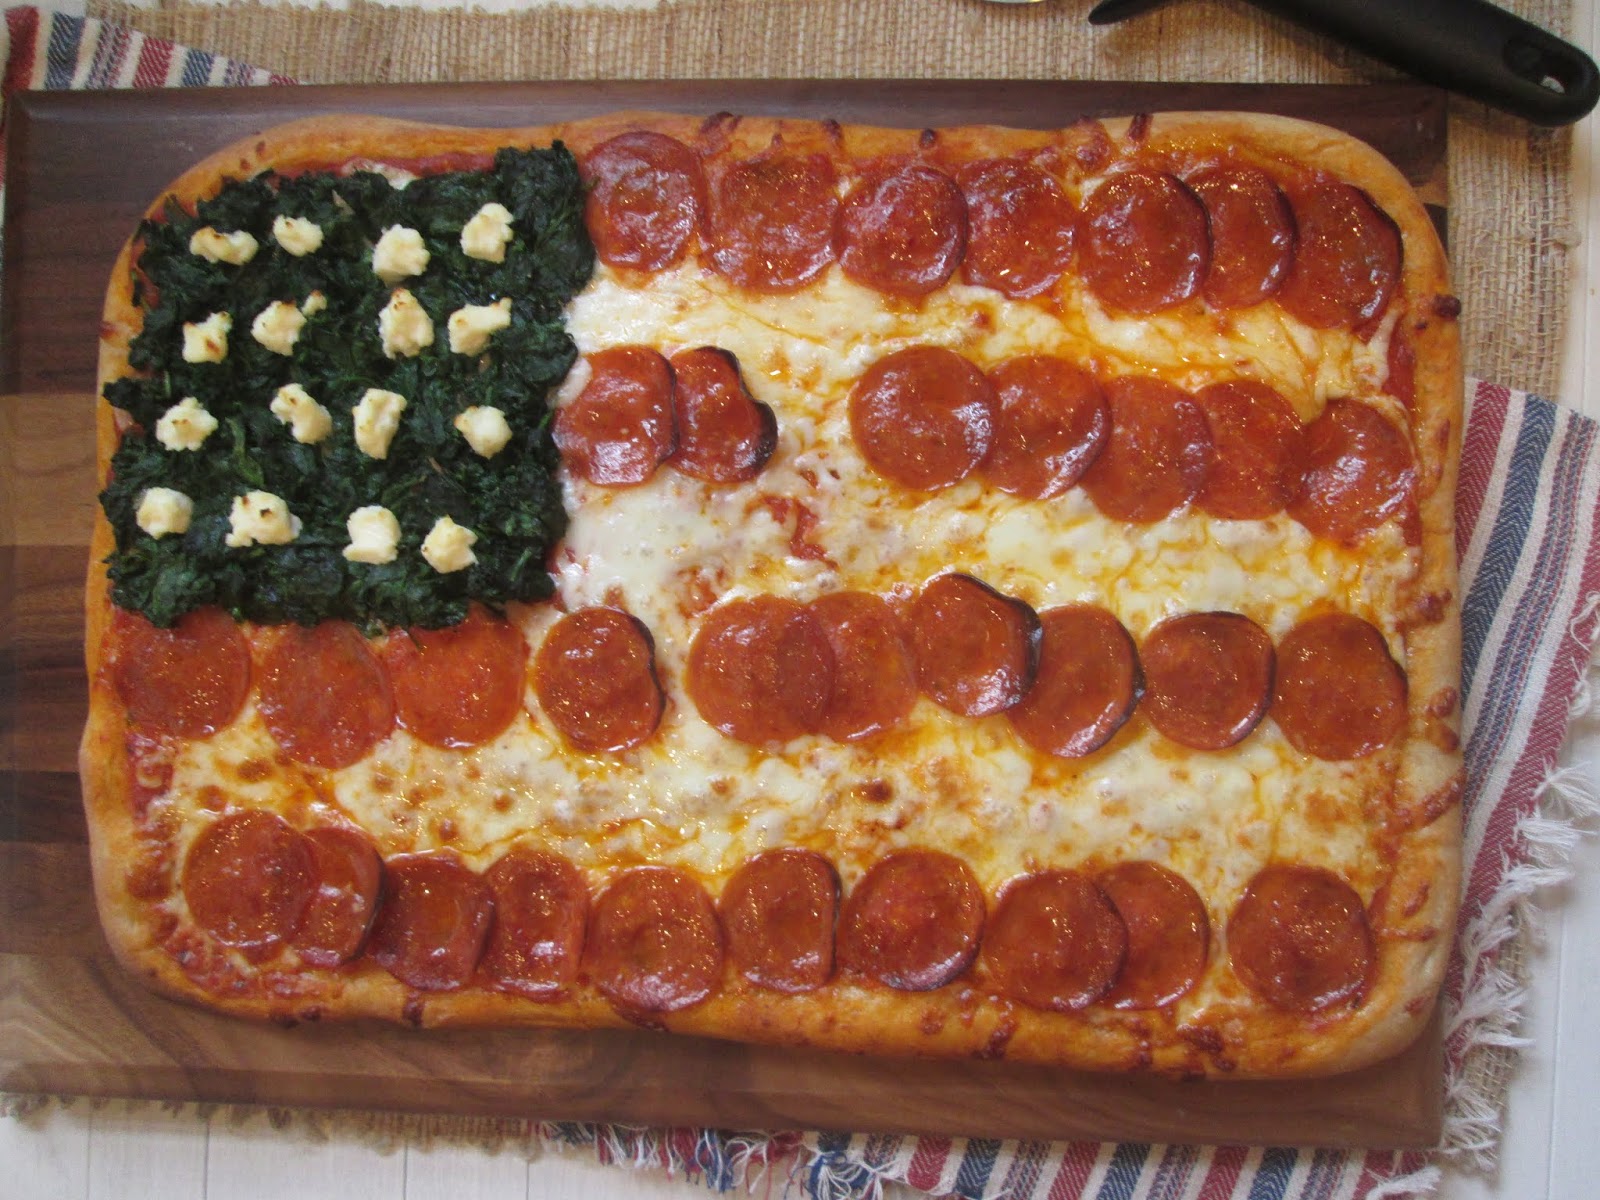
This is the perfect dish for your Fourth of July get together.  A fun flag-shaped pizza with stars and stripes and two different toppings cut into cute litte appetizer-sized servings.

While most of the pizza is pepperoni and cheese, the upper left hand corner is sauteed spinach with garlic, mozzarella, and ricotta "stars."  So if you have someone who wants to eat a little healthier, or is a vegetarian, this is a good option.

Giada says this pizza serves four, but I cut it into 20 small squares and I think it would serve far when served potluck with other dishes. We all loved this pizza and thought it was festive and fun. I'd definitely make it again next year!


Fourth of July Pizza
Adapted from Happy Cooking
by Giada De Laurentiis
Serves 4

For The Spinach
2 tablespoons extra virgin olive oil
2 garlic cloves, smashed and peeled
5 ounces baby spinach, chopped
salt, to taste

To Assemble
2 tablespoons flour
1 pound pizza dough
1 tablespoon extra virgin olive oil
3/4 cup pizza sauce
2 cups shredded mozzarella cheese
1 tablespoon ricotta cheese
28 slices pepperoni

Note: The middle portion of my pizza was a little soggy from all the toppings. My husband and daughter likes these "softer pieces" but if you don't, I suggest parbaking the crust for about 2-3 minutes before adding the toppings.

Preheat the oven to 500F. Position a rack in the lower third of the oven. 

Heat a medium skillet over medium-high heat. Add the oil and the garlic and cook until fragrant and lightly browned. Add the spinach and the salt and cook, stirring often, until the spinach is wilted, 1 to 2 minutes. Remove from the heat and drain the spinach in a fine mesh strainer. Set aside.

Sprinkle 1 tablespoon of flour on a clean work surface. Place the dough on top and sprinkle it with the remaining tablespoon of flour. Roll the dough out to a 15 x 10-inch rectangle. Drizzle the oil on a rimmed baking sheet and spread it evenly using a pastry brush. Transfer the dough to the prepared baking sheet.

Spread the sauce over the entire crust. Sprinkle with the mozzarella, creating a 5 x 4-inch rectangle in the upper left corner with slightly less cheese. Squeeze the liquid from the spinach and spread the spinach evenly over the upper left corner. Dot small clumps of ricotta cheese over the spinach to form the "stars." Arrange the pepperoni over the remaining surface of the pizza in horizontal rows, slightly overlapping the slices to form the stripes.

Bake for 12 to 15 minutes or until the crust is golden brown and cooked through and the cheese is bubbly.


Sunday, June 17, 2018

Almost-Famous In and Out Burgers {Animal Style}#ForAnthonyBourdain


A couple of years ago, I watched a quick video where Anthony Bourdain talked about his favorite restaurant in all of Los Angeles, In and Out Burger. The video stuck with me because I've been to Los Angeles, and I think of it as a food mecca with endless restaurants, all serving some of the most delicious food in the country. Then I watch Bourdain, who has been fortunate enough to try all kinds of food and cuisine, the world over, and he states that In and Out Burger is his favorite restaurant in all of Los Angeles. Kind of mind-blowing, right? 

Bourdain went on to say that every time he landed in Los Angeles he began and ended his trip at In and Out Burger. To paraphrase, Bourdain passionately extols the virtues of and an In and Out burger saying  "good bun selection, good quality meat, reasonably fresh greens and garnishes, no fancy cheese but a good cheese-like substance, and two thin patties that expose the maximum areas of meat surface to the tongue." 

When we dedicated this week to Anthony Bourdain over at I Heart Cooking Clubs I knew instantly what I wanted to make, a knock-off In and Out Burger, Animal Style. Years back Food Network published a knock-off recipe in their magazine that I thought would work well. Trouble was the recipe called for 60% lean beef and to be honest, I've never seen this in any market around. I decided to take a trip to the Bluegrass Stockyards, which is right down the street.


It may seem strange to some to visit a stockyard for meat, but it is actually a beautiful building where farmers buy and sell cattle. There is also a restaurant, gift shop, retail shop, and a meat shop, among other things. I found some well-marbled ground beef that was 73/27 and raised locally. I knew this was the best I could do.


 In the video, Bourdain talks about the burger saying something like "this is like a ballistic missile, a perfectly designed protein delivery system and I like mine animal style, and I'd tell you what this is but I'd have to kill you." A description only Bourdain could give.


It's been years since I've had an In and Out burger and I wasn't sure what animal style was so I looked it up. It appears that Animal Style means that your burger has mustard grilled beef patties, extra dressing, grilled onions, and extra pickles. Sounds like an awful lot of goodness, if you ask me!

These burgers take a lot of time to put together (making the caramelized onions takes 40 minutes alone), but if you have a hankering for a burger piled high with goodies, then this is your recipe! I'd love to be able to tell you that it's a good knock-off recipe, but truth be told, it's been way too long since I've had an In and Out burger to give proper feedback. I can say that the burger has a lot of five-star reviews on the Food Network site. We definitely enjoyed it, especially the caramelized onions, sauce, and mustard-fried patties. It was messy, it was over-the-top, and it was a somewhat obnoxious burger to eat.

In many ways, this burger reminds me of Anthony, full of goodness but oh so naughty. Many thanks to Anthony Bourdain for taking us along on his journey. His stories will definitely live on.


Almost-Famous In and Out Burgers, Animal Style
Adapted from Food Network
Serves 4, or more depending on size

2 tablespoons vegetable oil, plus more for brushing
2 large onions, finely chopped
1/4 cup mayonnaise
2 tablespoons ketchup
1 tablespoon sweet pickle relish
1/2 teaspoon white vinegar
2-pounds ground beef chuck (preferably 60 percent lean)*
4 hamburger buns, split
1/4 cup sliced dill pickles
3/4 cup shredded iceberg lettuce
 4 to 8 thin slices tomato
ground pepper
1/4 cup yellow mustard
8 slices American cheese

Note: These burgers are best if the patties are quite thin. We opted to serve ours as singles, not doubles. I would encourage anyone making this to make their sauce the night before so the flavors have time to meld. Also, the sauce is quite thin when first mixed and will thicken overnight. Be mindful of how much sauce you add to your burger or it will be too messy. One tablespoon per burger is a very good guideline. Also, it would be wise to make the onions ahead of time as well. This helps to speed things along when it is burger time. I was unable to source 60% lean beef so I used a local ground beef that was well marbled and 73/27.*

Heat the vegetable oil in a large skillet over medium-low heat.  Add the onions and 3/4 teaspoon salt, cover, and cook, stirring occasionally, until golden and soft, about 30 minutes (if the onions brown too quickly, reduce the heat to low).  Uncover, increase the heat to medium-high and continue to cook, stirring often, until caramelized, about 8 more minutes.  Add 1/2 cup water to the skillet, scraping up any browned bits from the bottom of the pan. Simmer, stirring, until the water evaporates, about 2 more minutes; transfer to a bowl and set aside. (The onions can be made up to 3 days ahead; cover and refrigerate, then reheat before using.)

Mix the mayonnaise, ketchup, relish, and vinegar in a bowl; set aside. Shape the beef into 8 patties (making the patties thin).  Heat a griddle or skillet over medium heat; lightly brush with vegetable oil. Toast the buns on the griddle, split-side down. Spread each toasted bun bottom with about 1 tablespoon of the mayonnaise mixture, then top with a few pickles, some lettuce, 1 or 2 slices tomato and another dollop of the mayonnaise mixture; set aside, keeping the griddle hot.

Season both sides of the patties with salt and pepper. Working in batches if necessary, put the patties on the griddle and cook 3 minutes.  Spread about 1 heaping teaspoon mustard on the uncooked side of each patty, then flip and top each with 1 slice cheese; continue cooking for about 2 more minutes or longer, until the desired doneness. Top 4 of the patties with caramelized onions, then cover with the remaining patties, cheese-side up. Sandwich the double patties on the buns.  *Feel free to make single patties as well, which is what I did.

Theme: For A Friend {For Anthony Bourdain} IHCC

 This is the way I will remember Bourdain, down to earth, extolling the virtues of a good burger as opposed to all the fancy restaurants L.A. has to offer. Love his style!


Sunday, June 10, 2018

Farmer's Market Salad with Shrimp, Basil Citrus-Honey Vinaigrette, and Herbs de Provence Croutons


Like most of you, I woke up Saturday morning to the devastating news about Anthony Bourdain. I was shocked and saddened to say the least. I immediately thought of the food blogging community and knew this would have a huge impact, but I mostly thought of my best blogging friend, Deb of Kahakai Kitchen. Deb is a much bigger Bourdain fan than me. Over in Hawaii, Deb was sound asleep with no knowledge of the sad news that awaited her.
,
Hours later Deb and I messaged about the news. Our hearts went out to Bourdain's family and friends, but our hearts also went out to our current I Heart Cooking Clubs chef Eric Ripert, not only because Eric and Anthony were best friends, but also because the news outlets were reporting that it was Ripert who found Bourdain. I couldn't imagine finding any of my friends that way.

It was then we decided to honor Bourdain, as well as Ripert and Bourdain's friendship, with a special theme at I Heart Cooking Clubs next week, For A Friend.  If anyone would like to join in with a dish to honor Anthony Bourdain, please do so. Your dish doesn't have to be specific to any chef or theme. Your recipe can be anything that speaks to you. A comforting dish. A dish inspired by a story or an adventure. A unique one-of-a-kind dish, like Bourdain. It can be anything, For A Friend.

If you would like to participate in our special theme at I Heart Cooking Clubs, please click on the link to IHCC in this post. It will redirect you to our site where you can link your dish, and a picture, to our post and also see the dishes others share.

I urge everyone to continue discussing mental health and suicide. These issues are simply not discussed enough. If you, or a friend are suffering, please know that you are important, you are loved, and you make a difference. Please call 1-800-273-8255, 24/7 for help.

I'll end with my favorite Bourdain quote, and one I tend to live my life by, "Move. As far as you can, as much as you can. Across the ocean, or simply across the river. Walk in someone else's shoes or at least eat their food. Open your mind, get up off the couch, move. - Anthony Bourdain


Farmer's Market Salad w/ Shrimp, Basil Citrus-Honey Vinaigrette, and 
Herbs de Provence Croutons
Recipe Adapted from Avec Eric
by Eric Ripert
Serves 2

1 lemon, zested and juiced
1 lime, zested and juiced
1 tablespoon honey
1 teaspoon Dijon mustard
salt and black pepper, to taste
6 tablespoons canola oil
1/2 cup fresh basil, sliced into ribbons
3 - 4 cups fresh lettuce
1/2 pound shrimp
teaspoon olive oil
1 clove minced garlic
sliced cucumber
sliced tomatoes
 2 slices of country bread
2 tablespoons butter
1 tablespoon Herbs de Provence

For The Dressing: Whisk the lemon zest and juice, lime zest and juice, honey, and mustard in a bowl and season to taste with salt and pepper. Slowly drizzle in the canola oil while whisking constantly until completely emulsified.  Add the basil and whisk. Set aside so the flavors can meld.

For The Shrimp: Preheat oven to 400F. In a skillet, or baking sheet, toss the shrimp with one teaspoon olive oil and one clove of minced garlic. Bake at 400F for about 8-10 minutes. (You can arrange the shrimp on a skewer if you like).

For the Croutons: Cut two slices of country bread into cubes. Melt two tablespoons butter and add in about 1 tablespoon Herbs de Provence. You can either toast the croutons in the oven with the shrimp or toast the croutons on the stovetop. I made my croutons on the stovetop over medium heat until the bread was toasty on all sides. It took less than five minutes. Allow to cool.

To Assemble The Salad: In a large bowl, toss the salad with the desired amount of dressing. I added sliced cucumbers and cherry tomatoes, but you can add whatever you like. Any kind of olive would be especially nice with this salad. Arrange the salad in a bowl, decorate with homemade croutons and shrimp. Drizzle the shrimp with a bit of the dressing, both for looks and taste. Serve immediately!


Follow This Link To IHCC

Sunday, June 3, 2018

Giada's Pizza Di Spaghetti


I've been very busy reorganizing my cookbook collection and cataloging an updated list of all recipes I want to make. Recently, I had a pile of Giada's cookbooks and I was astounded to find that after years of making Giada's recipes, I somehow managed to have nine whole pages of her recipes I wanted to make! Time to get busy!

This Pizza Di Spaghetti is a recipe I've always wanted to make but never got around to for one simple reason, it requires leftover spaghetti. In my house, there is no such thing as leftover spaghetti. My husband and daughter make sure there are never any leftovers. So, for this recipe, I made a batch of spaghetti with a simple tomato sauce and allowed it to sit on the counter to cool for about 20 minutes. That is about as leftover as it's going to get around here!

 Pizza Di Spaghetti is essentially a fried spaghetti pie, so I got out my best nonstick skillet and mixed the "leftover spaghetti" with the eggs, Parmesan cheese, milk, and salt and pepper. I turned the skillet to a medium heat and tried to fry the spaghetti mixture. After a few minutes it became clear the mixture was adhering like glue to my nonstick pan, so I got out my cast iron pan, and switched the mixture over to the cast iron. The cast iron was better, but still somewhat of a mess.

I've been cooking for a long time, and I used two really good pans, and I had all kinds of trouble trying to flip the Pizza Di Spaghetti. The one cup of Parmesan cheese in the mixture proved to stick to both pans, regardless of how much olive oil I added. Finally, after dirtying a sinkful of dishes, and using a large baking pan to aid in flipping, I was done. I was also frustrated.

You can see that my Pizza Di Spaghetti is a little dark in places. I'm really not sure how the dark spots could be prevented since the copious amounts of cheese darken quickly before the egg in the dish is fully cooked, even at a lowered heat. This dish didn't work for me for several reasons.

First, I never have leftover spaghetti. Second, this is a finicky thing to make and requires lots of effort and dishes. Third, this dish requires adding unnecessary calories, in the form of added cheese, eggs, milk, and quite a bit of oil, to spaghetti AND finally, this Pizza Di Spaghetti is just ok! Spaghetti, or even reheated spaghetti, is definitely way better. So, save yourself the calories and dishes, and in the odd case that you do have leftover spaghetti, just reheat it!

Now, it sounds like I'm fussing, but I've actually started to like it when I discover that something isn't for me. I know it sounds bizarre, but I actually become stressed out about trying to fit in all the things I want to do, or see, or eat. I find it ultimately helpful when I come across something that I don't like because it usually allows me to cross off several things on my list. This dish is a perfect example of that. I can now cross off any and all Pizza Di Pasta dishes on my list from Giada and anybody else. I have learned that I like the original pasta dish best the first time around, or even reheated, and that I don't need to fuss about with any leftover pasta concoctions. I consider that a win!


Pizza Di Spaghetti
Adapted from Everyday Italian
by Giada De Laurentiis
Serves 4

1 cup freshly grated Parmesan cheese, plus extra for garnish
1/2 cup whole milk
2 large eggs
salt and pepper, to taste
2 cup leftover cooked and sauced pasta
1/2 cup olive oil

In a large bowl, beat the 1 cup of Parmesan cheese, the milk, eggs, salt, and pepper. Add the leftover pasta and toss to coat.

In a 10-inch diameter, nonstick saute pan, heat the oil over a medium flame. Add the pasta mixture to the pan, spreading evenly. Cook until golden brown on the bottom, about 8 minutes. Carefully invert the pasta mixture onto a plate, then slide it back into the pan. Continue cooking until the bottom is golden brown and the mixture is heated through about 6 minutes. Transfer the pasta mixture to a serving platter and sprinkle with Parmesan cheese. Cut into wedges and serve warm.