Thursday, October 17, 2013

Mushroom & Shallot Migas {The New Southwest #Cookbook Spotlight}


For the next few weeks I'll be participating in The New Southwest Cookbook Spotlight hosted by my good friend, Heather of girlichef. The New Southwest: Classic Flavors with a Modern Twist is a brand new cookbook written by fellow food blogger, Meagan Micozzi. Meagan's adventure with southwestern inspired cuisine began when she relocated to Arizona and found comfort and inspiration in the local foods, flavors, and ingredients. Meagan created her food blog, Scarletta Bakes, to chronicle her adventures with southwestern food.  Her blog is now wildly popular for it's innovative approach to southwestern cuisine. If you've been reading her blog for long then you are probably already in love.  If you haven't been introduced yet then please go ahead and check her out. It's a love at first sight kinda thing.


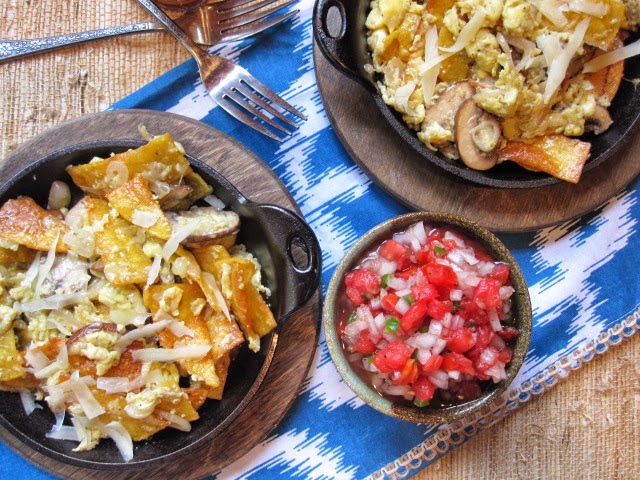
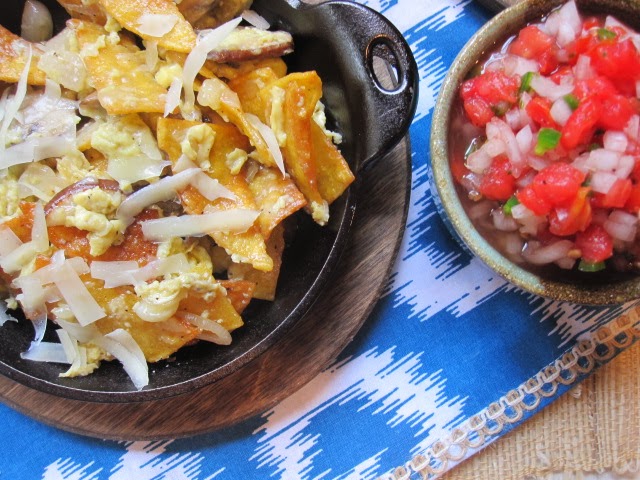
This week we are all making Migas, an egg dish starring leftover bread or tortillas.  Traditional Migas feature fried tortilla strips, tomato, onion, and jalapeno.  Meagan's Mushroom & Leek Migas feature fried tortilla strips, mushrooms, leeks*, and Manchego cheese.  I chose to make Meagan's migas for dinner one evening and they were an all-around hit!  Everyone raved about how they loved the crunch of the fried tortilla strips, the meatiness of the mushrooms, and the nutty flavor of the Manchego cheese.  We topped our migas with our favorite Pico de Gallo and it was a perfect veggie-packed meal.  So simple but very pleasing.  I'll definitely be making this again!

Stay tuned for more. There will be more recipes, as well as reviews, and several chances to win your very own copy of The New Southwest!  Click HERE to read about the Cookbook Spotlight and see a list of all the participants. A big thank you to Meagan for such a beautiful cookbook, the folks at Hippocrene, and to Heather of girlichef for giving me the opportunity to participate in this spotlight.


Mushroom & Shallot Migas
Adapted from The New Southwest 
by Megan Micozzi of Scarletta Bakes 

4 five inch corn tortillas
1-1/4 cups vegetable oil, divided
a little pat of butter*
1/4 cup heavy cream
salt and pepper to taste
8 ounces baby bella mushrooms, brushed clean and sliced (about 2 -1/2 cups)
2 shallots, sliced*
2 tablespoons minced fresh garlic
1 cup shredded Manchego cheese

Notes: The recipe calls for 1 leek, ends removed, and chopped.  I really don't care for leeks so I used two shallots sliced thinly.  Also I used only enough vegetable oil to fry the tortillas.  Instead of oil I used a little butter to saute the mushrooms and shallots and cook the eggs. 

To prepare the corn strips:  Cut the tortillas in half and then slice them into thin strips (1/2" to 3/4" wide).  Heat 1 cup of vegetable oil in a large in a large, heavy-bottomed saute pan (I prefer cast iron) over medium-high heat.  Working in batches, fry the tortilla strips for 1 to 2 minutes, flipping pieces as they fry and removing the crispy, browned strips to a paper towel-lined baking sheet to drain and cool.

Whisk the eggs and heavy cream together in a large bowl and season liberally with salt and pepper.  Set aside.

In a medium-sized skillet melt a bit of butter.  Saute the mushroom slices for approximately 3 minutes or until tender and fragrant.  Add the shallots and saute for 1 more minute.  Add the garlic and saute for 1 more minute.  Pour in the egg mixture and cook, stirring constantly in a circular motion until eggs begin to solidfy.  Just as eggs begin to solidfy, stir in the fried tortilla strips.  Continue cooking, stirring frequently, until eggs are light, fluffy, and cooked through.

Remove from heat, top with cheese, and serve immediately.  Goes very well with a good pico de gallo (as pictured above).

This recipe from The New Southwest by Meagan Micozzi copyright 2013, used with permission from Hippocrene Books.

*recipe from The New Southwest by Meagan Micozzi copyright 2013, used with permission from Hippocrene Books.
- See more at: http://www.girlichef.com/2013/10/MushroomLeekMigas.html#more


This post is part of The New Southwest Cookbook Spotlight sponsored by Hippocrene and hosted at girlichef. - See more at: http://www.girlichef.com/2013/10/MushroomLeekMigas.html#more

Sunday, October 13, 2013

Roasted Sweet Potato Pasta

One glimpse in my pantry would quickly reveal that we are a family of pasta lovers.  I pretty much buy pasta like it's my job.  In fact, buy might not even be the best word to describe it.  It's more like collect.  If you have 23 boxes of pasta in your pantry that qualifies as a collection, right? 

My collection of pasta always comes in handy for quick weeknight meals like this Roasted Sweet Potato Pasta.  This recipe was kinda like love at first sight for me.  I simply fell in love with all the colors in this dish: pops of green from the spinach, red from the tomato, and orange from the sweet potato.  Just looking at all that color makes me happy.  Of course, adding two kinds of cheeses helps any situation.  Tangy feta cheese and salty Parmesan make everything better.  Stir it all into some lovely linguine and you have yourself a wonderful and quick fall meal that goes very well with a glass of white wine.


Roasted Sweet Potato Pasta
Adapted from Donna Hay
Serves 4-6

3 sweet potatoes, peeled and chopped
3 Roma tomatoes, halved
olive oil*
1 pound of spaghetti or linguini
5 - 6 ounces baby spinach leaves 
salt and pepper
5 - 6 ounces feta cheese
lemon juice and olive oil, to serve
Optional: Sage, dried or fresh for adding to the roasted veggies
*reserve some of the pasta water

*Note: I used quite a bit of olive oil when roasting the veggies. It was easily between 1/4 and 1/2 cup.  I also tossed the veggies in a combo of dried sage, salt and pepper.


Preheat oven to 400F.  Place the sweet potato and tomato, cut-side up, in a baking dish.  Drizzle with oil and bake for 35-45 minutes or until the sweet potato is soft and golden.

Cook the pasta in a large saucepan of salted boiling water until al dente.  Reserve a little of the pasta water so that you can mix it in later for a creamier texture.  Drain pasta and combine with the sweet potato, tomato, spinach, Parmesan, reserved pasta water, salt and pepper.  Place in serving bowls, top with the feta and drizzle with lemon juice and oil to serve. 

Theme: Pantry Magic!

Sunday, October 6, 2013

Cashew Chicken Salad with Honey Mustard Dressing

Whenever I see a recipe for any kind of nut-crusted chicken I'm completely sold.  Something about that pairing gets me every single time.  Combine that with my favorite dressing, honey mustard, and it's a total win.  I loved this salad.  It was simple and straightforward and it totally hit the spot!

If you feel inclined you could do a few simple things to jazz this salad up.  A few dried cranberries or cherries would be a great addition, as well as a sprinkle or two of blue cheese, and maybe a few sprinkles of crushed cashews just for added texture, but only if you're in the mood! The idea is to keep it nice and simple!


Cashew Chicken Salad with Honey Mustard Dressing
Adapted from Simple Essentials Chicken
by Donna Hay
Serves 4
1 cup cashew nuts
1/2 pound or so (7-8 ounces) chicken tenders
salt and pepper
2 tablespoons olive oil
1 - 2 heads romaine lettuce
Honey Mustard Dressing:
1 tablespoon dijon mustard
2 tablespoons honey
1 tablespoon white vinegar
 To make the honey mustard dressing:  Combine the mustard, honey, and vinegar.  Set aside.

To make the salad: Place the cashews in a food processor and process for 2 - 3 minutes.  Coat the chicken with the cashew and salt and pepper.  Heat a medium non-stick frying pan over medium-high heat.  Add the oil to the pan and cook the chicken for 2- 3 minutes each side or until cooked through.  To serve, toss the chicken with the lettuce and spoon over the dressing and serve.
We are introducing a new chef over at I Heart Cooking Clubs this week.  We will be cooking the recipes of the great Donna Hay for the next six months.  If you're interested in joining us then head on over and check out the details. 


Theme: G'day Donna Hay!

Every Sunday @ Kahakai Kitchen


Sunday, September 29, 2013

Chicken Sofrito with 25 Cloves of Garlic and...My Favorite Yotam Ottolenghi Recipes


Sometimes simple cooking is best.  You know the recipes I'm talking about.  Plain old black and white pages.  No color photos.  Just a handful of ingredients.  Nothing flashy whatsoever. Just everyday common ingredients that are classic and comforting.  

For weeks Ottolenghi's Chicken Sofrito called to me from it's rather boring black and white pages. The promise of this quote kept going through my mind,  "This chicken sofrito requires slow cooking the meat in a pot on the stove top for a long time, in it's own juices, resulting in a very tender texture with a very distinguishably comforting flavor." 


If the description of tender meat cooked in it's own juices didn't win me over than the idea of adding 25 glorious cloves of garlic surely did.  Believe me when I tell you that this recipe didn't disappoint.  It was fabulous.  These few simple ingredients cooked slow over the stovetop combine to make one sexy little dish.  The chicken is fall apart tender, the potatoes are caramelized in the most heavenly way, and the entire dish is laced with the intoxicating flavor of roasted garlic.  It is simply mouthwatering.  We picked the entire chicken clean, leaving only the bones behind.  


Chicken Sofrito
Adapted from Jerusalem
by Yotam Ottolenghi
Serves 4

1 tablespoon canola oil
1 small chicken, about 3-1/4 pounds, butterflied
1 teaspoon paprika
1/4 teaspoon ground turmeric
1/4 teaspoon sugar
2-1/2 tablespoons freshly squeezed lemon juice
1 large onion, peeled and quartered
canola oil, for frying
1-2/3 pounds Yukon Gold potatoes, peeled, washed, and cut into 3/4" dice
25 cloves of garlic, unpeeled
salt and pepper to taste

Pour the oil into a large shallow pan (I prefer cast iron) or Dutch oven and put over medium heat.  Place the chicken flat in the pan, skin side down, and sear for 4 to 5 minutes, until golden brown.  Season all over with the paprika, turmeric, sugar, scant 1/4 teaspoon salt, a good grind of black pepper, and 1-1/2 tablespoons of the lemon juice.  Turn the chicken over so that the skin faces up, add the onion to the pan, and cover with a lid.  Decrease the heat to low and cook for a total of about 1-1/2 hours; this includes the time the chicken is cooked with the potatoes.  Lift the lid every now and then to check the amount of liquid in the bottom of the pan.  The idea is for the chicken to cook and steam in its own juices, but you may need to add a little bit of boiling water, just so that there is always 1/4 inch/5mm of liquid at the bottom of the pan.

After the chicken has been cooking for about 30 minutes, pour canola oil into a medium saucepan to a depth of 1-1/4 inches and place over medium high heat.  Fry the potatoes and garlic together in a few batches over medium-high heat. Fry the potatoes and garlic together in a few batches for about 6 minutes per batch, until they take on some color and crisp up.  Use a slotted spoon to lift each batch away form the oil and onto paper towels, then sprinkle with salt.

After the chicken has been cooking for 1 hour, lift it from the pan and spoon in the fried potatoes and garlic, stirring them with the cooking juices,  Return the chicken to the pan, placing it on top of the potatoes for the remainder of the cooking time, that is, 30 minutes.  The chicken should be falling off the bone and the potatoes should be soaked in the cooking liquid and completely soft.  Drizzle with the remaining lemon juice when serving.


Over at I Heart Cooking Clubs we are saying goodbye to Chef Yotam OttolenghiOh Ottolenghi, I love you so!  I Heart Cooking Clubs has been around for four years now and Yotam Ottolenghi has easily been my favorite chef to cook with.  I love the unique style of his recipes, the crazy flavor combinations, all the components in his recipes, and the way he plays with texture combinations.  I love his dedication to vegetables.  Goodness knows, that man does very sexy things with vegetables.  I also love the stories and history behind his recipes.  I see myself cooking his recipes for years to come and would encourage you to do the same.  He will definitely help you to open up your cooking repertoire and expand your knowledge base.  

There are so many more Ottolenghi recipes I want to try, all in time I suppose!

THESE ARE MY TOP ELEVEN YOTAM OTTOLENGHI RECIPES

(If you click on the recipe name you will be directed to my original post and recipe)


As far as I'm concerned, Ottolenghi's Hummus Kwarma (Hummus with Sauteed Lamb, Lemon Sauce, and Buttered and Toasted Pine Nuts) is pretty much the best thing you could ever put in your mouth!  I think I could eat it every single day of my life and not get tired of it! If hummus is your thing you need this in your life!


Another top favorite were these super flavorful and very satisfying Fava Bean Burgers.  Even the meat lovers in my house loved these!  Do yourself a favor and seek out canned fava beans.  They have a wonderful flavor and are different than any other bean out there.


Ottolenghi's Falafel on pita bread with his Spiced Chickpea & Veggie Salad was mouthwatering and delicious.  If you're in the mood for a kitchen project I definitely recommend it!


Of course, this Broccoli and Gorgonzola Pie is out of this world delicious too!  Not only is it brimming with my favorite green veggie, it is also packed with blue cheese, and a lip smackin' mustard sauce.  Throw all that on some puff pastry and you will make your mouth very happy.


If you're looking to make a stunning loaf of bread and/or you need a good host/hostess gift then please consider Ottolenghi's Cheese, Garlic, Veggie and Herb Bread.  Customize it as you wish.  You simply can't go wrong.


These Mini Turkey and Zucchini Burgers with Creamy Sumac Sauce are pretty much a dream come true.  These are pretty much tender, juicy, flavorful bite-sized nuggets of happiness.


I've been thinking about Ottolenghi's recipe for Marinated Buffalo Mozzarella with Tomato ever since the day I first made it.  If you still have fresh tomatoes in your garden then you should make this now!  This was a fun twist on a classic.  I can't seem to get it out of my mind!


If you are a salad fan, please consider trying Ottolenghi's Baby Spinach Salad with Dates and Almonds.  This was an extremely popular recipe during our six months with Ottolenghi and I'm pretty sure everyone raved about it!  There are several different components in this salad and they all go together perfectly.  If you can't locate fresh dates then sub out dried cherries or cranberries. 


This recipe for Crispy Couscous with Tomato and Shallots was really fun.  Essentially it's a very flavorful couscous cake.  I see this being a great side dish to practically everything.  We pretty much inhaled it!


These Sweet Potato Cakes were the very first Ottolenghi recipe I tried.  I made them six months ago and I'm still thinking about them. Crispy exterior, creamy interior, tangy sauce, great flavor.  Do yourself a favor and give them a try this fall/winter.


And, last but certainly not least, was this gorgeously caramelized Surprise Tatin.  I can sum this one up in three words: puff pastry, potatoes, and cheese.


Theme: Oh Ottolenghi!

Sunday, September 22, 2013

Salmon in Lemon Brodetto with Pea Puree

This dish seems all high maintenance and complicated.  It's really not.  It's just a matter of putting together three easy components for one incredible end result.  This Salmon in Lemon Brodetto with Pea Puree is one of the most pleasantly surprising dishes I've ever made.  I was expecting it to be good.  I just wasn't expecting it to be so darn good!

Every component in this dish compliments the other perfectly.  The lemon brodetto is the epitome of bright fresh flavor, the pea puree is incredibly smooth and velveety, and the salmon brings it all together with it's rich meaty texture and satisfying flavor.  The presentation looks gorgeous and fancy and you will feel rather proud presenting the final dish. Your first bite will be all dainty and polite.  Then all bets are off.  We pretty much inhaled this.


Salmon in Lemon Brodetto with Pea Puree
Adapted from Giada's Kitchen
by Giada De Laurentiis
Serves 4

Lemon Brodetto:
 2 tablespoons olive oil
1 shallot, diced
2 lemons, one zested and both juiced
2 cups chicken broth
1 tablespoon chopped fresh mint leaves

Pea Puree:
2 cups frozen peas, thawed (about 10 ounces)
1/4 cup fresh mint leaves
1 garlic clove
salt and pepper to taste
1/2 cup extra virgin olive oil
1/2 cup freshly grated Parmesan cheese

Salmon:
1/4 cup olive oil
4 (4-6 ounce salmon filets) 
salt and pepper to taste

To make the lemon brodetto: Warm the olive oil in a medium saucepan over medium heat.  Add the shallot and saute until tender, about 7 minutes.  Add the lemon zest and juice, and the broth.  Bring to a simmer, cover and keep warm over low heat. 

To make the pea puree: Combine the peas, mint, garlic, salt and pepper in a food processor and puree.  With the machine running, add the extra virgin olive oil in a steady drizzle.  Transfer the pea puree to a small bowl and stir in the Parmesan.  Set aside.

To make the salmon: Warm the olive oil in a large heavy skillet over high heat.  Season the salmon pieces with salt and pepper to taste.  Sear the salmon on one side until a golden crust forms, 4 - 5 minutes.  Flip the fish and continue cooking until medium-rare, about 2 minutes more depending on the thickness of the fish.

To assemble the dish: Stir the tablespoon of chopped mint into the lemon brodetto and divide among 4 shallow bowls.  Place a large spoonful of pea puree in the center of each bowl.  Place a salmon piece atop each mound of pea puree and serve immediately.


Sunday, September 15, 2013

Spicy Sweet Potato Wedges with Lemongrass Mayo

Please don't think of these as regular everyday sweet potato fries.  They are so much more than that!  These sweet potato wedges are mixed with a very lively combination of coriander (lots of it) and red chile pepper.  All that spicy flavor makes for a very savory and mouthwatering crust on the sweet potato wedges.  These wedges are delicious all on their own, but they pair very well with this bright and fresh lemongrass mayo.  I thought these wedges were very satisfying and comforting without weighing you down.  I'm absolutely addicted to them and can't wait to make them again!


Spicy Sweet Potato Wedges with Lemongrass Mayo
Adapted from Plenty
by Yotam Ottolenghi
Serves 4

3 medium sweet potatoes  (about 2 pounds)
4 tablespoons olive oil
1-1/2 teaspoon ground coriander
1 teaspoon salt
1 fresh red chile, finely diced

 Lemongrass Mayo

1/2 lemongrass stalk
1/2 cup mayo
grated zest and juice of 1 lime
1/2 inch fresh ginger, peeled and grated
salt and pepper, to taste

Preheat the oven to 400F.  Wash the sweet potatoes but don't peel them. Cut each lengthways in half.  Cut again lengthways into quarters and then once more in the same way so you are left with eight long wedges.

Place them on a roasting pan that has been lined with parchment paper and brushed lightly with some of the oil.  (Note: I didn't use the parchment paper and my wedges stuck slightly.  I worry that the parchment would impede the browning/caramelizing process so I would fore-go it next time as well. Toss the wedges with the remaining oil and sprinkle with a mixture of the ground coriander, finely diced red chile, and salt.  Roast for about 25-30 minutes or until the sweet potato is tender and golden brown.  Remove from the oven and allow to cool slightly.

To make the dipping sauce:
Very finely chop the lemongrass or grind finely in a spice grinder.  (Note: I found a jar of sliced lemongrass in the Asian section of my supermarket.) Whisk with all of the other ingredients for the dipping sauce and set aside. When ready to serve, place the wedges on a large, flat serving dish. Serve with the sauce on the side.
Theme: You Made Me Love You!

Sunday, September 8, 2013

Broccoli and Gorgonzola Pie


You know those recipes that feel like they were written specifically for you?  This Broccoli and Gorgonzola Pie is one of those recipes for me.  This pie is packed with everything I crave on a regular basis: flaky buttery pastry, loads of broccoli, robust Gorgonzola cheese, and a luscious creamy mustard sauce.  My friend, Michelle of Ms. enPlace, shared this pie last week and I've craved it ever since. It's total heaven!

Funny enough, I put off making this pie for two reasons. The biggest reason being that no one else in the house cares for broccoli, mustard, or blue cheese.  

Translation: Mom will have to eat the entire pie herself! 
 Danger: Mom will eat the entire pie herself!

Secondly, I'm a complete novice when it comes to puff pastry. 

 Confession: Pastry dough is my least favorite task in the kitchen.

However, last week I had the pleasure of using puff pastry for the very first time and would you believe it....I actually enjoyed it! I always figured puff pastry would be difficult to work with, but it is as simple as opening the package, thawing out the dough, and rolling/shaping it to the desired size.  There's simply nothing to it!  The puff pastry doesn't fall apart or tear and it's not even difficult to transfer or move around. I can honestly say I don't mind working with puff pastry at all.  In fact, I look forward to the next time!


As for this pie....I did end up eating it all by myself.  Every single delicious bite.  It was worth every single calorie.


Broccoli and Gorgonzola Pie
Adapted from Plenty
by Yotam Ottolenghi
Serves 6

One sheet of puff pastry
1 head of broccoli, cut into florets
2 tablespoons butter
2 shallots, minced
2/3 cup heavy whipping cream
1/3 cup water
1/3 cup chopped scallions
3 tablespoons dijon mustard
salt and pepper to taste
2 ounces Gorgonzola, crumbled
1 egg, beaten

Note: I did make quite a few changes to this pie to lighten it up.  The original recipe calls for two sheets of puff pastry and a whole lot more cheese, which I'm sure is quite delicious.  That recipe can be found here


Preheat the oven to 400F.  Roll out the puff pastry until it is 1/8" thick and large enough to line a 10-inch loose bottomed tart pan.  Line the tart pan with the puff pastry and trim off the excess pastry (reserve excess pastry to decorate the top of the pie).  Place tart pan (with the puff pastry inside of it) in the freezer for 10 minutes to chill.  

Remove the tart pan from the freezer.  Line the pastry with parchment paper and fill it with baking beans.  Bake blind for 15 to 20 minutes, or until light brown.  Remove the paper and beans and return to the oven to bake for about 5 minutes, or until the bottom of the shell is golden  Leave to cool down.

While the tart shell is baking, prepare the filling.  I steamed my broccoli, but you can cook the broccoli florets in a large pan of boiling water for about 2 minutes, or until tender but still firm.  Drain in a colander, rinse well with cold water and leave to dry. 

Melt the butter in a pan and fry the shallots on gentle heat for 10 to 15 minutes, or until soft but not colored.  Add the cream, water, scallions, mustard, salt and some black pepper.  Cook over low heat until mixture thickens and then remove from heat.  

To assemble, spread the shallot mixture over the bottom of the pastry case.  Scatter the broccoli on top and gently press into the shallot mix.  Dot with Gorgonzola.  Decorate the top of the pie with the remaining pieces of puff pastry.  Feel free to cut out shapes or strips.  I just cut my leftover pastry into squares and the placed the squares on top. 

If you wish, glaze the decorative puff pastry with a little beaten egg and bake for about 30 minutes, or until the pastry is golden brown.  Allow to cool a little before removing from the pan.


Theme: New To Me!