Showing posts with label everyday food. Show all posts

Friday, March 23, 2012

Everyday Cooking: Chicken Stir-Fry Lettuce Wraps

Can you believe this is the first time I've ever made any type of lettuce wrap?  What in the world was I waiting for?  I guess it took 90 degree heat in the middle of March.  Geez...I thought I'd have a few more months to shed some of that winter weight.  Summer clothes in March?  Torture.

Chicken Stir-Fry Lettuce Wraps.  Delicious.  Seriously flavorful.  Very filling.  Fun to make.  Family-approved.  I think I'll be wrapping all kinds of things in lettuce from now on. 

This recipe comes from Martha's Everyday Food Great Food Fast and I've had it bookmarked to make for years.  It's basically thin strips of chicken breast (could use chicken thighs, pork, tofu, etc.), thinly sliced onion, red pepper, and quite a bit of garlic.  Then the chicken mixture gets mixed with some soy sauce, some rice vinegar (for great tang), and a cornstarch slurry to thicken.  We loved these wraps as they were, but we thought it would be nice to add in some sliced water chestnuts and/or sprinkle some cashews on top for added crunch.  These are a definite make again recipe.

Note:  This are rather messy to eat with your hands.  You'll need lots of napkins.
 Chicken Stir-Fry Lettuce Wraps
Serves 4

 1-1/2 pounds boneless, skinless chicken breast halves, halved horizontally and thinly sliced
 coarse salt and freshly ground pepper
2 tablespoons olive oil
1 large onion, halved and thinly sliced
1 large red bell pepper, ribs and seeds removed, thinly sliced
3 garlic cloves, minced
1-1/2 teaspoons grated peeled fresh ginger
1/4 to 1/2 teaspoon red pepper flakes, plus more to serve (optional)
3 tablespoon soy sauce
3 tablespoons rice vinegar
1-1/2 teaspoons cornstarch mixed with 1 tablespoon water
12 to 16 Boston lettuce leaves (about 2 heads or one large head)

Note:  Sliced water chestnuts and/or cashews would also provide a nice crunch and be nice in these lettuce wraps.

Season the chicken with salt and pepper.  In a large nonstick skillet, heat 1 tablespoon of the oil over high heat.  Add half the chicken; cook, stirring constantly, until opaque throughout, 2-4 minutes.  Transfer to a plate.  Repeat with remaining chicken.

Add the remaining tablespoon oil to the pan, along with the onion and bell pepper.  Cook, stirring constantly, until the onion is tender and golden, about 4 minutes ( reduce the heat if browning too quickly).

Reduce the heat to medium; add the garlic, ginger, and red pepper flakes to the pan; cook, stirring until fragrant 30 to 60 seconds.

Stir in the soy sauce, vinegar, and cornstarch mixture; remove from the heat.  Add the chicken and any accumulated juices; toss to coat.  Serve in lettuce cups.

Friday, March 9, 2012

Everyday Cooking: Quick Chickpea Curry

I am a huge fan of Martha Stewart's Everyday Food publications.  There is just something about that little Everyday Food magazine, as well as the Everyday Food cookbooks that appeal to me on so many levels.  I chalk it up to the gorgeous photography and family-pleasing recipes.  Of course, the overall ease of the recipes is a bonus too. 

I recently added the newest cookbook, Everyday Food Light, to my collection and couldn't be more pleased with it.  The cookbook is loaded with lots of gorgeous light food that I can't wait to try. 
After seeing so many versions of chickpea curries online lately, this recipe for Quick Chickpea Curry really appealed to me. This recipe comes together with pantry ingredients and is no fuss at all.  I added a bit more garlic than called for just because I like lots of garlic.  I also added quite a bit of black pepper to spice things up, but other than that I left the recipe as is.  I was tempted to serve it over rice, but after tasting it I enjoyed it so much I ate it all on it's own.


Quick Chickpea Curry
Slightly Adapted from Everyday Food Light
Serves 4

"Why it's light -- Because lots of Indian food entrees use high-fat ghee (clarified butter) or coconut milk as the cooking liquid, they can contain more fat and calories than you might think.  For this vegetarian curry, chickpeas and spices are simmered simply in water, yet the results are still delicious.  Serve with rice or warm whole-wheat pits, if desired."

1 tablespoon olive oil
1 large yellow onion, finely chopped
4-6 garlic cloves (depending on your preference for garlic, minced)
1 tablespoon curry powder, preferably Madras
1 cinnamon stick (3 inches)
pinch of ground cloves (I omitted this as I do not care for cloves)
2 cans (15 ounces each) chickpeas, rinsed and drain
3 tablespoons ketchup
2 cups water
coarse salt and ground pepper (quite a bit of ground pepper)
chopped cilantro and lemon wedges for serving (optional)

In a large large skillet or pot, heat olive oil over medium-high.  Add onion and cook, stirring occasionally, until dark brown around edges, about 6 minutes.  Add garlic, curry cinnamon, and cloves (I omitted the cloves); cook, stirring, until fragrant, 30 seconds.

Add chickpeas, ketchup, and the water; season with salt and pepper.  Bring to a boil; reduce to a simmer, cover, and cook 20 minutes.

Uncover and increase heat to medium-high; cook, stirring, until sauce is slightly reduced, about 5 minutes.  Serve topped with cilantro, with lemon wedges alongside, if desired.

Per serving: 285 calories; 5.5g fat; 12.8g protein; 46.8 carbs; 9.7g fiber

There are so many Everyday Food recipes that I'd like to try.  I'm hoping to drag out one of my Everyday Food books or magazines once a week and cook from it, but then again, when it comes to food and recipes I have commitment issues. 

 This post is being submitted to My Legume Love Affair hosted by girlichef through March 31st.
For a host line-up visit HERE.

Wednesday, May 18, 2011

Everyday Food's Raisin Bran Muffins

 I'm not the biggest muffin fan, but of all the muffins out there, I really love a good ol' bran muffin.  Strange, eh?  Not only do I love the flavor of the bran, but I also love the not so sweet quality of a bran muffin.  This recipe, from Martha Stewart's Everyday Food, produces a slightly sweet muffin using good 'ol Raisin Bran cereal.  The end result is a dense muffin with a nice crackly top.  The recipe is quite healthy, using whole wheat flour and only 1/4 cup brown sugar and oil each.  I also love that the recipe only makes 6 muffins, which is perfect because we all know what happens when we have extra muffins laying around.
 Raisin-Bran Muffins
Adapted from Everyday Food
Serves 6

1-1/2 cups raisin-bran cereal
3/4 cup milk
1/2 cup whole-wheat flour
1/2 cup all-purpose flour
2 teaspoons baking powder
1/2 teaspoon ground cinnamon
1/4 teaspoon salt
1/4 cup vegetable oil, such as safflower
1 large egg, lightly beaten
1/4 cup packed dark-brown sugar

Preheat oven to 400F.  Line 6 cups of a standard muffin tin with paper liners.  In a bowl, combine cereal with milk; let stand until softened, about 5 minutes.  In another bowl, whisk together both flours, baking powder, cinnamon, and salt.  Stir oil, egg, and brown sugar into cereal mixture, then fold in flour mixture.

Divide batter evenly among lined cups.  Bake, rotating tin halfway through, until golden brown and a cake tester inserted into the centers comes out clean, 20-25 minutes.

Cool in tin 5 minutes, then turn out muffins onto a wire rack to cool completely.  Serve warm or at room temperature.  Muffins can be store up to 3 days at room temperature, or frozen up to 3 months, in a large resealable plastic bag; thaw at room temperature and warm in the oven before serving.

Notes/Results:  I initially made these muffins for myself because I had a very busy week last week and wanted something semi-healthy to grab on the go.  Turns out that I was only able to have one because everyone else stole the rest.  I think this is a great recipe for bran muffins, but I do want to note that they do have a rather "healthy" taste (which I liked) and also that they are not very sweet (which I also liked). 

Friday, February 25, 2011

Food 'n' Flix: Spicy-Sweet Pretzel Mix and Pomegranate Sodas

Over the winter months, my family and I have at least one movie night per weekend.  So far this year, it's been a winter full of old 80's movies (Goonies, Back to the Future, Karate Kid, Poltergeist, Spacecamp, you get the idea).  It's been a lot of fun watching the look on my daughter's face as she discovers how different things were back in the 80's.  A lot of things have been very shocking to her and we've had a lot of good laughs. My husband likes to joke that each old movie must be torture to her, but I can honestly say that she has loved each and every old movie we have chosen.  How could she not?  They're classics for a reason, right? 

On family movie night we always have popcorn.  Lots of popcorn.  I've tried to deviate from this, but it's just not pretty. Things just get ugly. So, during the week, when everyone is at work or school, I pick my very own movie and make my very own snack.  Most of the time this involves chocolate, but this time it was this Spicy-Sweet Pretzel Mix and a special drink just for me, a pretty pale pink Pomegranate Soda with a maraschino cherry floating on top.

 IT'S MOVIE TIME!

Once I have my snack, I pop in a movie of my very own choosing.  No cartoons, action flicks, or teeny bopper shows.  Only chick flicks.  It's time for girly, romantic, sappy, ridiculous, over-the-top, dramatic, passionate, and funny movies.  Even better if the movie involves cooking, like this month's Food 'n' Flix pick, Woman On Top. A very passionate love story about both love and cooking, it was the perfect choice for some down time. 
Spicy-Sweet Pretzel Mix
Adapted from Everyday Food September 2008 issue
Martha says this serves 8 (I say more like 2)

2 cups thin pretzel sticks
1 cup natural almonds
2 tablespoons unsalted butter 
2 tablespoons dark-brown sugar
1/8 teaspoon cayenne pepper

Preheat oven to 300 degrees.  Line a large rimmed baking sheet with parchment paper.  In a large bowl, toss together pretzels and almonds.

In a small saucepan, bring butter, sugar, cayenne, and 1 tablespoon water to a boil, stirring occasionally.  Pour over pretzel mixture in bowl; gently toss to combine.

Spread pretzel mixture in a single layer on prepared sheet.  Bake until almonds are crisp, about 20 minutes, tossing occasionally.  Cool on sheet before serving (To store, keep at room temp, up to 5 days).

Pomegranate Sodas
Adapted from Everyday Food September 2008 
Serves 8

1 cup sugar
1/2 cup pomegranate juice
club soda, for serving
maraschino cherries (optional)
Ice

In a small saucepan, combine sugar and juice; bring to a boil over high, stirring until sugar has dissolved. Reduce to a simmer; cook, without stirring, until mixture is syrupy, about 2 minutes. (To store, refrigerate syrup up to 1 week; adjust consistency with water, if necessary.)

To serve: Fill 8 glasses with ice. Pour 2 tablespoons syrup in each glass, and top with club soda. Garnish with cherries, if desired.

Notes/Results:  A very satisfying snack and drink combination that really caters to those sweet and salty cravings.  The sweet and spicy pretzel mix is delicious, a little more sweet than spicy, but it does have a gentle heat to it.  If you enjoy your food a little more spicy, go ahead and add 1/4 teaspoon cayenne in place of the 1/8 teaspoon. The crunchy pretzel mix pairs perfectly with the sweet pomegranate soda, a fun and delicious match.  I really enjoyed the pretzel mix, but I LOVED, LOVED, LOVED the pomegranate soda.  The soda is just plain fantastic! Not only is it a gorgeous pale pink color, but it is also sweet, bubbly, refreshing and just plain fun to drink.  Decorated with some maraschino cherries, this would be fun for a family, your next party, a group of girls (any age), or even just on a day when you're on your own and need a fun treat.  
Now Watching Woman On Top

Friday, December 3, 2010

Asian Turkey Meatballs with Carrot Rice... and a favorite food tip!


I was drawn to this recipe as soon as I first set eyes on it. I couldn't wait to give it a try, so I made it the very next night and fell in love. These are some tasty, flavor-packed meatballs folks. Good stuff! The meatballs are loaded with fun flavors like green onion, cilantro, soy sauce or fish sauce, Sriracha, garlic and just a hint of sugar. Yum! Just thinking about them has me craving them all over again.

I had to share the picture above so you could see all the flavors going into the meatballs above. If you don't care for ground turkey, you can also use ground pork.

Asian Turkey Meatballs with Carrot Rice
Everyday Food Issue 77, page 14
Serves 4
Coarse salt
1 cup long-grain white rice
1 carrot, shredded
3/4 cup breadcrumbs
1-1/2 pounds ground dark meat turkey or ground pork (I used only one pound)
3 scallions, white and green parts separated and thinly sliced
1/3 cup chopped fresh cilantro leaves
4 teaspoons fish sauce (I substituted soy sauce)
4 teaspoons hot-pepper sauce (preferably Sriracha)
4 teaspoons sguar
1 large garlic clove, minced (I used 2 good-sized cloves)
2 teaspoons vegetable oil (will not need if you bake your meatballs)
lime wedges, for serving

Preheat oven to 450F. In a medium saucepan, bring 1-1/2 cups salted water to a boil. Add rice, stir, and return to a boil. Cover, reduce to a simmer, and cook until rice is tender, about 15 minutes. Remove from heat and top with carrot. Let stand, covered, 5 minutes, then stir in carrot and fluff rice with a fork.

Meanwhile, in a medium bowl, combine breadcrumbs and 3 tablespoons water. Let stand 5 minutes. Add turkey, scallion whites, cilantro, fish/soy sauce, hot-pepper sauce, sugar, garlic and 1-1/2 teaspoon salt. Gently mix to combine and form 12 meatballs (I got about 17 meatballs).

In a large nonstick skillet, heat 1 teaspoon oil over medium-high. In batches, brown meatballs on all sides, 10 minutes total (add up to 1 tsp. oil as needed). Transfer to a rimmed baking sheet and bake until cooked through, 10 minutes. Serve meatballs with rice, scallion greens, and lime wedges. (NOTE: I baked my meatballs on a lightly oiled baking sheet at 350F for about 25 minutes)

Notes/Results: Before I called everyone to dinner, I grabbed a meatball off the tray and gave it a try. It was so good that I snuck another one. I started to have thoughts of running away with the tray, but thought better of it. Saying that,these meatballs would be great served on their own, with or without a dipping sauce. They also made for a wonderful meal with the rice. One more reason why Everyday Food by Martha Stewart is my absolute favorite cooking magazine.
Favorite Food Tip: Maybe you've heard this one before, maybe you haven't. Either way, I think it's really cool. Did you know that green onions can regenerate if you put them in a glass of water? I just learned this tip about a month ago and think it's the coolest thing. After cutting off the green tops, just place the white stems in a glass/jar of water and place on your windowsill. Within a day you will notice quite a bit of green growing from the tops of the stems. The green portion grows at about the rate of almost an inch per day. In less than one week, your green onions in the jar will look just like the ones at the store. Call me silly, but I get a big kick out of that. You can continue to cut them back and do this about 4-5 more times. After about the 4th cut, the green portion starts to get a bit soft and it's time to toss them out and start over. Green onions are inexpensive and all, but it really is fun to watch them regenerate on your windowsill. Best of all, it takes little to no effort and it's nice to always have a bit of green to add to your dishes!

Friday, November 19, 2010

Slow-Cooker Bacon Jam


Each month, either on the 15th or 16th, my new issue of Martha Stewart's Everyday Food magazine gets delivered to my mailbox. Don't worry, I'm not stalking the mailman. Er....well, maybe I am. He does arrive at my mailbox about 10:15 every morning. Is it bad that I know that?

I cozied up on the couch with my December issue this past Tuesday and quickly noticed this recipe for Slow-Cooker Bacon Jam. I mean....HELLO, Bacon Jam? Where has that been all my life? Then I thought of my friend Beth over at The Seventh Level of Boredom and I knew this recipe would be perfect for her new food adventure, The Bacon Games.


Slow-Cooker Bacon Jam

Adapted from the December 2010 Issue of Everyday Food Magazine
Makes 3 cups
Active Time: 30 minutes
Total Time: 4 HR

1-1/2 pounds sliced bacon, cut crosswise into 1-inch pieces
2 medium yellow onions, diced small
3 garlic cloves, smashed and peeled
1/2 cup cider vinegar
1/2 cup packed dark-brown sugar
1/4 cup pure maple syrup
3/4 cup brewed coffee

In a large skillet, cook bacon over medium-high, stirring occasionally, until fat is rendered and bacon is lightly browned, about 20 minutes. With a slotted spoon, transfer bacon to paper towels to drain. Pour off all but 1 tablespoon fat from skillet (reserve for another use); add onions and garlic and cook until onions are translucent, about 6 minutes. Add vinegar, brown sugar, maple syrup, and coffee and bring to a boil, stirring and scraping up browned bits from skillet with a wooden spoon, about 2 minutes. Add bacon and stir to combine.

Transfer mixture to a 6-quart slow cooker and cook on high, uncovered, until liquid is syrupy; 3-1/2 to 4 hours. Transfer to a food processor; pulse until coarsely chopped. Let cool, then refrigerate in airtight containers, up to 4 weeks

Per 2 tablespoons: 191 calories, 12.6 fat (4.9 g sat fat), 10.8 protein, 8.1g carb, 0.2g fiber

Notes/Results:
I think everyone should have a little bacon jam in their life. You can literally put this stuff on anything: bread, burgers, pizza, steaks, sandwiches, eggs, potatoes, chicken, fish....you name it! The combination of the bacon, sugar, maple syrup, onions, and coffee makes a smoky, sweet, tangy combination that is really unique and quite delicious. The jam keeps in the refrigerator for up to 4 weeks, but with so many uses it will never last that long. It is best served warm.
Timing Note: I will confess that it took me almost double the time for the prep, more like 50 minutes instead of 30 minutes, but I'm never usually in a hurry when I cook.
Additional Note: My bacon jam wasn't as photo friendly as in the magazine. I added a touch of chopped parsley and a little sprinkling of freshly cooked bacon to spruce up the photo. If you do choose to make this, make sure to use a food processor and follow the directions to coarsely chop the jam.

For now I plan on making some breakfast sandwiches and also some cheeseburgers with my bacon jam. Anyone have any fun ideas? I'd be happy to hear all about them!

Tuesday, November 9, 2010

Shortbread Candy Bars


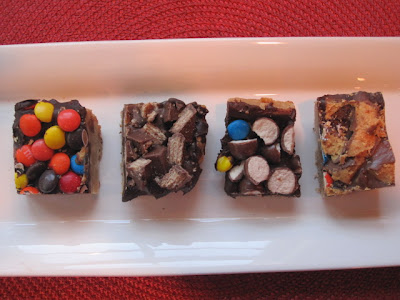
Rich and buttery shortbread bars, covered in chocolate, and topped with candy bars. Truly the most decadent and indulgent cookie bars I have ever made. We ate them in record time. I've been thinking about them ever since.

You could make these anytime of year, but they were inspired by leftover Halloween candy. I made two batches of these bars for a party. I used Reese's cups, Reese's pieces, Butterfinger, M&M's, Kit Kats, Whoopers, Snickers and Milk Duds. The Reese's cups, as well as the Reese's pieces, the Butterfinger, and the M&M's were all favorites. The others were a bit cumbersome to eat, but we managed.

*photo credit

Shortbread Candy Bars adapted from Everyday Food October 2010 Issue
Makes 16 bars
1 cup (2 sticks) unsalted butter, room temp
3/4 cup packed light-brown sugar
1-1/4 teaspoons coarse salt
2 cups all-purpose flour (spooned and leveled)
1 cup semisweet chocolate chips
2 cups assorted chocolate candies or roughly chopped candy bars (12 ounces)

Preheat oven to 350F. In a large bowl, using an electric mixer, beat butter, brown sugar, and salt on medium-high until light and fluffy, 3 minutes. With mixer on low, add flour in three additions and beat until combined (dough will be crumbly). Press dough evenly into an 8-inch square baking dish. Bake until golden brown and firm, 30-35 minutes.

Scatter chocolate chips on top of shortbread. Bake until soft, 1 minute. With the back of a spoon, spread chocolate evenly over shortbread. Scatter candies over top. Let cool on a wire rack 30 minutes. Refrigerate briefly to set chocolate, then cut into 16 bars. (Store in an airtight container, at room temperature, up to 4 days.)

Notes/Results: Absolutely decadent, delicious, addictive, and satisfying. The perfect indulgence. These bars were very easy, but they do take a little bit of time. You could use one type of candy bar to decorate the entire pan, but I think they look prettiest when they are broken into 4 sections and each section is devoted to a different candy bar. It's always good to have a little variation. The shortbread was thick, dense, and somewhat rich with a butterscotch flavor. The scattered chocolate chips melted to perfection and created a wonderful chocolate coating over the shortbread. Top them with your favorite candy bar and you will be in heaven. (My favorite was the Reese's pieces.) Be sure they are cool and set before you cut them.
*Photo courtesy of Martha Stewart website

Tuesday, October 5, 2010

Everyday Food's Cheddar-Topped Shepherd's Pie


Here in Kentucky, the weather has changed drastically in the past week. We went from 80 and 90 degree days to cold, chilly, windy and 50 degree days. With such a drastic temperature change I found myself craving comfort foods. After flipping through books and magazines I finally settled on Everyday Food's Cheddar-Topped Shepherd's Pie. Not only did it look delicious, but it was something I knew I could lighten up to suit my diet.

About two months ago I mentioned that I gained the Blogger 15. I decided that it was time to lose that weight before it turned into the Blogger 30, especially with the holidays fast approaching. In these past two months I have managed to lose the Blogger 15 and couldn't be happier. Ever since having my second child, losing weight is a real struggle for me. It seems like my body doesn't respond like it did when I was in my twenties and it usually gets the best of me. This time I was able to find my motivation and I'm so excited about losing the first 15 pounds that I'm going to shoot for losing another fifteen. This next 15 pounds isn't going to be easy. In fact, it's the same 15 pounds that I've been struggling with since the birth of my second child, which was almost 4 years ago now. It's a very stubborn 15 pounds, but I'm hoping that I'm a little more stubborn.

I lightened up this shepherd's pie by using 95% lean Hereford ground beef, 2 teaspoons of oil instead of 1 tablespoon, and 2% milk instead of whole milk. I made it a little healthier by adding more vegetables and using whole wheat flour instead of all-purpose. The end result was absolutely fantastic!

Cheddar-Topped Shepherd's Pie
Adapted from Everyday Food's October 2008 Issue
Serves 8
Prep Time: 30 minutes
Total Time: 1 hr

2 pounds baking potatoes (about 4), peeled and thinly sliced
coarse salt and ground pepper
1 tablespoon vegetable oil (*I used 2 tsp. extra virgin olive oil)
6 medium carrots, halved lengthwise, quartered if large, and thinly sliced
6 celery stalks, thinly sliced
1 large onion, chopped
3 cloves garlic, minced (*my addition)
1 zucchini, chopped
(*my addition)
1/4 cup all purpose flour (*I used whole wheat)
1/4 tomato paste (*I used the entire 6oz. can)
2 pounds ground beef chuck (*I used 95% lean Hereford beef)
1 cup whole milk (*I used 2%)
1-1/2 cup shredded sharp white cheddar (I used regular full fat cheese)

Preheat oven to 450. Place potatoes in a large saucepan, and cover by 1 inch with salted water. Bring to a boil; reduce to a simmer. Cook until potatoes are easily pierced with the tip of a paring knife, 15-20 minutes.

Meanwhile, heat oil in a 5 quart Dutch oven or heavy pot over medium-high. Add carrots, celery, onion (zucchini & garlic if using). Cook, stirring occasionally, until vegetables are tender, 8-10 minutes. Add flour and tomato paste; cook, stirring 1 minute. Add beef; cook, stirring occasionally, until no longer pink, 6-8 minutes. Add 1 cup water; bring to a boil, and simmer 1 minute. (I found I needed a little extra water, almost another 1 cup). Set beef filling aside.

Drain potatoes; return to pan. Cook over medium, stirring, until liquid has evaporated and thin film covers bottom of pan, about 1 minute. Remove pan from heat; add milk and 1 cup cheese. Mash until smooth; season cheddar-potato topping with salt and pepper.

Pour beef filling into a 13x9-inch baking dish. Drop dollops of topping over filling; spread to edges with a spatula. Using a fork, make decorative peaks; sprinkle with remaining 1/2 cup cheese. Bake until topping is browned and filling is bubbling rapidly, about 20 minutes (if topping and filling were chilled, increase to 35 minutes). Let stand 5 minutes before serving.

Notes/Results:
Absolutely delicious, even lightened up! In fact, this meal will be something that I make at least a couple times this fall and winter. This is actually a really healthy meal with lean ground beef and lots and lots of veggies. The filling is really adaptable and a great way to empty out your veggie bin. If you serve this with a green salad you will definitely be getting all your veggies in!

Nutrition Facts as written in Everyday Food Magazine: 558 calories, 33.4g fat, 29.1g protein, 34.3g carb, 4.2g fiber

Serving 8, the Weight Watchers points for my lightened version is 9 points.


My daughter is on fall break this week and we've been spending a lot of time outside. Yesterday we made a scarecrow and named her Princess Pumpkinhead!

Wednesday, September 29, 2010

Everyday Food's Lighter General Tso's Chicken


For about a week now I've been going through my pile of Martha Stewart's Everyday Food Magazine. I grab a stack of them, sit on the couch and get lost. I've always loved this small, little, colorful magazine that is filled with quick, easy and fairly healthy recipes. Somehow this little magazine seems to get lost in my huge stack of large cookbooks and hardly ever finds it way into my kitchen. This week, I made it a point to add several Everyday Food recipes to my grocery list.

This lighter version of General Tso's Chicken comes from the October 2008 edition. Skinless, boneless chicken breast are coated in a light batter of cornstarch and egg whites.

The chicken is cooked in a hot skillet (two batches if necessary) with a minimum amount of oil for 6-8 minutes, or until golden.

Once the chicken is finished cooking, set it aside. The snow peas, aromatics, spices, and a mixture of cornstarch, water, and soy sauce are added to the hot skillet until the snow peas are tender and the sauce thickens. Once the snow peas are tender and the sauce thickens, toss the chicken back in to coat with the sauce and serve over cooked brown rice.

Lighter General Tso's Chicken

Adapted from Everyday Food Magazine, October 2008 Issue
Serves 4 (I say serves 8)
Prep Time: 45 minutes
Total Time: 45 minutes

1-1/4 cups long-grain brown rice
1/4 cup cornstarch
1 pound snow peas, trimmed and halved crosswise
4 garlic cloves, sliced
2 teaspoons grated peeled fresh ginger
3 tablespoons light brown sugar
2 tablespoons soy sauce
1/2 teaspoon red-pepper flakes
2 large egg whites
coarse salt and ground pepper
1 pound boneless,skinless chicken breasts, cut into 1 inch pieces
2 tablespoons vegetable oil (**I got away with using 1 tablespoon)

Cook rice according to package instructions. Meanwhile, in a large bowl, stir together 1 tablespoon cornstarch and 1/2 cup cold water until smooth. Add snow peas, garlic, ginger, sugar, soy sauce, and red-pepper flakes; toss to combine, and set aside.

In another bowl, whisk together egg whites, remaining 3 tablespoons cornstarch, 1/2 teaspoon salt, and 1/4 teaspoon pepper. Add chicken, and toss to coat.

in a large nonstick skillet, heat 1 tablespoon oil over medium-high. Lift half the chicken from egg-white mixture (shaking off excess), and add to skillet. Cook, turning occasionally, until golden, 6-8 minutes. Transfer to a plate; repeat with remaining oil and chicken, and set aside (reserve skillet).

Add snow-pea mixture to skillet. Cover; cook until snow peas are tender and sauce has thickened, 3-5 minutes. Return chicken to skillet (with any juices); toss to coat. Serve with rice.

Nutritional Info (based on 4 servings, reduce in half if serving 8)
: 532 calories; 10.4g fat; 36.5g protein; 72.2g carb; 5g fiber

Notes/Results:
This was a great recipe and the entire family enjoyed it. The recipe indicates that it serves 4, but it really does make a huge amount of food. I think it easily serves 8, which makes this a great dish if you have a large family and/or if you enjoy leftovers. We enjoyed this meal with some fresh pineapple on the side and found it very filling and satisfying. This is one of those meals that you actually feel good about serving your family because it is full of lean protein, whole grains, and veggies. I would definitely make it again.