Showing posts with label Halloween. Show all posts

Friday, October 29, 2010

Vampire Cosmo


In the mood for a spooky spirit this Halloween weekend? Please head over to Cocktail Puppy, a great blog started by one of my favorite foodies, Natashya of Living in the Kitchen with Puppies.

I'm honored to say that I'll be contributing regularly along with Natashya, Heather of girlichef, and Danielle of Cooking for My Peace of Mind.

Time to get the party started!!

Sunday, October 17, 2010

Trick-or-Treat Turnovers


These Trick-or-Treat Turnovers are lots of fun for the kids (and adults too)! Canned biscuit dough is flattened to a four inch circle and filled with a beef filling. A second biscuit is flattened into another 4 inch circle and carved just like a pumpkin. The carved biscuit is placed over the biscuit with the meat mixture and pinched to seal the edges. Each Trick-or-Treat Turnover is brushed with a lightly beaten egg and baked until golden, about 15 minutes.

The filling for the Trick-or-Treat Turnovers can easily be switched to anything your heart desires. The possibilities are endless. You could even build a little "build your own station" with lots of chopped up little fillings and different cheese so that each person could customized theirs to their own liking. Either way, it really is a very fun way to spend time together in the kitchen.

Trick-or-Treat Turnovers
Adapted from Taste of Home Ultimate Halloween Magazine, also found online HERE
Makes 8 very large turnovers
1/2 pound of ground beef (I used 95% lean)
1 tablespoon finely chopped onion
4 ounces cubed part-skim mozzarella cheese
1/4 cup prepared mustard (I subbed tomato paste)
2 tubes (16.3 ounces each) large refrigerated flaky biscuits (I used Grands Golden Wheat,Reduced Fat)
1 egg, lightly beaten

In a large skillet, cook beef and onion over medium heat until meat is no longer pink; drain. Add cheese and mustard; cook and stir until cheese is melted. Cool slightly.

Flatten each biscuit into a 4-in circle; place four biscuits in each of two greased 15-in x 10-in x 1-in baking pans. Spoon 2 heaping tablespoons of meat mixture onto each.

Using a sharp knife or cookie cutters, cut out jack-o'-lantern faces from remaining biscuit circles; place over meat mixture and pinch edges to seal tightly. Reroll scraps if desired and cut out stems for pumpkins.

Brush with egg. Bake at 350F for 10-15 minutes (mine took about 20 minutes) or until golden brown.

Notes/Results:
These turnovers are probably our favorite Halloween-inspired recipe so far. Everyone really had a great time and enjoyed customizing their own pumpkin. I'm thinking of making these for our neighborhood Halloween party and creating a build your own station for the kids. There are a couple of notes worth sharing. The turnovers themselves are quite big. I think it would be possible to cut one biscuit in half and use one one biscuit to make each turnover. Also, depending on the filling they can be a little on the dry side. I think they would be great served with a dipping sauce on the side. Depending on your filling you could use honey mustard, marinara, cheese sauce, or barbecue sauce.

I am submitting these little handheld Halloween treats to my friend Deb at Kahakai Kitchen for her Souper Sundays event. Happy 2nd birthday Souper Sundays!


I am submitting this to my friend Brenda at Brenda's Canadian Kitchen for her weekly celebration of cookbooks, Cookbook Sundays.

I am also submitting these turnovers to my friend Roz over at La Bella Vita for her Seasonal Saturdays event.

Saturday, October 31, 2009

Happy Halloween & Spooky Treats

HAPPY HALLOWEEN!! I hope you all have a happy and safe Halloween. We started our morning with a spooky treat courtesy of Nigella. For breakfast we had Nigella's Chocolate Peanut Butter Fudge Sundaes. We rimmed our sundae glasses with orange sprinkles and filled them with ice cream. We topped them with Nigella's chocolate peanut butter fudge sauce, Halloween sprinkles, and scary monsters! I don't think I need to tell you that Nigella's chocolate peanut butter fudge sauce was delicious. How could it not be? It consisted of heavy cream, milk chocolate, smooth peanut butter, and corn syrup - yum!! If you like a decadent ice cream sauce, this is the one! This week's theme over at I Heart Cooking Clubs is spooky treats and spirits. Go check out all the other spooky posts!!

Chocolate Peanut Butter Fudge Sundae - Nigella Express by Nigella Lawson
3/4 cup heavy cream
4 oz milk chocolate, chopped
1/2 smooth peanut butter
3 tablespoons golden syrup or light corn syrup

Cook all ingredients on low heat until melted and glossy.


Earlier in the week we made Paula Deen's snake bites, recipe found here. This is a great Halloween treat, but can be made anytime of year. I am submitting this to Deb over at Kahakai Kitchen for Souper Sundays.

The snake bites are made with canned crescent dough that is flattened out and filled with sandwich fillings. Paula's recipe calls for ham, salami, bologna, Monterey jack cheese, and mustard. The crescent roll is rolled up into the shape of a snake, coated with egg yolk, and painted with food color to resemble a snake. Paula uses pimento-stuffed olives for the eyes, cloves for the nose, and a red pepper for the tongue.

I improvised and used black olives for the eyes, capers for the nose, and red pepper for the tongue. I filled my snakes with pizza sauce, fresh mozzerella, and pepperoni. I made another snake with pesto sauce and fresh mozzarella. The pizza themed snakes were tasty, but the filling was too much and spilled out the sides. I think you need to have a light hand with the filling. Other than that, they are really cute treats that make everyone happy. You can customize them adding any ingredient you like. Each snake makes about 8 little sandwiches.


Happy Halloween!!

Monday, October 19, 2009

Crispy Rice Pumpkin Patch Treats for My Girl Paula


This week's My Girl Paula recipe are these cute and kid-friendly crispy rice candy corn treats. A perfect sweet treat for the whole family, with a cute little Halloween twist! Paula's recipe called for candy corn, but my daughter isn't crazy about candy corn. I decided to use the little pumpkins instead, leaving them whole. Never again will rice crispies be plain. The recipe is really easy and makes a 9x13" pan full of rice crispy treats to hand out to all the kids in the neighborhood. Perfect to take along to a Monday night girl scout meeting!

We took my in-law's to the apple orchard and pumpkin patch yesterday and it was a fabulous time. Despite the unseasonably cold weather, it had finally quit raining long enough to enjoy some time outdoors. Kentucky is home to a lot of tobacco farms and it is no secret that the tobacco farmers are having a hard time right now. We are so happy to have Evans Orchard here in Georgetown. The Evans family used to be tobacco farmers, but were able to convert their farm to a apple orchard, cider mill, and pumpkin patch. It is a huge attraction each fall and this year they offered a season pass for families. Since we live so close, we took advantage of the season's pass this year and have probably been at least eight times already. I thought I would share some pictures that we took this season.
Queen of the Straw Castle

My husband, Tony, and two kids in the rat racers.
I hope you all have the chance to get outdoors and enjoy the fall season!!

Monday, October 12, 2009

Mini Mummies *A Halloween Treat* for My Girl Paula

This month for My Girl Paula, we are going to be making some of Paula's Halloween treats. This week's choice was Mini Mummies, a hot dog wrapped in pie dough (or crescent dough, in my case). The kids really like them and they can pretty much wrap them and cook them all on their own. My eight year old daughter had a blast wrapping up these hot dogs. You can find the recipe here.

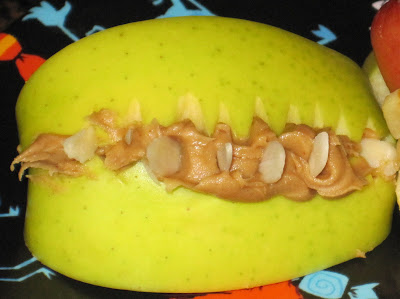
We served these little Greenie Meanies on the side, which turned out pretty cute. They are made pretty easily using two slices of green apple, peanut butter, and sliced almonds. You can cut various scary teeth patterns into the apple slices to create your own look. My creativity is limited, so I did a simple design. They turned out good, and reminded me of how good apples are with peanut butter- yum :D
Later on, we decorated our Halloween tree. I had an old green ficus tree laying around the house. Apparently, in addition to bouncing off the walls, kids also enjoy tearing apart plastic trees. My poor green tree had seen it's last life and it was time to do something with it. I decided to spray paint it black, decorate it with garland, and hang ornaments on it. The whole craft was a "learning experience", but I think it turned out cute and hopefully we can have it for the next couple years. Surprisingly, none of the kids are messing with the Halloween Tree. Apparently plastic green trees are much more fun to tear apart than a Halloween Tree!!?? Sometimes kids just don't make any sense, do they?
I won this award from Kathy of Three on Food. Thank you Kathy! I love your blog too! In fact, I am really enjoying everyone's blog lately. I'd like to share this award with everyone :D Sometimes it is to hard to pick just two people to pass it on to!

The rules of this award are to answer the questions with one word answers. I'm going to try...well, maybe not. I can never stop babbling....it's a real issue of mine.

Where is your cell phone? hopefully far away - I don't like the thing.
Your hair? needs cutting
Your mother? best friend
Your father? my hero
Your favorite food? pasta & chocolate
Your dream last night? moved to Colorado and got a job in an office
Your Favorite Drink? Iced Tea
Your dream/goal? A huge trip around the world
What room are you in? living room
Your hobby? Cooking and blogging
Your fear? Bugs
Where do you want to be in 6 years? Yikes....I'll be 40!! I can't think that far ahead.
Where were you last night? apple orchard and pumpkin patch
Something you aren't? Organized
Muffins? sometimes
Wish list item? great pair of black boots
Where did you grow up? Ohio *the heart of it all*
Last thing you did? made sesame noodles
What are you wearing? yoga pants and t-shirt
Your TV? is not on
Your pets? two children are enough to take care of, right?
Your friends? like sisters to me
Your life? ls a good mix of chaotic and relaxing
Your mood? happy
Missing someone? My dad and friends who live in Ohio
Vehicle? Chrysler Pacifica
Something you're not wearing? Bra -can't stand those things!
Your favorite store? Are you kidding me? All of them!
Your favorite color? right now it is anything pumpkin colored
When was the last time you laughed? just a minute ago
Last time you cried? not sure
Your best friend? I have known them since I was 5.
One place that I go over and over? the laundry room :D
One person who emails me regularly? Amazon
Favorite place to eat? San Francisco, Las Vegas, any major city

Monday, September 28, 2009

Fall Baking Series: Great Pumpkin Cake


Ever see those recipes that look so easy? You know, the ones you think you can just whip up in no time at all? Well, this cake isn't that recipe. Oh, looks can be deceiving alright! Then again, my cake decorating skills need improvement. It is possible that someone else would actually have an easy time with this recipe. All that aside, the kids loved this cake and thought it was really cute!!

It is basically a cake mix baked in a 12-cup fluted tub pan. It is frosted with a cream cheese frosting that has been colored with food coloring. The pumpkin stem is a frosted ice cream cone.
The recipe actually says you can use any cake mix, but I learned my lesson with that one. I used a chocolate cake mix and you could see the chocolate cake peeking through the frosting. Lesson number one is to chose a light cake mix.

I made my own cream cheese frosting, hence lesson number two. While my homemade frosting was delicious, it was much thinner. I should have followed the recipe in the book. I think their recipe would've yielded a thicker frosting making it easier to cover the cake. Instead, I fought to frost this cake for at least an hour.

I will try this recipe again next year, or maybe for Thanksgiving. Next time, I'm going to buy a light cake mix and make the frosting in the book. After all, this recipe should be easy!!

Great Pumpkin Cake - Halloween Food, Fun & Crafts
1 pkg. (2-layer) cake mix, any flavor
1 pkg. (8 oz) cream cheese, softened
1/4 cup (1/2 stick) butter, softened
4 cups powdered sugar
Few drops each: green, red and yellow food coloring
1 cake-style ice cream cone

Prepare cake batter and bake in 12-cup fluted tube pan as directed on package. Cool in pan 10 minutes. Invert cake onto wire rack; remove pan. Cool cake completely. Meanwhile, beat cream cheese and butter in medium bowl with electric mixer on medium speed until blended. Gradually add sugar, beating until well blended after each addition. Remove 1/2 cup of the frosting; place in small bowl. Add green food coloring; stir until well blended. Spread half of the green frosting onto outside of ice cream cone; set aside. Cover and reserve remaining green frosting for later use. Add red and yellow food colorings to remaining white frosting to tint it orange. Spread onto cake to resemble pumpkin. Invert ice cream cone in hole in top of cake for the pumpkin's stem. Pipe the reserved green frosting in vertical lines down side of cake.

Makes 24 servings