Tuesday, November 6, 2012

Onion Fritters with Fresh Green Chutney

 The town I live in is pretty small and rural.  In fact, if you go down the street and make a left you'll run into a cattle farm.  To push my point even further, we were a dry county (no beer or alcohol sales allowed) until just about a month ago.  It's just a nice, small, old-fashioned kinda town.  While we do love living here, sometimes we miss living in a bigger city with all it's conveniences.  

However, just last week our little town had a grand opening for a brand new very fancy grocery store.  I was beyond ecstatic!  For four years I've been running to the "city", which is 30 minutes away, to get all my special hard-to-find grocery items.  Now all those special ingredients are right at my fingertips.  All I have to do is go down the street and make a left when I see the cattle farm.  It's literally minutes away.

My neighbors are laughing at me because I've been to the new grocery store every day since they've opened.  I know you all understand.  I can't believe that here, in what feels like the middle of nowhere, we now have a grocery store that has a sushi bar, and get this....a cupcake bar.  You can literally make your own cupcake.  Can I just tell you that this grocery store sells everything?  Heck, they even sell whole (skinned and deboned) frogs!  Crazy, huh?  

So anyway, I've basically been stalking the place with big wide eyes full of wonder.  It's safe to say that I've spent way too much money buying up all the ingredients that I've been dying to get my hands on all these years.

Chickpea flour, or besan, is one of the ingredients that I've been searching for until now. Chickpea flour can be used for many things, but what I've been wanting to make with it lately are these savory and totally addicting onion fritters. 

The batter for these fritters consists chickpea flour, egg, four different spices, green chile, and fresh cilantro.  The batter rests for awhile so that it has a chance to soak up all the great added flavors.   The diced onion is thrown in at the last minute right before frying.  These fritters are okay on their own, but magic happens when you dunk them in this Fresh Green Chutney.  The chutney is fresh from the addition of mint and cilantro, tangy from the yogurt, and a little bit acidic from the lemon juice.  It is a perfect pairing.  I served these as an appetizer prior to serving Jaffrey's Delicious Chicken Bits that I posted here last month.  If you're looking for a new way to prepare your chicken, please try those chicken bits.  They are absolutely incredible!

Onion Fritters with Fresh Green Chutney

1 large egg
4 tablespoons water
1 tablespoon fresh lemon juice
1 cup chickpea flour (also called besan)
3/4 teaspoon salt
1/2 teaspoon cayenne pepper
1/2 teaspoon garam masala
1/2 teaspoon cumin seeds
1 teaspoon ground cumin
1/4 teaspoon ground turmeric
1 fresh, hot green chile, finely chopped (do not remove seeds)
2 tablespoons chopped fresh cilantro
vegetable oil, for frying
1 medium-large onion, peeled and chopped into medium-size dice

Break the egg into a bowl and beat well.  Add the water and the lemon juice.  Mix.  Add in the chickpea flour and mix well with a whisk.  Put in the salt, cayenne pepper, garam masala, cumin seeds, ground cumin, turmeric, green chile, and cilantro.  Mix well and set aside for at least 10 minutes.  Mix again with a whisk.  The batter should be of a droppable consistency.  

Put the oil in a wok or deep fryer and set over medium heat. You should have at least 3 inches of oil in the center of the wok.  When the oil is hot, put the onion into the batter and mix.  (This should always be done just before frying).  Remove heaping teaspoons of the batter and drop it into the hot oil.  Use up all the batter this way.  Stir and fry the fritters for 7 to 8 minutes or until they are golden red.  Remove the fritters with a slotted spoon and drain on a plate lined with paper towels.  Serve hot, as soon as the fritters are made.

Fresh Green Chutney

6 tablespoons plain yogurt
 2 heaping tablespoons coarsely chopped mint
2 heaping tablespoons coarsely chopped fresh cilantro 
1 tablespoon fresh lemon juice
1/3 teaspoon salt or to taste

Put 2 tablespoons of the yogurt and the mint, cilantro, lemon juice, and salt into the container of an electric blender and blend until smooth, pushing down with a rubber spatula if necessary.

Put the remaining 4 tablespoons of yogurt into a bowl and beat lightly.  Add the paste from the blender.  Stir to mix.

This chutney may be stored, covered, in the refrigerator for 2 to 3 days.
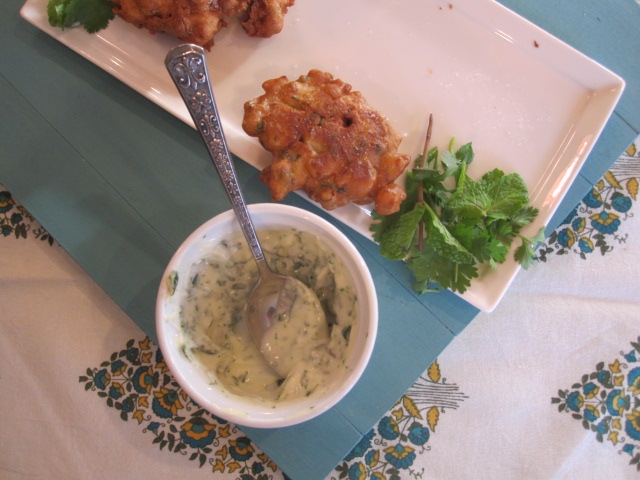
Eat 'em all up til they're gone!

Theme: Relishes, Chutneys and Pickles

Sunday, October 28, 2012

Mango and Cardamom Lassi

A lassi is a traditional Indian beverage made with yogurt, very much like a smoothie. There are many versions of lassis, both sweet and savory.  This version is a sweet lassi sweetened with mango and sugar and lightly spiced with a little bit of aromatic citrusy cardamom. 

This is a creamy, sweet, and refreshing drink.  It pairs very well with spicy food and also makes a great breakfast or post-workout drink.

 Mango and Cardamom Lassi
Adapted from Quick & Easy Indian Cooking
by Madhur Jaffrey
Serves 2-3

1-1/4 cups plain yogurt (I used Greek yogurt)
1 cup chopped, ripe mango
3 tablespoons sugar, or to taste
1/4 teaspoon ground cardamom seeds, plus more for sprinkling on top
8 ice cubes

Combine all the ingredients in an electric blender and blend.  Some ice pieces may remain.  Pour into 2 or 3 glasses and serve.  Garnish with additional cardamom, if desired.


Theme: Everything's Better with Yogurt


Wednesday, October 17, 2012

Green Lentil and Vegetable Curry

Never in my life did I think I would become a stay-at-home mom, but when I had my second child it just didn't seem worthwhile to work any longer.  I thought staying at home would be a piece of cake.  Thought I'd have all day long to do what I wanted.  Boy was I wrong.

Mornings around here are a train wreck.  I wake myself up at 6:15 so I have a few minutes to do the bare essentials.  At 6:30 I wake up my 5 year old, and I must admit that he's really pretty good about getting ready for school...as long as I follow closely behind to keep him on task.  I take him to school at 7 o'clock and come back to help my 11 year old daughter get ready for middle school.  The next hour, leading up to 8 o'clock, is my most challenging and dramatic part of the day.  I repeat everything I say eight to ten times until she finally hears me.  Because middle school is a fashion show we bicker over what she's going to wear, which usually results in lots of whining until I give in.  Finally I pretend to hear the bus and usher her outside. When the bus pulls away I take a deep cleansing breath. 

As soon as my daughter gets on the bus I meet my neighbor for our morning walk.  Most mornings we walk a total of an hour and a half, making it 9:30 when I get home (only 1 more hour before I have to pick up my son from Kindergarten).  Immediately after walking, I grab my keys and dash to the grocery store where I literally have to run into the store and down the aisles grabbing stuff off the shelves like a mad woman so that I can make it to the carpool line in time.  I'm not exaggerating when I say that I run through the aisles.  I'm out of breath when I get in the car.

When I get home with my son at 11 o'clock I've been up for about 5 hours and I've been going nonstop.  I haven't had time to eat yet and I'm feeling ravenous.  I get my son situated and unload the groceries.  I'm so hungry I can't stand it.  I've learned to have healthy options ready and waiting for me when I get home, otherwise I will make very bad choices.

This green lentil and vegetable curry is a comforting, satisfying, and healthy option. It's chock full of protein-packed lentils, green beans, kale, and carrots which are simmered away in a spicy sauce.  I really enjoyed this curry best over brown rice, with a dollop of yogurt and a piece of naan bread on the side.  I do have to say that my family didn't care for this meal at all, but they are all picky eaters, and I didn't really want to share anyway.  I really enjoyed knowing that this meal was waiting for me in the fridge after a long hectic morning. It's worth mentioning that this dish improves over time once the flavors have a chance to meld. 

I wanna take this time to say that I love and appreciate being able to stay home with my kids.  I realize that not everyone has the option to do so and I am grateful.  I just want people to know that we all lead busy lives and we all feel short on time.  It helps to have healthy dishes like this up your sleeve and at the ready.

Green Lentil Curry
Adapted from Food and Wine
contributed by Madhur Jaffrey
Serves 4-6 easily

  1 teaspoon finely grated ginger 
1 garlic clove, mashed to a paste 
2 teaspoons ground coriander 
1 teaspoon ground cumin 
3 tablespoons canola oil 
1/4 teaspoon cumin seeds 
1 small shallot, minced
1 tablespoon tomato paste mixed with 1 tablespoon of water 
1 1/4 cups dried green lentils 
1/4 teaspoon ground turmeric (omitted)
4 ounces green beans, cut into 3/4-inch lengths 
4 ounces kale, stemmed and leaves finely chopped 
1 medium carrot, thinly sliced 
1 cup finely chopped cilantro 
1/2 teaspoon cayenne pepper, more if you like it spicy 
salt 
In a small bowl, combine the ginger, garlic, coriander and ground cumin. Stir in 1/4 cup of water to make a paste. In a small skillet, heat the oil until shimmering. Add the cumin seeds and cook over moderately high heat for 5 seconds, just until sizzling. Add the shallot and cook, stirring, until lightly browned, about 1 minute. Add the spice paste and let cook until most of the liquid has evaporated, about 2 minutes. Stir in the tomato paste and cook until thick, about 1 minute longer. 
In a saucepan, combine the lentils with the turmeric and 5 cups of water; bring to a boil. Cover partially and simmer over low heat for 20 minutes, until the lentils are barely tender. Add the green beans, kale, carrot, three-fourths of the cilantro and the cayenne and season with salt. Cook until the lentils and vegetables are tender, 15 minutes. Scrape in the spice paste and the remaining cilantro. Simmer for 5 minutes, then serve.
Serve with steamed basmati rice, or in my case, brown rice, warm naan, and plain yogurt.

Theme: Lentil Love!

Thursday, October 11, 2012

Madhur Jaffrey's Delicious Chicken Bits

These incredibly addictive mouth-watering chicken bits are a celebration of spices.  Coated in a blend of pepper, turmeric, cayenne pepper, cumin, dried thyme, garlic powder, paprika and salt they simply dance around on your taste buds.  In fact, my non-chicken eating, non-spice eating daughter went crazy for them.  I was pleasantly surprised.  

These chicken bits can be served on their own as an appetizer, but I chose to make a meal out of them and serve them over rice.  We loved these chicken bits.  Next time (which may even be as soon as tomorrow) I will make a double batch of them.  This is a fantastic recipe!  I urge you to give it a try!

Delicious Chicken Bits
Adapted from Quick & Easy Indian Cooking
by Madhur Jaffrey
Serves 6-8 as an appetizer or 4 as a main course

1-1/4 pounds boned, skinned chicken breasts
1 teaspoon freshly ground black pepper
1/4 teaspoon ground turmeric
1/4 teaspoon cayenne pepper
1 teaspoon ground cumin
1 teaspoon dried thyme or 1/2 teaspoon ajwain seeds
1/4 teaspoon garlic powder
1 teaspoon bright red paprika
3/4 teaspoon salt
3 tablespoons vegetable oil

Preheat the oven to 350F.  Cut each chicken breast piece lengthwise into thirds, and then crosswise into 3/4 inch to 1-inch segments.  Put in a bowl.  Add the black pepper, turmeric, cayenne pepper, cumin, thyme or ajwain, garlic powder, paprika, salt and 1 tablespoon of the oil.  Mix well and set aside for 10 minutes or longer.

Heat 2 tablespoons oil in a wok or large, nonstick frying pan over very high heat.  When the oil is very hot, put in the chicken.  Stir and fry quickly until the chicken pieces are lightly browned or turn opaque on the outside.  Put in a baking dish, cover loosely with lightly oiled wax paper (which should sit inside the dish and directly on the chicken pieces) and bake for 8 - 10 minutes or until the chicken pieces are just cooked through.  If not to be eaten immediately, remove the chicken pieces from the hot baking dish to prevent them from drying out.
Theme: Spice Bazaar

Sunday, October 7, 2012

Chicken Patties with Ginger and Sesame Seeds with Korean Dipping Sauce {and a cookbook winner}!!

Over at I Heart Cooking Clubs we are welcoming in Madhur Jaffrey.  For the next six months we will be cooking and sharing one of her recipes each week.   We are a very flexible cooking group so if you feel like jumping in once or twice, or more often, feel free to join us.  Jaffrey has a huge selection to chose from!

If this first recipe is any indication of how great Jaffrey's recipes are then I'm off to a great start!  These little Chicken Patties with Ginger and Sesame Seeds are from Jaffrey's Step-by-Step Cooking book.  While Jaffrey is widely known for her Indian cooking books, the Step-by-Step book is focused mainly on recipes from the Far East (Indonesian, Thai, Korean, Chinese, and Japanese).  When I page through my copy of this book I literally want to make everything, however, it was this recipe for these chicken patties that caught my attention the most.  And I'm so glad they did!

These patties are delightfully seasoned with garlic, scallion, ginger, roasted sesame seeds, sesame oil and soy sauce.  The best part....they are so juicy!  Of course, you cannot make these without pairing them with the Korean Dipping Sauce.  I could literally drink that sauce.  These little chicken patties disappeared in no time flat.  We wished there were more of them!

Jaffrey says these can be served up as an appetizer, alongside rice with the sauce drizzled on top as a main course, or as a hamburger on a bun with the sauce drizzled on top.  Any way you serve them they are delicious.

Chicken Patties with Ginger and Sesame Seeds
Tak Kogi Sopsanjok
Makes 6 patties

1 scallion
1 large garlic clove
1-inch cube fresh ginger
1 pound ground chicken
1 tablespoon roasted sesame seeds*
1 tablespoon sesame oil
1 tablespoon soy sauce or shoyu
freshly ground black pepper
1/4 to 1/2 teaspoon chili powder
Korean dipping sauce *
1 to 2 tablespoons vegetable oil
fresh cilantro sprigs, for garnish 

Cut the scallion crosswise into very fine rounds along its entire length, including the green section.  Peel and mince the garlic.  Peel and finely grate the ginger.  Put the chicken in a bowl.  Add the scallion, garlic, ginger, roasted sesame seeds, sesame oil, soy sauce, black pepper, and chili powder.  Mix thoroughly. 

Shape the mixture into 6 patties, each about 3-1/2 inches in diameter.  Put them in a single layer on a plate and cover with plastic wrap.  Set the patties aside until you are ready to eat.  Prepare the Korean Dipping Sauce (recipe below).

Lightly grease a large non-stick frying pan with the oil and set over a medium-high heat.  When hot, add the patties and cook for 1- 1-1/2 minutes or until golden brown underneath.  Turn the patties over and cook the other side for the same time.  Turn the heat to medium and cook the patties for another minute or longer on each side, until browned and cooked through.  To test, pierce the center with the point of a sharp knife - if meat is no longer pink inside, the patties are cooked.  Serve hot, garnished with sprigs of cilantro if you like. 

Korean Dipping Sauce
Yang Nyum Jang
Serves 4

1 small garlic clove
1 scallion
4 tablespoons soy sauce, preferably Japanese shoyu
2 tablespoons distilled white vinegar
1 tablespoon sesame oil
1 teaspoon sugar
1 teaspoon roasted sesame seeds*
1/4 teaspoon chili powder

Peel and mince the garlic.  Cut the scallion into very thin rounds.  Combine the garlic, 1 tablespoon sliced scallion, the soy sauce, vinegar, sesame oil, sugar, sesame seeds, and chili powder in a small serving bowl and mix well.


*To roast sesame seeds: Set a small cast-iron frying pan over a medium-low heat.  When hot, add 1 to 3 tablespoons sesame seeds.  Stir them until they turn a shade darker and give out a wonderful roasted aroma.  You could turn down the heat slightly when they do this, or cover the pan loosely.  Remove the seeds from the pan as soon as they are done.  You may roast sesame seeds in advance, cool, then store in a screw-topped jar for 2 to 3 weeks, though they are best freshly roasted.
*********************************************************************
And now for winner of the Muy Bueno Cookbook!!

Congratulations to Teresa from A Blog About Food!  I'm so happy you won!!
 I will send you an email for your information and the publisher will send you a copy of the book.
*I used the random number generator to decide the winner and the random number was number 8.     
Theme: Welcome Madhur Jaffrey


Wednesday, October 3, 2012

Muy Bueno Cookbook Review and Giveaway!!

Muy Bueno
Three Generations of Authentic Mexican Flavor
Authors: Yvette Marquez-Sharpnack, Veronica Gonzalez-Smith, 
& Evangelina Soza
Publisher: Hippocrene
Softcover: 288 pages

Chapters Include: Introduction - Glossary of Chiles - Tamales - Breads - Salsas - Drinks - Aquas y Paletas - Appetizers - Soups - Entrees - Sides - Desserts- Gracias - Spanish Recipe Index - and Recipe Index

The Muy Bueno cookbook is honestly one of the prettiest cookbooks I've seen in some time.  You can literally get lost in the beautiful pictures and stories that are shared in this book.  During my journey with this cookbook I tried several recipes, and they were all terrific, but it was the sentiment of the book that really captured my heart. This book is so much more than recipes.  It's the tale of three generations of women spending time together in the kitchen and bonding through food.  It's a testament to the wonderful memories you can create in the kitchen.


Here is a recap of the dishes I tried from Muy Bueno:

Mexican Chorizo and Cheese
Adapted from Muy Bueno
Serves 6

5 ounces Mexican chorizo, casings removed
1/2 cup sliced white onion (1/2-inch strips)
1/2 cup silver/blanco tequila
12 ounces quesadilla or asadero cheese, shredded (I used monterey jack)
1 tablespoon chopped cilantro (I used green onion)
6 corn or flour tortillas, warmed

Preheat oven to 350F.  In an oven-safe skillet (cast iron is perfect), cook the chorizo on your stovetop until almost done, about 15 minutes (mine was done in about 8 minutes).  Drain excess fat.  Add the onion to the chorizo and cook until browned.  Remove pan from the heat.

Carefully add the tequila.  Return to heat and simmer, uncovered, for 15 to 20 seconds or until most of the tequila has dissipated.  Remove from heat.

Stir in the cheese and combine well.  Place skillet in the oven and bake uncovered for about 10 to 15 minutes or until cheese is completely melted and slightly golden brown on top.  Sprinkle with fresh cilantro.  Serve with corn or flour tortillas.

*If you need to double the recipe, do not double the tequila, use only 1/2 cup.

These are the recipes I'd like to try:  Red Chile & Pork Tamales - Cranberry Margarita - La Llorona - Albondigas - Chicken Tinga - Ham and Avocado Torta - Old Fashioned Mexican Oatmeal - Jalapenos with Soy Sauce - and Vangie's Famous Thanksgiving Stuffing
GIVEAWAY
Hippocrene has generously offered one of my readers the chance to win their very own copy of the newly released Muy Bueno: Three Generations of Authentic Flavor cookbook (US shipping addresses only, please).  All you need to do is leave a comment letting me know that you're interested in winning a copy of the book! It's as easy as that!!  The giveaway will run until Saturday, October 6th at midnight (EST).  The winner of the book will be drawn via random number generator and announced on Sunday, October 7th.

*Visit the Muy Bueno Cookbook Spotlight and Cook-off Announcement page for more chances to win a copy of the book.  Simply scroll down to week three and click on the links to each participant for additional chances to win a copy of this cookbook.  


Thanks to Heather at girlichef, and to the publisher Hippocrene, for the opportunity to review this book!  This post is part of the Muy Bueno Cookbook Spotlight & Cook-Off sponsored by Hippocrene and hosted at girlichef 

Muy Bueno Cookbook Cook-Off and Spotlight (small)

Sunday, September 30, 2012

Stuffed Bell Peppers with Ground Beef and Potatoes {Muy Bueno Cookbook Spotlight and Cook-off}

When I first received my copy of the soon-to-be-released Muy Bueno: Three Generations of Authentic Mexican Flavor Cookbook, I did what I always do. I grabbed a notebook and pen and sat down to explore my new book.  One of my favorites things to do with a new cookbook is write a list of all the recipes I want to try.  Usually my list is about half a page long. This time, however, I opened my Muy Bueno cookbook and once my pen hit the paper it never came back up.  Soon I realized that I literally wanted to make every single recipe.   

Instead of listing every recipe in the book I decided to catalog the top few that drew my attention the most.  The recipes destined for my kitchen right away.  Let me tell ya...that took awhile.  However, there was one recipe that was so colorful it drew me in, bell peppers in a rainbow of colors stuffed with a hearty mix of ground beef and potatoes. 

Stuffed peppers are special to me.  My Mom's specialty always was and continues to be her stuffed peppers.  She makes an awesome stuffed pepper filled with beef, rice, tomatoes, and cheese.  They are a real hit around here.  Mom's stuffed peppers are so good that I never even attempted to make stuffed peppers myself.  Until now. 

This recipe, from the Muy Bueno cookbook, is different enough that it simply can't be compared to Mom's stuffed peppers.  My Mom's recipe is more about the filling where in this Muy Bueno version I feel like the bell pepper itself is the star.  You really taste the pepper.  This version is very fresh and feels almost virtuous, perfect for this time of year when temperatures still remain high but comfort food is calling.
Stuffed Bell Peppers with Ground Beef and Potatoes
Pimientos Rellenos con Picadillo
Makes 3 stuffed bell peppers

3 bell peppers (your choice of color)
1 batch picadillo (recipe follows)
1 tablespoon olive oil
1/2 cup crumbled queso fresco (I subbed feta cheese)
cilantro, for garnish (optional)

For Picadillo:
1 tablespoon olive oil
1/2 cup chopped white onion
1 pound ground beef
2 cloves garlic, minced
1 teaspoon salt
1 cup chopped roma tomatoes
1 small russet potato, peeled and finely chopped

To make picadillo: In a large skillet heat oil over medium heat.  Add onion and cook for about 2 minutes, until translucent.  Add ground beef and brown,  Using a potato masher, mash meat so you have small pieces of meat with no big chunks.  Drain off excess grease.  Add garlic, salt, tomatoes, and potatoes and cook over low heat for about 15 minutes, until potatoes are done.  Salt to taste.

To make the stuffed peppers:  Preheat the oven to 350F.  Make picadillo for stuffing the bell peppers (see above). Rinse the peppers, Cut the tops off and remove the white flesh and seeds.  Rinse out the inside of each pepper.  In a large stockpot parboil the peppers, about 3-5 minutes, depending on how soft you want them to be in the final dish.  Remove the peppers and drain any excess water that is inside them.  

Brush each pepper with olive oil.  Heat up a comal (or griddle) and place the peppers on their side on the comal, about 1 minute on each side, just long enough to sear the sides of each pepper.

Prepare a baking dish (about 10.5 inches by 7 inches/a bread loaf pan would be perfect) that will accommodate your 3 peppers.  Spray the dish with cooking spray to keep the peppers from sticking to it.  Pour about 1/4 inch water into pan.  

Stuff each pepper with some picadillo and place it in the baking dish.  Cover with foil and crimp the edges onto the dish creating a seal.  Bake for about 25 to 30 minutes.  

Remove from oven and let rest for about 5 minutes.  Plate 1 pepper per plate, top with crumbled queso fresco (or feta), and garish with cilantro. 
This post is part of the Muy Bueno Cookbook Spotlight & Cook-Off sponsored by Hippocrene and hosted at girlichef*


Stay tuned for next week when I will be hosting a Muy Bueno Cookbook Review and Giveaway!  You don't want to miss out on a chance to win a copy of this gorgeous book!