Thursday, January 6, 2011

Citrus Cream Smoothie


Resolutions.  I resolve to eat lots of good food.   I resolve to buy more cookbooks.  I resolve to try lots and lots of new fantastic recipes.  Most of all, I resolve to continue writing and blogging about food.  In fact, today my blog turned 2 years old!  Hooray!

Prior to blogging I felt very alone in my passion for cooking.  It seemed that no one understood how exciting cooking was to me.  All my blabbering about food went in one ear and out the other.  It was a pretty lonely feeling.  Then I discovered food blogs and a whole new door opened up for me.  Finally I was able to meet other people like me who were just as passionate about food.  I treasure my friendships with all of you and appreciate your continued support and encouragement.   Thank you for being there for me and for understanding the passion!  Let's toast to many more years of cooking and blogging together!  I just happened to bring along the perfect drink......
Citrus Cream Smoothie
Serves 6

1/2 cup water
1/2 cup sugar
3 cups plain Greek yogurt
1-1/4 cups orange juice
2 medium bananas, cut into 1-inch pieces
2 tablespoons grated orange zest (from 1 large orange)
2 teaspoons pure vanilla extract 
1 cup ice 

In a small saucepan, bring the sugar and water to a boil over medium-high heat. Simmer, stirring occasionally, until the sugar has dissolved, about 5 minutes. Cool for 20 minutes.

Pour the cooled syrup into a blender. Add the yogurt, orange juice, bananas, orange zest, vanilla extract, and ice. Blend until the mixture is smooth. Pour into glasses and serve.
Notes/Results:  This smoothie is fantastic!  Smooth, thick, creamy and full of citrus flavor and aroma....it is a sure way to beat the winter blahs.  The whole family was crazy about this smoothie.  Since the smoothie makes enough to serve 6, we had enough smoothie left to make 3 popsicles (it's never to cold to eat popsicles).  This smoothie would make a great addition to your breakfast table.  
Now cooking the recipes of Giada De Laurentiis

Wednesday, January 5, 2011

Dorie Greenspan's Go-To Beef Daube with Saint-Germain-Des-Prés Onion Biscuits

I normally like to do a monthly round up of my French Fridays with Dorie recipes, but this month will be different.  I'm trying to play catch up to last month's recipes and keep up with this month's recipes as well.  I've got a lot of cooking to do!

My husband bought me a brand new Martha Stewart Dutch oven for Christmas.  Hooray!  Prior to receiving this Dutch oven, I had been using the insert in my crock pot as a "makeshift" Dutch oven.  I'm so glad that my husband took notice of my "makeshift" Dutch oven and bought me a real Dutch oven as a Christmas gift.  It really is a beautiful pot and I know that I will get years and years of good use out of it.  Making Dorie's Go-To Beef Daube was the perfect way to break it in!
I have to confess that I've never made or ate a Beef Daube before.  Turns out that a Beef Daube is pretty much a beef stew or even much like a pot roast with veggies.  The recipe begins with a  3.5 pound chuck roast that has been cut into 2- to 3-inch cubes.   Four slices of bacon are cooked in the Dutch oven until brown, then removed.  The beef cubes are then browned in the bacon fat until they have quite a bit of color.  Once the beef has achieved a deep and dark color, it is removed and set aside. 
Do you like to chop veggies?  I love chopping veggies.  It's probably one of my favorite tasks in the kitchen.  Lucky for me this recipe requires a lot of chopping.  Featured in the pan below are two yellow onions and six shallots.  I love to chop, but those onions and shallots were very strong....there were some tears involved.  I stuck my head in the freezer a few times.  Do you ever do that?  It works.  Stops the tears instantly.
After about 8 minutes, once the onions and shallots cooked down, I added one and a half pounds of carrots, a half pound of parsnips, and an entire head of garlic (with the loose papery peel removed).  My kitchen was a mess at this point.  Onion and shallot peels were everywhere, including my hair.  I didn't sweat it though.  You know why?  It was time to break out the alcohol!  Get out the Brandy and the red wine................. 
It's time for the Brandy once all the veggies have a chance to mingle together for a few minutes. Do you like to deglaze?  I do!  I love it. I poured that Brandy in the pot and waited for the sizzle.  Once you hear that sizzle then you know you are going to be in for some wonderful aromas.  Not to mention..... this is your chance to sneak a sip, or two, of the Brandy.  Believe me, look around at your kitchen.  It's messy.  You'll need a few good sips.  Possibly even more than a few sips.
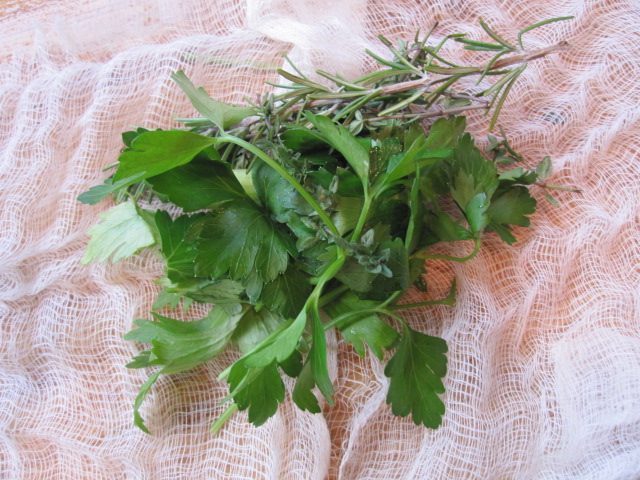
Now it's time to make the bouquet garni.  Do you like to make a bouquet garni?  I love it.  There's just something about that cute little package of herbs and/or spices.  The bouquet garni for this recipe includes rosemary, thyme, parsley, and celery leaves.
The beef cubes and bacon are added back into the Dutch oven, as well as the cute little bouquet garni and then an entire bottle of red wine is added in (I like to use Cabarnet with my beef).  Thankfully I had another half bottle in the fridge left for drinking.  It came in handy when it was time to clean up my kitchen.  I love to chop.  I love to deglaze.  I love to make bouquet garni.  I DO NOT like to clean.
The Beef Daube cooks at 350F for 2-1/2 hours (with a sheet of foil and a lid over the top).  After 2-1/2 hours, it is fall-apart tender, with a deep dark and rich color, and full of flavor thanks to the red wine.  A delightful and glorious meal.  Everyone loved it, including my 9 year old daughter who tends to be picky from time to time. 
We enjoyed the Beef Daube with Dorie's Saint-Germain-Des-Prés Onion Biscuits.  The biscuits weren't one of the recipes for last month or this month, but I thought they sounded delicious and it turns out they were.  The biscuits were tender and flaky and studded with finely chopped and lightly cooked onion.  The biscuits had a mild onion flavor and went perfectly with the Beef Daube.  I would make both recipes again.

Happy Cooking!

Sunday, January 2, 2011

Artichoke and Bean Bruschetta

Happy New Year!  I hope you all had a wonderful holiday with your friends and family.  After celebrating Christmas here in Kentucky, we loaded up the car and headed up to visit family and friends in Ohio.  It was a wonderful visit, but the past few weeks have felt like a whirlwind and I am beyond anxious for everything to settle down and return to normal.
It's amazing how much you can miss your kitchen when you are away.  In celebration of getting back into the kitchen, I made Giada's Artichoke and Bean Bruschetta.
Artichoke and Bean Bruschetta
Adapted from Giada at Home
Makes 4 - 6 servings

Vegetable oil cooking spray
4 very thin slices prosciutto (I used bacon)
12 (1/4-inch-thick) slices rustic country bread
1/2 cup olive oil, plus more for drizzling
1 (12-ounce) pkg frozen artichoke hearts, thawed (I used jarred)
1 (15-ounce) can cannellini beans, rinsed and drained
1 cup freshly grated Pecorino Romano cheese
1/2 cup coarsely chopped fresh basil leaves
1 teaspoon grated lemon zest
1 tablespoon fresh lemon juice
2 teaspoons salt
1/2 teaspoon freshly ground black pepper

Place an oven rack in the center of the oven and preheat the oven to 375F.  Spray a rimmed baking sheet with vegetable oil cooking spray.

Lay the prosciutto in a single layer on the prepared baking sheet and bake for 10 to 2 minutes, until crispy.  Set aside to cool for 10 minutes.

On another baking sheet, arrange the bread slices in a single layer.  Using a pastry brush, brush the bread with 1/4 cup of the oil.  Bake for 12-15 minutes, until golden.

In a food processor, combine the artichoke hearts, beans, cheese, basil, lemon zest, lemon juice, salt and pepper.  Pulse until the mixture is chunky.  With the machine running, slowly add the remaining 1/4 cup olive oil and mix until combined but still slightly chunky.
Spoon the artichoke mixture onto the crostini.  Crumble the prosciutto and sprinkle on top.  Drizzle with oil and serve.

Notes/Results: We enjoyed the smooth creaminess of the artichoke and bean mixture, but felt the added lemon zest and lemon juice were a little too overpowering.  Next time around, I would probably omit both the lemon zest and lemon juice and add in a clove or two of garlic.  Also, I didn't have any prosciutto on hand, so I subbed bacon. I think I actually prefer the bacon for this recipe because it lends a heartiness and smokiness that you just don't get with prosciutto. I would make this again with the changes mentioned.

I'm really looking forward to catching up on all your blogs and seeing what you've been up to.  May the new year bring us lots of new and tasty recipes!

Now cooking the recipes of Giada De Laurentiis
At Brenda's Canadian Kitchen

Saturday, December 25, 2010

Breakfast Enchiladas and Christmas Wishes

I hope that all of you are having a wonderful Christmas!  My family and I are having a relaxing and fun day.  For the first time in many years we woke up to a White Christmas.  After opening up the presents, we bundled up and went outside.  The kids couldn't wait to try out their new mini four wheeler.  
After a long morning and lots of time out in the cold, we were all really hungry and enjoyed these Breakfast Enchiladas.    
The enchiladas were like a heartier and ultra-comforting step up from a breakfast burrito.  Ground sausage, eggs, green onion, cilantro and a green chile-pepperjack cheese sauce are enveloped in a flour tortilla and topped with more green chile-pepperjack cheese sauce.  This was the perfect, indulgent, and satisfying breakfast treat!  You can find the recipe HERE at Food.com.  This is a great breakfast if you need to feed a crowd of hungry people. 

I had a few recipes planned that I hoped to fit in before the holidays, but I ran out of time.  Tomorrow afternoon we are headed to Ohio to visit with my Dad and some friends.  I won't be able to visit or comment much, but wanted to wish all of you a very Merry Christmas and a Happy New Year!  Looking forward to seeing all of your tasty recipes next year!

Tuesday, December 21, 2010

A Comfort Food Feast: Giada's Pot Roast with Porcini Mushrooms, Herbed Cheese Polenta, and Brussels Sprouts with Pancetta

All you could hear was the sound of forks hitting plates.  No one said a word.  They were too busy shoving food in their mouths.  There was no talking, no drinking, and there was no one asking for salt, napkins, etc.  The food was inhaled.  The entire 4 pound roast.... gone in one sitting!  Everyone was so pleased with this meal that it was requested again, and soon. 

Thank you to all my wonderful blogging friends who pointed out Giada's recipe for Pot Roast with Porcini Mushrooms.  You sang it's praises, posted some astoundingly drool-worthy photos, and inspired me to make it for myself.  It was glorious.  It was delicious.  It was savory, tender, succulent.....and that sauce was out of this world.  Seriously one of the best pot roasts to ever touch my lips.  I will make it again and again.

I won't lie.  The pot roast was infinitely better served atop this creamy, cheesy, sinfully rich Herbed Cheese Polenta
 And, because my nine-year old daughter has a new love for Brussels Sprouts, I made Giada's Brussels Sprouts with Pancetta.  A five-star veggie dish for sure!
 It was an extremely rewarding and comforting feast.  A welcome change from the quick meals and cookies that we've been eating all week.  If you're looking for a wonderful meal, here it is.  Be ready to dig in.  Try not to cry when you don't have any leftovers.
Pot Roast with Porcini Mushrooms
Adapted from Giada's Family Dinners
Serves 8-10, or maybe just 4
1 (5 pound) boneless beef chuck roast
salt and freshly ground black pepper
2 tablespoons olive oil
2 onions, chopped
6 garlic cloves, coarsely chopped
1 cup dry red wine
1-3/4 cups canned low-sodium beef broth (I didn't have broth on hand so I used water)
1/2 ounce dried Porcini Mushrooms
1 large spring of fresh rosemary (I also didn't have any rosemary, so I omitted this)
Preheat the oven to 350F.  Pat the beef dry with paper towels and sprinkle generously with salt and pepper.  Heat the oil in a heavy, 6-quart pot or Dutch oven over medium-high heat.  Add the beef and cook until browned on all sides, about 12 minutes.  (Don't rush this step, which is what creates the deep rich flavor in the finished dish.) Transfer the beef to a bowl.
Reduce the heat to medium.  Add the onions to the same pan and saute until tender, scraping up the brown bits on the bottom of the pot, about 5 minutes.  Add the garlic and saute for 1 minute.  Add the wine and boil for 1 minute.  Stir in the broth and mushrooms.  Return the beef to the pan and bring the liquids to a boil.  Cover the pot and transfer to the oven.  Braise until the beef is fork-tender, about 3 hours, turning the beef over halfway through.
Transfer the beef to a cutting board.  Tent with foil and let stand for 15 minutes.  Meanwhile, spoon any excess fat off the top of the pan juices.  Transfer the pan juices and vegetables to a blender and puree until smooth.  In a medium, heavy saucepan, combine the sauce and rosemary sprig.  Bring to a boil, then season the sauce to taste with salt and pepper.
Cut the beef across the grain into 1/2-inch-thick slices.  Arrange the sliced beef on a platter.  Spoon some of the sauce over and serve, passing the remaining sauce in a gravy boat.


Herbed Cheese Polenta
Adapted from Giada's Family Dinners
8-10 servings
9 cups water (I added up to a cup more when the polenta became too thick)
1 tablespoon salt
2-1/2 cups yellow cornmeal or polenta
1-1/2 cups freshly grated Parmesan cheese
1-1/2 cups whole milk (I used half and half)
10 tablespoons (1-1/2 sticks) unsalted butter, cut into chunks
1/3 cup chopped fresh flat-leaf parsley
1 tablespoon finely chopped fresh rosemary (left out just because I didn't have any)
1 tabelspoon chopped fresh thyme
3/4 teaspoon freshly ground black pepper
Bring the water to a boil in a large, heavy pot.  Add the salt.  Gradually whisk in the cornmeal..  Reduce the heat to low and cook, stirring often, until the mixture thickens and the cornmeal is tender, about 15 minutes.  Remove from the heat.  Add the cheese, milk, butter, herbs, and pepper.  Stir until the butter and cheese melt.  Transfer the polenta to a bowl and serve.

In the interest of not writing a book, the recipe for the Brussels Sprouts with Pancetta can be found HERE, you will be redirected to the Food Network.

Notes/Results:  Absolutely amazing!!  Just a couple things to share.  I was really upset when I found that I didn't have the beef broth to make the roast, but I ended up subbing water and found the end result was still fantastic.  I halved the recipe for the polenta, which worked out great.  I subbed half and half for whole milk just because it was what I had on hand.  I added about 1 extra cup of water to the polenta while is was cooking.  I found that the polenta was too thick as the recipe was written.  All in all, a couple of subs and additions, but the end result of all three recipes was fabulous.  All three recipes are keepers!
Cooking the recipes of Giada De Laurentiis

Monday, December 20, 2010

Ina Garten's Baked Cheese

The first recipe that screamed to me from the pages of Ina Garten's How Easy is That?, was her Baked Fontina.  I was seduced by the gloriously melted cheese and had to have it.   
Baked Fontina, aka Baked Mozzarella
Adapted from Ina Garten's How Easy Is That?
Serves 4-6
1-1/2 pounds Italian Fontina Val d'Aosta cheese, rind removed and 1-inch diced (*I ended up using an equal amount of fresh mozzarella, more on that later)
1/4 cup good olive oil
6 garlic cloves, thinly sliced
1 tablespoon minced fresh thyme leaves
1 teaspoon minced fresh rosemary leaves
1 teaspoon kosher salt
1 teaspoon freshly ground black pepper
1 crusty French baguette

Preheat the broiler and position the oven rack 5 inches from the heat.

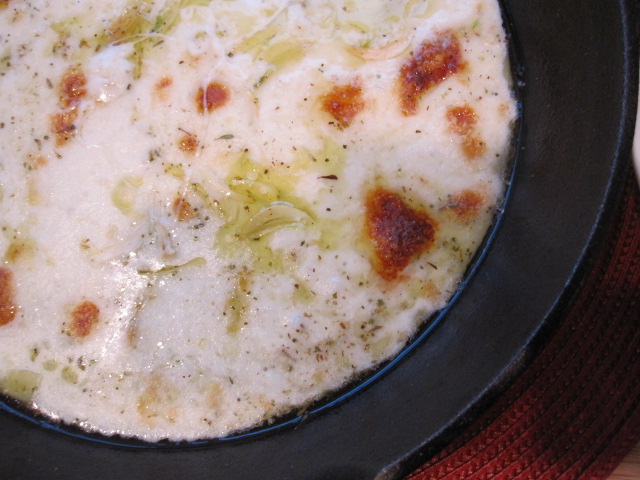
Distribute the cubes of Fontina (or mozzarella in my case) evenly in a 12-inch cast-iron pan.  Drizzle on the olive oil.  Combine the garlic, thyme, and rosemary and sprinkle it over the cheese and olive oil.  Sprinkle with the salt and pepper and place the pan under the broiler for 6 minutes, until the cheese is melted and bubbling and starts to brown.

Serve the baked Fontina (mozzarella) family-style - right out of the oven in the cast-iron pan with crusty chunks of bread for everyone to dip.

Notes/Results:  Ina recommended the Fontina Val d'Aosta, so I hightailed it to the city and bought roughly 1/2 pound ($11 for just 1/2 pound).  A couple of days later, I went to make this and opened up my package of Fontina Val d'Aosta.  The smell of the cheese was extremely offensive - extremely! It was so bad that I had to wrap it up and take it outside immediately.  I bought the Fontina from a reputable store, but somewhere along the line the cheese had definitely gone bad.  I had my heart set on a glorious pot of melted cheese, so I took out some fresh mozzarella and went ahead with the recipe.  I'm sure Ina's recommendation for the Fontina Val d'Aosta is fabulous, and I'll definitely give it another try, but the fresh mozzarella worked wonderfully too! I think you could easily adapt this one to use a lot of different cheeses.  I served my Baked Mozzarella with some chunky bread and sliced pepperoni.  Lips were smacking, mouths were happy, and all was fabulous!


Special Note:  If anyone has had Fontina Val d'Aosta, I'd love to hear about it.  I'm sure it's a wonderful cheese and am convinced I just bought a bad piece.
 
Yum!  Bring on the ooey gooey cheese!


Sunday, December 19, 2010

Michael Symon's Risotto with Bay Scallops and Spinach Salad with Fried Egg, Bacon, and Morels

Risotto is one of those dishes that reminds me of my love for cooking.  A labor of love, it cannot be left alone to tend to itself.  You have to pour your heart into it, stirring and stirring all the while.  You don't answer the door.  You don't answer the phone.  You stir, you daydream, you get lost in the recipe.  It's just you, your pot and that wooden spoon.  Tune the world out.....

That isn't the only reason risotto is one of my go-to meals. Risotto is also a cook's dream.  It can be a grand meal with fresh seafood and glorious cuts of meat or it can be a clean-out-the fridge kind of meal.  Either way, if you have a box of Arborio or Nano Rice, then you most likely have the makings for an impressive meal.  A little aromatics, some stock, leftover bits of cheese, veggies, meats...... you're good to go!

Michael Symon's risotto was the first time I've added prosciutto to risotto and I loved it.  Creamy and delicious with chunks of tender scallops and prosciutto...a beautiful meal.


Risotto with Bay Scallops
Adapted from Michael Symon's Live To Cook
Serves 4
2 tablespoons olive oil
1 medium yellow onion, minced
2 garlic cloves, minced
1/2 cup diced prosciutto
1 cup Arborio rice
1 generous pinch saffron (didn't have any on hand, so I left it out)
1/2 cup dry white wine
3-4 cups chicken stock, warmed
1/2 pound bay scallops, or 1/2 pound sea scallops cut into 1/2-inch pieces
1/4 cup sliced fresh flat-leaf parsley leaves
1 tablespoon unsalted butter
2 tablespoons grated Parmesan

Heat the olive oil in a 4-quart saucepan over medium heat.  Add the onion and sweat it for 2 minutes.  Add the garlic and sweat it for 2 minutes  more.  Add the prosciutto and cook it until it crisps, about 1 minute.  Add the rice and let it toast slightly in the hot fat, about 1 minute, stirring with a wooden spoon.

Reduce the heat to low, add the saffron and wine, and stir continuously until most of the wine has cooked off.  Add 1 cup of the stock and stir continuously until the liquid has cooked off, about 3 minutes.  Add another cup of stock and repeat the process.  Taste the rice.  Continue to add stock in 1/4-cup increments until the rice is tender and the risotto is creamy.

Add the scallops and continue to stir for 2 minutes, or until the scallops are heated through.  Remove the pan from the heat and stir in the parsley, butter, and cheese and serve immediately.
Spinach Salad with Fried Egg, Bacon, and Mushrooms
Adapted from Michael Symon's Live To Cook
Serves 4
2 teaspoons extra virgin olive oil, or more as needed
8 ounces slab bacon, cut into 1-inch by 1/4 inch pieces
1 shallot, thinly sliced
6 ounces morel mushrooms, halved if large (I used baby bellas)
1/2 cup chicken stock or water
6 tablespoons balsamic vinegar, or more to taste
4 large eggs
Kosher salt and freshly ground black pepper
8 ounces fresh spinach leaves (about 8 cups loosely packed), stemmed

Heat a saute pan glazed with 1 teaspoon of the olive oil over medium-high heat.  Add the bacon pieces and saute them until they develop a crispy exterior but remain tender on the inside, adjusting the heat as necessary, 5-10 minutes.  Add the shallot and saute until it is translucent, another minute or two.  Add the mushrooms, and once they begin to soften, after about 2 minutes, add the stock, scraping the browned bits from the bottom of the pan as the liquid comes to a boil.  Reduce the pan liquid by half.  Add the balsamic vinegar, bring to a simmer, and then remove the pan from the heat.  Taste the pan sauce looking for a proper balance of fat and acidity.  If the sauce taste too fatty, add another dash of balsamic.  If it's too acidic, correct it with additional extra-virgin olive oil.

Heat a large nonstick pan over medium-low heat.  Glaze the pan with the remaining teaspoon of olive oil and crack in the eggs, taking care not to break the yolks.  Season each egg with a pinch of salt and some black pepper.  Fry the eggs gently until the whites are cooked through but the yolks remain runny.

Place the spinach in a large bowl.  Pour the warm dressing, with the bacon and morels (mushrooms), over the spinach and toss until the leaves are wilted and coated.

Divide the spinach salad among four plates and top each with a fried egg.
 
Trying to play catch up with the Symon Sundays group, I made his Sweet Corn and Wild Mushroom Soup.   The star of this soup is the corn cob stock, so fragrant and wonderful.  I had never made corn cob stock up until this point and I  must tell you that it is fabulous.  I'll be saving all my corn cobs from now on.  You can find the recipe for the corn cob stock, as well as the Sweet Corn and Wild Mushroom Soup here on Joanne's site, Eats Well With Others.
  
With some leftover rotisserie chicken, I made Symon's Mac and Cheese with Roasted Chicken, Goat Cheese, and Rosemary.  Quite possibly the easiest Symon recipe yet, it was absolutely creamy, indulgent, and incredible.  I highly recommend this one.  The recipe can be found at Natashya's site, Living in the Kitchen with Puppies, by clicking here.