Sunday, September 30, 2012

Stuffed Bell Peppers with Ground Beef and Potatoes {Muy Bueno Cookbook Spotlight and Cook-off}

When I first received my copy of the soon-to-be-released Muy Bueno: Three Generations of Authentic Mexican Flavor Cookbook, I did what I always do. I grabbed a notebook and pen and sat down to explore my new book.  One of my favorites things to do with a new cookbook is write a list of all the recipes I want to try.  Usually my list is about half a page long. This time, however, I opened my Muy Bueno cookbook and once my pen hit the paper it never came back up.  Soon I realized that I literally wanted to make every single recipe.   

Instead of listing every recipe in the book I decided to catalog the top few that drew my attention the most.  The recipes destined for my kitchen right away.  Let me tell ya...that took awhile.  However, there was one recipe that was so colorful it drew me in, bell peppers in a rainbow of colors stuffed with a hearty mix of ground beef and potatoes. 

Stuffed peppers are special to me.  My Mom's specialty always was and continues to be her stuffed peppers.  She makes an awesome stuffed pepper filled with beef, rice, tomatoes, and cheese.  They are a real hit around here.  Mom's stuffed peppers are so good that I never even attempted to make stuffed peppers myself.  Until now. 

This recipe, from the Muy Bueno cookbook, is different enough that it simply can't be compared to Mom's stuffed peppers.  My Mom's recipe is more about the filling where in this Muy Bueno version I feel like the bell pepper itself is the star.  You really taste the pepper.  This version is very fresh and feels almost virtuous, perfect for this time of year when temperatures still remain high but comfort food is calling.
Stuffed Bell Peppers with Ground Beef and Potatoes
Pimientos Rellenos con Picadillo
Makes 3 stuffed bell peppers

3 bell peppers (your choice of color)
1 batch picadillo (recipe follows)
1 tablespoon olive oil
1/2 cup crumbled queso fresco (I subbed feta cheese)
cilantro, for garnish (optional)

For Picadillo:
1 tablespoon olive oil
1/2 cup chopped white onion
1 pound ground beef
2 cloves garlic, minced
1 teaspoon salt
1 cup chopped roma tomatoes
1 small russet potato, peeled and finely chopped

To make picadillo: In a large skillet heat oil over medium heat.  Add onion and cook for about 2 minutes, until translucent.  Add ground beef and brown,  Using a potato masher, mash meat so you have small pieces of meat with no big chunks.  Drain off excess grease.  Add garlic, salt, tomatoes, and potatoes and cook over low heat for about 15 minutes, until potatoes are done.  Salt to taste.

To make the stuffed peppers:  Preheat the oven to 350F.  Make picadillo for stuffing the bell peppers (see above). Rinse the peppers, Cut the tops off and remove the white flesh and seeds.  Rinse out the inside of each pepper.  In a large stockpot parboil the peppers, about 3-5 minutes, depending on how soft you want them to be in the final dish.  Remove the peppers and drain any excess water that is inside them.  

Brush each pepper with olive oil.  Heat up a comal (or griddle) and place the peppers on their side on the comal, about 1 minute on each side, just long enough to sear the sides of each pepper.

Prepare a baking dish (about 10.5 inches by 7 inches/a bread loaf pan would be perfect) that will accommodate your 3 peppers.  Spray the dish with cooking spray to keep the peppers from sticking to it.  Pour about 1/4 inch water into pan.  

Stuff each pepper with some picadillo and place it in the baking dish.  Cover with foil and crimp the edges onto the dish creating a seal.  Bake for about 25 to 30 minutes.  

Remove from oven and let rest for about 5 minutes.  Plate 1 pepper per plate, top with crumbled queso fresco (or feta), and garish with cilantro. 
This post is part of the Muy Bueno Cookbook Spotlight & Cook-Off sponsored by Hippocrene and hosted at girlichef*


Stay tuned for next week when I will be hosting a Muy Bueno Cookbook Review and Giveaway!  You don't want to miss out on a chance to win a copy of this gorgeous book!

Tuesday, September 25, 2012

My Top Five Rick Bayless Recipes

Over the last six months I've been cooking up the recipes of Rick Bayless with my friends at the I Heart Cooking Clubs group.  After spending six months with a chef I always end up with a few favorites.  These are the dishes that my family loved the most.  In fact, all of the dishes below have been repeated in my kitchen at least once, if not more, since I first made and shared them here on my site.  
 
First up, and quite possibly the most popular of all the Rick Bayless dishes I tried, are these Cafe Tacuba-Style Creamy Chicken Enchiladas.  These enchiladas are a perfect and comforting family meal.  Roasted poblanos and spinach are combined to make a very flavorful and creamy sauce that is poured over casserole-style enchiladas.  These enchiladas are awesome!
 Next up are these Quick Fried Shrimp with Sweet Toasty Garlic.  If you love garlic, these are an absolute MUST MAKE.  Total heaven on a plate.  I should know.  I pretty much ate the whole batch myself.  
These Crusty Black Bean-Chorizo Subs were our first introduction to the Mexican torta and they were a huge hit.  It is worth seeking out traditional Mexican bolillo rolls at your supermarket because the bread really does make a difference.  We loved these layered sammies with smashed black beans, spicy chorizo, creamy avocado, and salty feta cheese all served up on some good crusty bread.  I crave these sandwiches.
To prove that we love a good Mexican torta, here is another hit recipe.  My Mom, and my husband, went crazy for these Crispy Chicken Tortas.  Here again, you have a layer of seasoned and smashed black beans, a crispy breaded chicken cutlet, monterey jack cheese, and creamy avocado on a crusty bolillo roll.  My Mom declared this one of her favorite meals I've ever made and even asked that I make these for her birthday.  The ultimate compliment.
This Quick and Easy Arroz con Pollo is another great family meal.  Rick calls for whole pieces of chicken in this recipe, which would probably be equally delicious, but I decided to make a quicker version with some leftover sliced rotisserie chicken.  You know how sometimes a dish turns out perfectly seasoned?  This is how I feel about this dish.  Everything about this dish was perfectly seasoned and balanced and the rice was incredibly fluffy.  This is a great staple dish and the leftovers, if there are any, definitely improve with time.
 
 This wraps up my time with Rick.  I'm so happy I had the chance to explore his cookbooks and try so many of his recipes.  Starting next week we're going to be cooking the recipes of Madhur Jaffrey.

Theme: Adios y Gracias, Rick!

Sunday, September 23, 2012

Mexican Shortbread Cookies (Polvorones Mexicanos)

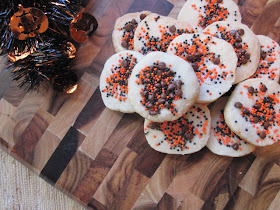
This weekend the weather was a little on the chilly side so it was the perfect time to stay indoors and do some Halloween decorating.  Once all the decorations were up we decided to make a batch of these Mexican Shortbread Cookies (otherwise known as Polvorones).  Of course, since we were in Halloween mode, we had to decorate them with Halloween colored sprinkles.

These cookies were a big hit with the kids.  I think it's a well-known fact that all kids LOVE sprinkles, right?  Let's just say they had a fantastic time decorating and eating these cookies. These cookies can be decorated with all kinds of toppings (finely chopped Mexican chocolate or mini chocolate chips, finely chopped nuts, pumpkin or sunflower seeds, sesame seeds, chopped dried fruit, oatmeal, and of course the ever famous sprinkles).  While the kids loved them best with sprinkles I think I'd like to try them with a little bit of cinnamon and sugar sprinkled on top.

The way this recipe is written you make the dough, chill it for 30 minutes, then roll it out and cut out shapes from the dough.  I must confess that one of my least favorite things to do is roll out dough and cut out shapes.  It's just way too messy and time-consuming in my opinion.  Instead of doing all that, I chose to place the dough onto plastic wrap, shape it into a log, and chill it for 30 minutes.  When I unwrapped the dough I simply cut the dough into circles/discs.  It worked out great.  I'd definitely take that short cut again.

Polvorones Mexicanos
(Mexican Shortbread Cookies)
Adapted from Mexican Everyday by Rick Bayless
Makes 24 three inch cookies
(recipe can be cut in half successfully)

1 cup butter, softened
2-1/2 cups all-purpose flour
1/2 cup granulated sugar
1 teaspoon salt 

Toppings: Decorative sprinkles, mini chocolate chips, cinnamon/sugar, dried fruit, or chopped nuts


In a large bowl, combine the flour, sugar, and salt.  Using a potato masher, combine the butter into the flour mixture until no big pieces of butter are visible.  Continue to work the dough with your hands until the dough forms a ball.  Wrap dough in plastic and refrigerate for 30 minutes.

Preheat oven to 350F.  Roll out the dough, between two sheets of plastic wrap, to 1/4-inch thickness.Peel off the top layer of plastic wrap and cut out cookies with a 3-inch cookie cutter.

Decorate the cookies with any toppings you like (sprinkles, chocolate chips, cinnamon and sugar, etc.)  Gently press down on the sprinkles (or other topping) so that they stick to the cookie.  Carefully transfer the cookies to an ungreased baking sheet, placing the cookies about 1 to 2-inches apart.  Bake at 350F for 15 to 17 minutes, rotating the cookie sheet once, after 10 minutes.  Let the cookies cool for about 2 minutes on baking sheet, then transfer to wire rack to cool completely.
Theme: What's in your lunchbox?

Friday, September 21, 2012

Mushroom, Jalapeno, and Cilantro Salsa for the Muy Bueno Cookbook Spotlight and Cook-off

This beautiful and unique salsa is straight from my preview copy of the new Muy Bueno Cookbook: Three Generations of Authentic Mexican Flavor.   I gotta tell you...this cookbooks is gorgeous!  The pictures of the food are so warm and inviting.  The book practically calls you into the kitchen.  But that's not my favorite part.  My favorite part of this cookbook is that it spans three generations of beautiful women and tells of their time spent in the kitchen.  There are so many styles of cooking in this book, everything from Old-World Mexican cuisine, to South of the Border dishes, and even some contemporary Latin fusion dishes.  It's really a masterpiece! 

The best news is... you will all have a chance to win a copy of this cookbook coming up in a few short weeks!  Next week I will highlight a recipe of my choice from the book and the following week I will do a cookbook review where I will also host a giveaway for my readers.  Stay tuned because you definitely don't want to miss out on this one!

Now let's talk salsa.  Have you ever had a mushroom salsa?  Me neither!  Just like all salsas, this mushroom, jalapeno, and cilantro salsa is completely versatile.  This week, as part of the spotlight and cook-off, I've had a chance to see what other bloggers have done with this salsa and it's been eye-opening.  This salsa has been paired with steak, eggs, tortillas, stuffed in avocados, and served on bruschetta.  The possibilities are endless!  I served mine with tortilla chips, but also used it as a topping for some beef brisket tacos. Delicious!
Mushroom, Jalapeno, and Cilantro Salsa
(Salsa de Hongos y Jalapenos)
Makes 3 cups

1 pound fresh white mushrooms, finely chopped
1 small red onion, finely chopped
2 jalapeno peppers, stemmed and finely chopped
handful cilantro, chopped
3/4 cup fresh lime juice
1 tablespoon olive oil
salt to taste

In a bowl combine the mushrooms, onion, jalapeno, and cilantro.  Add the lime juice and olive oil and toss gently.  Salt to taste.

Let sit for a couple of hours allowing the flavors to meld.  This salsa is best served at room temperature.

Serve as a topping for fish, chicken, grilled steak, or as an appetizer with a basket of your favorite tortilla chips.


*This post is part of the Muy Bueno Cookbook Spotlight & Cook-Off sponsored by Hippocrene and hosted at girlichef*

Sunday, September 16, 2012

Quick Fried Shrimp with Sweet Toasty Garlic

Dear Friends,

I have a confession to make.  I love shrimp, especially when it's all garlicky with a little bit of heat thrown in for good measure.  I made this recipe with the best of intentions in mind.  I thought I'd share these garlicky jumbo shrimp with my husband.  The problem is, when it was time to eat, my husband was outside riding bikes with my son.  I went out quickly and looked for him and when he was nowhere to be found I decided to go ahead and taste a shrimp right out of the pan.  This is where I went wrong. One shrimp lead to another and another and before you know it I had eaten all but four.

In my defense there were probably only 20 shrimp in the pan.  They were colossal sized shrimp after all.  And secondly, they were coated with the most addictive lip-smackin' garlic and chipotle flavored oil.  It was really just too hard to stop. I found myself trying to use the shrimp to scoop up all those extra garlic pieces at the bottom of the skillet.  Rick Bayless says that if you're a garlic lover then you are in for the treat of your life with this dish.  I agree. Sometimes I think shrimp with garlic is my favorite meal on earth.  Try these one day and eat them straight from the pan with your hands.  They are seductive.
 
Quick Fried Shrimp with Sweet Toasty Garlic
adapted from Rick Bayless, found online here
Serves 2-4, depending on who's eating
(I halved the recipe with great results)

2 whole garlic heads
1 cup good-quality oil, preferably extra-virgin olive oil
Salt to taste 
 3 limes
2 canned chipotle chiles en adobo, seeded and cut into thin strips
2 pounds (about 48) medium-large shrimp, peeled (leaving the last joint and tail intact if you wish)
3 tablespoons chopped fresh cilantro or parsley (optional)
  
To make the mojo de ajo:  Either chop garlic with a sharp knife into 1/8-inch bits or drop cloves through feed tube of a running food processor and process until pieces are roughly 1/8 inch. You should have about ½ cup chopped garlic. Scoop into a small saucepan, measure in oil (use all of it for even cooking) and ½ teaspoon salt, and set over medium-low heat. Stir occasionally as mixture comes barely to a simmer (there should be just a hint of movement on the surface of the oil). Adjust the heat to very lowest possible setting to keep mixture at that very gentle simmer (bubbles will rise in the pot like mineral water).Cook, stirring occasionally, until garlic is a soft and pale golden (the color of light brown sugar), about 30 minutes (the slower the cooking, the sweeter the garlic). Squeeze juice of 1 of the limes into the pan and simmer until most of the juice has evaporated or been absorbed into the garlic, about 5 minutes. Stir in chiles, then taste the mojo de ajo and add a little more salt to taste. Keep pan over low heat, so garlic will be warm when shrimp are ready. Cut remaining limes into wedges, scoop into a serving bowl and set on the table.

To cook the shrimp: Devein shrimp. Over medium-high heat, set a large nonstick skillet and spoon in 1½ tablespoons of oil (but not the garlic) from the mojo. Add half of the shrimp to the skillet, sprinkle generously with salt, then stir gently and continuously until shrimp are just cooked through, 3 or 4 minutes. Stir in cilantro or parsley if desired. Scoop cooked shrimp onto deep serving platter. Repeat steps for cooking shrimp with the remaining half and another 1½ tablespoons of the garlicky oil. When all the shrimp are cooked, use a slotted spoon to scoop out the warm bits of garlic and chiles from the pan, and douse them over shrimp. (You may have as much as 1/3 cup of the oil leftover, for which you'll be grateful -- it's wonderful for sautéeing practically anything). If you're a garlic lover, you're about to have the treat of your life.  Serve with lime wedges to add sparkle.
Theme: Dia de Independencia

Friday, September 14, 2012

Barbecue Chicken Salad with Cornbread Croutons

I fell in love with this salad at first bite.  Quite possibly one of the best salads ever.  I knew it was a major hit when my non-salad-eating husband swooned in delight and sang it's praises all through dinner.  I think it blew his mind.


This salad has all the components of your favorite barbecue.  Lettuce and coleslaw are mixed with red onion, corn, poppy seeds and coleslaw dressing to create a creamy and textured base for this salad.  The salad is topped with a blend of cheddar and Monterey Jack cheese and graced with a sweet and smoky mound of tender barbecued chicken.  The crowning glory is the buttery, garlicky, crisp cornbread croutons.  It's like a party in your mouth!

The best part is, this is another semi-homemade rotisserie chicken kind of meal. You only need to cook one thing and the rest is all assembly.  Simply prepared a boxed mix of cornbread in an 8x8 lined pan (I used Jiffy).  Let the cornbread cool, cut into cubes, brush with a butter mixture and pop in the oven until crisp and golden.  The rest is in the assembly.  Easy peasy and oh so delicious!


 Barbecue Chicken Salad with Cornbread Croutons
Serves 4-6

1 (8.5 ounce) package corn bread mix, prepared according to package directions*
3 tablespoons butter, melted
1 teaspoon garlic powder
1 teaspoon dried basil
2 heaping cups coarsely chopped rotisserie chicken
1/2 cup prepared barbecue sauce
1 (10 ounce) package iceberg lettuce salad mix*
1 (16 ounce) package coleslaw mix
1 small red onion, peeled and diced*
1 cup frozen corn, thawed
1 cup prepared coleslaw dressing*
1/4 cup poppy seeds
2 cups shredded Cheddar and Monterey Jack cheese
1 (2.25 ounce) can sliced olives, drained*

*Notes: I used a package of Jiffy cornbread mix.  I bought a 10 ounce package of iceberg lettuce mix that included radishes.  I omitted the red onion and olives (not because I wanted to) but because I didn't have them on hand.  I used Marzetti's brand coleslaw dressing.  I added a bit of sliced green onion to make up for the red onion that I omitted.

Make the cornbread: Grease an 8x8 baking dish with butter.  For easy removal, line the pan with parchment paper and butter it well. Cornbread is very delicate and crumbly so lining the pan will be very helpful when it's time to cut the cornbread into cubes for croutons.  Prepare the cornbread according to package directions.  Transfer the cornbread mixture to the prepared 8x8 baking dish and bake according to package directions (Jiffy brand bakes for about 15 minutes at 400F).  Let cool completely.

Make the croutons: Preheat oven to 350F.  Dice half the prepared cornbread into 1-inch cubes, being careful so as not to break apart the cornbread (reserve the remaining cornbread for another use).  Place the cubed cornbread on a buttered baking tray.  In a small bowl melt the butter and add in the garlic powder and dried basil.  Using a pastry brush, brush the butter mixture onto the cubed cornbread being careful not to break up the cornbread. Bake the croutons for 8 minutes on one side, turn over, then bake another 8 minutes, or until crisp and golden.

Prepare the chicken:  Mix together the chicken and the barbecue sauce in a medium-sized bowl.  Cover and refrigerate until use.

Assemble the salad:  Toss together the iceberg salad mix, the coleslaw mix, red onion, corn, dressing, and poppy seeds in a large serving bowl.  Taste the salad mixture, add more dressing if needed, and/or salt and pepper to taste.  Plate the salad individually, putting the desired amount of salad down on the plate.  Sprinkle the salad with the cheddar and Monterey jack cheese.  At this point I chose to heat my barbecue chicken very slightly in the microwave just enough to remove the chill.  Mound the barbecue chicken in the middle of the salad and top with the cornbread croutons and olives (if using).  Enjoy!

A weekly celebration of soups, sammies, and salads @Kahakai Kitchen

Wednesday, September 12, 2012

Let's Talk Freezer Meals: Burritos

You're peeking into the freezer of my 25 year old refrigerator that I keep out in the garage.  My parents bought this old thing back when I was in high school.  It's old and it's loud, but it was made back in the day when companies still valued quality. My husband laughed at me when we moved this old fridge from Ohio to Kentucky.  He told me he'd buy me a pretty new fridge, but I wasn't having it.  That was ten years ago now.  My husband laughs about it now and says I was right about this old fridge.  It's outlasted two pretty-as-can-be stainless steel fridges.  We call it old reliable, put all the kids artwork on it, and cover it in magnets.  It's a little dose of the old days and we just love it.
I recently went through a refrigerator, freezer, and pantry purge getting rid of a few old lingering items and eating up the rest.  Now I'm on a mission to stock my freezer full of freezer ready meals. This is brand new territory for me.    
It's true that I do love to cook but,  I don't love to cook 24/7.  My family doesn't seem to understand this concept.  My kids like to eat 5-7 times a day and let's face it....no one likes to cook and clean up that much.  Here's where the freezer meals come in.  In this case I spent about 20-30 minutes putting together 8 breakfast burritos (I should have made more) that are really going to come in handy for the chaotic mornings we have on school days.  

You could stuff these tortillas with any filling (it doesn't have to be breakfast related).  The idea is to make them ahead, roll them up, wrap them in plastic wrap, and place them in a plastic ziploc bag or a tupperware container.  When you're ready to eat one you simply unwrap the plastic, wrap the burrito in a damp paper towel and reheat in the microwave until it's warmed through.  It's easy, virtually mess-free, and open to whatever fillings you like.

For these burritos I bought eight whole wheat flour tortillas and stuffed them with a mixture of one pound sauteed chorizo, 1/2 cup of bell pepper, 1 cubed and boiled potato, 7 scrambled eggs, 2 sliced green onions, a cup of cheddar cheese, and quite a bit of hot sauce.  I added a heaping 1/2 cup of the mixture to each burrito and folded it up.  Next time I think I'll try a bean, rice and cheese combination to have on hand for lunches, but really the ideas are virtually endless.  What combination would you try?
 Do you store freezer ready meals in your freezer?  If so, what are your favorites?  I'd love to know!

Saturday, September 8, 2012

Quick and Easy Arroz con Pollo


This is by no means a traditional Arroz con Pollo, but it's definitely a quick and easy version that has all the familiar flavors and is every bit as comforting. What makes this dish a little quicker, and easier, is the use of a store-bought rotisserie chicken.  

Once a week I buy at least one rotisserie chicken.  My son usually eats the legs and thighs over the course of a few days so I always need a plan for the leftover chicken breast.  I love being creative with the leftover chicken breasts and actually have created a running list of recipes to try with these leftovers.  I must confess that most times my leftover chicken turns into some rather tasty chicken quesadillas, mostly because we all love them so.  Other times, the chicken finds it's way into enchiladas, chicken croquettes, or some kind of dip, like this fabulous barbecue chicken dip. Either way, this leftover chicken is a cook's best friend. I can't tell you how many times it's saved me.

This time around, my leftover chicken inspired me to make a quicker and easier version of this tasty Latin American classic, Arroz con Pollo.  I actually prefer this version because I've come to enjoy the texture of shredded chicken much better than chunks or large pieces of chicken. This was a lovely meal.


Quick & Easy Arroz con Pollo with Black Beans
Adapted from Mexican Everyday 
by Rick Bayless
Serves 4

1-2 tablespoons canola oil
2-1/2 tablespoons chili powder (any type of chili powder: regular, chipotle, or ancho)
salt and pepper, to taste
1 medium white onion, diced
1 cup long grain white rice
sliced or shredded chicken from one rotisserie chicken (about 2 cups)
2 big or 4 small garlic cloves, finely chopped
1-1/2 cups chicken broth
One 15-ounce can black beans, drained and rinsed (optional)*
1/4 cup chopped green onions
1/3 cup chopped cilantro
1/2 - 1 cup salsa for serving, if desired
warm toasted tortillas, if desired

Add the oil to a large saute pan or Dutch oven over medium-high heat.  Add in the diced onion and rice, stirring as you go, and cook until the rice turns from translucent to opaque.  Add the garlic and the 2 and a half tablespoons of chili powder and cook for 1 minute, then add the broth and salt and pepper to taste.  Stir well.  When the mixture comes to a boil, reduce the heat to medium-low and cover the pot.  Cook for 15 minutes.

Do not stir the rice if you want it to be fluffy!

Add the sliced or shredded chicken and black beans to the top of the pot (without stirring the rice), recover the pot, and cook over very low heat until the chicken and beans are warmed through and the flavors mingle, about 5-6 minutes.

Do not stir the rice if you want it to be fluffy!

Uncover, sprinkle with green onions and cilantro on top of the mixture (do not stir the rice).  Recover the pot and let stand off the heat for 5 to 10 minutes.  
 
Fluff the rice with a fork and serve with salsa or warmed tortillas, if desired.

Theme: Esta Rojo!

Sunday, September 2, 2012

Hickory House Baked Beans

I love baked beans of every variety.  I love them out of a can....did I really just say that?  I love them made totally from scratch.  I also love them semi-homemade, which is what this recipe is. 

If you're in need of a good side dish for your upcoming Labor Day cookout try these Hickory House Baked Beans.  They take a little more effort than opening up a can of store-bought baked beans, but the nice thing is that they take on the flavors of your favorite barbecue sauce.  I added a little bit of dry mustard to mine, simply because I like to add dry mustard to all of my barbecue.  I also think you could replace the diced bell pepper with diced jalapeno for a little extra kick.  Flavor them your way!


Hickory House Baked Beans
Adapted from saveur.com
Serves 4-6

1/2 large red or green bell pepper (or maybe jalapeno)
2  15 oz. cans, drained cooked pinto or navy beans
1 cup of your favorite barbecue sauce
2 tbsp. dark brown sugar
1 tbsp. worcestershire
Optional:  1-2 teaspoons dry mustard or your favorite bbq seasoning

Preheat oven to 375º. Stem and seed bell pepper, cut into 1/4" pieces, and put into a 2-quart or 8" x 8" baking dish. Add beans, barbecue sauce, brown sugar, and 1/2 cup water to dish and mix well. Drizzle worcestershire sauce on top. Bake until top is glazed-looking and browned, the beans start to peek up from the liquid, and the liquid is bubbling vigorously around the edges, 45-60 minutes. Let cool slightly before serving.
Theme:  Outside of Mexico