Wednesday, May 30, 2012

Cookbook Review: The Cookie Dough Lover's Cookbook {and Chocolate Chip Cookie Dough Ice Cream}

Hardcover 
160 pages
*Spiral bound for easy flipping

Seven Chapters:  Introduction; Candy; Cookies and Brownies; Cakes, Custards, and Pies; Frozen Treats; Indulgent Breakfasts; and Fun Snacks and Party Fare

Lindsay Landis, of the popular Love and Olive Oil blog, has created one helluva cookbook in The Cookie Dough Lover's Cookbook. This book is a complete dream for any cookie dough lover, kids and adults alike. Not only that, but the book includes an extensive set of recipes, from Cookie Dough Wontons with Chocolate Dipping Sauce to Cookie Dough-Stuffed Cinnamon Rolls.  There are so many fun new ways to enjoy cookie dough in this book.  Wanna know the best part?  All the cookie dough is egg-free.  So there's no worries about eating raw egg.

I had a hard time deciding on what to make from the book, so I let my daughter decide.  It was no surprise when she chose the Chocolate Chip Cookie Dough Ice Cream.  It is her favorite after all.  We all loved this ice cream.  My husband, who is my toughest critic, declared this ice cream the best I've ever made.  I have to agree.  We loved the brown sugar flavored ice cream base, but what we loved even more was the fact that this was the creamiest ice cream ever.  The texture was perfect!  Sometimes homemade ice cream can be icy and best served on day one.  This ice cream isn't that way at all.  This ice cream is creamy and it stays creamy, even on day five in the freezer.  But, of course, the best part of this ice cream is all the plentiful little chunks of cookie dough...and let me tell you, this ice cream is not skimpy in the cookie dough department.  It's fully loaded!!


Chocolate Chip Cookie Dough Ice Cream
Makes 1-1/2 quarts

For Ice Cream:
2 cups heavy cream, divided
1 cup whole milk
1/4 cup granulated sugar
1/2 cup light brown sugar, packed
pinch salt
4 egg yolks
1 teaspoon vanilla extract

For Cookie Dough:
1/2 cup (1 stick) unsalted butter, room temperature
1/4 cup granulated sugar
1/2 cup light brown sugar, packed
1/4 teaspoon salt
1/2 teaspoon vanilla extract
2 tablespoons milk or cream
3/4 cup all-purpose flour
1/2 cup mini semisweet chocolate chips


Recipes Tagged To Make:  Crispy Peanut Butter Cookie Dough Cups; White Chocolate-Macadamia Nut Cookie Dough Blondies; Cookie Dough Mosaic Cheesecake; Mexican Chocolate Cookie Dough Tartlets; Invisible Cookie Dough Ice Pops; Cookie Dough Oatmeal Pancakes; Baked Cookie Dough Doughnuts; Cookie Dough-Stuffed Cinnamon Rolls; Oatmeal Raisin Cookie Dough Granola Bars; and Cookie Dough S'mores.

*Quirk Books sent me a copy of The Cookie Dough Lover's Cookbook for review, but all opinions shared are my own.

Saturday, May 26, 2012

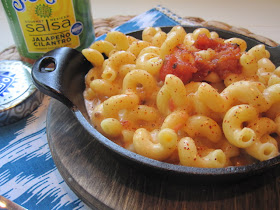
Salsa Mac and Cheese

This is a quick and easy no-bake macaroni and cheese recipe that is perfect for making on a hot summer day.  All you have to do is whip up a quick cheese sauce on the stovetop and boil some pasta and you are all set.  No oven.  Just quick, almost instant, gratification. 

Lately our favorite pasta shape is cavatappi.  I think the long hollow spirals of pasta are just perfect for macaroni and cheese and I highly recommend seeking it out for this recipe.  Also, be sure to use your favorite salsa in this recipe.  The flavor of the salsa really comes through.  If I was on the ball I would have made my own salsa.  As it was, I had a jar of Rick Bayless' Frontera Jalapeno and Cilantro Salsa that I had been saving for a special occasion and I decided this salsa mac and cheese was definitely a special occasion.

This mac and cheese is creamy and delicious and lends itself well to all sorts of garnishes.  You could easily amp it up with sliced chicken or steak.  You could also throw in some extra veggies, top with extra salsa, spice it up with some jalapenos, add some tortilla chips for crunch, and/or even a little chili powder for garnish.  It's definitely easy to make this recipe your own.


Salsa Mac and Cheese
Adapted from Rick Bayless
Recipe available online here 

2 tablespoons butter
1/4 cup all-purpose flour
2 cups milk
1 1/2 to 2 cups of your favorite salsa
2 cups shredded cheddar cheese
Salt
1 pound dried pasta (though elbow macaroni will do, I suggest you try cork-screw cavatappi or the spiral rotini or fusilli)
Optional: garnish with chili powder, additional salsa, tortilla strips, scallions, jalapeno, etc.

Pour 4 quarts of water into a large pot, cover and set over high heat.

In a medium-size saucepan, melt the butter over medium heat, then stir in the flour and whisk until the mixture turns a deep golden, about 2 minutes.  Add the milk and continue to whisk constantly until the mixture thickens and comes to a full boil, 4 or 5 minutes.  (Whisk diligently and there will be no lumps.)  Stir in the salsa, remove from the heat, then stir in cheese.  Continue stirring until all the cheese has melted.  Taste and season generously with salt, usually 1 1/2 teaspoons. Cover to keep warm until the pasta is done.

When the water has come to a boil, add the dried pasta. Stir well to keep the pasta from sticking together and boil until the pasta is al dente, about 10 minutes.  Drain thoroughly and add the pasta to the sauce.  Stir until all the pasta is covered in the salsa cheese sauce.  You’re ready to dig in.

Theme: Potluck!

HAPPY MEMORIAL DAY WEEKEND TO ALL MY AMERICAN FRIENDS!  IT'S OFFICIALLY SUMMER!!

Wednesday, May 23, 2012

Cookbook Review: Weeknights with Giada

Weeknights with Giada:
Quick and Simple Recipes to Revamp Dinner
Hardcover
240 pages

Eight Chapters:  Soups & Salads; Bruschettas, Sandwiches, & Pizzas; Pasta & Grains; Meat, Poultry & Fish; Change of Pace; Breakfast for Dinner; Veggies & Sides; and Desserts

When I heard that Giada was coming out with a new cookbook I preordered it.  I knew I would love it and I was right.  Weeknights with Giada is full of family-friendly, super easy, inventive and fun recipes for the weeknights.  There are lots of days where I love to spend all day in the kitchen, but then there are also days where I need quick and easy and this book delivers.  On top of all that, the book is absolutely gorgeous, full of both family photos and gorgeous food.  You will find lots of Italian-inspired recipes in this book, but you'll also find that Giada branches out with recipes like Sweet and Spicy Greek Meatballs, Chicken Adobo, Thai Turkey Lettuce Cups, and Chicken with Peruvian Chile Sauce.  But most importantly, everything I tried was delicious!

**The recipes for each of the dishes below can be found by clicking on the recipe name.  The link will take you to the recipe on the Food Network.
Just for fun let's start where it counts.....DESSERT!!  Giada's Peanut Butter Cookies with Blackberry Jam.  These are no everyday peanut butter cookie.  These cookies have cocoa powder added to them, which is perfect for those of us who are addicted to the combo of peanut butter and chocolate.  I made some of the cookies with the blackberry jam and some without any jam at all.  Both were a huge success!  The recipe makes 10 huge cookies and believe me, they were gone in no time at all!
 From the Veggies & Sides chapter is probably my favorite recipe of the bunch, Giada's Scallion and Mozzarella Cornbread.  Holy cow is this stuff good!  The buttermilk in this recipe makes for an extremely tender and incredibly moist cornbread.  You can actually see the mozzarella in the cornbread....it is so cheesy.  And, we just loved the studs of olives and scallions running throughout.   I'm gonna go out on a limb here and tell you that this is probably the best cornbread I've ever had.  In fact, I'm making another version of it today.
If you're a potato lover, then you will fall in love for these Baked Potatoes with Sausage and Arugula.  A fluffy baked potato is topped with Italian sausage and a very cheesy creamy tomato sauce.  Since there is quite a bit of arugula mixed into the sauce I've deemed these healthy.  My family absolutely loved these and asked for more so I went ahead and made them again (twice in the same week).  This is a recipe that I can see myself making again and again, which is the mark of a very successful recipe.  Food bloggers rarely make the same thing twice, right?

All in all, this is a fabulous book and one that I am very happy to have in my collection.  In fact, I'll be sharing more recipes soon!

Recipes tagged to make: Literally everything...Shrimp and Sausage Cioppino; Burgers a la Pizzaiola; Ricotta, Lentil & Rice Rolls; Herbed Lamb Chops with Homemade BBQ Sauce; California-Style Chopped Salad with Shrimp; Sweet Corn & Basil Lasagna; Chicken with Tarragon & White Wine; Black Forbidden Rice with Shrimp, Peaches & Snap Peas; and Grilled Creamed Corn with Spinach and Parmesan....just to name a few!

Sunday, May 20, 2012

One Amazing Corn Chowder

We are celebrating the color yellow over at I Heart Cooking Clubs this week and this corn chowder has been extremely popular, for very good reason.  It is amazing!  So, if you're saying to yourself that a thick creamy chowder isn't what you want to eat during the summertime I hope you'll reconsider because the time to make this chowder is now.  Now, while fresh corn is in season. 

This chowder is mild and creamy and what's more...my husband, who almost never likes soup, loved it!  And, the other ladies who made the soup said the special men in their life loved the soup as well.  Also, this soup is gluten-free and vegetarian, making it a great soup to serve for a number of people.  I loved this soup garnished with crumbled feta and cilantro.  My husband loved it garnished with Monterey Jack cheese and tortilla strips.  There are a number of ways you could garnish this soup.  You can't go wrong!


Fresh Corn Chowder 
from Authentic Mexican by Rick Bayless/adapted from Ms. enPlace
Serves about 4

3 large ears of fresh sweet corn or 2 1/2-3 cups frozen corn, defrosted
4 tablespoon unsalted butter, divided
1/2 medium onion, finely chopped
2 cloves garlic, minced
1 1/2 tablespoon cornstarch
2 cups milk, plus more if needed
2 fresh chiles poblanos, roasted and peeled, seeded and diced (I omitted)
1 cup whipping cream
about 1 tablespoon salt
about 2 tablespoons hot sauce, or to taste (I used Frank's) 

To garnish:
  crumbled fresh cheese, such as feta
 chopped cilantro
tortilla chips
Monterey jack cheese

If using fresh corn, husk and remove silk.  Cut the kernels from the cob with a sharp knife.  Scrape the remaining bits of corn from the con with the end of a spoon.  You should have 2 1/2-3 cups of corn.  Transfer to a blender or food processor.  If using defrosted frozen corn, just place in a blender or food processor.

Heat half of the butter in a small skillet.  Add the onion and cook until soft, 6-7 minutes.  Stir in the garlic and cook 1 more minute.  Add this mixture to the blender, along with the cornstarch and 1/4 cup water.  Process until smooth.  If using  a blender, you'll have to pulse the machine and stir several times--but do not add more liquid.  Once the blades break up the corn, there will be enough moisture.

Melt the remaining butter in a medium-large saucepan on medium heat.  Add the corn puree and stir constantly for several minutes until thick.

Whisk in the milk, partially cover, and simmer about 15 minutes. over medium-low, stirring often.  Strain through a sieve.  Rinse out the pan, and add the soup back in.  Stir in the poblano (if using), cream, salt, and hot sauce.  Simmer for about 10 minutes, stirring frequently.


Theme: Yellow

Souper Sundays every Sunday @ Kahakai Kitchen


Sunday, May 13, 2012

Shrimp Taquitos

A very happy Mother's Day to everyone!  My Mom and I have a slight obsession with shrimp, therefore we really look forward to trying out new shrimp recipes.  Most of the time we enjoy our shrimp with a garlic butter sauce, or a spicy sauce, or just plain straight up.  This recipe for shrimp taquitos is actually the first time I've ever stuffed shrimp into something, but I have to tell you....I'm all for it!  We loved these shrimp taquitos, but then again...I knew we would! 

These taquitos are a little different from the typical chicken or beef taquito in that they are filled with a flavorful and fresh tomato sauce and little chunks of shrimp.  I was especially fond of the little pieces of shrimp that fell out of the taquito when frying, becoming rather golden and crispy in the hot oil.  The recipe below includes an option for a tomato broth, which can be served over the taquitos, but I decided to forego it and instead topped my taquitos with the remaining tomato sauce from the filling.  Either way, you can't go wrong with these, especially if shrimp is your thing! 

Shrimp Taquitos
Adapted from Fiesta at Rick's
by Rick Bayless
Makes about 15 

For the Filling:
1 T (15ml) Olive Oil 

1/2 medium onion,cut into 1/4" dice 

2 garlic cloves, crushed or finely chopped 

2 jalapenos, finely diced

1 teaspoon ground Cumin 

3/4 lb Tomatoes (2 medium sized tomatoes), diced into 1/4" or ran through food processor's coarse grating disc 

1 lb shrimp, peeled, de-veined, and cut into 1/2" pieces 

3 to 4 tablespoons chopped fresh Cilantro 

salt, to taste 

12 thin corn tortillas
 
Oil for frying (enough to have a depth of 2" in your pan), preferably Grape Seed Oil or Peanut Oil

Tomato Broth Recipe Ingredients 

3/4 lb (340 g) ripe Tomatoes, roughly chopped 

1/2 med.  Sweet Onion, roughly chopped 

2 cloves Garlic, peeled and roughly chopped 

1 T Olive Oil 

2 c Chicken or Shrimp broth 


 Make the filling

1. In a large saute pan, heat olive oil over medium heat. Add onion and cook, stirring occasionally, until translucent, @ 3-4 minutes, then add garlic, chilies, and cumin and cook for another minute.


2. Add the tomatoes and cook, stirring occasionally, until it reduces to a thick sauce, about ketchup consistency. Add the shrimp and cook for one minute.  Remove from heat and allow to cool.  Stir in cilantro and season with sea salt to taste.

If serving with Tomato Broth, make now.  *recipe follows

 
Roll and  Fry Tacos
1. Heat the oil to  about 350-375ยบ, or until hot enough a drop of water reacts quickly when flicked in oil. Grab two tortillas at a time with a pair of tongs, and dip them for few seconds in the oil to soften then.  Pat dry with paper towels and pile them into a single stack.
2. Spoon 3 T of filling in a line across the bottom of the tortillas. Tightly roll them up the tacos, then skewer with toothpicks to keep them closed.
3. Fry the tacos in the hot oil for about 1.5 minutes, then turn over and finish frying until golden. Drain on paper towels and serve immediately with tomato broth poured over.

Tomato Broth Directions

1. Combine tomatoes, onion, and garlic in a blender. Puree until smooth.
2. Heat the olive oil in a medium saucepan. When hot enough to sizzle a drop of the puree, add all of the puree, cook and stir until noticeably thicker and darker, @ five minutes. Add the broth, bring to a boil and simmer on medium-low for 30 minutes. It should have a "soupy" consistency. Add a little water if necessary. Season with sea salt to taste.

Theme: For Mom!


Sunday, May 6, 2012

Tropical Margaritas

Yesterday was a big day for celebrations.  We celebrated Cinco de Mayo for lunch, Derby for dinner, and then followed that up with a special book signing in the evening.  It was a day full of good fun, margaritas, tacos, wine, mint juleps, ham, biscuits, and books.  Not to mention, the moon sure was gorgeous last night, wasn't it?

A frozen margarita is my all-time favorite drink.  I had my heart set on making a mango margarita, but couldn't find any mangoes in my market.  I did find a frozen mix of tropical fruit that included mango, pineapple, and strawberry and decided that was the next best option.  I ended up adapting one of Bayless' margarita recipes with my frozen tropical mix for a toned done version. This is one delicious and refreshing margarita.  It goes down easy.  Too easy.

Tropical Margaritas
Loosely adapted from Fiesta at Rick's
by Rick Bayless
Serves 8-9

3/4 cup lime juice, freshly squeezed
1/4 cup sugar (1/2 cup if you like it sweet)
3/4 ice cubes
1 cup tequila
1/2 cup cointreau or Grand Marnier
2 cups freshly squeezed orange juice
1 (16 oz.) bag of frozen fruit (mine was mango, pineapple & strawberry)
lime half for moistening glass rims (optional)
coarse salt for the rim of glass (optional)


In a blender, mix the lime juice, sugar,  3/4 c. ice cubes, tequila, Cointreau, orange juice, and frozen fruit until well blended.  Pour into glasses and serve.  Garnish with fruit if you like.

If you like salt on the rim of your glass, moisten the rims of three 6-oz. martini glasses w/ the cut side of a lime half. Spread coarse salt on a small plate, then dip the glasses into the salt to crust the rims.  Pour blended mixture into glasses and serve.
Theme: Cinco de Mayo