Wednesday, February 29, 2012

Joy The Baker Cookbook Spotlight and Cook-off: Snack Time with Joy

Every once in awhile you discover something about yourself that you never knew.  For instance, up until recently I thought I was more of a sweet than savory type of gal.  A total chocoholic, pie-eating, cookie monster, baked-goods-eating-machine.  I've never been one to have very much willpower around sweets.  Sadly, I'm one of those people who can rationalize having a slice of fruit pie for breakfast because...well, because it has fruit in it.     

So, imagine my surprise when I opened up Joy the Baker's cookbook for the first time and after paging through the most super-duper, absolutely crave-inducing, sinful and indulgent treats around, the first recipe that screamed at me was Joy's Honey Mustard Roasted Cashews.  Savory over Sweet? Say What?
I blame it all on the mustard.  Me and mustard are BFFs.  Not to mention...cashews.  Aren't cashews awesome?  They're perfect all on their own with salt but imagine them all glazed over and somewhat sticky with honey, then flavored with mustard and black pepper.  We're talking gourmet prime-time snackin'.
When I go nuts, I really go nuts.  I also decided to make Joy's Crunchy Cocoa Roasted Almonds.  These are such a unique treat.  Very crunchy, a little salty, a little sweet, not too chocolatey but just enough chocolate flavor to quell that craving.  I hate to say it, but I think I even enjoyed these crunchy cocoa roasted almonds better than the honey mustard roasted cashews.  Could this mean chocolate and sweets win out in the end after all?
And, last but not least, I made Joy's Perfect Kettle Corn because my family is absolutely crazy for all things popcorn.  This is a simple stovetop recipe for popcorn that includes just the right amount of balance between sweet and salty.  It also requires a lot of shaking to get all that goodness evenly distributed.  I didn't perfect it the first time around, but I'm convinced I will with practice.  
I loved each and every one of these snacks, but my favorite was probably the Crunchy Cocoa Roasted Almonds.  There's just something special about them that's hard to put a finger on.  Maybe it's because they're the perfect mix between sweet and savory.  The perfect snack for those of us who walk the fine line.

Crunchy Cocoa Roasted Almonds
Slightly Adapted from Joy The Baker Cookbook
Makes 3 cups 

3 cups raw almonds
6 tablespoons butter
2 large egg whites
1 teaspoon salt
1 cup granulated sugar
3 tablespoons unsweetened cocoa powder
1/8 teaspoon cayenne powder (could use a tad more if you are really into spicy)

Place a rack in the center of the oven and preheat to 350 degrees F.

Place almonds on a baking sheet and roast for 15 minutes in the oven.  Remove from oven and place in a medium bowl to cool completely.

Place butter on a rimmed baking sheet and melt in the oven for 5- 7 minutes.  Remove from the oven and set aside.  

In the bowl of an electric mixer with the whisk attachment (I did this by hand with a whisk), add egg whites and 1/2 teaspoon of the salt.  Beat on medium speed until frothy.  Gradually add sugar.  Increase the mixer to medium-high and beat until white and glossy and the egg whites hold almost stiff peaks.

Add the remaining 1/2 teaspoon salt, the cocoa powder, and cayenne pepper (go big if you like spicy or you will not taste this at all), and beat until well incorporated.

Pour the egg mixture over the toasted almonds and toss together until almonds are evenly coated.  Spoon mixture atop the melted butter on the rimmed baking sheet.  Bake for 30-40 minutes (30 worked perfectly for me), removing the pan from the oven to toss almonds 2 or 3 times during baking.

Remove from the oven and allow to cool completely before serving.  Almonds will keep, in an airtight container, at room temperature for up to a week.

Note:  When roasting nuts it is best to allow them to cool to room temperature before testing.  When they first come out of the oven they will not have that crispy crunchy texture you are looking for.  They need time to cool down and achieve that great crunch.
This post is part of the Joy the Baker Cookbook Spotlight and Cook-Off sponsored by Hyperion and hosted at girlichef*

Saturday, February 25, 2012

Joy The Baker Cookbook Spotlight and Cook-off: California Biscuits

Okay, okay....these biscuits are really called Whole Wheat Honey and Goat Cheese Drop Biscuits.  The problem is there is no way I could say, "Honey, we're having Whole Wheat Honey and Goat Cheese Drop Biscuits for breakfast."  My southern-loving buttermilk biscuit eating husband would probably run for the door.  So, I called them California Biscuits.  I described them as a healthy whole wheat drop biscuit and no one was the wiser. 

I did make some changes to Joy's original recipe.  First I used white whole wheat flour in place of the whole wheat flour.  Secondly I used tomato and basil goat cheese in place of regular goat cheese.  And, lastly, because I used tomato and basil goat cheese I omitted the honey.  

 I served these biscuits on the side, along with some scrambled eggs, in my new baby cast iron serving skillet with a wood underliner.  I have to admit, ever since I was a kid I've loved the whole breakfast skillet look.  I'm beyond excited to finally have a set of these little baby breakfast skillets.
Scrambled eggs with caramelized onions, peppers, and breakfast sausage
 Are you curious to know the verdict on these biscuits?  My husband loved them.  I don't think he even tasted the goat cheese in them at all.  Score!  I enjoyed these biscuits and found the texture of them really pleasing.  I especially loved the crispy buttery bottoms on the biscuits.  And, I really appreciated how stinking easy these biscuits came together.  After making the traditional southern biscuit for years I can now say that I have a new appreciation for the drop biscuit.  I will say that I'm slightly disappointed that you can't taste the goat cheese. I'm a fan of goat cheese and would like to actually taste it in these biscuits.  That said, I'm sure I can remedy that situation by simply adding more goat cheese next time.  I'm always up for adding more cheese!
 Whole Wheat and Goat Cheese Drop Biscuits
Slightly adapted from Joy The Baker Cookbook
Makes 8-10 biscuits

2 cups whole wheat flour (I used white whole wheat)
3 teaspoons baking powder
1/4 teaspoon baking soda
1-1/2 teaspoons salt
1/4 cup (1/2 stick) salted butter, cold, cut into cubes, plus more for the pan
4 tablespoons crumbled goat cheese (I used tomato and basil goat cheese and went heavy with it)
1 cup buttermilk, cold
2 tablespoons honey, plus more for topping (I omitted the honey)

Place a rack in the upper third of the oven and preheat to 400 degrees F.  Place a 10-inch cast-iron skillet in the oven as it preheats.

In a medium bowl, whisk together the flour, baking powder, baking soda, and salt.  With your fingers, quickly incorporate the cold butter and goat cheese until the flour resembles coarse meal.  Some of the butter and cheese chunks will be the size of small pebbles; others will be the size of oat flakes.  Make a well in the center of the flour mixture.  Add the cold buttermilk to the well of the flour mixture.  Use a fork to blend together the wet and dry ingredients.  Mix until all of the flour is incorporated and no dry flour remains.  Set aside.

Note:  If you chose to add the honey to these biscuits you will need to incorporate the honey into the buttermilk and then pour it into the well.

Remove the hot skillet from the oven and add 1 tablespoon butter.  Swirl the butter around the bottom and sides of the pan until butter is melted and pan is coated.  

Spoon batter by the 1/4 cupful into the hot skillet.  About 6 biscuits will fit into the 10-inch skillet.  Biscuits should have about an inch of room separating them, but will bake up to touch one another. Place in the oven to bake for 14 to 16 minutes, until golden and tops appear dry and slightly firm.  Remove from oven.  Let rest for 5 minutes.  Remove from skillet and top with more honey (if using).  Repeat the process to cook the remaining biscuits, remembering to add another tablespoon of butter to the skillet before placing the biscuit dough inside (you want to make sure you get those crispy buttery bottoms on all your biscuits).  These biscuits are best served immediately, but will last for up to 3 days, well wrapped, at room temperature.

look at those crispy buttery bottoms!
This post is part of the Joy the Baker Cookbook Spotlight and Cook-Off sponsored by Hyperion and hosted at girlichef*

Wednesday, February 22, 2012

Couscous Salad with Chickpeas, Sun-dried Tomatoes, and Goat Cheese


While away on vacation I literally ate and drank everything in sight.  Every morning we had eggs, bacon, and biscuits and gravy for breakfast. Some mornings there were even pancakes added to the mix. Then there were the racks of ribs, the crazy good filet mignon, and the one-pound baked potatoes.  Let's not forget about the pizza, the burgers, the macaroni and cheese, the brownies, or the cookies.  Couple all that food along with wine, margaritas, and the moonshine and I think you can imagine how I feel.  I need to detox.  In a major way.

My body is craving light dishes filled to the brim with veggies, grains, and you guessed it......beans!  If you haven't noticed it by now, I am a total bean fanatic. When I settled on the recipe for this couscous salad I immediately knew I would have to make some changes to accommodate my cravings. First, and most importantly, I knew I had to add a can of chickpeas. It was a no brainer.  I also knew I would sub zucchini in place of the cucumber (just because it's what I had on hand). In addition to that, I subbed parsley for the mint (no one in my family enjoys mint besides me).  This salad originally called for only 3 tablespoons of lemon juice which after tasting, was nowhere near enough lemon, so I doubled the amount of lemon juice to 6 tablespoons.  Six tablespoons of lemon is right around the perfect amount.  However, if you really enjoy a strong lemon flavor then I would suggest adding between 6-8 tablespoons of lemon.  Lastly, this salad benefits from the addition of salt, quite a bit of salt.  I found myself tasting and adding salt.  Tasting again and adding more salt, etc. 

I really enjoyed this salad. I loved the bright flavors and all the different textures, as well as the lovely little chunks of goat cheese.  I found this salad hearty and filling yet light at the same time.  My Mom, however, did not enjoy it at all.  She's decided that she is not a fan of couscous.  She said she felt like she was eating a salad made with breadcrumbs.  Then she preceded to pick out all the veggies and beans, leaving the couscous on the plate.  The kids thought it was pretty funny to see Grandma pushing her couscous aside on the plate.  She's not likely to live it down anytime soon.
Couscous Salad with Chickpeas, Sun-dried Tomatoes and Goat Cheese
Adapted from Falling Cloudberries by Tessa Kiros
Serves 6-8

1 & 2/3 cups couscous (I used a green spinach couscous)
About 1 cup sun-dried tomatoes in oil (tomatoes chopped into bite sized pieces, oil reserved)
1 can of chickpeas, drained
1 small zucchini (quartered and chopped into bite-sized pieces)
5 scallions, chopped
1/2 cup parsley, chopped
6 tablespoons lemon juice
1/3 cup olive oil (or used reserved sun-dried tomato oil)
1 cup goat cheese, crumbled
quite a bit of salt and pepper

Put the couscous in a large bowl and season well with salt and pepper.  Add a splash of the oil from your jar of sun-dried tomatoes and 2 cups of just-boiled water.  Stir, cover, and let cool completely, fluffing it up gently now and then, so that the bottom does not become stiff.

Add the zucchini, scallions, chickpeas, parsley, and lemon juice to the couscous.  Add the tomatoes and the rest of their oil, topping off the 1/3 cup with regular olive oil if there is not enough from the tomatoes, and stir well.  Add the goat cheese and stir in carefully, especially if it is soft.  Taste for seasoning, adjust if necessary, and serve.

Couscous is one of those things that you either love or hate.
How do you feel about couscous?

Theme: Lighten Up


Every Sunday @ Kahakai Kitchen

Monday, February 20, 2012

Pomegranate Sorbet

Over the weekend my husband and I went on a much needed adults only vacation to the Smoky Mountains of Tennessee.  We rented a beautiful cabin that was perched way, way, way high atop a large mountain (I had to cover my eyes on the drive up).  It was very remote. And by remote I mean no internet.  Three and a half days with no internet.  I consoled myself with beautiful breathtaking views like this.  This is a real picture taken just this morning.  The snow on the mountains was as beautiful as beautiful gets.
During the day I shopped.  The Lodge Cast Iron Factory Store was my personal favorite.  We're talking wall-to-wall cast iron of every shape and size.  Everything from super cute minis to a super-sized cast iron paella pan.  I wanted it all, but in the end I settled for a few pieces.  One of the pieces I bought was this oval serving griddle.  
The nights called for another type of consolation.  Something strong, something special, something mountain made and over a century old.  Believe me when I say nothing fits the bill like Ole Smoky Tennessee Moonshine.  The Ole Smoky Tennessee Moonshine Distillery is one of the only places you can buy moonshine legally.  They have every flavor imaginable.  I tried them all (the results were very entertaining).
 
All in all I do have to say that I really missed popping online here and there, BUT I did manage to fill my days with several worthwhile distractions.  We had a wonderful time, but it is nice to be back.  My body needs a break from all that moonshine.

Before leaving on vacation I made this very refreshing pomegranate sorbet.  It was both tart and sweet and had just the right balance of lemony flavor.  The kids loved it.  I loved it.  It disappeared in a flash.  We loved it so much I'd double the recipe next time around.  It really was that good.  Next time around I'd like to scoop a bit into a champagne flute and pour some champagne or prosecco over it. 

Pomegranate Sorbet
Adapted from Apples for Jam
by Tessa Kiros
Serves 4

4 ripe pomegranates or 1-3/4 cups Pom Wonderful 100% pomegranate juice
Juice of 1 lemon
1/4 cup sugar

Juice the pomegranates very thoroughly, using a levered juice extractor or a citrus juicer, and then strain.  Or, pour 1 - 3/4 cups of Pom Wonderful pomegranate juice into a bowl/cup.  Put the lemon juice in a small saucepan with the sugar and 3 to 4 tablespoons of the pomegranate juice.  Heat, stirring, over medium-low heat until the sugar has dissolved.  Remove from the heat, leave to cool a little, and then stir in the rest of the pomegranate juice.

If  using an ice cream machine:  Place the mixture in the refrigerator until it is completely chilled.  When the mixture is chilled, place it in your ice cream machine and follow the mfg. instructions.

If you do not have an ice cream machine:  Pour the mixture into a bowl or container that has a lid.  Put the lid on, and put it in the freezer.  After an hour give the mixture an energetic whisk with a hand whisk.  Put it back in the freezer and then whisk again after another couple of hours.  When the sorbet is nearly firm, give one last whisk, and put it back in the freezer to set.  

Theme: In the Pink

Thursday, February 16, 2012

Joy the Baker Cookbook Spotlight & Cookoff: Chocolate Fudge Brownies with Chocolate Buttercream Frosting

These brownies have an intense chocolate flavor. They are fudgey, rich, dense, studded with chocolate chips and topped with the creamiest, smoothest, most indulgent chocolate buttercream frosting.  There is nothing subtle about this brownie.  This brownie is total and complete decadence.  Pure bliss for the chocolate lover.  It's not often that you'll hear me say something like this, but just one of these brownies will satisfy your deepest darkest chocolate craving. 

I'm happy to be sharing these brownies with you today as part of the Joy The Baker Spotlight & Cookoff  hosted by my friend Heather at girlichef and sponsored by the folks at Hyperion.  I've been a fan of Joy The Baker's blog for years now and I am beyond thrilled to have a sneak peak of Joy's new book before it even hits the stores.  Over the next few weeks I'll be sharing lots of Joy's recipes, ending with a review of her new book. 


Chocolate Fudge Brownies with Chocolate Buttercream Frosting
Adapted from Joy The Baker Cookbook
Makes one 8-inch pan

1/4 cup all-purpose flour
1 teaspoon baking powder
1/2 teaspoon salt
1/2 cup (1 stick) unsalted butter
3 ounces unsweetened chocolate
1/2 cup packed brown sugar
1/2 cup granulated sugar
2 large eggs
1 large egg yolk
1 teaspoon pure vanilla extract
1/2 cup semisweet chocolate chips

Place a rack in the upper third of the oven and preheat to 350F.  Grease and flour an 8-inch-square baking dish and set aside.

In a medium bowl, whisk together flour, baking powder, and salt.  Set aside.

Bring about 2 inches of water to a boil in a medium saucepan.  In a medium, heatproof bowl, add butter and unsweetened chocolate.  Place the bowl over, but not touching, the simmering water and allow to melt.  Stir to incorporate.  Once melted, remove the bowl from the simmering pot.  Whisk in brown and granulated sugars.  Whisk in eggs, yolk, and vanilla.  Add the flour mixture, all at once, to the chocolate mixture.  Fold together with a spatula until well incorporated.  Fold in chocolate chips.

Pour batter into prepared pan and bake for 25 to 30 minutes.  Bake until a skewer inserted in the center of the brownie comes out clean.  Remove from the oven and cool completely before frosting.

Frost with half a recipe of The Best Chocolate Buttercream Frosting (recipe follows) when cooled.  Brownies last, well wrapped, at room temp for up to 5 days.


The Best Chocolate Buttercream Frosting
Adapted from Joy The Baker Cookbook
Makes enough to frost one 2-layer 8- or 9-inch cake or 24 cupcakes
Note: You will only need half the amount below to frost the brownies

3/4 cup (1-1/2 sticks) unsalted butter, at room temp
1/2 cup unsweetened cocoa powder
1/2 teaspoon salt
2-1/2 to 3 cups powdered sugar, sifted
2 tablespoons milk
1 teaspoon vanilla extract
scant 1/2 cup heavy cream
1/3 cup Ovaltine powder

In the bowl of an electric stand mixer fitted with a paddle attachment, cream together butter, cocoa powder, and salt.  Mixture will be very thick, but cream for about 3 minutes on medium speed.

Turn off the mixer, scrape down the sides of the bowl and add 2-1/2 cups powdered sugar.  Turn the mixer on low to incorporate the sugar while adding the milk and vanilla.  As the sugar incorporates, gradually increase the mixer speed to medium-high.  Stop the mixer and scrape down the sides of the bowl as necessary.  Beat until smooth.

In a 1-cup measure, stir together cream and Ovaltine.  Turn the mixer to medium, and pour the cream in a slow and steady stream until the frosting reaches your desired consistency: smooth, creamy, and spreadable.  Add more powdered sugar to adjust consistency.  Spread or pipe frosting onto cooled cakes or cupcakes.

Frosting will last, well wrapped, in the refrigerator for up to 5 days.  

Note: Putting the frosting in the fridge for about 30 minutes makes it harden just a little and makes it easier to spread.


Please visit girlichef's site here for a chance to win the Joy The Baker Cookbook.
This post is part of the Joy the Baker Cookbook Spotlight and Cook-Off sponsored by Hyperion and hosted at girlichef*

Wednesday, February 15, 2012

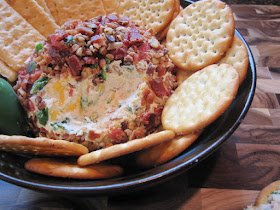
Bacon-Jalapeno Cheeseball

In the eighties and early nineties I ate my fair share of cheeseballs.  They were everywhere.  My Mom made them.  My friend's mother's made them.  They were the "thing" to bring to a party or get together.  Then somewhere along the way the cheeseball became out of favor and fell to the wayside.  I'm not sure who decided to do away with the cheeseball, but I think it should make a comeback.  Heck, the cheeseball deserves to make a comeback.  A modern comeback, pumped up with all kinds of flavor.
 
Imagine cream cheese and cheddar cheese flavored with bacon, jalapeno, garlic, cumin, cayenne, cilantro, and Worcestershire all rolled into a ball and then rolled in toasted pecans, more bacon, and even more jalapeno.  It's creamy, it's crunchy, it's spicy, and it's bursting with flavor.  It's simply addictive.  You might even make a meal out of it!
This is my first cheeseball, but it won't be my last.  I highly recommend this for any occasion or absolutely no occasion at all.
Bacon-Jalapeno Cheeseball
Adapted from The Homesick Texan
Serves 4-6

8 ounces cream cheese, room temperature
1/2 cup shredded cheddar cheese (4 ounces)
2 tablespoons chopped cilantro
1 clove garlic, minced
1/4 teaspoon ground cumin
Pinch of cayenne
1 teaspoon lime juice (I omitted the lime juice)
1/2 teaspoon Worcestershire sauce
2 jalapeños, stems and seeds removed, diced, divided
6 pieces cooked bacon, crumbled, divided (about 6 ounces)
Salt to taste
1/4 cup chopped pecans, roasted
Crackers for serving

Method:
Mix together the cream cheese, cheddar cheese, cilantro, garlic, cumin, cayenne, lime juice (if using), Worcestershire sauce, half of the diced jalapeños and half of the crumbled cooked bacon. Taste and adjust seasonings and add salt.

Place the roasted pecans and remaining diced jalapeños and bacon on a plate. Stir together so well mixed. With your hands, roll the cheese mixture into a ball, then place on the plate and roll in the jalapeños, bacon and pecans until covered.

Chill covered for at least an hour before serving. Serve with crackers.

Monday, February 13, 2012

Breakfast in Bed: Heart-Shaped Egg in a Hole with a side of Oven-Baked Bacon


This Valentine's Day forget about the chocolates, the candies, and all the other sweet treats.  Try serving your loved ones breakfast in bed instead!

The classic egg in a hole becomes much more festive when the bread is cut into a cute little heart shape and served alongside. 
Egg in a Hole
Serves 1

1 slice of bread
1 good-sized tablespoon butter, plus 1 teaspoon (room temperature)
1 egg
salt & pepper

Cut desired shape from bread (I used a heart-shaped cookie cutter).  Generously butter both sides of the bread and the cut-out shape (you need about a tablespoon of butter to do this right).  In a skillet over low heat, place 1 teaspoon of butter and allow to melt. Put the slice of bread in the skillet and allow it to cook for a minute or two. Carefully break the egg into the center of the bread, season with salt and pepper, and cover the skillet (covering the skillet allows the egg to cook a little quicker).  Allow to cook for a minute or two, depending on how you like your eggs.  Flip and cook the other side of bread. When the bread is toasted and your egg is how you like it, gently remove and place on a plate.  Add cut-out shape to pan and toast both sides.  Serve immediately.
Note:  The key to this recipe is using lots of butter! 


And now for the best part....bring on the bacon! This oven-baked bacon is my family's newest obsession.  Baking the bacon in the oven does take a considerable amount of time, but the results are fantastic.  The flavor of the bacon really intensifies in the oven and the texture...oh my!  Oven-baked bacon nearly melts in your mouth.

This is now the only method I use for cooking bacon.  There are so many advantages to oven-baking bacon.  Number one, it's easy.  Just place it on a pan, pop it in the oven, and walk away.  Number two, it's much cleaner.  No grease.  No messy clean up.  Number three, the bacon bakes up in nice perfect slices and looks pretty.  Number four, you need not worry about the chewy/crisp debate.  Oven-baked bacon will satisfy everyone's tastes.  Number five, oven-baked bacon is crazy good!


Method:  Turn to 350F.  While the oven is preheating get out a large baking sheet.  Place a wire rack over the baking sheet.  Place as many slices of bacon as possible on the wire rack.  Do not overlap the bacon. Bake the bacon for about 30-40 minutes, depending on how you like your bacon.  Remove and drain on paper towels.  Serve.

Note:  Yes, that's a soda you see in the above picture.  I'm just keeping it real.


HAPPY VALENTINE'S DAY!

Monday, February 6, 2012

Cherry Jam Shortbread Cookies

 Every time I clean out my pantry and/or my fridge it's somewhat of an adventure.  Apparently I've started to stockpile food items.  In fact, I think I would qualify as a hoarder.  I believe it began last year when I found 29 boxes of pasta in my pantry.  Then I opened my freezer and found 6 bags of peas and 5 bags of shrimp.  This time around I found 8 different jars of mustard, 10 bags of dried beans, several bags of dried chiles, about a dozen different breakfast cereals for the kids, and approximately 7 jars of jellies, jams, and preserves.  I think I may need to join a program or something.  

In the meantime I think I'll console myself with these cute, buttery, heart-shaped shortbread cookies.  If you're like me at all, then you already have all the ingredients on hand to make these.  One jar of jelly down...six more to go!

Cherry Jam Shortbread Cookies
Adapted from Apples for Jam by Tessa Kiros
Makes about 12 to 15 bars, depending on size

7 tablespoons butter, softened
1/2 cup superfine sugar
1-2/3 cup all-purpose flour
1/2 teaspoon baking powder
1 egg, lightly beaten
1 few drops of vanilla extract
about 2/3 cup of your favorite jam

Preheat the oven to 325F.  Have a 8 x 8 baking pan ready - you can line it if you like, to help you lift out the shortbread when it's cooked, but it's not absolutely necessary.

Put the butter and sugar in a good-sized bowl and work them together by hand or wooden spoon until combined.  Add flour and baking powder and work them in.  Add the egg and vanilla and knead them in until it is all compact and smooth.  Cover with plastic wrap and leave in the fridge for at least half an hour until the dough is firm enough to roll out.

Divide the dough in half.  Roll out one half on a lightly floured surface so that it will fit into your pan.  It should be about 1/8 inch thick.  Fit it into your baking pan, making sure that it is fairly even thickness all over.  Spread the jam over the top, and fit as exactly as possible over the bottom one.  If it is difficult to lift, roll it loosely over your rolling pin and carry it that way.  It isn't essential that all your edges are exact; you can break off a bit from here and patchwork it in there.  It will taste the same.

Bake for about 20-25, checking regularly, or until the shortbread is golden in places.  The edges will start to turn golden brown first, followed by the top.  Remove from the oven and cool for 5 minutes in the pan.  Lift out of the pan, using the paper.

Cut into shapes with a cookie cutter, or just into squares or diamonds.  Or you can leave it in one piece and keep cutting chunks out of it as you go.  It will keep in a sealed container for 5 to 6 days.


Theme: February Potluck

Sunday, February 5, 2012

Very Thin Fries with Sriracha-Garlic Mayonnaise

Do you make your own mayonnaise?  I do, but it's only been recently.  Why only recently?  Well, I have an unnatural fear of eating anything that contains raw eggs.  However, one day I needed some mayonnaise for a recipe and I was completely out.  I didn't want to run to the store so I made my own.  It was an eye opening experience and now I simply can't go back to the storebought brands.  Homemade mayonnaise is so much better!  It's way easier than you'd ever imagine and you can flavor it up any way you chose. You simply can't go wrong.

I made this batch of mayonnaise for my husband who loves to dip his fries in mayo.  My husband is also a huge fan of sriracha so I added a heaping tablespoon of sriracha to spice it up.  The result was a pefectly balanced mayonnaise.  Not too spicy, just the right amount of heat.  Garlic loves mayonnaise so I left the cloves in.  If you're not a garlic fan you can take the garlic out before blending. 

I served the sriracha-garlic mayonnaise with Tessa's very thin fries.  Tears were shed over the fries.  Big tears.  The kids fought over them, literally.  I ended up doubling the recipe (8 potatoes total) and I still only manged to sneak a few for myself. 

Mayonnaise
Adapted from Apples to Jam by Tessa Kiros
Makes 1 cup

1 cup olive oil (or canola oil) 
(OR  a mixture of canola and olive oil)
1 big garlic clove, peeled and squashed a bit
1 whole egg
1 egg yolk
1/2 teaspoon Dijon mustard
1/2 tablespoon apple cider vinegar
juice of half a lemon
1/2 teaspoon salt
freshly ground black pepper

For Sriracha Garlic Mayo:  Do not discard the garlic cloves.  Leave them in the mixture and blend.  Add 1 heaping tablespoon of sriracha, and stir/blend.

Put the oils in a bowl with the garlic clove and leave for 15 minutes or so to infuse.  Remove the garlic, if you wish, or if you want extra garlic flavor leave it in.

In a small processor or with a handheld blender, whiz the eggs until they become very thick.  Add the mustard, vinegar, lemon juice, and 1/2 teaspoon of salt and whiz together.  With the motor running, add the oil drop by drop, and continue mixing until all the oil has been added and the mixture is thick and fluffy.  Taste for salt and pepper.  Remove mayo to a bowl and stir in one tablespoon of sriracha.  Serve immediately or store in fridge for up to 1 or 2 days.  

 Very Thin Fries
Adapted from Apples for Jam by Tessa Kiros
Serves 4

4 medium potatoes
canola oil or olive oil, for frying
salt

Peel the potatoes and cut them into slices about 1/4 inch thick, keeping them long.  Cut these into 1/4 inch sticks.  Rinse under cold water and dry thoroughly on paper towels.  

Pour about 2 inches of oil into a cast iron pan.  Place over medium-high heat until the oil is hot.  You will need to fry the potatoes in batches.  Just or minute or so after you have put the fries in the oil, give them a stir with a wooden spoon to make sure none are sticking.  Leave them for a minute or two to crisp up and then give another stir.  Let them fry until they are nice and crisp and lightly golden.  Lift them out into a bowl lined with paper towels to absorb the excess oil.  Transfer them to a clean bowl, scatter with salt and pepper (if desired), and serve at once.

Theme: Some Like it Hot - and Spicy!
Note:  Because homemade mayonnaise contains raw eggs, it's something that needs to be made and used within a day or two.  I reduced the original recipe, which was for 2 cups, down to 1 cup (which is still quite a bit of mayo to use in 2 days).  It is best to make only the amount you can use within that time.