I've recently fell in love with my copy of Carmine's Family-Style Cookbook. Each and every recipe I have made from this book has been packed with flavor and absolutely delicious. I was intrigued with this recipe and the combination of flavors. Curious how it would all turn out, I began the brining process for the pork chops. The recipe calls for them to brine for 48 hours. I was tempted to forgo the brining process, but decided to stay true to the recipe for the first go around. I was glad I did.
The end result was a tender and spicy pork chop in a robust garlic sauce. My husband really enjoyed this and said it was his favorite Carmine recipe to date. I served it with Carmine's roasted potatoes, which are out of this world delicious. It was all gobbled up in no time and there were no leftovers. A definite make again recipe!
Pork Chops with Sweet and Hot Vinegar Peppers - Carmine's Family-Style Cookbook
Brine:
3 tablespoons dark brown sugar
3 tablespoons kosher salt
1 cup hot water
2 cups cold water
5 black peppercorns
1 onion, peeled and sliced
1 clove garlic, peeled and crushed
1 whole clove
1 bay leaf
1 tablespoon vegetable oil
1/2 stick cinnamon
Pork Chops:
4 loin pork chops, each 1 inch thick
2 tablespoons olive oil
1 tablespoon coarsely chopped garlic
1 cup chicken stock
10 small whole sweet vinegar peppers, quartered and seeded
10 small whole hot vinegar peppers, quartered and seeded
7 tablespoons sweet vinegar pepper juice from jar
7 tablespoons hot vinegar pepper juice from jar
4 tablespoons unsalted butter
2 tablespoons chopped fresh basil
2 tablespoons chopped flat-leaf parsley
To prepare the brine and brine the pork chops:
Dissolve the sugar and kosher salt in the hot water. Add the cold water and the rest of the brine ingredients. Mix the brine well and transfer it to a large resealable plastic bag. Place the pork chops in the bag, seal it, and gently shake the bag to make sure the chops are covered by the brine. Put the bag in a bowl. Refrigerate them for 2 days, turning the bag from time to time.
To Cook the Pork Chops:
Preheat the oven to 400F. Remove the pork chops from the brine, pat them dry with paper towels, and set them aside. Discard the brine. In a large ovenproof saute pan, heat the olive oil over high heat. When the oil is hot, cook the pork chops for 3-4 minutes or until they are golden brown on one side. Reduce the heat to medium-high and brown the other side of the pork chops for 2-3 minutes. Transfer the pan to the oven and cook the pork chops for 3 minutes or until they are pale pink in the center and the internal temp is 150F. Transfer the chops to a platter, cover them, and keep them warm. Add the garlic to the saute pan and cook it over low heat for about 1 minute or until it is lightly browned. Add the chicken stock, sweet and hot peppers, and pepper juice, a little at a time. Taste the sauce and add only as much hot or sweet pepper juice as you like to make it pleasantly tart. Add the butter, basil, and parsley, increase the heat to medium-high, and boil the sauce for about 2 minutes. Return the chops to the pan and turn them to coat them with the sauce. Put the chops on a platter, spoon the sauce over them, and serve.
Note: This recipe really does pack a punch in the heat department. I only added about half of the pepper juices and it was really potent. I love super spicy hot foods, but 14 tablespoons of pepper juice on top of more peppers would've been too much for me.
Tuesday, September 29, 2009
Monday, September 28, 2009
Fall Baking Series: Great Pumpkin Cake
Ever see those recipes that look so easy? You know, the ones you think you can just whip up in no time at all? Well, this cake isn't that recipe. Oh, looks can be deceiving alright! Then again, my cake decorating skills need improvement. It is possible that someone else would actually have an easy time with this recipe. All that aside, the kids loved this cake and thought it was really cute!!
It is basically a cake mix baked in a 12-cup fluted tub pan. It is frosted with a cream cheese frosting that has been colored with food coloring. The pumpkin stem is a frosted ice cream cone.
The recipe actually says you can use any cake mix, but I learned my lesson with that one. I used a chocolate cake mix and you could see the chocolate cake peeking through the frosting. Lesson number one is to chose a light cake mix.
I made my own cream cheese frosting, hence lesson number two. While my homemade frosting was delicious, it was much thinner. I should have followed the recipe in the book. I think their recipe would've yielded a thicker frosting making it easier to cover the cake. Instead, I fought to frost this cake for at least an hour.
I will try this recipe again next year, or maybe for Thanksgiving. Next time, I'm going to buy a light cake mix and make the frosting in the book. After all, this recipe should be easy!!
Great Pumpkin Cake - Halloween Food, Fun & Crafts
1 pkg. (2-layer) cake mix, any flavor
1 pkg. (8 oz) cream cheese, softened
1/4 cup (1/2 stick) butter, softened
4 cups powdered sugar
Few drops each: green, red and yellow food coloring
1 cake-style ice cream cone
Prepare cake batter and bake in 12-cup fluted tube pan as directed on package. Cool in pan 10 minutes. Invert cake onto wire rack; remove pan. Cool cake completely. Meanwhile, beat cream cheese and butter in medium bowl with electric mixer on medium speed until blended. Gradually add sugar, beating until well blended after each addition. Remove 1/2 cup of the frosting; place in small bowl. Add green food coloring; stir until well blended. Spread half of the green frosting onto outside of ice cream cone; set aside. Cover and reserve remaining green frosting for later use. Add red and yellow food colorings to remaining white frosting to tint it orange. Spread onto cake to resemble pumpkin. Invert ice cream cone in hole in top of cake for the pumpkin's stem. Pipe the reserved green frosting in vertical lines down side of cake.
Makes 24 servings
Squash Casserole for My Girl Paula
This squash casserole was heaven on a plate! I am happy to say that Paula's squash casserole was one of my suggestions for this month's My Girl Paula recipes. This time of year, squash is everywhere in abundance. Plus, it is super cheap and tastes delicious. I am inhaling it right now as a write this post and I am wishing that I would have made more!! The squash, onion, cheese and ritz cracker really come together to make one flavorful dish. This is a absolute repeater recipe. In fact, it might be my very favorite Paula recipe to date!! If you love squash, you will be super excited about this recipe, I promise.
On another note, food blogging can be known to cause "strange" behavior. Like making squash casserole for breakfast because the recipe is due to post today!! I know that all food bloggers know what I'm talking about, but my family thinks I've lost my mind. I am one of those people who need deadlines, otherwise some things just never come to pass. I am so glad the deadline came about for this squash casserole today, it was a delicious breakfast.
Squash Casserole - The Lady & Sons Too by Paula Deen
2 cups cooked mashed yellow squash
2 cups Ritz cracker crumbs
1 cup evaporated milk
1 cup shredded cheese, such as Cheddar or Swiss
1 cup chopped onion
2 eggs, lightly beaten
1 teaspoon salt
1 teaspoon pepper
pinch of sugar
6 tablespoons butter
Place the squash in a large bowl. Add the cracker crumbs, milk, cheese, and onion, and stir well. Stir in the eggs, salt, pepper, sugar, and butter, and pour into a greased 1-quart casserole. Bake at 350 for 40 minutes.
Notes: I actually quartered the recipe and it turned out fabulous. The recipe was somewhat vague. I wasn't sure how to cook or mash the squash. I ended up softening the squash with a little bit of butter in a skillet on the stove. Once it was softened, I mashed it up with a spoon, leaving some texture. I also cooked the chopped onions with the squash, because I didn't want the onion to be raw in the casserole. I didn't have evaporated milk, so I used regular milk with fab results. I had some 5 year aged cheddar in my refrigerator from my favorite cheese shop. It added a delicious flavor to this recipe. Because I quartered the recipe, it reduced the egg to 1/2 egg. I used the egg white and tossed the egg yolk. I had to do my part in making the recipe healthier - ha ha!! Also, the recipe doesn't say how to add the butter into the casserole. I chose to soften mine in the microwave and stir it into the mixing bowl with the other ingredients.
Head on over to My Girl Paula where you can see a list of all the members and find out how they liked this casserole. Better yet, join up and cook along with us!! If you chose to play along, it wouldn't hurt to stock up on butter :D
Friday, September 25, 2009
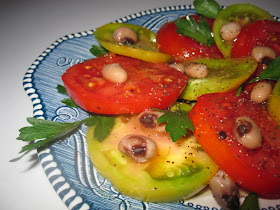
Heirloom Tomatoes and Black-Eyed Peas - Recipe #41 Stirring the Pot
I was so happy to finally make this salad! It's taken quite some time to get the two main ingredients for this recipe. I had heirloom tomatoes and then couldn't find black-eyed peas anywhere. I went to three grocery stores in Kentucky for black-eyed peas and no one had them. I happened to go to a co-op last week and found a can. By that time, the tomatoes had been put to another use and I had to look for more heirloom tomatoes. Another debacle. No one had any heirlooms left by the time I found the black-eyed peas. My Mom, however, has grown some beautiful tomatoes this year and they looked beautiful to me.
I made this tomato salad last night at my Mom's before going to work. It was very quick, maybe 5-10 minutes. We enjoyed it and would eat it again, but agreed that we missed the cheese like a Caprese salad would offer. This salad was stunning in presentation and would be healthier than a Caprese, a good option for anyone watching what they eat.
Heirloom Tomatoes and Black-Eyed Peas - Stirring the Pot by Tyler Florence
6 large ripe heirloom tomatoes, various colors and varieties
2 cups canned black-eyed peas, cooked
1/2 small red onion
1 tablespoon red wine vinegar
1/4 cup extra-virgin olive oil
kosher salt and freshly ground pepper
1/4 bunch fresh hydroponic watercress, for garnish (I used parsley because no one sells watercress in Kentucky)
Cut tomatoes into thick slices and lay them on a large plate in a single layer, mixing the colors and varieties. Darin black-eyed peas and rinse under cold water. Scatter black-eyed peas and rinse under cold water. Using a sharp knife, cut the red onion in half lengthwise (root to tip). Slice each onion half lengthwise to create thin crescent-shape slices. Scatter onion on top of black-eyed peas.
In a small bowl whisk together vinegar and oil; drizzle over salad and season with salt and pepper. Garnish with watercress or parsley, in my case.
This is also my contribution to Tyler Florence Fridays, a very popular site devoted to Tyler's recipe. Head on over there to check out what everyone else made this week! I am also submitting this to Deb over at Kahakai Kitchen for her Souper Sundays club. Every Sunday Deb posts a beautiful array of soups, salads and sandwiches.
Wednesday, September 23, 2009
Fall Baking Series: Morning Maple Muffins & Maple Butterscotch Brownies
Fall happens to be my favorite time of year. I am in love with the colors of fall so much, that we painted my kitchen a color named "Pumpkin Bar". We love to going to the apple orchard and the pumpkin festivals. There is nothing like eating a fresh apple cider donut while hunting for the perfect pumpkin. We are lucky to live in a big farming community where lots of these farms surround us. It is a great way to support the local farmers and enjoy family time.
When I think of fall baking I think of maple syrup, apples, pears, nuts, pumpkin, and warm spices. My all-time favorite ingredient to use, in the fall, is maple syrup. I love the flavor and smell and it always makes me feel like fall has arrived. Both recipes below are super delicious, the brownies being my personal favorite. In fact, I think they are a must bake this fall. If you love maple, love brownies, and love easy recipes, then this brownie recipe is for you! The Morning Maple Muffin is great in the morning and I'm toying with the idea of adding bacon to it, to make it a more savory breakfast treat.
Morning Maple Muffins - Taste of Home Winning Recipes
2 cups all-purpose flour
1/2 cup packed brown sugar
2 teaspoons baking powder
1/2 teaspoon salt
3/4 cup milk
1/2 cup butter, melted
1/2 cup maple syrup
1/4 cup sour cream (I used greek yogurt)
1 egg
1/2 teaspoon vanilla extract
Topping:
3 tablespoons all-purpose flour
3 tablespoons sugar
2 tablespoons chopped nuts (I used walnuts)
1/2 teaspoon ground cinnamon
2 tablespoons cold butter
In a bowl, combine the flour, brown sugar, baking powder and salt. In another bowl, combine the milk, butter, syrup, sour cream, egg and vanilla. Stir into the dry ingredients just until moistened. Fill greased or paper lined muffin cups two-thirds full. Combine flour, sugar, nuts and cinnamon; cut in butter until crumbly. Sprinkle over batter. (NOTE: If you love streusel, then double the streusel recipe). Bake at 400 for 16-20 minutes or until a toothpick inserted near the center comes out clean. Cool for 5 minutes before removing from pans to wire racks.
Makes 16 regular sized muffins
Doesn't that look delicious? Let me tell you that these brownies had the perfect texture. They were crisp on the top and chewy in the middle. Absolutely delicious. I think I ate about 3/4ths of the pan all on my own. The batter smells so delicious that it will literally drive you insane while you are waiting for the brownies to finish baking. A must make !!!
Maple Butterscotch Brownies - Taste of Home Winning Recipes
1/2 cup butter, melted
1-1/4 cups packed brown sugar
2 eggs
1-1/2 teaspoons maple flavoring
1-1/2 cups all-purpose flour
1 teaspoon baking powder
1 cup chopped walnuts
Confectioner's sugar, optional for dusting on top
In a large mixing bowl, cream the butter and brown sugar. Add eggs, one at a time, beating well after each addition. Beat in maple flavoring. Combine flour and baking powder; add to egg mixture. Stir in walnuts. Pour into a greased 9-in square baking pan. Bake at 350F for 27-32 minutes or until a toothpick inserted near the center comes out clean. Cool. Dust with confectioner's sugar if desired. Yield: 16 brownies that you will literally inhale.
I am a chocolate lover and love a great chocolate brownie, but these Maple Butterscotch Brownies are right up there!!
Tuesday, September 22, 2009
Family Favorites for IHCC: Cheddar Cheese Risotto and Marshmallow Crispy Squares
This week's pick for I Heart Cooking Clubs is family favorites by Nigella Lawson. I spent a lot of time trying to decide what to make. The truth is, my family rarely eats the same thing for dinner. My son, Jackson, is allergic to so many things: wheat; eggs; soy; all nuts, beans and legumes; beef; turkey; red dye and I'm sure I'm forgetting something. He does LOVE cheese, lots of it! He also eats a lot of rice, potatoes, milk and chicken. I was ecstatic to find two Nigella recipes that Jackson could eat. I knew these two choices would make everyone happy! After all, who wouldn't like cheddar cheese risotto and Nigella's version of Rice Crispy Treats?
Cheddar Cheese Risotto - Nigella Express, by Nigella Lawson
Serves 2 as a main course or 4 as a starter/side dish
1 tablespoon butter
1 tablespoon vegetable oil
2 baby leeks or 2 fat scallions, finely sliced
1-1/2 cups risotto rice
1/2 cup white win
1/2 teaspoon Dijon mustard
4 cups hot vegetable stock
1 cup chopped Cheddar cheese
2 tablespoons chopped chives
Melt the butter and oil in a medium-sized pan and cook the sliced baby leeks or scallions until softened. Add the risotto rice and keep stirring for a minute or so, then turn up the heat and add the wine and mustard, stirring until the wine is absorbed. Start ladling in the hot stock, letting each ladleful become absorbed as you stir before adding the next one. Stir and ladle until the rice is al dente, about 18 minutes, then add the cheese, stirring it into the rice until it melts. Take the pan straight off the heat, still stirring as you do, and then spoon into warmed dishes, sprinkling with some of the chopped chives.
Marshmallow Crispy Squares - Nigella Express, Nigella Lawson
Makes 24 squares
3 tablespoons butter
6 cups mini marshmallows
6 cups crispy rice cereal
edible glitter or sprinkles, optional
Melt the butter in a large saucepan over low heat. Add the marshmallows and cook gently until they are completely melted and blended, stirring constantly. Take off the heat and immediately add the cereal, mixing lightly until well coated. Press the mixture into a greased 13 x 9-inch pan; you may have to put on latex gloves and press it down into the corners, as it will be very sticky. Flatten the top and then sprinkle over the edible glitter or sprinkles if so inclined. Let the marshmallow crispy squares cool completely in the pan and then cut them into 24 squares.
Notes/Results: The family and I enjoyed both recipes tremendously. I imagine that Nigella uses a wonderful English Cheddar in her version of Cheddar Cheese Risotto. However, even with my Kraft Cheddar, this risotto was heaven! We have had many versions of risotto, never with cheddar cheese. I loved the combination of the cheddar cheese and the chives. I will be making this risotto again, especially since I almost always have the ingredients on hand.. A great family dish. Nigella's marsmallow crispy treats taste just like other rice crispy treats, delicious! Her version calls for edible glitter or sprinkles. I topped mine with some orange sugar and sprinkles, in favor of the upcoming Halloween season. Can you believe that I've never made rice crispy treats myself? Well, they were super duper easy and delicious! Both my daughter and son gobbled them up and they will be gone in no time. My son was so excited to have a rice crispy treat! He kept telling me "I can eat it. It's for me." Here is a picture of Jackson, with his mouthful, eating his marshmallow crispy treats.
Head on over to I Heart Cooking Clubs throughout the week to see what everyone else has made. There are bound to be some great recipes for your family too!
Monday, September 21, 2009
Corn Chive Pudding for My Girl Paula
Corn chive pudding was this week's selection for My Girl Paula, a club dedicated to cooking recipes from Paula Deen. I was a little worried about serving this pudding to a family of corn purists. We usually like to eat our corn on the cob, fried, grilled or just plain with a little butter. However, I decided to have faith in Paula and get to work. I halved the recipe below to serve 4 and had this put together in no time at all.
The addition of eggs and milk make this corn chive pudding a little reminiscent of a quiche. The green color of the chives is striking against the background of the yellow corn pudding. This is a beautiful recipe that was enjoyed by all and would be great as part of a special family celebration or as part of a holiday dinner. I will definitely be making this again over the holiday season. Additionally, it would be a great casserole/potluck dish.
Corn Chive Pudding - The Lady & Sons, Too by Paula Deen *serves 8*
Two 10-oz packages frozen corn, thawed
1/4 cup sugar
1-1/4 teaspoons salt
4 large eggs
2 cups milk
1/4 cup melted unsalted butter, cooled
1/4 cup chopped fresh chives
3 tablespoons all-purpose flour
1 teaspoon vanilla extract *don't be afraid to add this, you won't really taste it in the dish*
pinch of freshly grated nutmeg
Preheat the oven to 350 degrees. Butter a 1-1/2 quart baking dish. In a food processor, pulse half of the corn until coarsely chopped; transfer to a mixing bowl. Add the remaining corn and sprinkle with the sugar and salt; stir to combine. Whisk together the eggs, milk, butter, chives, flour, and vanilla, and combine with the corn. Pour into the baking dish and sprinkle with nutmeg. Bake in the center of the oven until the center of the pudding is just set, about 45 minutes.
Enjoy!
Saturday, September 19, 2009
Carmine's Garlic Butter & Garlic Bread Parmigiana
I know what you're thinking. You're thinking that you already know how to make garlic bread and you already have your own recipe. However, I'm here to tell you that you absolutely have to make this garlic bread. It is downright delicious! This is hands down the very best garlic bread that I have ever ate. In fact, this garlic butter is so good that I'm going to try to keep it on hand as a staple.
Check out the list of ingredients for this garlic butter! It is loaded with tons of good ingredients. This recipe makes 1-1/4 cup garlic butter. You can use it for garlic bread or for many other applications! It stores in the refrigerator for up to one month (but once you taste it, it will never last that long!) I have already made garlic bread twice this past week and the family is begging for it again.
Garlic Butter - Carmine's Family-Style Cookbook
1 cup salted butter, at room temperature (2 sticks)
12 fresh oregano leaves, chopped
2 tablespoons finely chopped garlic (about 8-10 cloves of garlic)
2 tablespoons grated Romano cheese
2 tablespoons garlic powder (this is a lot of garlic powder, but it turns out beautifully)
1 tablespoon olive oil
1 tablespoon dried oregano
1 tablespoon chopped flat-leaf parsley
1 teaspoon onion powder
In a medium-sized bowl, beat the butter, using a rubber spatula or wooden spoon, for about 3 minutes or until it is very soft. Mix in the remaining ingredients until they are well blended. Transfer the garlic butter to a glass dish, cover it, and refrigerate it. It will keep for 1 month. Let butter come to room temperature before using. (Notes: I have mine stored in a mason jar in the refrigerator. I have made two loaves of garlic bread, and have enough left for about 2 more loaves of garlic bread.
Yum- look at those crisp buttery edges filled with juicy butter!
Carmine's Garlic Bread Parmigiana - Carmine's Family-Style Cookbook
1 loaf of rustic country bread, baguette, or french bread
Carmine's garlic butter, how much depends on how much bread you have
2 teaspoons of Romano cheese
Preheat broiler. Slice bread into 1/2" thick slices. Toast the bread under the broiler for 1-2 minutes or until it is golden brown. Turn the bread and toast the other side for about 1 minute or until it is golden brown. Turn off broiler and preheat the oven to 400F. Spread about 1 tablespoon of the butter on one side of each piece of toast, making sure to cover the entire surface. Sprinkle the grated cheese over the bread. Transfer the toasts to a sheet pan. Bake them for about 12 minutes or until they are crispy and lightly browned. (Notes: The 12 minutes cook time depends on the size of your toasts. Mine were very small and crostini sized and they baked in about 8 minutes. The 12 minute baking time would be for a piece of toast the size of regular bread).
Switching gears, I am absolutely IN LOVE with this cookbook, Carmine's Family-Style. Last week I posted the Chicken Alla Romano; Rustic Lentil Soup; and Spice Cookies with Lemon Icing. This week I've already made the Garlic Butter and Garlic Bread Parmigiana; Beef Cutlet Milanese with Caper, Roasted Pepper, and Tomato Butter Sauce; Carmine's Marinara Sauce; and Pork Chops with Sweet and Hot Vinegar Peppers. All of the dishes have been loaded with flavor and big hits! There will be many more future posts from this cookbook :D
Thursday, September 17, 2009
Crispy Asian Chicken Salad - Recipe # 40 Stirring the Pot
I'm convinced that all husbands love to tease their wives. After so many Tyler meals and finding Tyler's cookbooks in the bed, my husband has become quite acquainted with Tyler. In fact, he has come up with a very funny nickname for Tyler. Hubby likes to call Tyler "T Flo". I'm not sure if Tyler would like this nickname, but I happen to find it hysterical. It always makes me laugh when the nickname is mentioned because it's not representative of Tyler at all. Then it makes me chuckle because it implies that we know Tyler well enough to give him a nickname.
Tonight I made T Flo's Crispy Asian Chicken Salad. It was easy and didn't require a sink full of dirty dishes! (Bonus points for Tyler) I loved everything about this salad and found it a welcome change to all the heavy Italian dishes, desserts and home cooking. I love the crunch of the wonton crisps, the bite of the sesame seeds, and the overall appeal of all the colors in this salad. It is a unique salad that is sure to please. I love the fact that I can feel good about eating this week's T Flo recipe.
Crispy Asian Chicken Salad - Stirring the Pot, by Tyler Florence
1 and a half inch piece of ginger, peeled and grated
1 tablespoon toasted sesame seeds (I used black sesame seeds for more color)
1 tablespoon toasted sesame oil
1 tablespoon honey
2 tablespoons reduced-sodium soy sauce
extra virgin olive oil
1 large boneless chicken breast (Tyler says skin on, I say skin OFF- yuck), halved
kosher salt and freshly ground black pepper
1 zucchini, sliced lengthwise for fancy prep or cubed it really wouldn't matter
6 wonton wrappers, cut into strips, deep-fried, and salted
1/4 bunch fresh cilantro, for garnish
Preheat oven to 375F. For the glaze, combine the ginger, sesame seeds, sesame oil, honey, and soy sauce in a small bowl and stir to mix. Set aside.
In a large saute pan heat a 2-count of olive oil (about 2 tbsp) over medium heat. Season the chicken on both sides with salt and pepper. Place the breasts, skin sides down, in the pan and sear for 3-5 minutes, until golden. Turn the breasts over and, using a pastry brush, liberally brush the glaze on top of the skin. Place the whole pan in the preheated oven and roast for 7-10 minutes, until chicken juices run clear (180F). Baste with glaze throughout cooking so the breast remains moist and tender. Let chicken stand until ready to serve the salad, then slice chicken.
Arrange zucchini strips on the bottom of a plate and top with sliced chicken breast. Scatter crispy wonton strips on top and drizzle with pan juices. Garnish with cilantro.
Notes: This was by far my most favorite salad from Stirring the Pot, thus far. Sometimes I am weird about dishes that are hot and cold. I prefer my chicken to be room temp or almost cold on top of a salad. I let my chicken completely cool before eating. I loved everything about this salad. It was sweet and salty, which is a great combination! I have to say that I agree with Tyler when he says that not every Asian salad has to start with mandarin oranges. I think this is a great salad that has crunch, flavor, and is visually appealing. I would recommend this to anyone who enjoys these Asian flavors and wants to deviate from the "normal" salad full of lettuce. This is a terrific way to showcase all that summer zucchini. I absolutely devoured it : D
This is my submission to this week's Tyler Florence Fridays. Please head on over there to see what everyone else has made this week. This is also my submission to this week's Souper Sundays, hosted by Deb of Kahakai Kitchen.
Tuesday, September 15, 2009
Halloumi Bites
Thank you to Nigella Lawson for inspiring me to try these wonderful fried cheesy bites! They are my first submission to a fabulous new cooking club, I Heart Cooking Clubs! I am especially excited to participate in this new cooking club because we are currently celebrating Nigella Lawson. I adore her and think she is fun and unadulterated. This is a another great cooking club which allows you to chose your own recipe based on a theme each week. This week's theme is Party Treats! I poured and poured over my copy of Nigella Express. So many recipes to choose from and it really gave me something fun to think about. I decided on these Halloumi Bites. How can you ever go wrong with fried cheese?
Over the weekend I went to the Mousetrap, a fabulous cheese shop in Lexington. It's almost embarrassing to admit the sheer excitement I get when going to the Mousetrap. They have every cheese you can possibly imagine. They also carry all sorts of gourmet foods and cookware. I am truly inspired each time I go there. During this visit, I was able to buy four great imported cheeses: Halloumi, Camembert, Fontina, and Romano. So exciting!
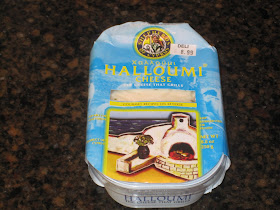
Here is a picture of the Halloumi I bought. Halloumi is a cheese made in Cyprus and is used in Greek/Mediterranean cooking. It's very versatile and can be grilled, grated, fried or served in a salad or sandwich. It is a staple in Mediterranean cooking as it features the texture of mozzarella with the briney moisture of a feta. At my local store it was $8.99 for about half a pound (8.8oz). I urge you to try this cheese if you have not. It is worth the price, packs a punch, and can be used for many recipes.
This is what it looks like when you remove the packaging. I was expecting it to be fragile, like feta, but it was more smooth like a mozzarella. It was easy to slice for the Halloumi bites.
This is one of those recipes that you can throw together in five minutes. It was SO easy and very delicious. I ate some plain and then I put some inside a pita and it was awesome!
Halloumi Bites - Nigella Express by Nigella Lawson
1/4 cup garlic oil *(I used chili oil)
3 tablespoons chopped parsley
2 tablespoons lime juice
good grind of pepper
3 (8 oz.) blocks halloumi cheese, drained *(I used about 1/3 a package for 2)
Combine oil, parsley, lime juice, and pepper in a large shallow dish. Slice the drained (I didn't have to drain mine) halloumi into 1/4 inch-wide pieces, and then cut each slice in half again. Don't worry if they splinter as you cut. Heat a dry skillet and dry-fry the slices of cheese until golden on both sides. This should take only a minute or so in a hot pan. Put the fried halloumi into the shallow dish of other ingredients as you go, and then turn the halloumi about to coat each piece before turning into a serving dish.
I am excited to say that I have leftover Halloumi cheese and will be trying some more recipes later this week. I like the idea of making a Mediterranean pizza, putting the Halloumi on a skewer, and also grating it into pasta or even an omelet!
Enjoy!!
Sunday, September 13, 2009
Chocolate Chip Pound Cake for My Girl Paula
Chocolate chip pound cake is this week's recipe for My Girl Paula. I have really been a little too indulgent lately, and wasn't really looking forward to this recipe. In fact, I've actually gained about 5 pounds in the past month and this is not a trend that I wish to continue. So, with recipients in mind, this cake was baked and distributed accordingly. (Okay, okay...yes I did indulge in a piece first). The rest of the cake was sent to my mom and my mother-in-law for Grandparent's Day. After delivering the cake, I went to work (very hard work selling bath bombs) and I got out the tester below.
You know it's a bad day when any of us break out the Silky Underwear dusting powder. It can only mean one thing......chafing thighs!! Ugh, not a girl's best friend!! I headed straight for the Silky Underwear and went into the stockroom. I meant business! Who can work 8 hours with chafing thighs, not me!! Anyway, the girls suggested I buy this product. Can you believe that? It was as if they felt I was going to continue using this powder. I mean really! Who do they think they are? Please.....I would probably replace my skirts with pants before I would be caught dead buying this powder : )
Chafing thighs aside, Paula's chocolate chip pound cake was good. I can't tell you that it was my favorite or even that I would make it again, but it was enjoyable. The recipe calls for a butter recipe cake mix, a vanilla pudding mix, and a chocolate pudding mix. It is a very moist and dense cake with bits of chocolate chips running through it. Paula suggests topping it with confectioner's sugar or chocolate sauce. Once again, I found a way to make Paula's recipe more decadent, topping it off with vanilla ice cream and homemade chocolate sauce.
This was a very easy cake to throw together and if you are looking for a moist, dense, chocolaty cake then this would fit the bill.
Chocolate Chip Pound Cake - The Lady & Sons, Too - by Paula Deen
4 eggs
1-1/2 cups water
1 teaspoon vanilla extract
1 package butter recipe cake mix
One 3.4 oz. pkg. instant vanilla pudding mix
One 3.4 oz. pkg. instant chocolate pudding mix
1/2 cup (1 stick) melted butter
1/4 cup vegetable oil
6-ounces chocolate chips
Confectioner's sugar, for dusting
Preheat oven to 350F. Grease and flour a tube pan or bundt pan. In a mixing bowl, beat the eggs, water, and vanilla by hand. Stir in the cake mix and pudding mixes. Slowly add the butter and oil, and mix well. Stir in the chocolate chips. Pour into the prepared pan. Bake for 50-60 minutes (mine baked about 70-80 mins). Cool for 10 minutes, then invert onto a cake plate. Sift confectioner's sugar over the cake, or drizzle with chocolate sauce, if desired.
I also received this award from Kay of Cooking with K. Thanks Kay! Kay is a great blogging friend who also participates in the My Girl Paula group. As part of the award, I am to share seven things about myself.
1- I am an only child and was also an only grandchild on both sides.
2 - I wanted to be a chef when I was in high school and went to school for business instead.
3 - I really wish I had went to culinary school and one day hope to.
4 - I sometimes cook out of a box. Kraft macaroni & cheese is a big hit around here.
5 - I don't like the word "hate". I think it is a very nasty word.
6 - I really dislike doing the dishes, whether or not a dishwasher is involved.
7 - I believe in the golden rule "treat others the way that you want to be treated".
I want to share this award with everyone who reads my blog!! If you want to play along, copy the award and share seven fun things about yourself! Thanks again Kay : )
Friday, September 11, 2009
Carmine's Family-Style Cookbook: Cookbook Review, Chicken Alla Romana, Rustic Lentil Soup, & Spice Cookies with Lemon Icing
When it comes to food, I am easily pleased. However, I am NOT easily impressed. This cookbook, Carmine's Family-Style Cookbook impressed me very much! I read all the ratings on both The Good Cook and Amazon and both sites gave this cookbook five-star reviews. A five-star review could be for many reasons. Maybe the book is simply beautiful, has wonderful pictures, clear instructions, or just awesome recipes. This has the five-stars because it delivers FLAVOR to your table like no one's business. I am in love with this new cookbook! I have never had the pleasure of dining at Carmine's, but I am convinced that this cookbook will deliver all those flavors right in my own home.
The book is laid out in eight chapters: Appetizers, Soups & Salads; Carmine's Hero Sandwiches; Pasta, Fish and Seafood Mains; Meat and Poultry Mains; Side Dishes; Desserts; and Basic Recipes. There is a little story in the beginning of the book detailing the start up of their restaurant and their love for Italian food. There isn't a picture for every recipe, but there are many color pictures throughout the book. There are many Italian favorites in this book, including basic recipes for Carmine's Marinara, Meatballs, Breadcrumbs, All-Purpose Red Sauce, and more.
I'm not sure if I would recommend this book to a beginner cook, mostly because some recipes have recipes within a recipe and are rather involved, In fact, the Chicken Alla Romano had me a little flustered in the kitchen, but the end result was well-worth it. To explain, I had to make/wanted to make everything from scratch. That's what makes it good, right? I made Carmine's breadcrumbs, Carmine's Roasted Red Peppers, 1 Recipe Spinach in Garlic and Oil, and then continued on with the recipe. However, everything I have made from this cookbook is packed with flavor and I have been smacking my lips with delight all week : ) I highly recommend this cookbook. If you like flavor, this will be one of your go-to cookbooks.
The first dish that I made was the Chicken Alla Romano, which is a breaded chicken with a lemony butter sauce. It is everything you need for a family meal on one single platter and it is TO DIE FOR!! I think it is one of the best dishes to ever come out of my kitchen! Needless to say, I was very impressed.
The recipe begins with roasting five large red potatoes, along with onion, melted butter, rosemary, oregano, parsley and Romano cheese in a 350F oven for a little over one hour. It then requires you to make Carmine's breadcrumbs (skip the part where I shattered my brand new $150 Breville blender to pieces). Trust me and make these breadcrumbs, they are delicious and full of more flavor. I breaded the chicken and stuck in the fridge to let the breading dry out (a Tyler tip). While they were "drying out" I made the sauce. The sauce is a mixture of dry white wine, chicken stock, capers, roasted red peppers (which I also made from scratch), butter and lemon juice. When the sauce was finished I made the spinach in garlic and oil and set it aside. I then sauteed the chicken (this step was missed in the cookbook - rather odd). Once the chicken is sauteed, you put the potatoes and spinach into the oven to reheat. You also add a slice of fresh mozzarella to each chicken breast and bake until melted (about 4 minutes). Serve with potatoes on the side and sauce drizzled over the top. You will be smacking your lips, and I'm not kidding.
Next, I made Carmine's Rustic Lentil Soup, for Souper Sundays. It reminds me more of an Italian chili. It was also filled with flavor and was even better the next day when the flavors had a chance to blend a little more. Even my hubby liked it, and he is not a big soup fan! The base begins with bacon and pancetta,how can you go wrong with that? There is a lot of flavor with the bay leaves, fresh thyme, fresh oregano, and hot red pepper flakes. The lentils and veggies cook for about 45 mintues, a russet potato thickens up the soup, and it is topped off with sauteed Italian sausage- very hearty and delicious!
I wanted to try a dessert from the book. I have really been worn down on chocolate lately (did I really say that?) So, I opted for these Spice Cookies with Lemon Icing. These cookies were a great start to my Fall Baking Series. They were crisp on the outside and cakey in the middle with a light spicy flavor and a wonderful lemony glaze on top. They called for raisins, but I left them out because I like my cookies "unadulterated" (a word borrowed from my blogging friend Julie, The Sporadic Cook). These were the perfect way to cap off the Rustic Lentil Soup.
I have many more recipes bookmarked in my copy of Carmine's. Sometime soon I am going to make the Beef Cutlet Milanese with Caper, Roasted Pepper, and Tomato Butter Sauce. I plan on serving that with the Garlic Bread Parmigiana and maybe the Fontina Potato Croquettes. I am truly looking forward to both cooking and eating those dishes.
Please share if you have either been to Carmine's or cooked anything from their cookbook. I'd love to hear comments either way about your experience!!
I will be happy to share these recipes upon request, I just didn't want to make my post any longer than it already is : )
Congrats to Gaby of What's Gaby Cooking, she has won the Oikos Greek Yogurt giveaway via random.org, which selected number 12. I will be contacting Gaby and providing her information to Kristina at Stonyfield.
Wednesday, September 9, 2009
Spaghetti and Meatballs for Tyler Florence Fridays
I think everyone has a go-to dish in the kitchen. One of the very first things I cooked was pasta and it has been my go-to dish ever since. I usually always have the ingredients on hand for spaghetti and meatballs. It is a family favorite that everyone enjoys and is easy and quick to cook.
This week, I decided to try my hand at Tyler's Spaghetti and Meatballs, found here. It is not much different from my own recipe as Tyler uses both ground beef and pork. The main difference between my recipe and Tyler's recipe is the size of the meatballs. I usually make small to medium sized meatballs, but Tyler makes 10 HUGE meatballs. And, I have to say that I think this is a great idea! Who wants to spend 20 minutes rolling out medium-sized meatballs when you can make 10 huge meatballs? Tyler also fries his meatballs briefly and then finished them off in the oven, after they have been topped with cheese! Pretty tasty Tyler, pretty tasty! Why not sneak extra cheese into a dish if you can? It doesn't hurt my feelings at all : )
Notes: I love the idea of making 10 big meatballs instead of many smaller ones. This makes the process go faster and helps me out when it is time to serve the dish. My husband will happily gobble up the meatballs, while my daughter won't want one at all. She doesn't even like to have pieces of ground meat in her sauce. The big size of the meatball really helped with this. This spaghetti is very close to what you might already be making and serving at home. It is a dish that everyone will love and a great staple in Tyler's archive of recipes. Tyler's recipe calls for a Pomodoro sauce, I used my own spaghetti sauce that was made with my mom's homegrown tomatoes.
**Don't forget about the Oikos Greek Yogurt giveaway ending this Friday at midnight. Please go here, and leave a comment sharing your favorite way to eat greek yogurt. The winner will receive all kinds of free goodies from Stonyfield. It is a great package!
Head on over to Tyler Florence Fridays to see what everyone else made this week!
Monday, September 7, 2009
Final Oikos Greek Yogurt Post & Strawberry Pretzel Salad for My Girl Paula
I want to start off by announcing the winner of the "Pitch Your Own Food Network Show" contest. Congratulations Pam of Sidewalk Shoes! Pam is the random winner of three Lush Fresh Handmade Cosmetics products: Ocean Salt (an exfoliating scrub for face & body), Lemony Flutter (a lemony cuticle cream), and Up You Gets (a citrusy shower aromatherapy product). Pam's concept for a food network show was to feature a selected herb for each show, making an appetizer, main course, and dessert. Great idea Pam!
Secondly, this week's My Girl Paula recipe is Strawberry Pretzel Salad. This salad is somewhat like a pie. It is made with a pretzel crust, a cream cheese layer, and topped with strawberries and strawberry jello. This is a recipe that I have ate before and enjoyed, especially in the summertime. It is a good dish to take to a summer potluck. Paula's version also includes crushed pineapple, but I didn't have any so I left it out. We enjoyed this recipe for it's salty and sweet flavors. You can find the recipe here.
Lastly, this is my last week of posting recipes for Oikos Greek Yogurt. A big thanks to Kristina at Stonyfield for sending me such a generous pack of coupons! I was able to try my hand at a variety of recipes. The first week I made Martha's Date Bran Muffins and Tyler's Greek Yogurt. The second week, I made the Food Network's Almost-Famous frozen yogurt. The following week, I made an Apple-Walnut Turkey Sandwich , using the Greek yogurt in place of mayo as a sandwich dressing. Last week, I made these decadent looking Loaded Mashed Potatoes , using the Greek yogurt to replace the sour cream.
This week I have two recipes for you! You simply can't feature Greek yogurt and not do a smoothie recipe. It just wouldn't be right! As a tribute to summer, I have chosen two of my favorite summertime fruits, the peach and the raspberry, and combined them into one smoothie; The Peach Melba Smoothie. It was super delicious, unique, and healthy.
Peach Melba Smoothie - courtesy of Recipezaar, adapted by me
1/2 cup frozen raspberries
1 cup frozen peaches
1 cup low-fat milk
1 cup Greek yogurt
1 frozen banana (optional)
Whisk in a blender and serve.
This smoothie was thick, like a milkshake, creamy, refreshing, cold and best of all....different from the same old strawberry-banana smoothie. You can even add a tablespoon of wheat germ if you like.
I did try one more recipe with the Greek yogurt that is really unique! At work, we have face masks made with yogurt. Yogurt is terrific for your skin as it smoothes, pampers, moisturizes and tightens your skin. It will remove traces of dirt, pollution and makeup from pores. You can use plain yogurt, or even blueberry, strawberry or honey. It all depends on your skin type. Any fruit, such as blueberries or strawberries acts as an antioxidant removing dead skin and revealing new and glowing skin. Here is a basic recipe for a face mask using Greek yogurt, or even regular yogurt:
Dry Skin - 1 Cup yogurt
1 Tablespoon honey (honey brightens skin and retains moisture)
Oily Skin- 1 Cup yogurt
Couple drops of lemon (acid cuts excess oil on skin)
* Leave the mask on for about 30 minutes and rinse off!
Now onto the giveaway!!! Kristina at Stonyfield offered to share more coupons and goodies with a winner!
The winner will receive:
2 FREE 16 OZ. OIKOS COUPONS
4 FREE 5.3 OZ OIKOS COUPONS
$4 WORTH OF STONYFIELD COUPONS
OIKOS SPATULA & RECIPE CARD SET
All you need to do is leave a comment telling me your favorite way to use Greek Yogurt! It's that simple. If you have never used Greek Yogurt, then pick a way that you would like to use it. Giveaway is open to all! Comments will close this Friday at midnight and winner will be pulled in a random drawing, which will be announced this Saturday morning! Good luck : )
Friday, September 4, 2009
Corn Chowder with Chorizo - Recipe #39
I took a rather long break cooking from Tyler's Stirring the Pot this summer. I tried many recipes from Tyler's Dinner at My Place book, joined up with the My Girl Paula group, tried my hand at cooking and baking with greek yogurt, and enjoyed some creative cooking using ingredients on hand.
This fall I'm going to change it up a little bit. I plan on featuring some Halloween recipes and ideas, as well as many other seasonal recipes. I also have a lot of soups coming up to share with my friends at Souper Sundays. I finally received my copy of Carmine's Family-Style Cooking and am excited to say I will be cooking and featuring some great Italian recipes from their book. I also plan on cooking from Stirring the Pot, as well as many other Tyler recipes for Tyler Florence Fridays. And, last but not least, I have stocked up on butter so that I can cook with the girls at My Girl Paula every Monday.
This week, I made Tyler's Corn Chowder with Chorizo from Stirring the Pot. Tyler's includes Fried Hog Island Oysters with his soup, but I couldn't find oysters anywhere around town, so I had to leave them out. I was very excited to actually find some Spanish style chorizo to include with this soup. I even got to chose between the regular version of Spanish chorizo and a spicy version. I totally chose spicy!!
Corn Chowder with Chorizo- adapted from Stirring the Pot by Tyler Florence
4 cups milk
1 cup heavy whipping cream
4 ears sweet corn, husked
2 garlic cloves, peeled
4 sprigs fresh thyme
2 links Spanish chorizo (about 1/2 pound) casings removed, and chopped into small cubes
extra virgin olive oil
kosher salt and pepper
In a large pot heat milk and cream over low heat. Add corn, garlic, and thyme. Bring to a boil; simmer for 5 minutes. Cover and shut off heat to allow the milk to steep with the corn. Once steeped (about 15 minutes), cut the corn off the cobs. Strain the milk mixture with a fine sieve and transfer to a blender. Add the corn to the strained milk and puree. Season to taste with salt and pepper. Keep warm. In a skillet cook chorizo and a 2-count of olive oil (about 2 tbsp) over low heat for 2-3 minutes to render fat and infuse the oil.
Serve corn chowder topped with chorizo, a splash of infused chorizo oil, a fried oyster (if you have it, and parsley.
Notes: I loved this chowder and have become a big fan of it. My chowder was not super thick, but had a very nice consistency. I found the chowder perfectly creamy, with little bits of corn throughout (even though blended) and a slightly sweet taste. I enjoyed the chowder both plain and with chorizo and liked it both ways, depending on my mood. Tyler's recipe states that this makes 4 servings, but this actually makes a ton of soup and could feed an army. The spanish chorizo definitely adds a great amount of flavor and is worth searching out. It was rather pricey here and cost $9.99 for two links. It's not something I would buy all the time, but I wanted to try the spicy version and I knew hubby would enjoy it. I would make this again, and probably will this fall. I read online that many people love Tyler's version of corn chowder and make it a part of their Thanksgiving table. I agree and think this would be a great addition to any Thanksgiving table. It is a perfectly comforting soup!
This is my submission for Tyler Florence Fridays and also Souper Sundays! Both are great groups of people who pick a recipe of their own choosing to share each week.